Page 3 - Contents; Setting Up and Using Your Computer
Contents 3 Contents Finding Information . . . . . . . . . . . . . . . . . . . . . . . . . . . . . . . . 9 1 Setting Up and Using Your Computer Attaching and Removing the Computer Stand . . . . . . . . . . . . . . . . . . 11 Setting Up a Printer . . . . . . . . . . . . . . . . . . . . . . . . . . . ....
Page 4 - Solving Problems
4 Contents 2 Solving Problems Troubleshooting Tips . . . . . . . . . . . . . . . . . . . . . . . . . . . . . . . 27 Battery Problems . . . . . . . . . . . . . . . . . . . . . . . . . . . . . . . . . 27 Drive Problems . . . . . . . . . . . . . . . . . . . . . . . . . . . . . . . . . . 27 CD and DVD d...
Page 5 - Troubleshooting Tools; Removing and Installing Parts
Contents 5 3 Troubleshooting Tools Diagnostic Lights . . . . . . . . . . . . . . . . . . . . . . . . . . . . . . . . . 43 Dell Diagnostics . . . . . . . . . . . . . . . . . . . . . . . . . . . . . . . . . 46 When to Use the Dell Diagnostics . . . . . . . . . . . . . . . . . . . . . 46 Dell Diagnosti...
Page 6 - Appendix
6 Contents Media Card Reader . . . . . . . . . . . . . . . . . . . . . . . . . . . . . . . 71 Removing a Media Card Reader . . . . . . . . . . . . . . . . . . . . . . 71 Installing a Media Card Reader . . . . . . . . . . . . . . . . . . . . . . . 72 Modem . . . . . . . . . . . . . . . . . . . . . . ...
Page 7 - Index
Contents 7 FCC Notices (U.S. Only) . . . . . . . . . . . . . . . . . . . . . . . . . . . . . 95 Class A . . . . . . . . . . . . . . . . . . . . . . . . . . . . . . . . . . . 95 Class B . . . . . . . . . . . . . . . . . . . . . . . . . . . . . . . . . . . 95 FCC Identification Information . . . . . ....
Page 9 - Finding Information
Finding Information 9 Finding Information NOTE: Additional documentation may be included with your computer, depending on your country. What are you looking for? Find It Here • Warranty information• Safety instructions• Regulatory information• Ergonomics information• End User License Agreement• Term...
Page 11 - Attaching and Removing the Computer Stand; Rotate the computer to an upside-down position.
Setting Up and Using Your Computer 11 Setting Up and Using Your Computer Attaching and Removing the Computer Stand CAUTION: Before you begin any of the procedures in this section, follow the safety instructions in the Product Information Guide . NOTE: Place your computer on a soft surface to prevent...
Page 13 - Setting Up a Printer
Setting Up and Using Your Computer 13 4 Tighten the screw. 5 Place the computer in the upright position. To remove the stand: 1 Turn the computer over so that the stand is at the top. 2 Loosen the screw and lift the stand away. 3 Place the computer in a horizontal position until you reattach the sta...
Page 14 - Printer Cable; Using a Media Card Reader
14 Setting Up and Using Your Computer www .dell.com | support.dell.com Printer Cable Your printer connects to your computer with a USB cable. Your printer may not come with a printer cable, so if you purchase a cable separately, ensure that it is compatible with your printer. If you purchased a prin...
Page 15 - To use the Media Card Reader:; Connecting a TV
Setting Up and Using Your Computer 15 • SecureDigital Card (SD) • MultiMediaCard (MMC) For information on installing a Media Card Reader, see "Installing a Media Card Reader" on page 72. To use the Media Card Reader: 1 Check the media or card to determine the proper orientation for insertion...
Page 16 - Changing the Display Settings; Windows; Setting Up a Home and Office Network; Connecting to a Network Adapter; Connect the other end of the network cable to a network device.
16 Setting Up and Using Your Computer www .dell.com | support.dell.com 3 Connect the other end of the S-video cable to the S-video input connector on your TV. Changing the Display Settings 1 After you connect the TV, turn on the computer.The Microsoft ® Windows ® desktop displays on the monitor. 2 E...
Page 17 - Network Setup Wizard; Connecting to the Internet
Setting Up and Using Your Computer 17 Network Setup Wizard The Microsoft ® Windows ® XP operating system provides a Network Setup Wizard to guide you through the process of sharing files, printers, or an Internet connection between computers in a home or small office. 1 Click the Start button, point...
Page 18 - Setting Up Your Internet Connection
18 Setting Up and Using Your Computer www .dell.com | support.dell.com • DSL connections that provide high-speed Internet access through your existing telephone line. With a DSL connection, you can access the Internet and use your telephone on the same line simultaneously. • Cable modem connections ...
Page 19 - Playing a CD or DVD; Press the eject button on the front of the drive.
Setting Up and Using Your Computer 19 If you are having problems connecting to the Internet, see "E-Mail, Modem, and Internet Problems" on page 29. If you cannot connect to the Internet but have successfully connected in the past, the ISP might have a service outage. Contact your ISP to chec...
Page 20 - A CD player includes the following basic buttons:
20 Setting Up and Using Your Computer www .dell.com | support.dell.com To format CDs for storing data, to create music CDs, or to copy CDs, see the CD software that came with your computer. NOTE: Ensure that you follow all copyright laws when you create CDs. A CD player includes the following basic ...
Page 21 - Adjusting the Volume; Adjusting the Picture; Copying CDs and DVDs; How to Copy a CD or DVD
Setting Up and Using Your Computer 21 Adjusting the Volume NOTE: When the speakers are muted, you do not hear the CD or DVD playing. 1 Click the Start button, point to All Programs → Accessories → Entertainment , and then click Volume Control . 2 In the Volume Control window, click and drag the bar ...
Page 22 - If you have one optical drive; Helpful Tips
22 Setting Up and Using Your Computer www .dell.com | support.dell.com Currently, five DVD-writable disc formats are available: DVD+R, DVD+RW, DVD-R, DVD-RW, and DVD-RAM. The DVD-writable drives installed in Dell™ computers can write to DVD+R and DVD+RW media, and can read DVD-R and DVD-RW media. Ho...
Page 23 - Power Management; Standby Mode
Setting Up and Using Your Computer 23 • You cannot create audio DVDs with Sonic RecordNow. • Music MP3 files can be played only on MP3 players or on computers that have MP3 software installed. • Do not burn a blank CD-R or CD-RW to its maximum capacity; for example, do not copy a 650-MB file to a 65...
Page 24 - Hibernate Mode
24 Setting Up and Using Your Computer www .dell.com | support.dell.com Hibernate Mode Hibernate mode conserves power by copying system data to a reserved area on the hard drive and then completely turning off the computer. When the computer exits from hibernate mode, the desktop is restored to the s...
Page 26 - Click the
26 Setting Up and Using Your Computer www .dell.com | support.dell.com (SP1) or later operating system because Windows XP is optimized to take advantage of Hyper-Threading technology. While many programs can benefit from Hyper-Threading, some programs have not been optimized for Hyper-Threading and ...
Page 27 - Troubleshooting Tips; Follow these tips when you troubleshoot your computer:; Battery Problems; Drive Problems
Solving Problems 27 Solving Problems Troubleshooting Tips Follow these tips when you troubleshoot your computer: • If you added or removed a part before the problem started, review the installation procedures and ensure that the part is correctly installed. • If a peripheral device does not work, en...
Page 28 - CD and DVD drive problems
28 Solving Problems www .dell.com | support.dell.com CD and DVD drive problems NOTE: High-speed CD or DVD drive vibration is normal and may cause noise, which does not indicate a defect in the drive or the CD or DVD. NOTE: Because of different regions worldwide and different disc formats, not all DV...
Page 29 - Hard drive problems
Solving Problems 29 Hard drive problems E-Mail, Modem, and Internet Problems CAUTION: Before you begin any of the procedures in this section, follow the safety instructions located in the Product Information Guide . NOTE: Connect the modem to an analog telephone jack only. The modem does not operate...
Page 30 - Error Messages
30 Solving Problems www .dell.com | support.dell.com Error Messages CAUTION: Before you begin any of the procedures in this section, follow the safety instructions located in the Product Information Guide . If the message is not listed, see the documentation for the operating system or the program t...
Page 31 - Media Card Reader Problems
Solving Problems 31 Media Card Reader Problems CAUTION: Before you begin any of the procedures in this section, follow the safety instructions located in the Product Information Guide . IEEE 1394 Device Problems CAUTION: Before you begin any of the procedures in this section, follow the safety instr...
Page 32 - Keyboard Problems; Lockups and Software Problems; The computer does not start up
32 Solving Problems www .dell.com | support.dell.com Keyboard Problems CAUTION: Before you begin any of the procedures in this section, follow the safety instructions located in the Product Information Guide . Lockups and Software Problems CAUTION: Before you begin any of the procedures in this sect...
Page 33 - The computer stops responding
Solving Problems 33 The computer stops responding NOTICE: You might lose data if you are unable to perform an operating system shutdown. A program stops responding A program crashes repeatedly NOTE: Software usually includes installation instructions in its documentation or on a floppy disk or CD. A...
Page 34 - Other software problems; Memory Problems
34 Solving Problems www .dell.com | support.dell.com Other software problems Memory Problems CAUTION: Before you begin any of the procedures in this section, follow the safety instructions located in the Product Information Guide . C H E C K T H E S O F T W A R E D O C U M E N T A T I O N O R C O N ...
Page 35 - Mouse Problems
Solving Problems 35 Mouse Problems CAUTION: Before you begin any of the procedures in this section, follow the safety instructions located in the Product Information Guide . I F Y O U E X P E R I E N C E O T H E R M E M O R Y P R O B L E M S — • Reseat the memory modules (see page 64) to ensure that...
Page 36 - Network Problems; Power Problems
36 Solving Problems www .dell.com | support.dell.com Network Problems CAUTION: Before you begin any of the procedures in this section, follow the safety instructions located in the Product Information Guide . Power Problems CAUTION: Before you begin any of the procedures in this section, follow the ...
Page 37 - Printer Problems
Solving Problems 37 Printer Problems CAUTION: Before you begin any of the procedures in this section, follow the safety instructions located in the Product Information Guide . NOTE: If you need technical assistance for your printer, contact the printer’s manufacturer. I F T H E P O W E R L I G H T I...
Page 38 - Scanner Problems
38 Solving Problems www .dell.com | support.dell.com Scanner Problems CAUTION: Before you begin any of the procedures in this section, follow the safety instructions located in the Product Information Guide . NOTE: If you need technical assistance for your scanner, contact the scanner’s manufacturer...
Page 39 - Sound and Speaker Problems; No sound from speakers
Solving Problems 39 Sound and Speaker Problems CAUTION: Before you begin any of the procedures in this section, follow the safety instructions located in the Product Information Guide . No sound from speakers NOTE: The volume control in some MP3 players overrides the Windows volume setting. If you h...
Page 40 - No sound from headphones; Video and Monitor Problems; If the screen is blank
40 Solving Problems www .dell.com | support.dell.com No sound from headphones Video and Monitor Problems See the monitor documentation for troubleshooting procedures. CAUTION: Before you begin any of the procedures in this section, follow the safety instructions located in the Product Information Gu...
Page 41 - If the screen is difficult to read
Solving Problems 41 If the screen is difficult to read T E S T T H E E L E C T R I C A L O U T L E T — Ensure that the electrical outlet is working by testing it with another device, such as a lamp. C H E C K T H E D I A G N O S T I C L I G H T S — See page 43. C H E C K T H E M O N I T O R S E T T ...
Page 43 - A B C D
Troubleshooting Tools 43 Troubleshooting Tools Diagnostic Lights CAUTION: Before you begin any of the procedures in this section, follow the safety instructions located in the Product Information Guide . To help you troubleshoot a problem, your computer has four lights labeled "A," "B,&#...
Page 46 - Dell Diagnostics; When to Use the Dell Diagnostics
46 Troubleshooting Tools www .dell.com | support.dell.com Dell Diagnostics CAUTION: Before you begin any of the procedures in this section, follow the safety instructions located in the Product Information Guide . When to Use the Dell Diagnostics If you experience a problem with your computer, perfo...
Page 47 - Main Menu; Dell Diagnostics Main Menu; Main; Custom Test
Troubleshooting Tools 47 4 When the Dell Diagnostics Main Menu appears, select the test you want to run (see page 47). Dell Diagnostics Main Menu 1 After the Dell Diagnostics loads and the Main Menu screen appears, click the button for the option you want. 2 If a problem is encountered during a test...
Page 48 - Drivers; Identifying Drivers
48 Troubleshooting Tools www .dell.com | support.dell.com 4 Close the test screen to return to the Main Menu screen. To exit the Dell Diagnostics and restart the computer, close the Main Menu screen. Drivers What Is a Driver? A driver is a program that controls a device such as a printer, mouse, or ...
Page 49 - Reinstalling Drivers
Troubleshooting Tools 49 5 Click Device Manager . 6 Scroll down the list to see if any device has an exclamation point (a yellow circle with a [ !] ) on the device icon.If an exclamation point is next to the device name, you may need to reinstall the driver or install a new driver (see page 48). Rei...
Page 50 - Resolving Software and Hardware Incompatibilities; Restoring Your Operating System; Using Microsoft
50 Troubleshooting Tools www .dell.com | support.dell.com Resolving Software and Hardware Incompatibilities If a device is either not detected during the operating system setup or is detected but incorrectly configured, you can use the Hardware Troubleshooter to resolve the incompatibility. To resol...
Page 53 - Before You Begin; Product Information Guide.; Recommended Tools; Start; Before Working Inside Your Computer
Removing and Installing Parts 53 Removing and Installing Parts Before You Begin This chapter provides procedures for removing and installing the components in your computer. Unless otherwise noted, each procedure assumes that the following conditions exist: • You have performed the steps in "Tur...
Page 54 - Disconnect any telephone or network cables from the computer.; Front and Back View of the Computer; Front View
54 Removing and Installing Parts www .dell.com | support.dell.com CAUTION: Before you begin any of the procedures in this section, follow the safety instructions in the Product Information Guide . CAUTION: Handle components and cards with care. Do not touch the components or contacts on a card. Hold...
Page 56 - Back View
56 Removing and Installing Parts www .dell.com | support.dell.com Back View 7 hard-drive activity light The hard-drive activity light is on when the computer reads data from or writes data to the hard drive. The light might also be on when devices such as your CD player are operating. 8 power button...
Page 58 - Reattaching the Front Door; Shut down the computer through the; Move the hinge arms to the closed position.
58 Removing and Installing Parts www .dell.com | support.dell.com Reattaching the Front Door To prevent damage to your computer, the front door is designed to "break away" if it is opened too far. To reattach the front door: 1 Shut down the computer through the Start menu (see page 53). 2 En...
Page 59 - Opening the Computer Cover; Locate the
Removing and Installing Parts 59 Opening the Computer Cover CAUTION: Before you begin any of the procedures in this section, follow the safety instructions in the Product Information Guide . 1 Shut down the computer through the Start menu (see page 53). 2 Ensure that your computer and attached devic...
Page 60 - Inside View Of Your Computer
60 Removing and Installing Parts www .dell.com | support.dell.com Inside View Of Your Computer CAUTION: Before you begin any of the procedures in this section, follow the safety instructions in the Product Information Guide . CAUTION: To guard against electrical shock, always unplug your computer fr...
Page 62 - System Board Components
62 Removing and Installing Parts www .dell.com | support.dell.com System Board Components front-panel USB connector for Media Card Reader (FPUSB) battery socket (BATTERY) PCI Express x16 card connector (PEG) back of computer internal speaker (SPKR) front-panel connector(FRONT PANEL) front-panel 1394...
Page 63 - Memory; DDR2 Memory Overview; with
Removing and Installing Parts 63 Memory You can increase your computer memory by installing memory modules on the system board.Your computer supports DDR2 memory. For additional information on the type of memory supported by your computer, see "Memory" on page 81. DDR2 Memory Overview If you...
Page 64 - Addressing Memory With 4-GB Configurations; Installing Memory
64 Removing and Installing Parts www .dell.com | support.dell.com NOTICE: If you remove your original memory modules from the computer during a memory upgrade, keep them separate from any new modules that you may have, even if you purchased the new modules from Dell. If possible, do not pair an orig...
Page 65 - Close the computer cover.
Removing and Installing Parts 65 4 Align the notch on the bottom of the module with the crossbar in the connector. NOTICE: To avoid damage to the memory module, press the module straight down into the connector while you apply equal force to each end of the module. 5 Insert the module into the conne...
Page 66 - Removing Memory; Cards; One PCI Express x16 card slot; PCI Express Cards
66 Removing and Installing Parts www .dell.com | support.dell.com Removing Memory CAUTION: Before you begin any of the procedures in this section, follow the safety instructions located in the Product Information Guide . NOTICE: To prevent static damage to components inside your computer, discharge ...
Page 70 - If necessary, disconnect any cables connected to the card.
70 Removing and Installing Parts www .dell.com | support.dell.com 9 Press the retention arm into place, securing the card(s) in the computer. NOTICE: Do not route card cables over or behind the cards. Cables routed over the cards can prevent the computer cover from closing properly or cause damage t...
Page 71 - Remove the card’s driver from the operating system.; Media Card Reader; Removing a Media Card Reader; Disconnect the CD drive cable from the back of the CD drive.
Removing and Installing Parts 71 NOTICE: To connect a network cable, first plug the cable into the network device and then plug it into the computer. 6 Close the computer cover, reconnect the computer and devices to electrical outlets, and then turn them on. 7 Remove the card’s driver from the opera...
Page 72 - Disconnect the IEEE 1394 connector on the system board (see page 62).; Installing a Media Card Reader
72 Removing and Installing Parts www .dell.com | support.dell.com 5 Disconnect the USB cable on the back of the Media Card Reader from the front panel USB connector on the system board (see page 62). 6 Disconnect the IEEE 1394 connector on the system board (see page 62). 7 Release the cable from the...
Page 73 - Disconnect the cable from the back of the CD drive.
Removing and Installing Parts 73 3 Open the computer cover (see page 59). 4 Disconnect the cable from the back of the CD drive. 5 Remove the Media Card Reader and bracket from its packaging. 6 Make sure the USB cable and IEEE 1394 cable are connected to the back of the Media Card Reader. 7 Connect t...
Page 74 - Modem; Replacing the Modem
74 Removing and Installing Parts www .dell.com | support.dell.com 9 Press in on the release tabs at each end of the bracket and slide the unit until it clicks in place. 10 Route the USB cable and the IEEE 1394 cable through the cable routing clip. 11 Close the computer cover (see page 80). Modem Rep...
Page 75 - Replacing the Modem Cable and External Modem Connector
Removing and Installing Parts 75 3 Remove the existing modem: a Disconnect the modem cable from the modem. b Use a size #1 screwdriver to remove the screws securing the modem and ground wire to the system board, and set the screws aside. c Move the ground wire out of the way. d Pull straight up on t...
Page 76 - Remove the modem cable and ground wire from the modem:
76 Removing and Installing Parts www .dell.com | support.dell.com NOTICE: Before you remove or install the modem, make sure to disconnect all telephone and network cables from your computer. NOTICE: To prevent static damage to components inside your computer, discharge static electricity from your b...
Page 78 - Battery; Replacing the Battery; To replace the coin cell battery:
78 Removing and Installing Parts www .dell.com | support.dell.com Battery Replacing the Battery CAUTION: Before you begin any of the procedures in this section, follow the safety instructions located in the Product Information Guide . NOTICE: To prevent static damage to components inside your comput...
Page 79 - Install the new system battery.
Removing and Installing Parts 79 NOTICE: To avoid damage to the battery connector, you must firmly support the connector while installing or removing a battery. 5 Install the new system battery. a Support the battery connector by pressing down firmly on the positive side of the connector. b Hold the...
Page 80 - Closing the Computer Cover
80 Removing and Installing Parts www .dell.com | support.dell.com NOTICE: To connect a network cable, first plug the cable into the network device and then plug it into the computer. 7 Connect your computer and devices to electrical outlets, and turn them on. 8 Enter system setup (see page 86) and r...
Page 81 - Specifications
Appendix 81 Appendix Specifications Processor Processor type Intel ® Pentium ® 4 processor 520, 530, 540, 550, 560, and 570 with Hyper-Threading technology NOTE: Not all Pentium 4 processors support Hyper-Threading technology. Intel Celeron ® D processor 330 and 335 NOTE: Dell™ Dimension™ 4700C with...
Page 85 - System Setup; Overview; Use system setup as follows:
Appendix 85 System Setup Overview Use system setup as follows: • To change the system configuration information after you add, change, or remove any hardware in your computer • To set or change a user-selectable option such as the user password • To read the current amount of memory or set the type ...
Page 86 - Entering System Setup; Options List
86 Appendix www .dell.com | support.dell.com Before you use system setup, it is recommended that you write down the system setup screen information for future reference. NOTICE: Unless you are an expert computer user, do not change the settings for this program. Certain changes can make your compute...
Page 87 - System Setup Options; System
Appendix 87 System Setup Options NOTE: Depending on your computer and installed devices, the items listed in this section may not appear, or may not appear exactly as listed. System System Info Lists system information such as the computer name, the BIOS version number and date, system tags, and oth...
Page 88 - Security
88 Appendix www .dell.com | support.dell.com USB Controller Set to On (default) so that USB devices will be detected and supported in the operating system. The No Boot option enables a USB controller, but does not recognize a USB storage device. Serial Port Identifies and defines the serial port set...
Page 89 - Maintenance
Appendix 89 Admin Password This option provides restricted access to the computer's system setup program in the same way that access to the system can be restricted with the System Password option. NOTE: To delete a password, enter the old password and press <Enter> two times. System Password ...
Page 90 - Boot Sequence
90 Appendix www .dell.com | support.dell.com Boot Sequence This feature allows you to change the boot sequence for devices. NOTICE: If you modify any boot sequence settings, save the new settings to avoid losing the changes. Option Settings • Diskette Drive — The computer attempts to boot from the f...
Page 91 - Use the arrow keys to highlight the; Clearing Forgotten Passwords
Appendix 91 NOTE: To boot to a USB device, the device must be bootable. To make sure your device is bootable, check the device documentation. NOTE: You can also change the boot sequence using the Boot Sequence options in the System Setup Options (see page page 87). Changing Boot Sequence for Future ...
Page 92 - Clearing CMOS Settings
92 Appendix www .dell.com | support.dell.com 4 Connect your computer and monitor to electrical outlets, and turn them on. 5 After the Microsoft ® Windows ® desktop appears on your computer, shut down the computer (see page 53). 6 Turn off the monitor and disconnect it from the electrical outlet. 7 D...
Page 93 - Cleaning Your Computer; Mouse; Blow carefully into the ball cage to dislodge dust and lint.; CDs and DVDs
Appendix 93 Cleaning Your Computer CAUTION: Before you begin any of the procedures in this section, follow the safety instructions located in the Product Information Guide . Computer, Keyboard, and Monitor CAUTION: Before you clean your computer, disconnect the computer from the electrical outlet. C...
Page 95 - Most Dell computer systems; Class A
Appendix 95 Definition of "Third-Party" Software and Peripherals Third-party software and peripherals include any peripheral, accessory, or software program sold by Dell not under the Dell brand (printers, scanners, cameras, games, and so on). Support for all third-party software and periphe...
Page 96 - Reorient or relocate the receiving antenna.; FCC Identification Information; Contacting Dell
96 Appendix www .dell.com | support.dell.com harmful interference to radio or television reception, which can be determined by turning the equipment off and on, you are encouraged to try to correct the interference by one or more of the following measures: • Reorient or relocate the receiving antenn...
Page 113 - sound
Index 113 Index A audio. See sound B battery problems, 27replacing, 78 BIOS, 85 boot sequence, 90 changing, 90-91option settings, 90 booting to a USB device, 90 C cards installing, 67PCI Express, 66removing, 70slots, 66types supported, 66 CD/DVD drive problems, 28 CD/DVD-RW drive problems, 28 CDs co...
Page 114 - system
114 Index 114 Index H hard drive problems, 29 hardware Dell Diagnostics, 46 Hardware Troubleshooter, 50 Help and Support Center, 10 hibernate mode, 24-25 Hyper-Threading, 25 I IEEE 1394 problems, 31 installing parts before you begin, 53recommended tools, 53turning off your computer, 53 Internet conn...
Page 115 - monitor
Index 115 power (continued) options, schemes, 24problems, 36standby mode, 23 power light conditions, 36 Power Options Properties, 24 printer cable, 14connecting, 13problems, 37setting up, 13USB, 14 problems battery, 27blue screen, 33CD drive, 28CD/DVD-RW drive, 28computer crashes, 32-33computer stop...


 Dell Dimension 4500 User Manual
 Dell Dimension 4500S User Manual
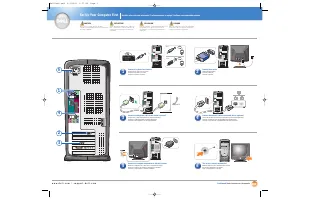 Dell Dimension 4550 User Manual
 Dell Dimension 4600 User Manual
 Dell Dimension 4600C User Manual
 Dell Dimension 5100 User Manual
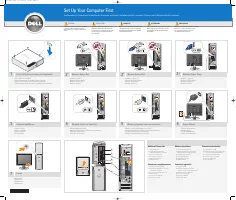 Dell Dimension 5150C User Manual
 Dell Dimension 8100 User Manual
 Dell Dimension 8200 User Manual
 Dell Dimension 8250 User Manual