Page 2 - Abbreviations and Acronyms
Notes, Notices, and Cautions NOTE: A NOTE indicates important information that helps you make better use of your computer. NOTICE: A NOTICE indicates either potential damage to hardware or loss of data and tells you how to avoid the problem. CAUTION: A CAUTION indicates a potential for property dama...
Page 3 - Contents; Setting Up and Using Your Computer
Contents 3 Contents Safety Instructions . . . . . . . . . . . . . . . . . . . . . . . . . . . . . 7 Finding Information for Your Computer . . . . . . . . . . . . . . . . . . . 9 1 Setting Up and Using Your Computer Setting Up a Printer . . . . . . . . . . . . . . . . . . . . . . . . . . . . 11 Print...
Page 4 - Advanced Troubleshooting
4 Contents IEEE 1394 Device Problems . . . . . . . . . . . . . . . . . . . . . . . . . 23 Keyboard Problems . . . . . . . . . . . . . . . . . . . . . . . . . . . . 24 Lockups and Software Problems . . . . . . . . . . . . . . . . . . . . . . 24 The computer does not start up . . . . . . . . . . . . ....
Page 6 - Index
6 Contents FCC Notices (U.S. Only) . . . . . . . . . . . . . . . . . . . . . . . . . . 77 Class A . . . . . . . . . . . . . . . . . . . . . . . . . . . . . . . . 77 Class B . . . . . . . . . . . . . . . . . . . . . . . . . . . . . . . . 77 FCC Identification Information . . . . . . . . . . . . . . ....
Page 7 - Safety Instructions
Safety Instructions 7 Safety Instructions See your Product Information Guide for safety instructions.
Page 9 - Finding Information for Your Computer
Finding Information for Your Computer 9 Finding Information for Your Computer What are you looking for? Find It Here • How to set up my computer Setup Diagram • Tips on using Windows• How to clean my computer• How to use my mouse and keyboard Tell Me How Help File 1 Click the Start button and click ...
Page 11 - Setting Up a Printer; Printer Cable
Setting Up and Using Your Computer 11 Setting Up and Using Your Computer Setting Up a Printer NOTICE: Complete the operating system setup before you connect a printer to the computer. See the documentation that came with the printer for setup information, including how to: • Obtain and install updat...
Page 12 - Connecting a USB Printer
12 Setting Up and Using Your Computer www .dell.com | support.dell.com 3 Turn on the printer and then turn on the computer. If the Add New Hardware Wizard window appears, click Cancel . 4 Install the printer driver if necessary. See the documentation that came with your printer. Connecting a USB Pri...
Page 13 - Setting Up a Home and Office Network; Connecting to a Network Adapter
Setting Up and Using Your Computer 13 Setting Up a Home and Office Network Connecting to a Network Adapter Before you connect your computer to a network, the computer must have a network adapter installed and a network cable connected to it.To connect a network cable, perform the following steps. NO...
Page 14 - Network Setup Wizard; Connecting to the Internet
14 Setting Up and Using Your Computer www .dell.com | support.dell.com Network Setup Wizard The Microsoft ® Windows ® XP operating system provides a Network Setup Wizard to guide you through the process of sharing files, printers, or an Internet connection between computers in a home or small office...
Page 15 - Setting Up Your Internet Connection
Setting Up and Using Your Computer 15 • Cable modem connections that provide high-speed Internet access through your local cable TV line. If you are using a dial-up connection, connect a telephone line to the modem connector on your computer and to the telephone wall jack before you set up your Inte...
Page 16 - Copying CDs and DVDs; How to Copy a CD or DVD
16 Setting Up and Using Your Computer www .dell.com | support.dell.com Copying CDs and DVDs NOTE: Ensure that you follow all copyright laws when you create CDs or DVDs. This section applies only to computers that have a CD-R, CD-RW, DVD+RW, DVD+R, or DVD/CD-RW combo drive.The following instructions ...
Page 17 - Helpful Tips
Setting Up and Using Your Computer 17 Helpful Tips • Use Microsoft ® Windows ® Explorer to drag and drop files to a CD-R or CD-RW only after you start Sonic RecordNow and open a RecordNow project. • You must use CD-Rs to burn music CDs that you want to play in regular stereos. CD-RWs do not play in ...
Page 18 - Booting to a USB Device; Turning Off Your Computer
18 Setting Up and Using Your Computer www .dell.com | support.dell.com Booting to a USB Device NOTE: To boot to a USB device, the device must be bootable. To ensure that your device is bootable, check the device documentation. To restart your computer to a USB device such as a floppy drive, memory k...
Page 19 - Solving Problems; Battery Problems
Solving Problems 19 Solving Problems Battery Problems CAUTION: There is a danger of a new battery exploding if it is incorrectly installed. Replace the battery only with the same or equivalent type recommended by the manufacturer. Discard used batteries according to the manufacturer's instructions. ...
Page 20 - CD and DVD drive problems
20 Solving Problems www .dell.com | support.dell.com CD and DVD drive problems NOTE: High-speed CD or DVD drive vibration is normal and may cause noise, which does not indicate a defect in the drive or the CD or DVD. NOTE: Because of different regions worldwide and different disc formats, not all DV...
Page 21 - Hard drive problems
Solving Problems 21 Hard drive problems E-Mail, Modem, and Internet Problems CAUTION: Before you begin any of the procedures in this section, follow the safety instructions in the Product Information Guide . NOTE: Connect the modem to an analog telephone jack only. The modem does not operate while i...
Page 22 - Error Messages
22 Solving Problems www .dell.com | support.dell.com Error Messages CAUTION: Before you begin any of the procedures in this section, follow the safety instructions in the Product Information Guide . If the message is not listed, see the documentation for the operating system or the program that was ...
Page 24 - Keyboard Problems; Lockups and Software Problems; The computer does not start up
24 Solving Problems www .dell.com | support.dell.com Keyboard Problems CAUTION: Before you begin any of the procedures in this section, follow the safety instructions in the Product Information Guide . Lockups and Software Problems CAUTION: Before you begin any of the procedures in this section, fol...
Page 25 - A program stops responding
Solving Problems 25 A program stops responding A program crashes repeatedly NOTE: Software usually includes installation instructions in its documentation or on a floppy disk or CD. A program is designed for an earlier Windows operating system A solid blue screen appears E ND THE PROGRAM — 1 Press &...
Page 26 - Other software problems; Memory Problems
26 Solving Problems www .dell.com | support.dell.com Other software problems Memory Problems CAUTION: Before you begin any of the procedures in this section, follow the safety instructions in the Product Information Guide . C HECK THE SOFTWARE DOCUMENTATION OR CONTACT THE SOFTWARE MANUFACTURER FOR T...
Page 27 - Mouse Problems
Solving Problems 27 Mouse Problems CAUTION: Before you begin any of the procedures in this section, follow the safety instructions in the Product Information Guide . C HECK THE MOUSE CABLE — 1 Check the cable connector for bent or broken pins and for damaged or frayed cables. Straighten bent pins. 2...
Page 28 - Network Problems; Power Problems
28 Solving Problems www .dell.com | support.dell.com Network Problems CAUTION: Before you begin any of the procedures in this section, follow the safety instructions in the Product Information Guide . Power Problems CAUTION: Before you begin any of the procedures in this section, follow the safety i...
Page 29 - Printer Problems
Solving Problems 29 Printer Problems CAUTION: Before you begin any of the procedures in this section, follow the safety instructions in the Product Information Guide . NOTE: If you need technical assistance for your printer, contact the printer’s manufacturer. . I F THE POWER LIGHT IS AMBER AND GREE...
Page 30 - Scanner Problems
30 Solving Problems www .dell.com | support.dell.com Scanner Problems CAUTION: Before you begin any of the procedures in this section, follow the safety instructions in the Product Information Guide . NOTE: If you need technical assistance for your scanner, contact the scanner’s manufacturer. V ERIF...
Page 31 - Sound and Speaker Problems; No sound from speakers
Solving Problems 31 Sound and Speaker Problems CAUTION: Before you begin any of the procedures in this section, follow the safety instructions in the Product Information Guide . No sound from speakers NOTE: The volume control in some MP3 players overrides the Windows volume setting. If you have been...
Page 32 - No sound from headphones
32 Solving Problems www .dell.com | support.dell.com No sound from headphones R UN THE SPEAKER DIAGNOSTICS R EINSTALL THE SOUND DRIVER — See page 41. C HECK FOR INTERRUPT REQUEST CONFLICTS — See page 44. C HECK THE HEADPHONE CABLE CONNECTION — Ensure that the headphone cable is securely inserted int...
Page 33 - Video and Monitor Problems; If the screen is blank; If the screen is difficult to read
Solving Problems 33 Video and Monitor Problems CAUTION: Before you begin any of the procedures in this section, follow the safety instructions in the Product Information Guide . If the screen is blank NOTE: See the monitor documentation for troubleshooting procedures. If the screen is difficult to r...
Page 35 - Diagnostic Lights
Advanced Troubleshooting 35 Advanced Troubleshooting Diagnostic Lights To help you troubleshoot a problem, your computer has four lights labeled "A," "B," "C," and "D" on the back panel (see page 47). The lights can be yellow or green. When the computer starts normall...
Page 38 - Dell Diagnostics; Starting the Dell Diagnostics
38 Advanced Troubleshooting www .dell.com | support.dell.com Dell Diagnostics If you experience a problem with your computer, perform the checks in "Solving Problems" (see page 19) and run the Dell Diagnostics before you contact Dell for technical assistance. Running the Dell Diagnostics may...
Page 40 - Drivers; Identifying Drivers
40 Advanced Troubleshooting www .dell.com | support.dell.com 4 Close the test screen to return to the Main Menu screen. To exit the Dell Diagnostics and restart the computer, close the Main Menu screen. Drivers What Is a Driver? A driver is a program that controls a device such as a printer, mouse, ...
Page 41 - Reinstalling Drivers; Restoring Your Operating System
Advanced Troubleshooting 41 5 Click Device Manager . 6 Scroll down the list to see if any device has an exclamation point (a yellow circle with a [ !] ) on the device icon.If an exclamation point is next to the device name, you may need to reinstall the driver or install a new driver (see page 41). ...
Page 42 - Using Microsoft
42 Advanced Troubleshooting www .dell.com | support.dell.com Using Microsoft Windows XP System Restore The Microsoft Windows XP operating system provides System Restore to allow you to return your computer to an earlier operating state (without affecting data files) if changes to the hardware, softw...
Page 43 - Using Dell PC Restore by Symantec
Advanced Troubleshooting 43 Undoing the Last System Restore NOTICE: Before you undo the last system restore, save and close all open files and exit any open programs. Do not alter, open, or delete any files or programs until the system restoration is complete. 1 Click the Start button, point to All ...
Page 44 - Resolving Software and Hardware Incompatibilities
44 Advanced Troubleshooting www .dell.com | support.dell.com Enabling System Restore If you reinstall Windows XP with less than 200 MB of free hard-disk space available, System Restore is automatically disabled. To see if System Restore is enabled: 1 Click the Start button and click Control Panel . ...
Page 45 - Removing and Installing Parts; Front and Back View of the Computer; Front View
Removing and Installing Parts 45 Removing and Installing Parts Front and Back View of the Computer Front View 1 11 2 9* 3* 4 7 10 8 6 5 12 *On computers with an optional floppy drive.
Page 47 - Back View
Removing and Installing Parts 47 Back View 12 3 13 8 9 4 1 7 14 15 6 10 2 5* 11 *May not be present on all computers. 1 mouse connector Plug a standard mouse into the green mouse connector. Turn off the computer and any attached devices before you connect a mouse to the computer. If you have a USB m...
Page 49 - Removing the Computer Cover
Removing and Installing Parts 49 Removing the Computer Cover CAUTION: Before you begin any of the procedures in this section, follow the safety instructions in the Product Information Guide . 1 Shut down the computer through the Start menu (see page 18). 2 Ensure that your computer and attached devi...
Page 50 - Looking Inside Your Computer
50 Removing and Installing Parts www .dell.com | support.dell.com Looking Inside Your Computer CAUTION: Before you begin any of the procedures in this section, follow the safety instructions in the Product Information Guide . CAUTION: To guard against electrical shock, always unplug your computer fr...
Page 51 - System Board Components
Removing and Installing Parts 51 System Board Components Adding Cards CAUTION: Before you begin any of the procedures in this section, follow the safety instructions in the Product Information Guide . 1 Shut down the computer through the Start menu (see page 18). 2 Ensure that your computer and atta...
Page 54 - Adding a Floppy Drive
54 Removing and Installing Parts www .dell.com | support.dell.com 11 Replace the computer cover (see page 68). NOTICE: To connect a network cable, first plug the cable into the network wall jack and then plug it into the computer. 12 Connect your computer and devices to electrical outlets, and turn ...
Page 59 - Adding a Second CD or DVD Drive
Removing and Installing Parts 59 22 Press <Enter>. 23 Press <Esc>. 24 Press <Enter> to Save changes and Exit . The computer restarts. 25 See the documentation that came with the drive for instructions on installing any software required for drive operation. Adding a Second CD or DV...
Page 64 - Adding Memory; Installing Memory
64 Removing and Installing Parts www .dell.com | support.dell.com Adding Memory You can increase your computer memory by installing memory modules on the system board. For information on the type of memory supported by your computer, see "Memory" on page 70. Installing Memory CAUTION: Before...
Page 66 - Removing Memory; Replacing the Battery
66 Removing and Installing Parts www .dell.com | support.dell.com Removing Memory CAUTION: Before you begin any of the procedures in this section, follow the safety instructions in the Product Information Guide . NOTE: Memory purchased from Dell is covered under your computer warranty. 1 Shut down t...
Page 68 - Replacing the Computer Cover
68 Removing and Installing Parts www .dell.com | support.dell.com 11 Access the system setup program (see page 74) and restore the settings you recorded in step 1. 12 Properly dispose of the old battery (see ). Replacing the Computer Cover 1 Ensure that all cables are connected, and fold cables out ...
Page 69 - Appendix; Specifications
Appendix 69 Appendix Specifications Microprocessor Microprocessor type Intel ® Pentium ® 4 or Celeron ® L1 cache 8 KB first-level (Pentium 4 and Celeron). L2 cache 256- or 512-KB (displayed in the system setup program) pipelined-burst, eight-way set associative, write-back SRAM (Pentium 4); 128-KB S...
Page 72 - Standard Settings
72 Appendix www .dell.com | support.dell.com Standard Settings The system setup program contains the standard settings for your computer. NOTICE: Unless you are an expert computer user, do not change the settings for this program. Certain changes might make your computer work incorrectly. See the fo...
Page 73 - Viewing Settings
Appendix 73 Viewing Settings 1 Turn on (or restart) your computer. 2 When the blue DELL™ logo appears, press <F2> immediately. If you wait too long and the operating system logo appears, continue to wait until you see the Microsoft ® Windows ® desktop. Then shut down your computer and try agai...
Page 74 - System Setup Program Screens
74 Appendix www .dell.com | support.dell.com System Setup Program Screens The system setup screens are organized into the following sections: • The menu bar at the top provides access to the main program screens:– Main provides settings for the basic computer configuration. – Advanced provides detai...
Page 75 - Clearing Forgotten Passwords
Appendix 75 Changing Boot Sequence for Future Boots 1 Enter the system setup program (see page 72). 2 Use the arrow keys to highlight the Boot Sequence menu option and press <Enter> to access the pop-up menu. NOTE: Write down your current boot sequence in case you want to restore it. 3 Press t...
Page 77 - Class A
Appendix 77 Dell-installed peripherals include any internal expansion cards, or Dell-branded module bay or PC Card accessories. In addition, any Dell-branded monitors, keyboards, mice, speakers, microphones for telephonic modems, docking stations/port replicators, networking products, and all associ...
Page 78 - FCC Identification Information; Contacting Dell
78 Appendix www .dell.com | support.dell.com radiate radio frequency energy and, if not installed and used in accordance with the manufacturer’s instruction manual, may cause interference with radio communications. However, there is no guarantee that interference will not occur in a particular insta...


 Dell DHS Manual
 Dell Dimension 2100 User Manual
 Dell Dimension 2200 User Manual
 Dell Dimension 2300 User Manual
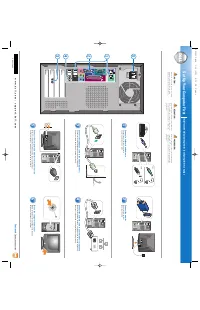 Dell Dimension 2350 User Manual
 Dell Dimension 3000 User Manual
 Dell Dimension 3100C User Manual
 Dell Dimension 4100 User Manual
 Dell Dimension 4300 User Manual
 Dell Dimension 4300S User Manual
 Dell Dimension 4400 User Manual