Page 2 - English; Dacor; Before you begin; have an issue; Troubleshooting; giv; Dacor Customer Assurance Team; Time; The Dacor Customer Assurance Team
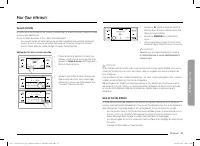
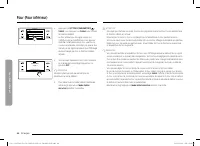
2 English To Our Valued Customer: Congratulations on your purchase of the very latest in Dacor products! Our unique combination of features, style and performance make us a great addition to your home. In order to familiarize yourself with the controls, functions and full potential of your new Dacor...
Page 3 - Regulatory Notice; Precautions to avoid exposure to excessive microwave energy; chassis; CAUTION
English 3 Regulatory Notice For products sold in the US and Canadian markets, only channels 1~11 are available. You cannot select any other channels. FCC STATEMENT: This equipment has been tested and found to comply within the limits for a Class B digital device, pursuant to part 15 of the FCC Rules...
Page 4 - was
4 English Regulatory Notice 2. IC Notice The term “IC” before the radio certification number only signifies that Industry Canada technical specifications were met. Operation is subject to the following two conditions: (1) this device may not cause interference, and (2) this device must accept any in...
Page 5 - Contents; Important safety information
English 5 C ontents Contents Important safety instructions 6 Introducing your new oven 20 Overview 20What’s included with your oven 20 Before you begin 21 Energy saving tips 21 Optitray (For microwave oven) 21 Water reservoir 22 Basic operations 23 Control panel 23 Setting the temperature 23 Control...
Page 7 - What you need to know about safety instructions; WARNING; Follow directions explicitly.
English 7 Impor tant saf ety ins truc tions SAVE THESE INSTRUCTIONS 9. This appliance should be repaired or serviced only by qualified service personnel. Contact the nearest authorized service facility for examination, repair, or adjustment. 10. Do not cover or block any openings in the appliance. 1...
Page 8 - State of California Proposition 65 warning (US only); To reduce risk of electric shock, fire, injury; Precautions to avoid exposure to excessive microwave
8 English Impor tant saf ety ins truc tions Important safety instructions SAVE THESE INSTRUCTIONS WARNING Improper use of the grounding plug can result in a risk of electric shock. • Plug into a grounded 3 prong outlet. Do not remove the third (grounding) prong. Do not use an adaptor or otherwise de...
Page 9 - bubb; For your safety; ssible
English 9 Impor tant saf ety ins truc tions SAVE THESE INSTRUCTIONS • Do not enter the oven. • Do not leave children alone. Never leave children alone or unattended in an area where this appliance is in use. They should never be allowed to sit or stand on any part of the appliance. • Never use your ...
Page 10 - use the; Electrical safety; For
10 English Impor tant saf ety ins truc tions Important safety instructions SAVE THESE INSTRUCTIONS • Use only dry potholders. Placing moist or damp potholders on hot surfaces may result in burns from steam. Do not let the potholder touch hot heating elements. Do not use a towel or other bulky cloth ...
Page 11 - Child safety; Do not let children play with any part of the combi.; Oven; Outer surfaces can also become hot
English 11 Impor tant saf ety ins truc tions SAVE THESE INSTRUCTIONS WARNING • Ensure that the appliance is switched off before replacing the lamp to avoid the possibility of electric shock. CHILD SAFETY WARNING • This appliance is not intended for use by young children or infirm persons without the...
Page 12 - Cleaning the oven; all accessories; Critical cleaning warnings; or
12 English Impor tant saf ety ins truc tions Important safety instructions SAVE THESE INSTRUCTIONS • Use care when opening the door. Let hot air or steam escape before you remove food from or put food into the oven. • Protective liners. Do not use aluminum foil to line the oven bottoms, except as su...
Page 13 - Critical usage warning; combi
English 13 Impor tant saf ety ins truc tions SAVE THESE INSTRUCTIONS • Do not use any commercial oven cleaner or oven liner protective coating of any kind in or on the outside of the oven. - Remove the nickel oven shelves from the oven before you begin the self-cleaning cycle or they may discolor. -...
Page 14 - Usage cautions; Stir drinking liquids during
14 English Impor tant saf ety ins truc tions Important safety instructions SAVE THESE INSTRUCTIONS • Do not cut or remove the ground prong from the power cord under any circumstances. • Connect the oven to a circuit that provides the correct amperage. • Do not install this appliance in a humid, oily...
Page 15 - Introducing your new oven; Overview
English 15 Impor tant saf ety ins truc tions SAVE THESE INSTRUCTIONS • Always observe safety precautions when using your oven. Never try to repair the oven on your own - there is dangerous voltage inside. If the oven needs to be repaired, contact an authorized Dacor service center near you. • If you...
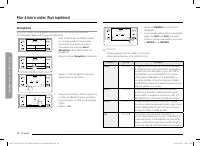
Page 16 - What’s included with your oven; Accessories; for the oven; These extend completely out of the oven for safe and easy handling; Accessories for; the; microwave; Use as appropriate to cook two dishes simultaneously; NOTE; Do not use the optitray without the roller ring.
16 English Impor tant saf ety ins truc tions Important safety instructions SAVE THESE INSTRUCTIONS • Do not insert fingers, foreign substances, or metal objects such as pins or needles into inlets, outlets, or holes. If foreign substances are inserted into any of these holes, contact your product pr...
Page 17 - Energy saving tips
English 17 Impor tant saf ety ins truc tions SAVE THESE INSTRUCTIONS USAGE CAUTIONS CAUTION • If the surface is cracked, turn the appliance off. - Failing to do so may result in electric shock. • Dishes and containers can become hot. Handle with care. • Hot foods and steam can cause burns. Carefully...
Page 18 - Water reservoir; The reservoir is on the oven's right side
18 English Impor tant saf ety ins truc tions Important safety instructions SAVE THESE INSTRUCTIONS • Do not put your face or body close to the appliance while cooking or when opening the door just after cooking. - Take care that children do not come too close to the appliance. - Failing to do so may...
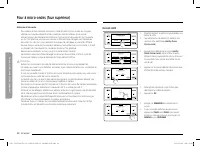
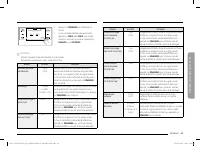
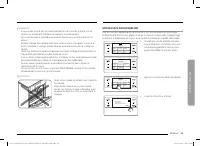
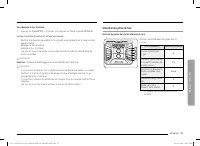
Page 19 - Basic operations; Control panel; Touch; Remove any sort of cook-preparation gloves to use the display.; Microwave; Indicator area
English 19 Impor tant saf ety ins truc tions SAVE THESE INSTRUCTIONS CRITICAL CLEANING WARNINGS CAUTION • Do not clean the appliance by spraying water directly on to it. • Do not use benzene, thinner, or alcohol to clean the appliance. - This may result in discoloration, deformation, damage, electri...
Page 20 - 5 Information area:; Off; None None; timers are set, the number of set timers is shown.
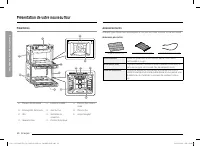
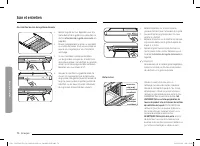
20 English Intr oducing y our ne w ov en Introducing your new oven What’s included with your oven This oven ships with different kinds of accessories that help you cook what you want. Accessories for oven Wire rack (1)* Gliding racks (2)* Temp probe (1)* Wire rack Use these racks in the lower oven w...
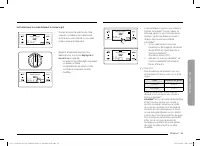
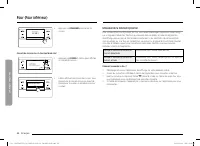
Page 21 - Control lockout; How to activate the control lockout feature
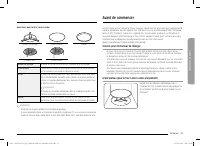
English 21 Befor e you begin Accessories for microwave Roller ring* Optitray* Even plate* Low rack* High rack* Roller ring Put in the center of the base. It supports the optitray. Optitray Put on the roller ring with the center fitting of the coupler. It serves as a cooking base. Racks Use one of th...
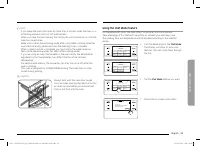
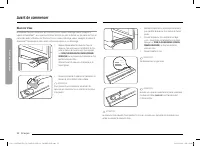
Page 22 - How to unlock the controls; Kitchen timer; How to set the timer; Tap; Tap the numbers in the numeric pad to
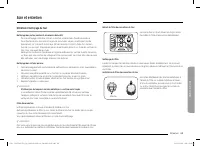
22 English Befor e you begin Before you begin Water reservoir The water reservoir is used for the Steam Bake, Steam Roast, Steam Proof and GreenClean™ functions and also to remove water scale that may form on the oven walls, especially after Steam Baking, Steam Roasting, Steam Proofing and Green cle...
Page 23 - How to change the timer name
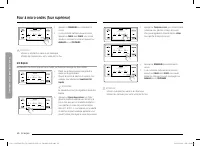
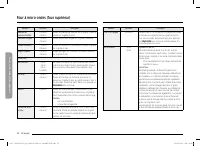
English 23 Basic oper ations Setting the temperature This oven provides two methods to set the temperature. Temperature knob • Use the Temperature Knob on the left or right side of the control panel to set the temperature for the upper Microwave oven and the lower oven respectively. For the upper ov...
Page 24 - Minimum and maximum settings; level via the numeric pad. See; Microwave energy lets food be cooked/reheated without
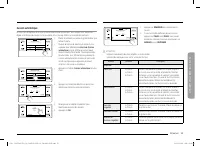
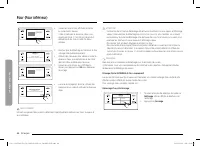
24 English Basic oper ations Basic operations Control lockout Control Lockout lets you lock the buttons on the touch pad so they cannot be activated accidently. Control Lock locks only the lower oven door so it cannot be opened. You can only activate Control Lockout when the oven is in standby mode....
Page 25 - Setting the power level; Power Level; Timed cooking; How to set the oven for timed cooking; MICROWAVE
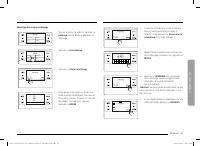
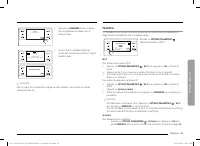
English 25 Basic oper ations Timer DELETE RESET + ADD Timer 01 01:53:03 START 5. Tap START . When the set time has elapsed, the oven will beep and the display will show the Timer has finished. Timer DELETE RESET + ADD Timer 01 01:52:48 Pause • You can pause, reset, or delete the timer at any time by...
Page 26 - See pg. 61 for basic baking and broiling
26 English Micr o w ave ov en (Upper O v en) Basic operations Feature Temp./ Power range Default Temp./ Power Max. time Auto mode Sense Cook™ The 16 Sensor Cooking features provide pre-programmed cooking times. You do not need to set either the cooking times or the power levels. Conv.Sear AutoCook T...
Page 28 - Power level
28 English Micr o w ave ov en (Upper O v en) Microwave oven (Upper Oven) 4:35 PM START UPPER Microwave Microwave Heating Power 100% 0 hr 10 min 30 sec +30SEC 5. Tap START to start cooking. 6. If you want to pause cooking, tap PAUSE . In PAUSE , you can cancel or continue cooking by tapping CANCEL or...
Page 30 - Sear
30 English Micr o w ave ov en (Upper O v en) Microwave oven (Upper Oven) 4:35 PM START UPPER Speed Conv.Sear Direct hot air convection with microwave Temp. Power 350°F 30% 0 hr 10 min 30 sec +30SEC 5. Tap START to start cooking. 6. If you want to pause cooking, tap PAUSE . In PAUSE , you can cancel ...
Page 33 - Fresh Root Veggies; for at least 5 minutes before using it again.
English 33 Micr o w ave ov en (Upper O v en) Food Amount Instructions Homemade lasagna 40 oz. Ingredients: 3/4 lb. ground beef, 2 tbsp. olive oil, 8 oz. tomato sauce, 4 oz. beef stock, 8 lasagna sheets, 1 onion (chopped), oregano, and basil to taste, 8 oz. grated mozzarella cheese. Method: Sauce: He...
Page 34 - Auto
34 English Micr o w ave ov en (Upper O v en) Microwave oven (Upper Oven) Food Amount Instructions Bake Box cake mix 1 pack. Pour the batter into 8 inch round cake pan. Place the pan on the low rack. Brownie mix 1 pack. Pour the batter into an 8 x 8 inch pan, then place the pan on the low rack. Cooki...
Page 35 - Sear AutoCook
English 35 Micr o w ave ov en (Upper O v en) Food Amount Instructions Cheese cake 1 ea. Ingredients: 15 graham crackers crushed, 1/2 cup butter, 14 oz. cream cheese, softened, 2 eggs, 1 cup granulated sugar, 1 teaspoon vanilla extract. Method: 1. Melt the butter in a pan. Add the crushed graham crac...
Page 36 - Hamburger patties; ut
36 English Micr o w ave ov en (Upper O v en) Microwave oven (Upper Oven) Defrost The oven provides 4 different defrosting options for your convenience. The time and power levels are automatically adjusted according to your selection. 4:35 PM Meat Fish Poultry Bread UPPER Defrost Jump start meal prep...
Page 40 - Poultry; optitray and close the door.
40 English Micr o w ave ov en (Upper O v en) Microwave oven (Upper Oven) Utensils & cover • To obtain good cooking results with the Auto Sensor function, follow the directions for selecting appropriate containers and covers in the charts in this manual. • Always use microwave-safe containers and...
Page 41 - – 4 servings; Carrots; Green beans; Spinach; while; Zucchini; Eggplant; Wash; Potatoes; ea
English 41 Micr o w ave ov en (Upper O v en) CAUTION • Use only microwave-safe cookware. • Use oven gloves when taking out food. Food Amount Instructions Fresh Vegetables Broccoli Florets 1 serving 2 servings3 servings4 servings (1 serving = 4-5 oz.) Wash and clean the broccoli. Prepare the florets ...
Page 42 - couscous; Follow package directions for recommended amount of; Tilapia fillet; Wash an; Sweet Potato; cut; Frozen Vegetables; Canned Vegetables; Put vegetables in microwave-safe bowl cover while; Food
42 English Micr o w ave ov en (Upper O v en) Microwave oven (Upper Oven) Food Amount Instructions Frozen Vegetables Broccoli Florets 1 serving 2 servings3 servings4 servings (1 serving = 4-5 oz.) Place the broccoli in a microwave safe bowl. Add 1-4 tablespoons of water (1 Tbsp per serving). Cover du...
Page 45 - patties; Place the french toast on the high rack.
English 45 Micr o w ave ov en (Upper O v en) 4:35 PM START UPPER Bone-in chicken pieces Use high rack Unit 2.0lb 21 min 00 sec 6. Tap START to start cooking. 7. If you want to pause cooking, tap PAUSE . In PAUSE , you can cancel or continue cooking by tapping CANCEL or CONTINUE . CAUTION • Use only ...
Page 46 - safe loaf pan on low rack.
46 English Micr o w ave ov en (Upper O v en) Microwave oven (Upper Oven) Food Amount Instructions Salmon Steak 2 ea.4 ea. (1 ea. = 5-6 oz.) Brush the salmon steak with oil and seasonings. Place the salmon steak on the even plate, and then place the plate on the high rack. Homemade Gratin 20 oz.40 oz...
Page 47 - Put oven dish on low rack.
English 47 O v en (L o w er O v en) Oven (Lower Oven) Timed cooking In timed cooking mode, the oven turns on immediately and cooks for the length of time you select.At the end of the cooking time, the oven turns off automatically. • You can use the timed cooking feature only with another cooking ope...
Page 49 - in; Cinnamon rolls; bsp
English 49 O v en (L o w er O v en) 2. Insert the temp probe plug into the socket on the top side wall of the oven as far as it will go. 3. Turn the lower oven mode knob to select the desired cooking mode (Bake, Convection Bake or Convection Roast). Set the cooking temperature. (See pages 23 .) 4. T...
Page 50 - frozen; pizza; bread; Put
50 English O v en (L o w er O v en) Oven (Lower Oven) Oven functions Cooking mode Turn the Upper or Lower oven mode knob to select the cooking mode. Set the temperature using the Upper or Lower oven Temp knob, the numeric pad, or the wheel picker. See Setting the Temperature on pages 23 and Basic Ba...
Page 53 - LOWER OVEN
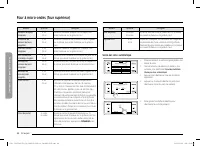
English 53 O v en (L o w er O v en) START 4:35 PM Convection Bake Faster, more even baking LOWER 325 °F None Cook Time InstantHeat™ Off Delay Start None TIP START 4:35 PM Convection Bake Faster, more even baking LOWER 325 °F None Cook Time InstantHeat™ Delay Start None TIP On 3. Follow the steps bel...
Page 54 - Eating spoiled food can result in sickness from food poisoning.; Delay start; The clock must be set to the current time.
54 English O v en (L o w er O v en) Oven (Lower Oven) How to adjust the temperature while cooking 4:35 PM Microwave UPPER 0hr 00min 24sec PAUSE Convection Bake LOWER 175° 325° CANCEL If you are using the ovens in single mode, do one of the following: • Use the upper or lower oven temperature knob to...
Page 55 - How to set the oven for delay timed cooking
English 55 O v en (L o w er O v en) NOTE • If you leave the oven door open for more than 2 minutes when the oven is on, all heating elements will shut off automatically. • When you have finished cooking, the cooling fan will continue to run until the oven has cooled down. • Make sure to drain the re...
Page 56 - Using the temp probe; How to use the temp probe; Keep Warm; Available temperatures
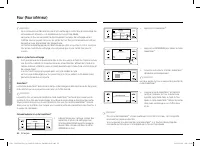
56 English O v en (L o w er O v en) Oven (Lower Oven) 4:35 PM Previous START Set start time 4 : 35 AM PM TIP Garlic prime rib 4. Tap START to start cooking. Cooking tips in the Chef Mode OK - For 8-9 servings- Use Roasting Pan with Roasting Rack- Use Temperature probe 4:35 PM LOWER TIP TIP Garlic pr...
Page 57 - but should be in or near the center.; during normal baking/cooking, cooking will stop after 1 minute.; Temp probe table; Type of Food; Removing the temp probe; Remove the temp probe plug from the socket.
English 57 O v en (L o w er O v en) To start the oven remotely 1. Tap SETTINGS > iQ Control, and then tap ON of LOWER. When IQ control is on you can: • Remotely change oven settings (mode, time, temperature) using your mobile device. • Remotely start the oven. • Remotely turn off the oven. • Once...
Page 58 - Oven functions; Cooking mode; Mode; circulates heated air evenly over and around food.
58 English O v en (L o w er O v en) Oven (Lower Oven) Rack and Pan placement Single Oven Rack Single Oven Rack 3 4 Multiple Oven Racks Multiple Oven Racks 5 3 Multiple Oven Racks Multiple Oven Racks 5 3 Centering baking pans in the oven as much as possible will produce better results. If baking with...
Page 60 - Broiling recommendation guide; pan and its grill when broiling, and preheat the oven for 5 minutes.; Steam cook recommendation guide
60 English O v en (L o w er O v en) Oven (Lower Oven) Before a self cleaning cycle Fig. 1 Fig. 1 Fig. 2 Fig. 2 Don’t hand Don’t hand clean the clean the oven door oven door gasket. gasket. You may You may hand clean hand clean the door. the door. • We recommend venting your kitchen with an open wind...
Page 61 - Basic baking and broiling instructions
English 61 O v en (L o w er O v en) How to run a self cleaning cycle Self clean Descale 4:35 PM GreenClean™ Draining LOWER Clean 1. Turn the Mode knob to Clean . The display will show 4 cleaning selections. Self clean Descale 4:35 PM GreenClean™ Draining Clean LOWER 2. Tap Self Clean . Self clean Ov...
Page 62 - High; or Delay Start function, set each
62 English O v en (L o w er O v en) Oven (Lower Oven) NOTE • You will not be able to start a self-cleaning cycle if the control lockout feature is activated or if the oven’s temperature is too hot. • The oven doors lock automatically. The display will show the cleaning time remaining. You cannot ope...
Page 63 - How to adjust the temperature while cooking; reaches the set temperature, the oven beeps 6 times.; Using the special function feature
English 63 O v en (L o w er O v en) Descale (LOWER oven only) If you use Steam Bake or Steam Roast functions frequently, we recommend descaling regularly to remove minerals from the oven that may affect the taste or quality of food cooked. When running a descaling cycle, use only descaling agents th...
Page 64 - by; dehydrated food; bowl
64 English O v en (L o w er O v en) Oven (Lower Oven) CAUTION • Running the Descaling function disables Steam Bake and Steam Roast. Do not cancel descaling while it is in process. If you stop it, you must restart the descaling cycle and complete it within the next three hours to re-enable the Steam ...
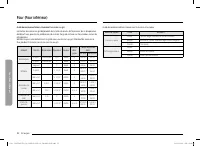
Page 65 - Rack position chart for special cooking options
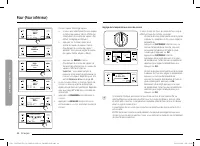
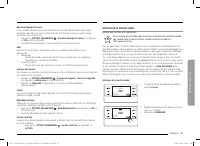
English 65 O v en (L o w er O v en) Settings In Settings, you can change the default settings to your preference or diagnose problems with the network connection. START 4:35 PM Convection Bake Faster, more even baking LOWER 325 °F TIP None Cook Time InstantHeat™ Off Delay Start None Tap SETTINGS . T...
Page 66 - Cooking tips in chef mode; The display will show the cooking tip.; You can view the tip before or during
66 English O v en (L o w er O v en) Oven (Lower Oven) Language Choose a display language. 1. Tap SETTINGS > Language , and then tap in the right screen. 2. You can select English, Spanish, or French. Volume Adjust the volume level for beeps and melodies. • Tap SETTINGS > Volume , and then use ...
Page 67 - Using the iQ control feature (Lower oven only); How to connect the oven; Self Clean mode cannot be started remotely.
English 67 O v en (L o w er O v en) Using the sabbath feature (For use on the Jewish Sabbath & Holidays) K For further assistance, guidelines for proper usage, and a complete list of models with the Sabbath feature, please visit the web at http:\\www.star-k.org. You can use the Sabbath feature w...
Page 68 - Using the oven racks; Lower oven rack positions; Recommended rack positions for cooking; • This table is for reference only.; Rack and pan placement; Centering baking pans in the oven as much
68 English O v en (L o w er O v en) Oven (Lower Oven) CAUTION • Do not to attempt to activate any other program feature except Bake while the Sabbath feature is active. • Do not open the oven door or change the oven temperature for about 30 minutes after you have started Sabbath mode to allow the ov...
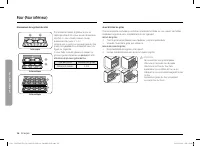
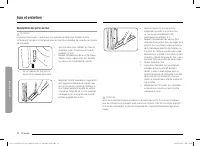
Page 69 - Before using the racks; Removing the racks; Using the gliding rack; Installing the gliding rack
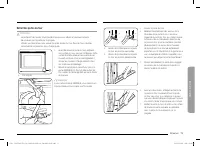
English 69 C ar e and maint enanc e Removing your oven’s convection filter When the oven is cool, put your fingers around the edges of the filter and gently push up. To clean the filter Soak it in hot, soapy water. Rinse well. You may also place it in a dishwasher on the top rack. Dry the filter bef...
Page 70 - Removing the gliding rack; With the oven off and cool, open the; Do not install the Gliding rack on the next; You can install the Gliding rack on any
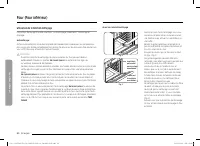
70 English C ar e and maint enanc e Care and maintenance 5. Repeat for the right (front and back) slide mechanism of the rack. 6. Open and close the rack several times to distribute the lubricant. 7. Replace the cap on the lubricant and shake it again. Turn the rack over and repeat steps 3, 4, 5, an...
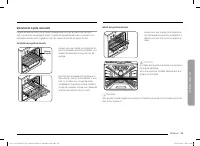
Page 71 - not let children near the oven during self-cleaning.; Before a self-cleaning cycle
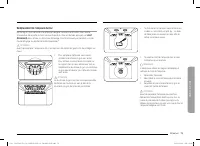
English 71 C ar e and maint enanc e A B A. Oven door hinge lock in locked position B. Oven door hinge lock in unlocked position 3. Open the oven door. 4. Locate the oven door hinge locks in both corners of the oven door, and then rotate the hinge locks toward the oven door to the unlocked position. ...
Page 72 - How to run a self-cleaning cycle
72 English C ar e and maint enanc e Care and maintenance 4. Lower the oven door to the fully open position. If the oven door does not open to a full 90°, repeat steps 1 through 3. 5. Locate the oven door hinge locks in the corners of the oven door, and rotate the hinge locks toward the oven cavity t...
Page 73 - After a self-cleaning cycle; If the oven is not clean after one cycle, repeat the cycle.; GreenCleanTM; to one side when opening the door so hot air or steam escape safely.
English 73 C ar e and maint enanc e 2. While holding the glass cover with one hand, insert a flat-sharp tool such as a table knife between the glass and the frame to remove the glass cover. 3. Turn the bulb cap counterclockwise to remove. NOTE If necessary, remove the metal rings and clean the bulb ...
Page 74 - Before a green cleaning cycle; is easily damaged; How to run a green-cleaning cycle
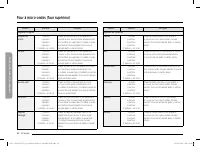
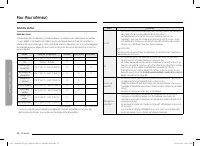
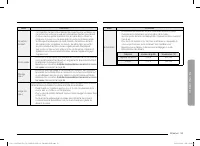
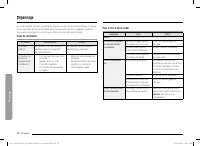
74 English Tr ouble shoo ting Troubleshooting For the Microwave Oven Symptom Cause Action General The buttons cannot be pressed properly. Foreign matter may be caught between the buttons. Remove the foreign matter and try again. For touch models: Moisture is on the exterior. Wipe the moisture from t...
Page 75 - Green cleaning will start automatically.; When Green cleaning is done, clean the; After a green cleaning cycle; soapy
English 75 Tr ouble shoo ting Symptom Cause Action The power turns off during operation. The oven has been cooking for an extended period of time. After cooking for an extended period of time, let the oven cool. The cooling fan is not working. Listen for the sound of the cooling fan. Trying to opera...
Page 76 - How to run a descale cycle
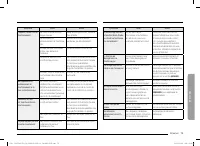
76 English Tr ouble shoo ting Troubleshooting Symptom Cause Action Optitray While turning, the optitray comes out of place or stops turning. There is no roller ring, or the roller ring is not properly in place. Install the roller ring and then try again. The turn table drags while turning. The rolle...
Page 77 - When descaling is complete, the oven; When rinsing is complete, use oven; Steam Bake and Steam Roast.
English 77 Tr ouble shoo ting Symptom Cause Action Convection The oven does not heat. The door is open. Close the door and try again. Smoke comes out during preheating. During initial operation, smoke may come from the heating elements when you first use the oven. This is not a malfunction. After yo...
Page 79 - Settings; iQ control; Easy connection
English 79 Tr ouble shoo ting Problem Possible cause Solution Food does not broil properly. The serving size may not be appropriate. Refer to the Broiling recommendation guide for serving sizes on page 52 , and then try again. The rack has not been properly positioned. See the Broiling recommendatio...
Page 80 - Display; Language; Choose a display language.; Volume; SETTINGS
80 English Tr ouble shoo ting Troubleshooting Information codes Displayed Code Possible cause Solution C-d0 This code occurs if the control key is short for 1 minute. Clean the buttons and make sure there is no water on/around them. Turn off the oven and try again. If the problem continues, contact ...
Page 82 - Using the Sabbath feature; LIGHT; How to use the Sabbath feature; Set the temperature and cook time you
82 English W arranty and Servic e Warranty and Service What Is Not Covered • Slight color variations may be noticed because of differences in painted parts, kitchen lighting, product placement, and other factors; this warranty does not apply to color variation. • Service calls to educate the custome...
Page 83 - • You can set the
English 83 Appendix Out of Warranty Should you experience a service issue beyond the standard warranty period, please contact us. Dacor reviews each issue and customer concern to provide the best possible solution based on the circumstances.THE REMEDIES PROVIDED IN THE ABOVE EXPRESS WARRANTIES ARE T...
Page 84 - Maintaining your appliance; Care and cleaning of the oven; Cleaning painted parts and decorative trim; Dry and buff with a clean, dry paper towel or soft cloth.; Oven racks; Assuran
Dacor ∙ 14425 Clark Avenue, City of Industry, CA 91745 ∙ Phone: 833-353-5483(USA), 844-509-4659(Canada) ∙ www.dacor.com DG68-01316A-01 FULL_DOC30x977Dx_DA_DG68-01316A-01_EN+MES+CFR.indb 84 FULL_DOC30x977Dx_DA_DG68-01316A-01_EN+MES+CFR.indb 84 2023-03-03 오후 12:05:52 2023-03-03 오후 12:05:52
Page 85 - To lubricate the slides of the gliding rack; Remove the rack from the oven. See; If there is debris in the slide tracks,
Manual del usuario Horno combinado de microondas empotrable DOC30*977D* FULL_DOC30x977Dx_DA_DG68-01316A-01_EN+MES+CFR.indb 1 FULL_DOC30x977Dx_DA_DG68-01316A-01_EN+MES+CFR.indb 1 2023-03-03 오후 12:05:52 2023-03-03 오후 12:05:52
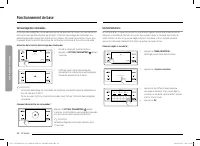
Page 86 - Oven door; • Use soap and water to thoroughly
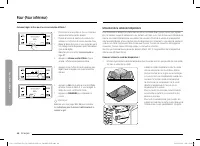
2 Español A nuestros valiosos clientes: ¡Felicidades por la compra de lo último en productos Dacor! Nuestra combinación única de características, estilo y desempeño nos hace una gran incorporación a su hogar. Para familiarizarse con los controles, las funciones y todo el potencial de su nuevo artefa...
Page 87 - hinge; Locked; Partially close the door to engage the
Español 3 Aviso sobre regulaciones En los productos vendidos en los mercados de Estados Unidos y Canadá, solo están disponibles los canales 1~11. No se pueden seleccionar otros canales. DECLARACIÓN DE LA FCC: Este equipo ha sido sometido a pruebas y se ha determinado que cumple con los límites para ...
Page 88 - Replacing the oven door (Lower oven only); Using two hands, grasp the side edges; Removing the oven door
4 Español Aviso sobre regulaciones 2. Aviso de IC El término “IC” antes del número de certificación de radio indica que se cumplieron las especificaciones técnicas de Industry Canada. El funcionamiento se encuentra sujeto a las siguientes dos condiciones: (1) este dispositivo no puede causar interfe...
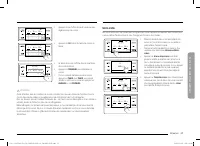
Page 89 - Changing the oven light (Lower oven only)
Español 5 C ontenido Contenido Instrucciones de seguridad importantes 6 Introducción a su nuevo horno 20 Descripción general 20 Elementos incluidos con su horno 20 Antes de comenzar 21 Sugerencias para ahorrar energía 21 Plato giratorio (para horno de microondas) 21 Depósito de agua 22 Operaciones b...
Page 90 - Control display; used
6 Español Instruc cione s de seg uridad impor tantes Instrucciones de seguridad importantes CONSERVE ESTAS INSTRUCCIONES PRECAUCIÓN Para reducir el riesgo de incendio, explosión, descarga eléctrica o lesiones personales cuando utilice el horno, siga estas instrucciones básicas de seguridad. NO inten...
Page 91 - Broiling; Symptom; oven; Optitray; Remove some
Español 7 Instruc cione s de seg uridad impor tantes CONSERVE ESTAS INSTRUCCIONES 9. Este electrodoméstico debe ser reparado solo por personal técnico calificado. Comuníquese con la oficina del servicio técnico autorizado más cercana para que examinen, reparen o ajusten el equipo. 10. No tape ni blo...
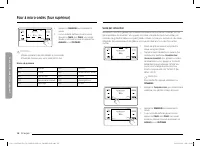
Page 92 - Convection; ing; For the lower oven; starting on
8 Español Instruc cione s de seg uridad impor tantes Instrucciones de seguridad importantes CONSERVE ESTAS INSTRUCCIONES ADVERTENCIA El uso inadecuado del enchufe de conexión a tierra puede provocar un riesgo de descarga eléctrica. • Enchúfelo a un tomacorriente de 3 clavijas conectado a tierra. No ...
Page 93 - Problem; g t
Español 9 Instruc cione s de seg uridad impor tantes CONSERVE ESTAS INSTRUCCIONES • No se introduzca en el horno. • No deje solos a los niños. Los niños nunca deben quedar solos o sin vigilancia en el lugar donde se utiliza este electrodoméstico. Nunca se les debe permitir sentarse o pararse sobre n...
Page 94 - Information codes; Displayed code
10 Español Instruc cione s de seg uridad impor tantes Instrucciones de seguridad importantes CONSERVE ESTAS INSTRUCCIONES • Utilice solamente agarradores aislantes secos. Colocar agarradores aislantes mojados o húmedos sobre superficies calientes podría producir quemaduras por vapor. No permita que ...
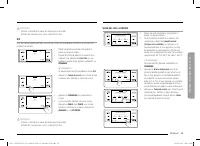
Page 95 - Warranty and Service; Getting Help; Before you request service:; Warranty
Español 11 Instruc cione s de seg uridad impor tantes CONSERVE ESTAS INSTRUCCIONES ADVERTENCIA • Asegúrese de que el electrodoméstico esté apagado antes de reemplazar la bombilla de luz para evitar la posibilidad de una descarga eléctrica. SEGURIDAD DE LOS NIÑOS ADVERTENCIA • Este electrodoméstico n...
Page 96 - LIMITATIONS OF COVERAGE
12 Español Instruc cione s de seg uridad impor tantes Instrucciones de seguridad importantes CONSERVE ESTAS INSTRUCCIONES • Cuando abra la puerta, hágalo con precaución. Permita la salida del vapor o aire caliente antes de retirar o volver a colocar los alimentos en el horno. • Revestimientos protec...
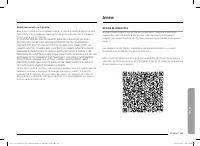
Page 97 - Appendix; Open source announcement
Español 13 Instruc cione s de seg uridad impor tantes CONSERVE ESTAS INSTRUCCIONES • No use ningún producto limpiador de hornos ni revestimiento protector dentro del horno ni sobre sus superficies exteriores. - Retire los estantes niquelados del horno antes de comenzar el ciclo de auto-limpieza, de ...
Page 98 - Notes
14 Español Instruc cione s de seg uridad impor tantes Instrucciones de seguridad importantes CONSERVE ESTAS INSTRUCCIONES • No corte ni retire el pin de conexión a tierra del cable de alimentación bajo ninguna circunstancia. • Conecte el horno a un circuito que proporcione el amperaje correcto. • No...
Page 99 - WARRANTY INFORMATION
Español 15 Instruc cione s de seg uridad impor tantes CONSERVE ESTAS INSTRUCCIONES • Siempre respete las precauciones de seguridad cuando utilice su horno. Nunca intente reparar el horno: contiene voltaje peligroso en el interior. Si se debe reparar el horno, comuníquese con un centro de servicio té...