Page 2 - English; Contents; Important information
2 English To Our Valued Customer: Congratulations on your purchase of the very latest in Dacor products! Our unique combination of features, style and performance make us The Life of the Kitchen™, and a great addition to your home. In order to familiarize yourself with the controls, functions and fu...
Page 3 - Care and maintenance; install; Troubleshooting
English 3 C ontents Contents Important safety instructions 4 Introducing your new oven 17 Overview 17What’s included with your oven 17 Before you begin 18 Energy saving tips 18 Water reservoir 18 Operating the oven 19 Control panel 19 Display 20Setting the temperature 20 Control Lockout 21 Kitchen T...
Page 4 - Dacor; Before you begin; have an issue; giv; Dacor Customer Assurance Team; Time; The Dacor Customer Assurance Team
4 English Impor tant saf ety ins truc tions Important safety instructions SAVE THESE INSTRUCTIONS CAUTION To reduce the risk of fire, explosion, electric shock, or personal injury when using your oven, follow these basic safety precautions. Do NOT attempt.Do NOT disassemble.Do NOT touch.Follow direc...
Page 5 - eave the oven door closed except to
English 5 Impor tant saf ety ins truc tions SAVE THESE INSTRUCTIONS Always disconnect the power to the appliance before servicing by removing the fuse or switching off the circuit breaker. • Do not enter the oven. • Do not leave children alone. Never leave children alone or unattended in an area whe...
Page 6 - Safety information; What you need to know about safety instructions; Important safety symbols and precautions; WARNING; severe personal injury or death.; injury or property damage.; CAUTION; Keep this manual in a convenient place for reference.; State of California Proposition 65
6 English Impor tant saf ety ins truc tions Important safety instructions SAVE THESE INSTRUCTIONS • Use only dry potholders. Placing moist or damp potholders on hot surfaces may result in burns from steam. Do not let the potholder touch hot heating elements. Do not use a towel or other bulky cloth i...
Page 7 - For your safety; s and nearby
English 7 Impor tant saf ety ins truc tions SAVE THESE INSTRUCTIONS WARNING • Ensure that the appliance is switched off before replacing the lamp to avoid the possibility of electric shock. CHILD SAFETY WARNING • This appliance is not intended for use by young children or infirm persons without the ...
Page 8 - Electrical safety; turn off and unplug the oven.; Child safety; Children should not be allowed to play with the oven.
8 English Impor tant saf ety ins truc tions Important safety instructions SAVE THESE INSTRUCTIONS • Use care when opening the door. Let hot air or steam escape before you remove food from or put food into the oven. • Protective liners. Do not use aluminum foil to line the oven bottoms, except as sug...
Page 9 - Oven; Do not operate the oven during a power failure.; begin to operate again. Forgotten food may catch fire or spoil.
English 9 Impor tant saf ety ins truc tions SAVE THESE INSTRUCTIONS SELF-CLEANING OVENS Do not clean the door gasket. The door gasket is essential for a good seal. Care should be taken not to rub, damage, or move the gasket. • Never keep pet birds in the kitchen. Birds are extremely sensitive to the...
Page 10 - Do not clean the door gasket.; Critical usage warning
10 English Impor tant saf ety ins truc tions Important safety instructions SAVE THESE INSTRUCTIONS CRITICAL INSTALLATION WARNINGS WARNING • This appliance must be installed by a qualified technician or service company. • Failing to have a qualified technician install the oven may result in electric ...
Page 11 - Usage cautions; to; Critical cleaning warnings; Do not spray water directly on the oven.
English 11 Impor tant saf ety ins truc tions SAVE THESE INSTRUCTIONS If the power cord is damaged, contact your nearest Dacor service center. CRITICAL USAGE WARNING CAUTION • If the appliance is flooded by any liquid, please contact your nearest Dacor service center. Failing to do so may result in e...
Page 12 - Introducing your new oven; Overview; NOTE; Accessories marked with an * can be purchased from Dacor Customer
12 English Impor tant saf ety ins truc tions Important safety instructions SAVE THESE INSTRUCTIONS • Do not attempt to repair, disassemble, or modify the appliance yourself. • Since a high voltage current enters the product chassis, it may result in electric shock or fire. • When a repair is needed,...
Page 13 - Operations; Control panel; TIMER; Press-hold for 3 seconds to disable all oven functions.; OFF
English 13 Impor tant saf ety ins truc tions SAVE THESE INSTRUCTIONS • Open the cap or stopper of sealed containers (herb tonic tea bottle, baby bottle, milk bottle and so on) before heating them. Make a hole in food items that have shells (eggs, chestnuts, etc) with a knife before cooking them. • F...
Page 14 - Display; Convection Bake; Off; None; If; The current or selected menu is displayed with a mode description.; show
14 English Impor tant saf ety ins truc tions Important safety instructions SAVE THESE INSTRUCTIONS USAGE CAUTIONS CAUTION • If the surface is cracked, turn the appliance off. • Failing to do so may result in electric shock. • Dishes and containers can become hot. Handle with care. • Hot foods and st...
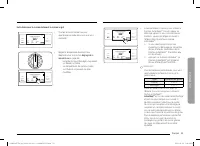
Page 15 - Water reservoir; RESERVOIR; Open the reservoir cap, and fill
English 15 Impor tant saf ety ins truc tions SAVE THESE INSTRUCTIONS • Do not put your face or body close to the appliance while cooking or when opening the door just after cooking. • Take care that children do not come too close to the appliance. • Failing to do so may result in children burning th...
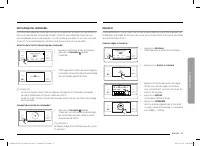
Page 16 - Close the cap and top portion of the; The reservoir heats up during; Control lockout; when the oven is in Standby mode.; How to activate Control Lockout; Cancel or turn off all functions.; The display changes to the Child Lock
16 English Impor tant saf ety ins truc tions Important safety instructions SAVE THESE INSTRUCTIONS CRITICAL CLEANING WARNINGS CAUTION • Do not clean the appliance by spraying water directly on to it. • Do not use benzene, thinner, or alcohol to clean the appliance. • This may result in discoloration...
Page 17 - How to unlock the controls; LOCK; Kitchen timer; How to set the timer
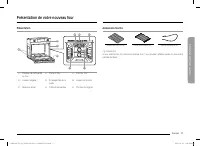
English 17 Intr oducing y our ne w ov en What’s included with your oven Wire racks (1)* Gliding rack (2)* Temp probe (1)* NOTE If you need an accessory marked with a *, you can buy it from the Dacor Customer Service. Introducing your new oven Overview 01 02 03 05 09 04 08 06 07 01 Oven control panel...
Page 18 - How to change timer name; Tap the timer name area.; Tap the keyboard to set the new timer
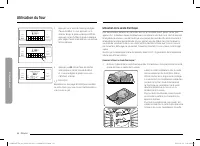
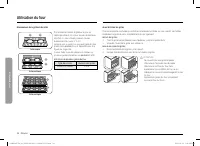
18 English Befor e you begin Before you begin Water reservoir The water reservoir is used for the Steam modes functions and also to remove water scale that may form on the oven walls, especially after Steam modes. Fill it with water in advance of steam cooking or descaling. 1. Locate the water reser...
Page 19 - Timed cooking; At the end of the cooking time, the oven turns off automatically.; How to set the oven for timed cooking; Swipe to the desired cooking mode.; The cook time appears in the Cook; fruits and vegetables.
English 19 Oper ating the o v en Before you begin 3. Replace the cap or the clear plastic top, and then slide the water reservoir back into the reservoir slot. 4. Push the reservoir in. There will be soft click when it is in place correctly. Touch OPEN/CLOSE RESERVOIR . The oven retracts the water r...
Page 20 - Delay start; How to set the oven for delay timed cooking; Timed; The Delay Start screen closes. The start
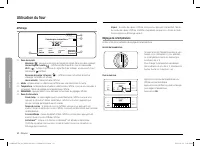
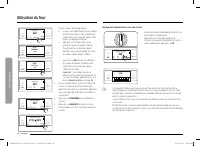
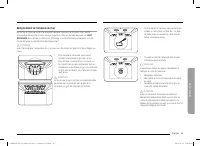
20 English Oper ating the o v en Operating the oven Display Convection Bake Faster, more even baking 325 °F InstantHeat™ Off Cook Time None Delay Start None START 4:35 PM TIP 0102 03 05 04 01 Indicator area • Timer ( ): When the timer is set, the timer indicator is displayed. • Door lock ( ): Displa...
Page 21 - Using the oven racks; Oven rack; Recommended rack; level; s for cooking; LEVEL; Broiling hamburgers; Rack and pan placement; at
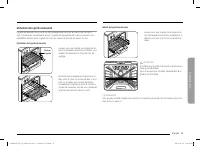
English 21 Oper ating the o v en Control Lockout Control Lockout lets you lock the buttons on the touch pad so they cannot be activated accidently. Control Lock also locks the oven door so it cannot be opened. You can only activate Control Lockout when the oven is in standby mode. How to activate th...
Page 22 - Before using the racks; accidentally pulled from the oven.; Removing the racks; Do not line the racks or oven chamber
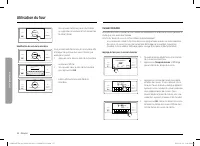
22 English Oper ating the o v en Operating the oven DELETE RESET Timer 01 00:00:18 PAUSE Timer + ADD SETTINGS TIMER LIGHT OPEN/CLOSE RESERVOIR • You can pause, reset, or delete the timer at any time by touching the screen. How to change timer name DELETE RESET Timer 01 00:00:20 START Timer + ADD SET...
Page 23 - Using the gliding rack; Installing the gliding rack; either
English 23 Oper ating the o v en Delay Start In the delay timed cooking mode, the oven’s timer turns the oven on at a time you select in advance. You can have the oven turn off automatically after a set time has elapsed by setting the Timed Cooking function as well. • You can use the delay start fea...
Page 25 - Using the temp probe; How to use the temp probe; Push the tip of the; Available temperatures
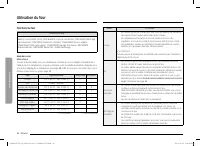
English 25 Oper ating the o v en 2. Insert the temp probe plug into the socket on the top side wall of the oven as far as it will go. 3. Turn the oven mode knob to select the desired cooking mode (Bake, Convection Bake, Convection Roast, Pure Convection, Steam Bake or Steam Roast). Set the cooking t...
Page 26 - cycle. You can permanently damage the probe.; normally, cooking will stop after 1 minute.; Temp probe table; Type of Food; Removing the temp probe
26 English Oper ating the o v en Operating the oven Oven functions Oven functions BAKE, BROIL, CONV BAKE(Convection bake), CONV ROAST(Convection roast), PURE CONV(Pure convection), STEAM BAKE, STEAM ROAST, STEAM PROOF, DEHYDRATE, CHEF MODE, CLEAN Cooking mode Turn the Oven Mode knob to select the co...
Page 27 - Oven functions; Cooking mode; Swipe to select the cooking mode. Set the temperature you want. See; Mode
English 27 Oper ating the o v en Mode Instruction Pure convection • Pure Convection uses the convection element and fan. The uniform air circulation provided by Pure Convection allows you to use more oven capacity at once. Use this mode for single rack baking, multiple rack baking, roasting, and pre...
Page 28 - Broiling recommendation guide
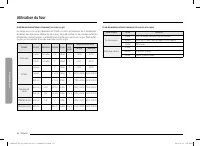
28 English Oper ating the o v en Operating the oven Broiling recommendation guide The size, weight, thickness, starting temperature, and your doneness preference will affect broiling times. This guide is based on meats at refrigerator temperature. Always use a broiler pan and its grid when broiling....
Page 29 - grill when broiling. Preheat the oven for 5 minutes.; Steam cook recommendation guide
English 29 Oper ating the o v en Basic Baking and Broiling Instructions START 4:35 PM Convection Bake Faster, more even baking 325 °F InstantHeat™ Off Cook Time None Delay Start None TIP SETTINGS TIMER LIGHT OPEN/CLOSE RESERVOIR 1. Turn the Oven Mode knob to select the desired cooking mode. START 4:...
Page 30 - Setting the mode; Swipe the screen; Summarized mode; Setting the temperature
30 English Oper ating the o v en Operating the oven START 4:35 PM Cook Time 0 hr 40 min Steam Medium Steam Bake Steam baking 350 °F Delay Start 4:35 PM SETTINGS TIMER LIGHT OPEN/CLOSE RESERVOIR TIP Low High Medium CANCEL OK SETTINGS TIMER LIGHT OPEN/CLOSE RESERVOIR • Steam Bake, Steam Roast a. If yo...
Page 31 - Basic baking and broiling instructions; Swipe to select a cooking mode.; Broil mode can be set only Hi or Low.; Follow the steps below to use the; InstantHeatTM; Always
English 31 Oper ating the o v en NOTE • If you leave the oven door open for more than 2 minutes when the oven is on, all heating elements will shut off automatically. • When you have finished cooking, the cooling fan will continue to run until the oven has cooled down. • Make sure to drain the remai...
Page 32 - Low; Low; Steam Bake, Steam Roast; Tap
32 English Oper ating the o v en Operating the oven 4:35 PM Garlic prime rib Previous START Set start time 4 : 35 AM PM LIGHT TIMER SETTINGS OPEN/CLOSE RESERVOIR TIP 4. Tap START to start cooking. Cooking tips in the Chef Mode Garlic prime rib OK - For 8-9 servings- Use Roasting Pan with Roasting Ra...
Page 33 - How to adjust the temperature while cooking
English 33 Oper ating the o v en To start the oven remotely 1. Tap SETTINGS > iQ Control, and then tap ON. When Smart Control is on you can: • Change oven settings (mode, time, temperature) using your mobile device. Once cooking starts, you can change the cooking time and temperature remotely. • ...
Page 34 - Using the special function feature
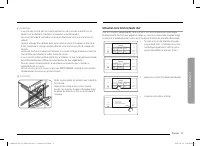
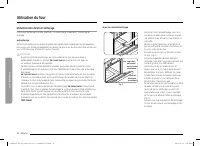
34 English Oper ating the o v en Operating the oven Before using the racks Each rack has stops that need to be placed correctly on the supports. These stops will keep the rack from coming completely out. Removing the racks 1. Pull the rack straight out until it stops. 2. Lift up the front of the rac...
Page 35 - dehydrated food; Category
English 35 Oper ating the o v en Removing the Gliding rack • With the Gliding rack in the Closed position and the oven off and cool, grasp the rack and frame and pull both forward to remove. CAUTION Do not install the Gliding rack directly above the Wire rack.You will not be able to install it prope...
Page 36 - Rack position chart for special cooking options; Using the Chef Mode feature; Swipe the screen to
36 English Oper ating the o v en Operating the oven Using the clean feature The Clean feature has four selections: Self-Clean, GreenClean™, Descale, and Draining. Self Clean This self-cleaning oven uses high temperatures (well above cooking temperatures) to burn off leftover grease and residue compl...
Page 37 - Cooking tips in the Chef Mode; The display will show the cooking tip.; Using the iQ control feature; When iQ Control on the oven is off:; How to connect the oven; Download and open the Dacor iQ Kitchen app on your smart device.
English 37 Oper ating the o v en 4:35 PM Self clean Oven cleaning Delay Start None Clean Time 3 hr 00 min START SETTINGS TIMER LIGHT OPEN/CLOSE RESERVOIR 6. If you don't want to use the Delay Start feature, go to Step 8. Otherwise, tap Delay Start , and then go to Step 7. 4:35 PM 1 6 7 8 9 0 2 3 4 5...
Page 38 - To start the oven remotely; When iQ control is on you can remotely:; When cooking is finished or cancelled, iQ Control deactivates.; Using the clean feature; Self clean; not allow children near the oven.
38 English Oper ating the o v en Operating the oven Self clean Descale 4:35 PM GreenClean™ Draining Clean SETTINGS TIMER LIGHT OPEN/CLOSE RESERVOIR 2. Tap GreenClean™. GreenClean™ Quick 20 minute steam clean 4:35 PM Clean Time 0 hr 20 min START SETTINGS TIMER LIGHT OPEN/CLOSE RESERVOIR 3. Tap START ...
Page 40 - How to run a self-cleaning cycle; Clean; Clean Time
40 English Oper ating the o v en Operating the oven WARNING Use only descaling agents that are specific to steam ovens or coffee machines. CAUTION • Running the Descaling function disables Steam Bake and Steam Roast. Do not cancel descaling while it is in process. If you stop it, you must restart th...
Page 41 - Set the time you want self-cleaning to; If you need to stop or interrupt a self; After a self-cleaning cycle; If the oven is not clean after one cycle, repeat the cycle.
English 41 Oper ating the o v en Settings In Settings, you can change the default settings to your preference or diagnose problems with the network connection. 4:35 PM Convection Bake Faster, more even baking 325 °F InstantHeat™ Off Cook Time None Delay Start None START TIP SETTINGS TIMER LIGHT OPEN...
Page 42 - is; the door so hot air and steam can escape safely.; How to run a Green cleaning cycle; GreenCleanTM
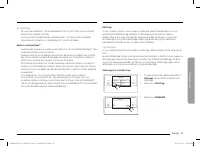
42 English Oper ating the o v en Operating the oven Easy connection Easy connection enables you to easily configure the network settings including the authentication procedure. Display 1. BrightnessYou can change the brightness of the display screen. • Tap Settings > Display > Brightness , and...
Page 43 - will be a significant amount of water; After a Green-cleaning cycle; a cloth soaked in vinegar.
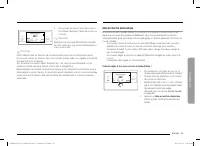
English 43 Oper ating the o v en 12 hour energy Saving If you accidently leave the oven on, this feature will automatically turn off the oven after 12 hours during baking functions or after 3 hours during a broil function. 1. Tap Settings > 12 hour energy Saving , and then tap ON in the right scr...
Page 44 - disabled until you have run a descaling cycle.; How to run a descale cycle; Swipe the screen to
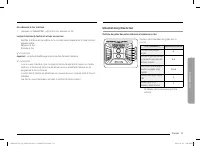
44 English Oper ating the o v en Operating the oven Settings About deviceSabbathDemo mode Help ? i 12th + DEMO OFF SETTINGS TIMER LIGHT OPEN/CLOSE RESERVOIR 4. Tap Settings > Sabbath , and then tap Sabbath to use the Sabbath feature. The oven will not beep or display any further changes. You may ...
Page 45 - drains water automatically.; When rinsing is complete, use oven; Keep children away from the oven during the descaling cycle.
English 45 C ar e and maint enanc e Removing your oven’s convection filter When the oven is cool, put your fingers around the edges of the filter and gently push up. To clean the filter Soak it in hot, soapy water. Rinse well. You may also place it in a dishwasher on the top rack. Dry the filter bef...
Page 47 - Settings
English 47 C ar e and maint enanc e A B A. Oven door hinge lock in locked position B. Oven door hinge lock in unlocked position 3. Open the oven door. 4. Locate the oven door hinge locks in both corners of the oven door, and then rotate the hinge locks toward the oven door to the unlocked position. ...
Page 49 - Volume; recipe times and temperatures.; 2 hour energy Saving
English 49 C ar e and maint enanc e 2. While holding the glass cover with one hand, insert a flat-sharp tool such as a table knife between the glass and the frame to remove the glass cover. 3. Turn the bulb cap counterclockwise to remove. NOTE If necessary, remove the metal rings and clean the bulb ...
Page 51 - Using the sabbath feature; no; How to use the Sabbath feature; Set the temperature and cook time you
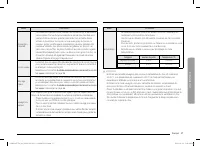
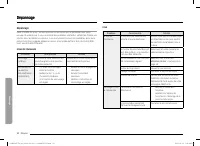
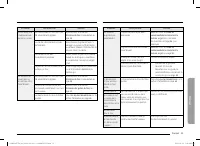
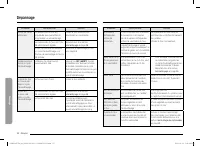
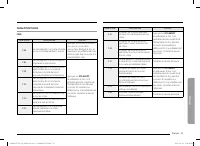
English 51 Tr ouble shoo ting Problem Possible cause Solution Food does not broil properly. The serving size may not be appropriate. Refer to the Broiling recommendation guide for serving sizes on page 28 , and then try again. The rack has not been properly positioned. See the Broiling recommendatio...
Page 53 - Care and cleaning of the oven; Cleaning painted parts and decorative trim; and dry. Do not use abrasive cleaners anywhere on the oven.; Cleaning stainless-steel surfaces; Shake a bottle of stainless-steel appliance cleaner/polish well.; Convection filter
English 53 Tr ouble shoo ting Displayed Code Possible cause Solution C-23 The temp probe sensor is short when the oven is operating. Press OFF , and then restart the oven. If the problem persists, disconnect all power to the oven for at least 30 seconds and then reconnect the power. If this does not...
Page 54 - Removing your oven’s convection filter; Oven racks; racks; Assurance
54 English W arranty and Servic e All cosmetic damage (such as scratches on stainless steel, paint/porcelain blemishes, etc.) to the product or included accessories must be reported to Dacor within 60 days of the original purchase date to qualify for warranty coverage. Consumable parts such as filte...
Page 55 - To lubricate the slides of the gliding rack; distribute the lubricant.; N OTE; Do not spray the gliding rack with
English 55 W arranty and Servic e Out of Warranty • Should you experience a service issue beyond the standard warranty period, please contact us. Dacor reviews each issue and customer concern to provide the best possible solution based on the circumstances. • THE REMEDIES PROVIDED IN THE ABOVE EXPRE...
Page 56 - Rack support; Removing the rack supports; Rotate the rack support about 45°.
56 English R egulat ory No tice Regulatory Notice FCC STATEMENT: This equipment has been tested and found to comply within the limits for a Class B digital device, pursuant to part 15 of the FCC Rules. These limits are designed to provide reasonable protection against harmful interference in a resid...
Page 57 - Replacing the rack supports
English 57 R egulat ory No tice • Consulting the dealer or an experienced radio/TV technician for help. FCC RADIATION EXPOSURE STATEMENT: This equipment complies with FCC radiation exposure limits set forth for an uncontrolled environment. This equipment should be installed and operated so there is ...
Page 58 - Oven door
58 English Open Sour ce Announc ement Open Source Announcement Memo Open Source Announcement The software included in this product contains open source software. You may obtain the complete corresponding source code for a period of three years after the last shipment of this product by contacting ou...
Page 59 - Removing the oven doors; Wire Harness
English 59 Memo DOB30x977Sx_AA_DG68-01312A-01_EN+MES+CFR.indb 59 DOB30x977Sx_AA_DG68-01312A-01_EN+MES+CFR.indb 59 2023-02-22 오후 9:34:37 2023-02-22 오후 9:34:37
Page 60 - Re-installing the oven doors; Slot in the oven chamber for the door; both sides
DG68-01312A-01 Dacor ∙ 14425 Clark Avenue, City of Industry, CA 91745 ∙ Phone: 833-353-5483(USA), 844-509-4659(Canada) ∙ www.dacor.com DOB30x977Sx_AA_DG68-01312A-01_EN+MES+CFR.indb 60 DOB30x977Sx_AA_DG68-01312A-01_EN+MES+CFR.indb 60 2023-02-22 오후 9:34:37 2023-02-22 오후 9:34:37
Page 61 - Removing the oven; To avoid damaging the wire, reinsert it; Changing the oven light; LIGHT
Manual del usuario Horno eléctrico empotrado en pared DOB30*977S* DOB30x977Sx_AA_DG68-01312A-01_EN+MES+CFR.indb 1 DOB30x977Sx_AA_DG68-01312A-01_EN+MES+CFR.indb 1 2023-02-22 오후 9:34:37 2023-02-22 오후 9:34:37
Page 62 - are unable to resolve the issue, call Dacor Customer; Control display; Blown fuse or tripped circuit breaker; im
2 Español Estimado cliente: Felicitaciones por haber adquirido este vanguardista producto Dacor. Nuestra excepcional combinación de funciones, estilo y rendimiento nos convierten en The Life of the Kitchen™ y una excelente incorporación a su hogar. Para familiarizarse con los controles, las funcione...
Page 63 - Problem
Español 3 C ontenido Contenido Instrucciones de seguridad importantes 4 Introducción a su nuevo horno 17 Descripción general 17 Elementos incluidos con su horno 17 Antes de comenzar 18 Sugerencias para ahorrar energía 18 Depósito de agua 18 Funcionamiento del horno 19 Panel de control 19 Pantalla 20...
Page 64 - Odor from insulation around oven cavity; Information codes; off moisture
4 Español Instruc cione s de seg uridad impor tantes Instrucciones de seguridad importantes CONSERVE ESTAS INSTRUCCIONES PRECAUCIÓN Prácticas peligrosas o inseguras que pueden provocar lesiones leves o daños a la propiedad . PRECAUCIÓN Para reducir el riesgo de incendio, explosión, descarga eléctric...
Page 65 - Warranty and Service; Getting Help; Review the; Warranty; What Is Covered
Español 5 Instruc cione s de seg uridad impor tantes CONSERVE ESTAS INSTRUCCIONES Mantenimiento del usuario- No repare ni reemplace ninguna pieza de este electrodoméstico salvo que esto se encuentre específicamente recomendado en este manual. Todas las demás tareas de reparación o mantenimiento debe...
Page 66 - LIMITATIONS OF COVERAGE; loss, time away from work or restaurant meals.
6 Español Instruc cione s de seg uridad impor tantes Instrucciones de seguridad importantes CONSERVE ESTAS INSTRUCCIONES • Utilice solamente agarradores aislantes secos. Colocar agarradores aislantes mojados o húmedos sobre superficies calientes podría producir quemaduras por vapor. No permita que e...
Page 67 - Out of Warranty
Español 7 Instruc cione s de seg uridad impor tantes CONSERVE ESTAS INSTRUCCIONES ADVERTENCIA • Asegúrese de que el electrodoméstico esté apagado antes de reemplazar la bombilla de luz para evitar la posibilidad de una descarga eléctrica. SEGURIDAD DE LOS NIÑOS ADVERTENCIA • Este electrodoméstico no...
Page 68 - Regulatory Notice; FCC CAUTION
8 Español Instruc cione s de seg uridad impor tantes Instrucciones de seguridad importantes CONSERVE ESTAS INSTRUCCIONES • Cuando abra la puerta, hágalo con precaución. Permita la salida del vapor o aire caliente antes de retirar o volver a colocar los alimentos en el horno. • Revestimientos protect...
Page 69 - than the radio or TV
Español 9 Instruc cione s de seg uridad impor tantes CONSERVE ESTAS INSTRUCCIONES HORNOS AUTO-LIMPIANTES No limpie la junta selladora de la puerta. La junta de la puerta es esencial para lograr que el horno quede bien sellado. Se debe tener cuidado de no frotar, dañar o mover la junta. • Nunca tenga...
Page 70 - Open Source Announcement
10 Español Instruc cione s de seg uridad impor tantes Instrucciones de seguridad importantes CONSERVE ESTAS INSTRUCCIONES ADVERTENCIAS FUNDAMENTALES PARA LA INSTALACIÓN ADVERTENCIA • La instalación de este electrodoméstico debe estar a cargo de un técnico o una compañía de servicio calificados. • Si...
Page 71 - WARRANTY INFORMATION
Español 11 Instruc cione s de seg uridad impor tantes CONSERVE ESTAS INSTRUCCIONES Si se daña el cable de alimentación, comuníquese con el centro de servicio técnico Dacor más cercano. ADVERTENCIA FUNDAMENTAL PARA EL USO PRECAUCIÓN • Si el electrodoméstico se inunda con cualquier líquido, comuníques...