Page 2 - Definitions: Safety Alert Symbols and Words
2 ENGLISH Definitions: Safety Alert Symbols and Words This instruction manual uses the following safety alert symbols and words to alert you to hazardous situations and your risk of personal injury or property damage. DANGER: Indicates an imminently hazardous situation which, if not avoided, will re...
Page 3 - SAVE THIS MANUAL
3 ENGLISH CMXEVCVVJC507P DANGER: NEVER OPERATE THIS UNIT WHEN FLAMMABLE MATERIALS OR VAPORS ARE PRESENT. OPERATING THIS UNIT WHEN FLAMMABLE MATERIALS OR VAPORS ARE PRESENT COULD CAUSE A FIRE OR EXPLOSION. WARNING: READ AND UNDERSTAND ALL INSTRUCTIONS BEFORE USING THIS VACUUM. Read and understand thi...
Page 4 - SAVE THESE
4 ENGLISH all parts of body away from openings and moving parts. w) Use extra care when cleaning on stairs. x) Use only as described in this manual. Use only manufacturer’s recommended attachments. y) This vacuum is provided with double insulation. Use only identical replacement parts. See DOUBLE IN...
Page 5 - ASSEMBLY
5 ENGLISH 2. Lift the power head 2 off the collection tank 6 . 3. Remove the contents from inside the collection tank 6 ; make sure you have all contents as listed on page 2. ASSEMBLY Caster System Assembly 4. Turn the collection tank upside down and insert the four casters 5 into the slots on the c...
Page 6 - BLOWER OPERATION
6 ENGLISH WARNING: ONCE YOU HAVE COMPLETED VACUUMING, FLIP THE ON/OFF SWITCH TO THE ‘O’ OFF POSITION AND UNPLUG THE POWER CORD FROM THE OUTLET. O = OFF I = ON BLOWER OPERATION This Wet/Dry Vacuum has blowing capabilities. To use the blower feature follow the instructions listed. WARNING: ALWAYS WEAR...
Page 7 - INSTALLING AND CLEANING THE
7 ENGLISH cloth filter is necessary to pick up dust. If the reusable cloth filter is wet, it will clog quickly and be very difficult to clean. Handle the filter carefully when removing it for cleaning and replacing it. Check the filters for tears or small holes. A small hole can let dust pass throug...
Page 8 - FOAM WET FILTER INSTALLATION
8 ENGLISH WARNING: WHEN THIS HAPPENS, TURN OFF THE MACHINE, DISCONNECT FROM POWER SUPPLY, AND DRAIN THE LIQUID INTO A SUITABLE RECEPTACLE OR DRAIN. AFTER WET VACUUMING, TURN THE MACHINE OFF AND REMOVE PLUG FROM POWER SUPPLY. EMPTY THE COLLECTION TANK, CLEAN AND DRY THE INSIDE AND OUTSIDE BEFORE STOR...
Page 9 - STORAGE; YEAR LIMITED WARRANTY
9 ENGLISH 6 , clean and dry the inside and outside before storage. Fig. 14. Fig. 14 STORAGE Before storing your vacuum, the collection tank should be emptied and cleaned. The accessories should be cleaned and stored so they can be readily available when needed. Store the wet/dry vacuum indoors. For ...
Page 10 - TROUBLESHOOTING
10 ENGLISH TROUBLESHOOTING WARNING: TO REDUCE THE RISK OF ELECTRIC SHOCK, UNPLUG BEFORE TROUBLESHOOTING. For assistance with your product, visit our website at www.craftsman.com for a list of service centers, or call CRAFTSMAN at 1-888-331-4569. PROBLEM POSSIBLE CAUSE SOLUTION The wet/dry vacuum wil...
Page 11 - EXPLODED VIEW
Page 12 - PARTS LIST
12 ENGLISH PARTS LIST Part Drawing Number Description Quantity 1 551552101 Handle Assembly 1 2 Power Head Assembly 1 3 551416106 Float 1 4 551437105 Filter Cage 1 5 Collection Tank 1 6 551001153 Vacuum Port 1 7 551012121 Caster 4 8 551296103 Floor brush/Squeegee Nozzle 1 9 551003108 Hose 1 10 551003...
Page 13 - COMPONENTES
13 SPANISH COMPONENTES Herramientas: Filtros incluidos: 1 Puerto de soplido 2 Cabezal motriz 3 Almacenamiento de accesorios 4 Seguro 5 Rueda 6 Tanque recolector 7 Puerto de aspirado 8 Interruptor de encendido/apagado 9 Empuñadura 10 Tornillos (2) 11 Manguera 12 Varas de extensión (3) 13 Boquilla de ...
Page 15 - CONSERVE ESTE
15 SPANISH CMXEVCVVJC507P PELIGRO: JAMÁS USE ESTA UNIDAD CERCA DE MATERIALES O VAPORES INFLAMABLES. USAR ESTA UNIDAD CERCA DE MATERIALES O VAPORES INFLAMABLES PODRÍA PROVOCAR UN INCENDIO O UNA EXPLOSIÓN. ADVERTENCIA: ANTES DE USAR ESTA ASPIRADORA, LEA Y COMPRENDA TODAS LAS INSTRUCCIONES. Lea y compr...
Page 16 - GUARDE ESTAS; INSTRUCCIONES SOBRE EL
16 SPANISH q) Para reducir el riesgo de lesiones provocadas por un encendido accidental, desconecte el cable antes de cambiar o limpiar el filtro. r) No deje la aspiradora desatendida cuando esté enchufada. Desenchúfela de la toma de corriente cuando no esté en uso y antes de realizar el mantenimien...
Page 18 - OPERACIÓN DE SOPLADO
18 SPANISH 10. Elija el accesorio deseado 13 y/o varas de extensión 12 e insértelo en el extremo de la manguera 11 . Fig. 4. Fig. 4 11. Enchufe el cable de alimentación en la toma de corriente. Encienda el motor moviendo el interruptor de encendido/apagado 8 a la posición de encendido “I” y comience...
Page 19 - INSTALACIÓN Y LIMPIEZA DEL
19 SPANISH 15. Antes de encender la aspiradora, sostenga firmemente el extremo suelto de la manguera. Enchufe el cable de alimentación en la toma de corriente. Encienda el motor moviendo el interruptor hacia la posición “I” ON (Encendido). ADVERTENCIA: TRAS HABER TERMINADO DE SOPLAR, MUEVA EL INTERR...
Page 20 - Aspirado en mojado
20 SPANISH ADVERTENCIA: COMPRUEBE QUE EL CABLE DE ALIMENTACIÓN ESTÉ DESCONECTADO DE LA TOMA DE CORRIENTE. 20. Desconecte la manguera 11 fde la aspiradora. Abra los seguros 4 y quite el cabezalmotriz 2 del tanque recolector. Fig 10 . Coloque el cabezal motriz boca abajo sobre una superficie limpia y ...
Page 21 - VACIADO DE LOS DESECHOS; ALMACENAMIENTO; GARANTÍA LIMITADA DE 3 AÑOS
21 SPANISH Fig. 13 24. Use una solución de agua y jabón suave para lavar el filtro de espuma para aspirar en mojado 15 y enjuáguelo con agua limpia. Fig. 13 . 25. Deje que el filtro para aspirar en mojado se seque al aire durante 24 horas antes de instalarlo en la caja del filtro. VACIADO DE LOS DES...
Page 22 - RESOLUCIÓN DE PROBLEMAS
22 SPANISH estas limitaciones podrían no aplicarse a usted. Esta garantía le da derechos legales específicos y usted podría tener otros derechos, los que varían en ciertos estados o provincias. GARANTÍA DE DEVOLUCIÓN DE DINERO DE 90 DÍAS Si no está completamente satisfecho con el desempeño de su asp...
Page 23 - DIAGRAMA DE REPUESTO
Page 24 - PARTES DE REPUESTO
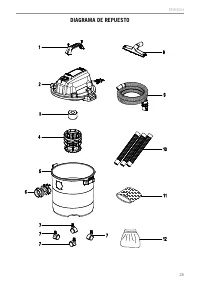
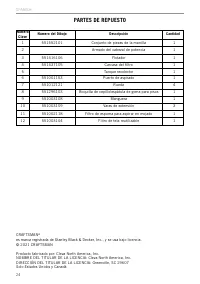
24 SPANISH PARTES DE REPUESTO Numero Clave Numero del Dibujo Descripción Cantidad 1 551552101 Conjunto de piezas de la manilla 1 2 Armado del cabezal de potencia 1 3 551416106 Flotador 1 4 551437105 Carcasa del filtro 1 5 Tanque recolector 1 6 551001153 Puerto de aspirado 1 7 551012121 Rueda 4 8 551...
Page 25 - COMPOSANTS
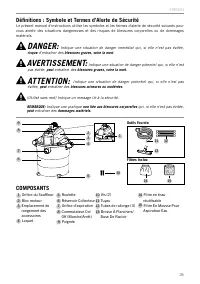
25 FRENCH COMPOSANTS Outils Fournis: Filtres Inclus: 1 Orifice du Souffleur 2 Bloc moteur 3 Emplacement de rangement des accessoires 4 Loquet 5 Roulette 6 Réservoir Collecteur 7 Orifice d’aspiration 8 Commutateur On/ Off (Marche/Arrêt) 9 Poignée 10 Vis (2) 11 Tuyau 12 Tubes de rallonge (3) 13 Brosse...
Page 27 - CONSERVEZ CE
27 FRENCH CMXEVCVVJC507P DANGER: NE JAMAIS FAIRE FONCTIONNER CET APPAREIL EN PRÉSENCE DE MATÉRIAUX OU DE VAPEURS INFLAMMABLES. L'UTILISATION DE CET APPAREIL EN PRÉSENCE DE MATÉRIAUX OU DE VAPEURS INFLAMMABLES PEUT ENTRAÎNER DES RISQUES D’INCENDIE OU D’EXPLOSION. AVERTISSEMENT: VEILLEZ À LIRE ET ASSI...
Page 28 - CONSERVEZ; INSTRUCTIONS RELATIVES À LA
28 FRENCH ramenez celui-ci à un centre de réparation. i) Ne pas débrancher l’appareil en tirant sur le cordon. Pour débrancher, saisissez la fiche, pas le cordon. g) Ne pas utiliser l'appareil si le cordon ou la fiche est endommagé(e). k) Ne tirez ou ne portez pas l'appareil en utilisant le cordon. ...
Page 30 - CONFIGURATION GÉNÉRALE; FONCTIONNEMENT DU
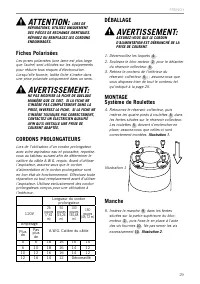
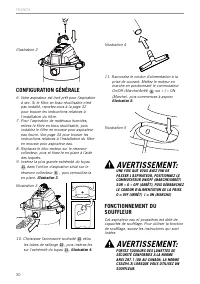
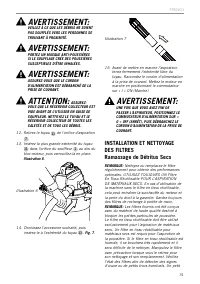
30 FRENCH Illustration 2 CONFIGURATION GÉNÉRALE 6. Votre aspirateur est livré prêt pour l'aspiration à sec. Si le filtre en tissu réutilisable n'est pas installé, reportez-vous à la page 32 pour trouver les instructions relatives à l'installation du filtre. 7. Pour l’aspiration de matériaux humides,...
Page 32 - INSTALLATION ET NETTOYAGE DU
32 FRENCH trou peut laisser passer la poussière à travers le filtre. N’utilisez pas un filtre troué ou déchiré ; remplacez-le immédiatement. INSTALLATION ET NETTOYAGE DU FILTRE EN TISSU RÉUTILISABLE: AVERTISSEMENT: ASSUREZ-VOUS QUE LE CORDON D'ALIMENTATION EST DÉBRANCHÉ DE LA PRISE DE COURANT. 16. R...
Page 33 - INSTALLATION ET NETTOYAGE
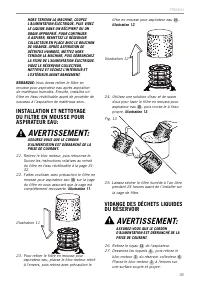
33 FRENCH Fig. 13 HORS TENSION LA MACHINE, COUPEZ L'ALIMENTATION ÉLECTRIQUE, PUIS VIDEZ LE LIQUIDE DANS UN RÉCIPIENT OU UN DRAIN APPROPRIÉ. POUR CONTINUER À ASPIRER, REMETTEZ LE RÉSERVOIR COLLECTEUR EN PLACE AVEC LE BOUCHON DE VIDANGE. APRÈS ASPIRATION DE DÉTRITUS HUMIDES, METTEZ HORS TENSION LA MAC...
Page 34 - RANGEMENT; GARANTIE LIMITÉE DE 3 ANS
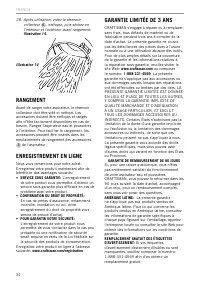
34 FRENCH 28. Après utilisation, videz le réservoir collecteur 6 , nettoyez, puis séchez-en l'intérieur et l'extérieur avant rangement. Illustration 14. Illustration 14 RANGEMENT Avant de ranger votre aspirateur, le réservoir collecteur doit être vidé et nettoyé. Les accessoires doivent être nettoyé...
Page 35 - DÉPANNAGE
35 FRENCH DÉPANNAGE AVERTISSEMENT: AFIN DE RÉDUIRE TOUS RISQUES D’ÉLECTROCUTION, DÉBRANCHEZ L’APPAREIL AVANT DE PROCÉDER AU DÉPANNAGE. Pour obtenir de l'aide concernant votre produit, veuillez visiter notre site Web à l'adresse: www. craftsman.com pour obtenir une liste des centres de services, ou a...
Page 36 - VUE ÉCLATÉE
Page 37 - LISTE DES PIÈCES
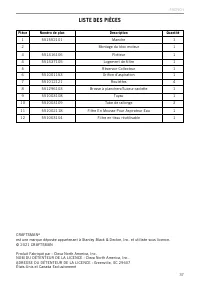
37 FRENCH LISTE DES PIÈCES Pièce Numéro de plan Description Quantité 1 551552101 Manche 1 2 Montage du bloc moteur 1 3 551416106 Flotteur 1 4 551437105 Logement de filtre 1 5 Réservoir Collecteur 1 6 551001153 Orifice d’aspiration 1 7 551012121 Roulettes 4 8 551296103 Brosse à planchers/Suceur-racle...