Page 2 - Оглавление
2 DSX TOUCH Оглавление 1. Инструкции по технике безопасности . . . . . . . . . . . . . . . . . . . . . . . . . . . . . . . . . . . . . . . . . . . . . . . . . . . . . . . . . . . . . . . . . . . . . . . . . . . 3 2. Описание прибора . . . . . . . . . . . . . . . . . . . . . . . . . . . . . . . . . ....
Page 3 - Инструкции по технике безопасности; находится в исправном рабочем состоянии.
CLAGE 3 1. Инструкции по технике безопасности Перед монтажом и первым включением прибора внимательно прочтите данную инструкцию. Храните инструкцию так, чтобы всегда иметь её под рукой. Инструкция по монтажу предназначена для специалиста, выполняющего монтаж прибора. Инструкция по эксплуатации предн...
Page 5 - Отображение температуры; Панель управления
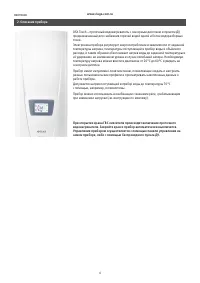
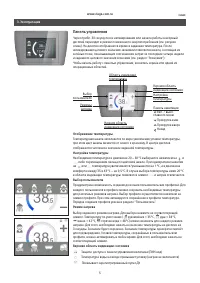
CLAGE 5 Отображение температуры Температурная шкала заполняется по мере увеличения уставки температуры, при этом цвет шкалы меняется от синего к красному. В центре дисплея отображается численное значение заданной температуры. Настройка температуры Необходимая температура в диапазоне 20 – 60 °C выбир...
Page 6 - Главное меню; Нижняя область индикации состояния
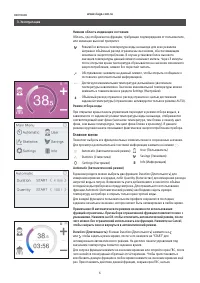
6 DSX TOUCH Главное меню Позволяет выбрать все функциональные элементы меню и сохраненные значения. Для просмотра дополнительной текстовой информации нажмите на символ . Automatic (Автоматический режим) Statistics (Статистика) Settings (Настройки) User (Пользователь) Savings (Экономия) Info (Информа...
Page 7 - Совет
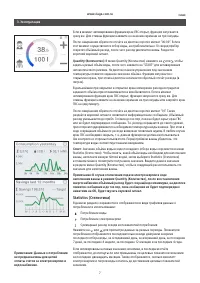
CLAGE 7 Statistics (Статистика) В данном разделе сохраняются и отображаются в виде графиков данные о потреблении и использовании: Потребление воды Потребление электроэнергии Суммарный расход исходя из показателей потребленияНажмите на или для просмотра данных за разные периоды. Показатели потреблени...
Page 8 - Настройка времени и даты.
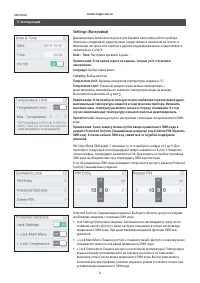
8 DSX TOUCH Settings (Настройки) Данный раздел меню используется для базовой настройки работы прибора. Переход к следующему разделу меню осуществляется нажатием на или . Изменение настроек или переход к другим подразделам меню осуществляется нажатием на или . Date / Time: Настройка времени и даты. П...
Page 10 - Savings target in standby-display; Информация о приборе
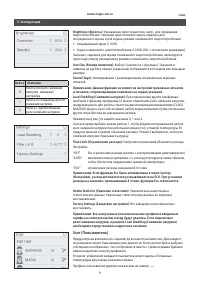
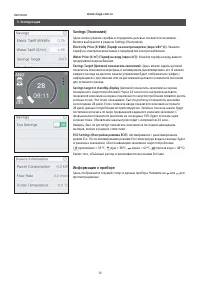
10 DSX TOUCH Savings (Экономия) Здесь можно указать тарифы и определить целевые показатели экономии. Валюта выбирается в разделе Settings (Настройки). Electricity Price (€/kWh) (Тариф на электроэнергию (евро/кВт*ч)): Укажите тариф на электроэнергию вашего предприятия электроснабжения. Water Price (€...
Page 11 - Чистка и уход; подводки и прибора не выйдет весь воздух.
CLAGE 11 • Для чистки пластиковых поверхностей и арматуры достаточно использовать влажную тряпку. Запрещается использовать абразивные и хлоросодержащие чистящие средства и растворители. • Для обеспечения беспрепятственного выхода воды следует регулярно чистить аэратор-распылитель, установленный в из...
Page 12 - Монтаж стенного кронштейна; место монтажа находится в зоне действия радиосигнала пульта ДУ.; • При использовании клейкой ленты: в связи с сильными адгезионными; Ввод в эксплуатацию; Прибор поставляется с уже зарегистрированным пультом ДУ.; Пульт ДУ FX
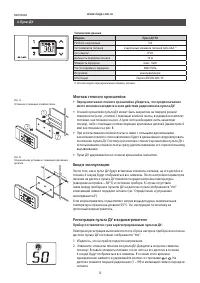
12 DSX TOUCH Монтаж стенного кронштейна • Перед монтажом стенного кронштейна убедитесь, что предполагаемое место монтажа находится в зоне действия радиосигнала пульта ДУ. • Стенной кронштейн пульта ДУ может быть закреплен на твердой ровной поверхности (напр., плитке) с помощью клейкой ленты, входяще...
Page 13 - Использование пульта ДУ
CLAGE 13 4. Пульт ДУ 3. С помощью кнопок и выберите нужный канал. Чтобы подтвердить выбранный канал, нажмите кнопку . Дисплей переходит в режим регистрации и показывает “ -- ” и мигающий символ передачи сигнала. 4. Поднесите пульт ДУ к прибору.5. Дисплей переключается на отображение значения уставки...
Page 14 - Примечания по технике безопасности; • Если связь с пультом ДУ отсутствует, прибор нагревает воду до; Замена элементов питания; • При замене элементов питания соблюдайте полярность.; Утилизация
14 DSX TOUCH 4. Пульт ДУ Примечания по технике безопасности • В случае неисправности пульта ДУ сразу же извлеките из него элементы питания. • Не подвергайте пульт ДУ воздействию влаги.• Разряженные элементы питания могут протечь и вывести из строя пульт ДУ. Поэтому рекомендуется заменить разряженные...
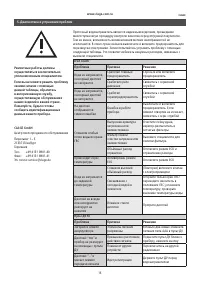
Page 15 - Отключите режим ECO; Идет регистрация; Диагностика и устранение проблем
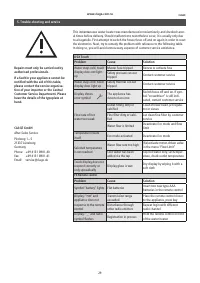
CLAGE 15 Проточный водонагреватель является надежным изделием, прошедшим многоступенчатую процедуру контроля качества перед отгрузкой покупателю. Тем не менее, возможность возникновения мелких неисправностей не исключается. В этом случае сначала выключите и включите предохранитель для перезапуска эл...
Page 16 - Contents
16 DSX TOUCH Contents 1. Safety instructions . . . . . . . . . . . . . . . . . . . . . . . . . . . . . . . . . . . . . . . . . . . . . . . . . . . . . . . . . . . . . . . . . . . . . . . . . . . . . . . . . . . . . . . . . . . . 17 2. Description of the appliance . . . . . . . . . . . . . . . . . . ...
Page 17 - Safety instructions; be used to heat incoming water from the mains supply.
CLAGE 17 1. Safety instructions Please read these instructions carefully before installing or using the appliance! Keep the instructions handy with the appli-ance for future use! Instruction manuals are intended for the specialist who is responsible for the installation of the appliance. Operation m...
Page 18 - Description of the appliance
18 DSX TOUCH 2. Description of the appliance As soon as you open the hot water tap, the instantaneous water heater switches on auto ma ti cally. When the tap is closed, the appliance automatically switches off. The water heater is operated at the device itself or with the wireless remote control. Th...
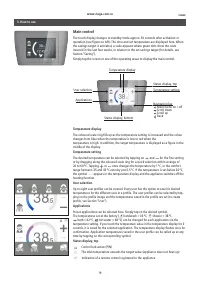
Page 19 - Temperature display; Main control
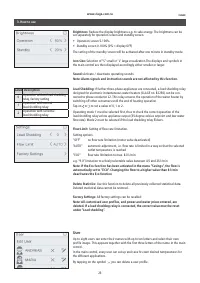
CLAGE 19 Temperature display The coloured scale ring fills up as the temperature setting is increased and the colour changes from blue when the temperature is low to red when the temperature is high. In addition, the target temperature is displayed as a figure in the middle of the display. Temperatu...
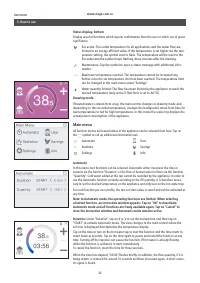
Page 20 - Main menu; Automatic
20 DSX TOUCH Main menu All function menus and saved values of the appliance can be selected from here. Tap on the symbol to call up additional information text. Automatic Statistics Settings User Savings Info Automatic In this menu, two functions can be selected. Automatic either measures the time i...
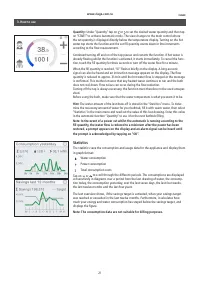
Page 21 - Statistics; Water consumption; Note: The consumption data are not suitable for billing purposes.
CLAGE 21 Statistics The statistics save the consumption and usage data for the appliance and display them in graph format: Water consumption Power consumption Total consumption costsTap on or to scroll through the different periods. The consumptions are displayed consecutively in diagrams over a per...
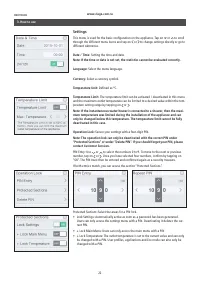
Page 22 - Settings; Setting the time and date.
22 DSX TOUCH Settings This menu is used for the basic configuration on the appliance. Tap on or to scroll through the different menu items and tap on or to change settings directly or go to different submenus. Date / Time: Setting the time and date. Note: If the time or date is not set, the statisti...
Page 23 - User; Value Description
CLAGE 23 User Up to eight users can enter their names with up to ten letters and select their own profile image. This appears together with the first three letters of the name in the main control.In the main control, every user can set up and save his own desired temperatures for the different appli...
Page 24 - Savings; Device Information
24 DSX TOUCH Savings Here, you can determine the parameters for the costs in the consumption statistics and define your own savings targets. You can select a currency symbol under “Settings”. Electricity Price (€/kWh): Indicate the electricity price from your own electricity com- pany. Water Price (...
Page 25 - abrasive or chlorine-based cleaning agents or solvents.; Cleaning and maintenance; air has been eliminated from the water heater.
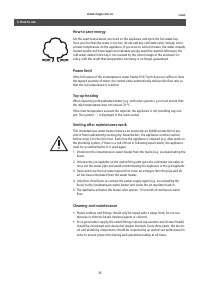
CLAGE 25 • Plastic surfaces and fittings should only be wiped with a damp cloth. Do not use abrasive or chlorine-based cleaning agents or solvents. • For a good water supply, the outlet fittings (special tap aerators and shower heads) should be unscrewed and cleaned at regular intervals. Every three...
Page 26 - Mounting the wall bracket; • The remote control is magnetically retained at the wall bracket.; Initial operation; The remote control is registered as-delivered condition.; ” as well as a flashing radio symbol.; FX Remote control
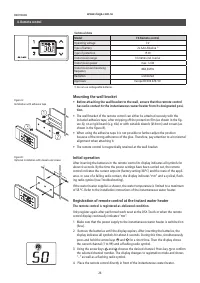
26 DSX TOUCH Mounting the wall bracket • Before attaching the wall bracket to the wall, ensure that the remote control has radio contact to the instantaneous water heater from its designated posi-tion. • The wall bracket of the remote control can either be attached securely with the included adhesiv...
Page 27 - Handling; Note: If the temperature display is set to “; Displayed information; Energy saving mode
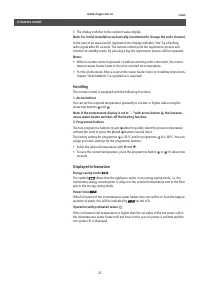
CLAGE 27 4. Remote control 5. The display switches to the setpoint value display. Note: For initial installation we basically recommend to change the radio channel. In the case of an unsuccessful registration the display indicates “ no ” by a flashing radio signal after 45 seconds. The remote contro...
Page 28 - Safety notes
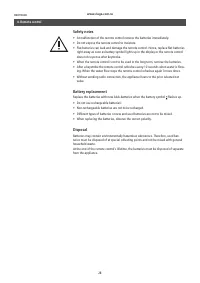
28 DSX TOUCH 4. Remote control Safety notes • At malfunction of the remote control remove the batteries immediately.• Do not expose the remote control to moisture.• Flat batteries can leak and damage the remote control. Hence, replace flat batteries right away as soon as battery symbol lights up in ...