Page 3 - English; imageRUNNER ADVANCE
English 1 0 imageRUNNER ADVANCE C5255/C5255i/C5250/C5250i/ C5240i/C5235i User’s Guide
Page 4 - Manuals for the Machine; Driver Installation Guide
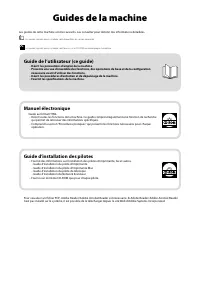
Manuals for the Machine The manuals for this machine are divided as follows. Please refer to them for detailed information. Guides with this symbol are printed manuals. Guides with this symbol are included on the accompanying CD-ROM. To view the manual in PDF format, Adobe Reader/Adobe Acrobat Reade...
Page 5 - Contents; Preface
3 Contents 1 Preface How to Use This Manual . . . . . . . . . . . . . . . . . . . . . . . . . . . . . . . . . . . . . . . . . . . . . . . . . . . . . . . . . . . . . . . . . . . . . . . . . . . . . . . 6 Symbols Used in This Manual . . . . . . . . . . . . . . . . . . . . . . . . . . . . . . . . . . ...
Page 7 - Preface
5 1 Preface Thank you for purchasing the Canon imageRUNNER ADVANCE C5255/C5255i/C5250/C5250i/C5240i/C5235i. Please read this manual thoroughly before operating the machine to familiarize yourself with its capabilities, and to make the most of its many functions. For information on the detailed setti...
Page 8 - How to Use This Manual; Symbols Used in This Manual; IMPORTANT; Illustrations Used in This Manual; Abbreviations Used in This Manual
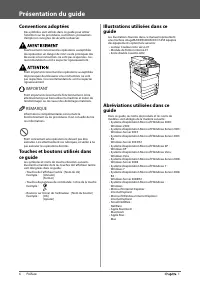
6 Preface 1 How to Use This Manual Symbols Used in This Manual The following symbols are used in this manual to explain procedures, restrictions, handling precautions, and instructions that should be observed for safety. Indicates a warning concerning operations that may lead to death or injury to p...
Page 9 - Trademarks
English 7 Preface 1 Trademarks MEAP and the MEAP logo are trademarks of Canon Inc. This product contains the Universal Font Scaling Technology or UFST® under license from Monotype Imaging, Inc.. UFST® is a trademark of Monotype Imaging, Inc. registered in the United States Patent and Trademark Offi ...
Page 10 - How to Install the e-Manual; Follow the procedure below to install the e-Manual.
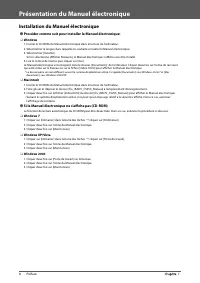
8 Preface 1 How to Use This Manual (e-Manual) How to Install the e-Manual ● Follow the procedure below to install the e-Manual. ❏ Windows 1. Insert the e-Manual CD-ROM into your computer. 2. Select the language for the e-Manual. 3. Select [Install]. If you select [Display Manuals], the e-Manual is d...
Page 11 - Top Page of the e-Manual; Performing a Search
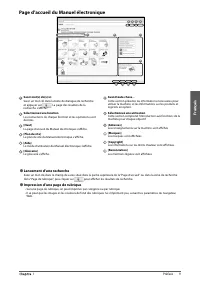
English 9 Preface 1 Top Page of the e-Manual 2 1 3 4 5 6 7 8 9 10 11 12 Enter keyword(s) here Enter a key word in the search dialog box, and press . The search results page is displayed. Select from functions The instructions of each function and operation method are described. [Top] The top page of...
Page 12 - Legal Notices; Product Name; IPv6 Ready Logo
10 Preface 1 Legal Notices Product Name Safety regulations require the product’s name to be registered. In some regions where this product is sold, the following name(s) in parenthesis may be registered instead. • imageRUNNER ADVANCE C5255/C5255i, imageRUNNER ADVANCE C5250/C5250i (F160400) • imageRU...
Page 13 - WEEE Directive; Copyright
English 11 Preface 1 WEEE Directive European Union (and EEA) only. These symbols indicate that this product is not to be disposed of with your household waste, according to the WEEE Directive (2002/96/EC), the Battery Directive (2006/66/EC) and/or your national laws implementing those Directives. If...
Page 14 - Disclaimers; NOTE
12 Preface 1 The Software Subjected to the Other Conditions Please refer to e-Manual on a CD-ROM bundled with this product, for more detail and corresponding license conditions. If you need source code of certain Software, under respective Licenses, used for this product, please send email in Englis...
Page 15 - Important Safety Instructions; Installation
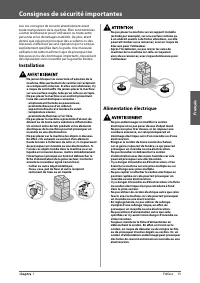
English 13 Preface 1 Important Safety Instructions Please read these “Important Safety Instructions” thoroughly before operating the machine. As these instructions are intended to prevent injury to the user or other persons or destruction of property, always pay attention to these instructions. Also...
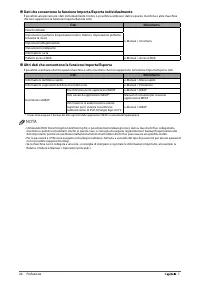
Page 16 - Handling
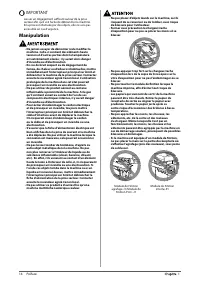
14 Preface 1 IMPORTANT Leave suffi cient space around the power plug so that it can be unplugged easily. If objects are placed around the power plug, you will be unable to unplug it in an emergency. Handling • Do not attempt to disassemble or modify the machine. There are high-temperature and high-v...
Page 17 - Maintenance and Inspections
English 15 Preface 1 • The laser beam can be harmful to human bodies. Since radiation emitted inside the product is completely confi ned within protective housings and external covers, the laser beam cannot escape from the machine during any phase of user operation. Read the following remarks and in...
Page 18 - Consumables
16 Preface 1 • The fi xing unit and its surroundings inside the machine may become hot during use. When removing jammed paper or when inspecting the inside of the machine, do not touch the fi xing unit and its surroundings, as doing so may result in burns or electrical shock. • When removing jammed ...
Page 19 - Installation Location and Handling; Installation Precautions
English 17 Preface 1 Installation Location and Handling This section describes precautions for installation location and handling. We recommend that you read this section prior to using this machine. Installation Precautions ■ Avoid Installing the Machine in the Following Locations • Avoid locations...
Page 20 - Select a Safe Power Supply; Moving the Machine
18 Preface 1 • Contact an authorized Canon dealer if communication is unavailable. Depending on your locale or your telephone connection, you may be unable to perform data communication. In this case, contact your local authorized Canon dealer. • Do not remove the machine’s leveling feet. Do not rem...
Page 21 - Handling Precautions
English 19 Preface 1 • The Duplex Color Image Reader Unit-E1, Puncher, Booklet Finisher-J1, Buff er Pass Unit-G1, and Paper Deck Unit-B2 are attached: 2,180 mm 2,062 mm 1,174 mm 118 mm 100 mm or more Handling Precautions • Do not attempt to disassemble or modify the machine. • Some parts inside the ...
Page 23 - Periodic Inspection of the Breaker; Checking the Breaker; Turn ON the main power.
English 21 Preface 1 Periodic Inspection of the Breaker This machine has a breaker that detects excess current or leakage current. Make sure to test the breaker once or twice a month using the following procedure. IMPORTANT • Make sure that the main power is turned OFF, before inspecting the breaker...
Page 24 - Check Sheet for the Periodic Inspection of the Breaker; How to Inspect the Breaker Periodically
22 Preface 1 Check Sheet for the Periodic Inspection of the Breaker Copy this page for future use, and store it in a safe place near the machine to document your periodic inspections of the breaker. ● How to Inspect the Breaker Periodically Follow the procedure described in “Periodic Inspection of t...
Page 25 - Backing Up/Exporting Data; Data You Can Backup/Restore; Data You Can Import/Export All
English 23 Preface 1 Backing Up/Exporting Data Various data such as the received data, stored data, address book, and Settings/Registration settings are stored on the hard disk of the machine. A malfunction in the hard disk may cause these data to be lost. Please regularly back up/export your import...
Page 26 - Data You Can Import/Export Individually; Other Data You Can Import/Export
24 Preface 1 ● Data You Can Import/Export Individually You can save/load data individually. In addition, you can exchange data with this machine and other machines which do not support the Import/Export All function. Data References Address Lists e-Manual > Remote UI Device Settings (Forwarding S...
Page 28 - What This Machine Can Do; Client
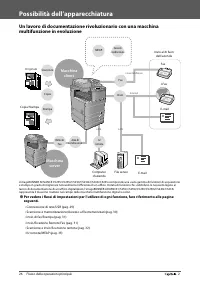
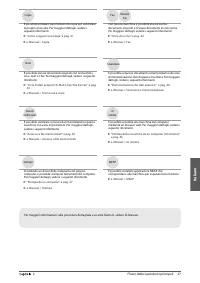
26 Flow of Basic Operations 2 What This Machine Can Do Revolutionary Documentation Work with an Evolving Multitasking Machine 3 2 4 1 3 2 4 1 Internet Original Copy/Print I-Fax E-Mail Fax Send In-Company Computer File Server E-Mail Send Outside the Company Copy MEAP Print Fax Advanced Space Scan Cli...
Page 30 - Flow of Settings for Using the Desired Functions; Logging In as an Administrator; Logging In from the Machine; Logging In from a Computer; Start the Web browser on your computer.
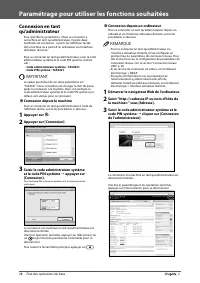
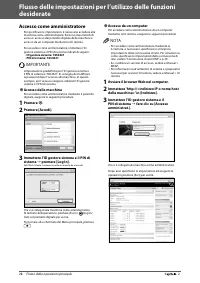
28 Flow of Basic Operations 2 Flow of Settings for Using the Desired Functions Logging In as an Administrator To specify the settings, you must log in to the machine as an administrator. There are two methods for logging in; logging in from the touch panel display of the machine and logging in from ...
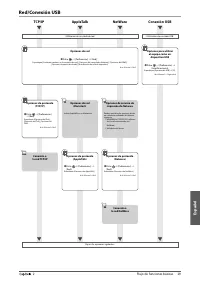
Page 31 - Network/USB Connection; AppleTalk
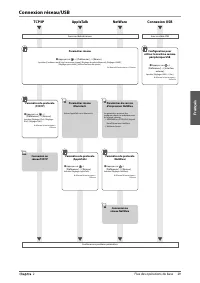
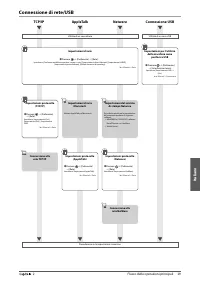
English 29 Flow of Basic Operations 2 Network/USB Connection TCP/IP AppleTalk Netware USB Connection Using Network Cable Using USB Cable Network Settings ● Press → [Preferences] → [Network]. Specify [Confi rm Network Connection Set. Changes], [Ethernet Driver Settings], [SNMP Settings], [Dedicated P...
Page 32 - Scan and Store/Access Stored Files; Advanced Space
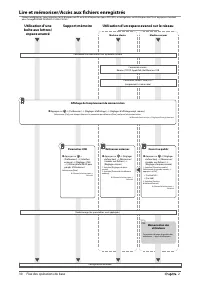
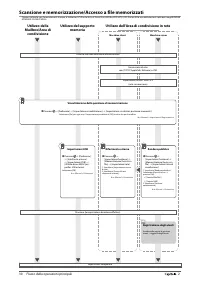
30 Flow of Basic Operations 2 Scan and Store/Access Stored Files Required Options: To perform printing, the PS Printer Kit or Direct Print Kit (for PDF/XPS) is required. The PS Printer Kit is standard-equipped for the imageRUNNER ADVANCE C5255i/C5250i. Logging In to the Machine as an Administrator U...
Page 33 - Sending Faxes/Printing; Sending/Receiving Remote Fax
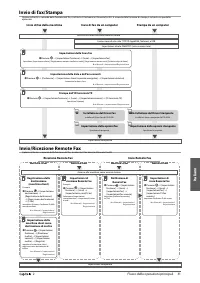
English 31 Flow of Basic Operations 2 Sending Faxes/Printing Required Options: Fax board or Remote Fax Kit is required, depending on the fax function. An optional product is required, depending on the print function. Sending Faxes from the Machine Printing from a Computer Sending Faxes from a Comput...
Page 34 - Scan and Send/Remote Scan; Sending to
32 Flow of Basic Operations 2 Scan and Send/Remote Scan Required Options: An optional product is required, depending on the function. Sending to a File Server Sending by E-Mail/I-Faxes Remote Scanning Logging In to the Machine as an Administrator Network Connection: TCP/IP Network Settings: SMB/CIFS...
Page 35 - Remote UI Settings
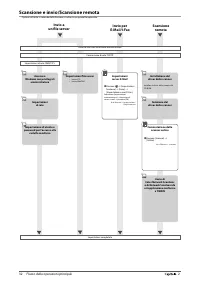
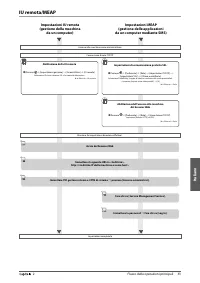
English 33 Flow of Basic Operations 2 Remote UI/MEAP Remote UI Settings (Managing the Machine from a Computer) MEAP Settings (Managing Applications from a Computer by Using SMS) Logging In to the Machine as an Administrator Network Connection: TCP/IP Enabling the Remote UI ● Press → [Management Sett...
Page 36 - Parts and Their Functions; External View
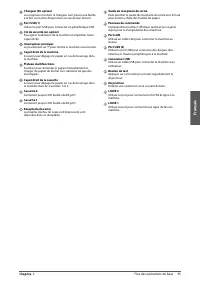
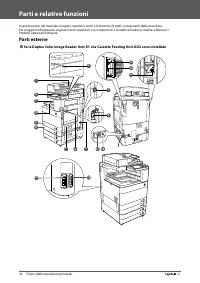
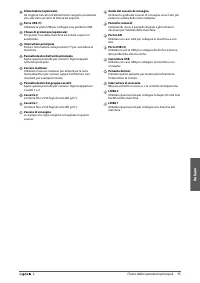
34 Flow of Basic Operations 2 Parts and Their Functions This section provides you with the names and functions of all the parts of the machine. For more information on optional products, parts and their functions, see e-Manual > Optional Products/Software. External View ● When the Duplex Color Im...
Page 38 - Internal View
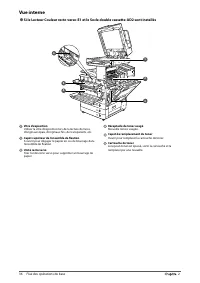
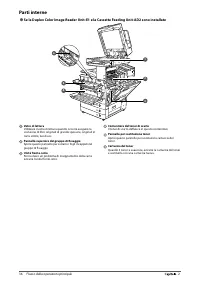
36 Flow of Basic Operations 2 Internal View ● When the Duplex Color Image Reader Unit-E1 and Cassette Feeding Unit-AD2 Are Attached 1 2 3 4 5 6 Platen Glass Use the platen glass when scanning books, thick originals, thin originals, transparencies, etc. Upper Cover of the Fixing Unit Open this cover ...
Page 39 - Control Panel Parts and Functions
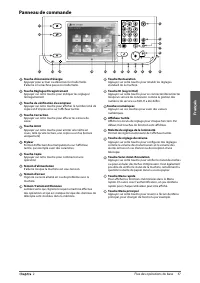
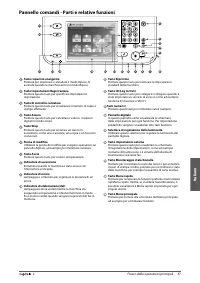
English 37 Flow of Basic Operations 2 Control Panel Parts and Functions 3 4 5 8 9 10 2 6 7 11 12 14 13 15 16 19 18 17 1 Energy Saver key Press to set or cancel the Sleep mode. Lights when the machine enters the Sleep mode. Settings/Registration key Press to specify settings/registration. Counter Che...
Page 40 - Using Control Panel; Use Quick Menu
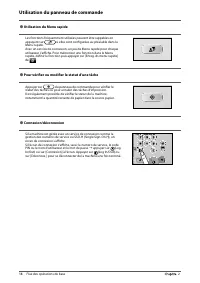
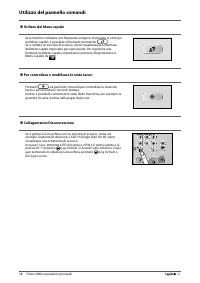
38 Flow of Basic Operations 2 Using Control Panel ● Use Quick Menu If functions that are frequently used are set in the Quick Menu beforehand, you can recall the function by pressing . If you are using a login service, Quick Menu screen set for each user appears. To register a function in the Quick ...
Page 41 - Using Touch Panel Display; If the touch panel display is turned OFF; Selecting Each Function; Use Help
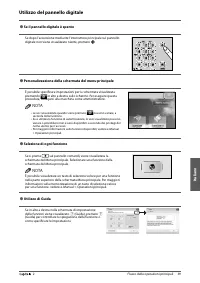
English 39 Flow of Basic Operations 2 Using Touch Panel Display ● If the touch panel display is turned OFF If nothing is displayed on the touch panel display after the main power switch is turned ON, press . ● Customizing Main Menu Screen You can specify settings for the displayed screen by pressing...
Page 42 - Main Power and Control Panel Power; How to Turn ON the Main Power
40 Flow of Basic Operations 2 Main Power and Control Panel Power This section describes how to use the main power switch and the Energy Saver key. Do not connect or disconnect the power cord with wet hands, as this may result in electrical shock. ● How to Turn ON the Main Power Make sure that the po...
Page 43 - How to Make a Copy; Placing Originals; Selecting Function; Setting the Number of Copies; Start Copying
English 41 Flow of Basic Operations 2 How to Make a Copy This section describes the fl ow of basic copy operations. 1 Placing Originals ● Place the original on the feeder or the platen glass. Placing originals in the feeder • Adjust the slide guides to fi t the size of your originals. Neatly place y...
Page 44 - Sending a Fax; Start Sending the Fax
42 Flow of Basic Operations 2 Sending a Fax This section describes the fl ow of basic fax operations. An optional product is required to use the Fax function. 1 Placing Originals ● Place the original on the feeder or the platen glass. Placing originals in the feeder • Adjust the slide guides to fi t...
Page 45 - Start Sending
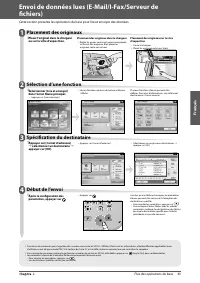
English 43 Flow of Basic Operations 2 Sending Scanned Data (E-Mail/I-Fax/File Servers) This section describes the fl ow of basic scan and send operations. 1 Placing Originals ● Place the original on the feeder or the platen glass. Placing originals in the feeder • Adjust the slide guides to fi t the...
Page 46 - Storing Scanned Data; Start Scanning
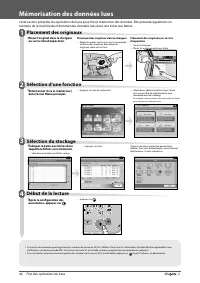
44 Flow of Basic Operations 2 Storing Scanned Data This section describes the fl ow of basic Scan and Store operations. It also describes an example of how to store scanned data in a mail box. 1 Placing Originals ● Place the original on the feeder or the platen glass. Placing originals in the feeder...
Page 47 - Accessing Stored Files; Select File; Start Printing or Sending
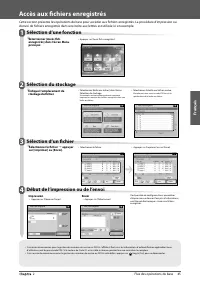
English 45 Flow of Basic Operations 2 Accessing Stored Files This section describes the fl ow of basic Access Stored Files operations. The procedure for printing or sending fi les stored in a mail box is used here as an example. 1 Selecting Function ● Select [Access Stored Files] from the Main Menu ...
Page 48 - Operating the Machine from a Computer (Remote UI); The Remote UI Is Useful in the Following Situations; Accessing the Remote UI from a Web Browser.
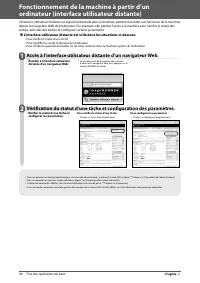
46 Flow of Basic Operations 2 Operating the Machine from a Computer (Remote UI) The Remote UI (User Interface) is preinstalled software in the machine that enables you to access the machine’s functions by using your computer’s Web browser. For example, the Remote UI enables you to access the machine...
Page 49 - Printing from a Computer; Display Print Settings Screen; Specify Print Settings; Start Printing
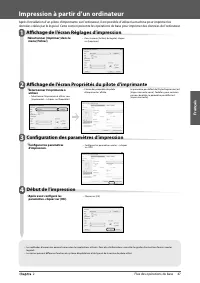
English 47 Flow of Basic Operations 2 Printing from a Computer If you install a printer driver in your computer, you can use the machine to print data created using application software. This section describes the fl ow of basic operations to print data from your computer. 1 Display Print Settings S...
Page 52 - Loading Paper; Loading Paper into a Paper Drawer; Open the paper drawer.; Prepare the paper to load.
50 Routine Maintenance 3 Loading Paper This section describes how to load paper. Loading Paper into a Paper Drawer If the selected paper runs out, or the selected paper drawer runs out of paper during printing, a screen prompting you to load paper appears on the touch panel display. Follow the proce...
Page 53 - Load the paper stack into the paper drawer.
English 51 Routine Maintenance 3 3 Load the paper stack into the paper drawer. 3 1, 2 1. Make sure that the paper size setting of the paper drawer matches the size of the paper to load in the paper drawer. 2. Load the paper stack against the right wall of the paper drawer. 3. Gently push the paper d...
Page 55 - Open the stamp cover.; Close the stamp cover.
English 53 Routine Maintenance 3 Replacing the Stamp Cartridge (Feeder) (Optional) Originals sent via the feeder can be stamped to indicate that they have been sent. Replace the stamp cartridge when the stamp mark is faint or no longer visible. When replacing the stamp cartridge, take care not to al...
Page 56 - Color Image Reader Unit-F1; Load the stamp cartridge.
54 Routine Maintenance 3 7 Close the cover of the document scanning area until it clicks. When closing the cover, be careful not to get your fi ngers caught, as this may result in personal injury. 8 Close the feeder. • When closing the feeder, be careful not to get your fi ngers caught, as this may ...
Page 57 - Replacing the Toner Cartridge/Waste Toner Container; Replacing the Toner Cartridge
English 55 Routine Maintenance 3 Replacing the Toner Cartridge/Waste Toner Container Replacing the Toner Cartridge When the message <Replace toner cartridge. (Black)> is displayed on the touch panel display, press on the bottom right and replace the toner cartridge for the displayed colour. Wh...
Page 58 - Prepare the new toner cartridge.
56 Routine Maintenance 3 1 Press [ ]. NOTE If the Black toner or all of the toners run out, this step is not necessary. 2 Open the toner replacement cover holding both sides. 3 Select the colour of the toner you want to replace from the display on the control panel press [Remove Toner Cartridges]....
Page 59 - Close the internal cover.
English 57 Routine Maintenance 3 6 Hold the new toner cartridge in your hands, as shown below, and gently tilt it up and down 10 times. 7 Twist the red protective cap of the new toner cartridge in the direction of the arrow to remove it. 8 Push the new toner cartridge in as far as possible. *1 *2 * ...
Page 60 - Open the front cover of the machine.; Insert the new waste toner container.
58 Routine Maintenance 3 IMPORTANT • Your local authorized Canon dealer will dispose of used waste toner containers. • Used toner cannot be reused. Do not mix new and used toner together. • Use only waste toner containers intended for use with this machine. • Do not replace the waste toner container...
Page 61 - Routine Cleaning; Platen glass; Manual Feeder Cleaning
English 59 Routine Maintenance 3 Routine Cleaning If the original is not copied clearly, clean the following parts of the machine. For high-quality printouts, we recommend cleaning these parts once or twice a month. ● Platen glass ● Underside of the feeder/platen cover ● Feeder’s rollers • When clea...
Page 62 - Open the inside cover.; Clean the rollers of the feeder.
60 Routine Maintenance 3 4 Open the inside cover. 5 Clean the feed scanning area with a cloth which is wrung after being dampened in water or a mild detergent, and then wipe the area with a soft dry cloth. 6 Close the inside cover. When closing the inside cover, be careful not to get your fi ngers c...
Page 63 - Clean the feeder scanning area.; Automatic Feeder Cleaning
English 61 Routine Maintenance 3 3 Clean the transparent plastic area on top of the inner cover. 2 1 1. Clean the plastic area. 2. Close the inner cover. When closing the cover, be careful not to get your fi ngers caught, as this may result in personal injury. 4 Clean the feeder scanning area. 1 2 1...
Page 64 - Cleaning the Dust Proof Glass; Open the front cover, holding both sides.; Close the front cover of the main unit.
62 Routine Maintenance 3 Cleaning the Dust Proof Glass If the dust proof glass is dirty, print defects may occur on the print output. Follow the procedure described below to clean the dust proof glass. 1 Open the front cover, holding both sides. 2 Remove the dust proof glass cleaner from the rear si...
Page 65 - Recommended Paper; Toner
English 63 Routine Maintenance 3 Consumables The following consumables are available from Canon. For more information, contact your local authorized Canon dealer. We recommend that you order paper stock and toner from your local authorized Canon dealer before your stock runs out. ● Recommended Paper...
Page 66 - Stamp Cartridge; Staple Cartridge; Genuine Consumables
64 Routine Maintenance 3 ● Stamp Cartridge The stamp cartridge is used to stamp originals. Use the tweezers provided to remove and replace the stamp cartridge. Stamp Ink Cartridge-C1 ● Staple Cartridge Finisher Staple Cartridge (Name/Shape) Booklet Finisher-J1 Canon Staple Cartridge-D2Canon Staple C...
Page 67 - When an Error Message/Error Code Is Displayed; When an Error Code Is Displayed
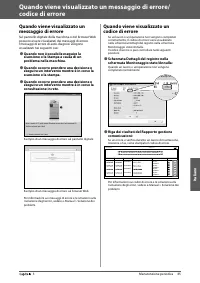
English 65 Routine Maintenance 3 When an Error Message/Error Code Is Displayed When an Error Message Is Displayed Error messages may appear on the touch panel display of the machine or the Web browser. Self-diagnostic error messages appear in the following cases: ● When scanning or printing cannot b...
Page 68 - Service Call Message; Turn OFF the main power of the main unit.
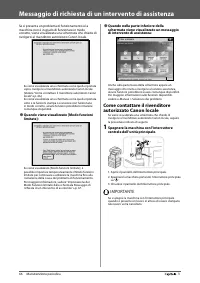
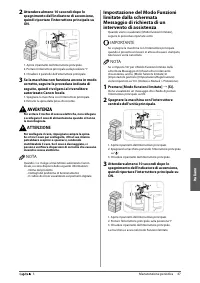
66 Routine Maintenance 3 Service Call Message If a malfunction occurs and the machine cannot operate normally, a screen prompting you to contact your local authorized Canon dealer is displayed. If a screen such as the one above is displayed, contact your local authorized Canon dealer. (See “Contacti...
Page 70 - Location of Staple/Paper Jams; Locations of Paper Jams
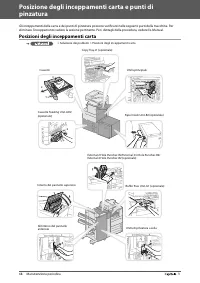
68 Routine Maintenance 3 Location of Staple/Paper Jams Paper Jams and staple jams may occur in the following parts of the machine. See the applicapble section to clear the paper jam. For details on the procedure, see the e-Manual. Locations of Paper Jams > Problem Solving > Locations of Paper ...
Page 71 - Locations of Staple Jams
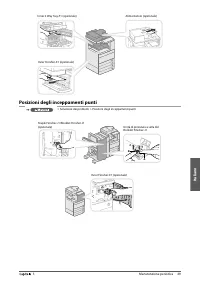
English 69 Routine Maintenance 3 Locations of Staple Jams > Problem Solving > Locations of Staple Jams A B 1 2 1 2 2 1 Inner 2 Way Tray-F1 (Optional) Inner Finisher-E1 (Optional) Feeder (Optional) Saddle Stitcher Unit of the Booklet Finisher-J1 Staple Finisher-J1/Booklet Finisher-J1 (Optional)...
Page 73 - Appendix
71 4 Appendix ■ Specifi cations . . . . . . . . . . . . . . . . . . . . . . . . . . . . . . . . . . . . . . . . . . . . . . . . . . . . . . . . . . . . . . . . . . . . . . . . . . . . . . . . . . . . 72 Main Unit . . . . . . . . . . . . . . . . . . . . . . . . . . . . . . . . . . . . . . . . . . . ....
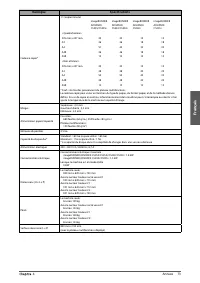
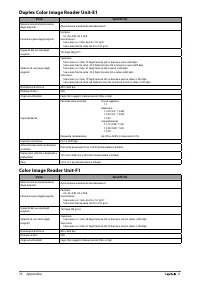
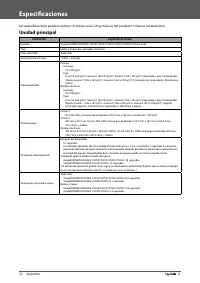
Page 74 - Specifi cations; Main Unit
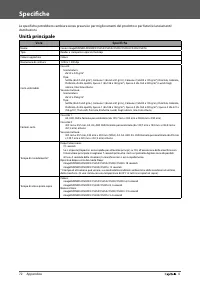
72 Appendix 4 Specifi cations Specifi cations are subject to change without notice for product improvement or future release. Main Unit Item Specifi cations Name Canon imageRUNNER ADVANCE C5255/C5255i/C5250/C5250i/C5240i/C5235i Type Reader-Printer Separated, Desktop Colour Supported Full Colour Reso...
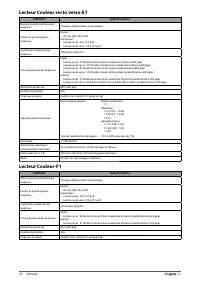
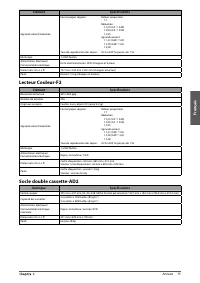
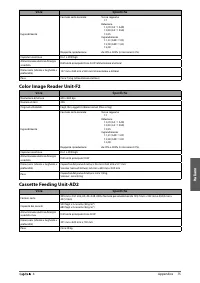
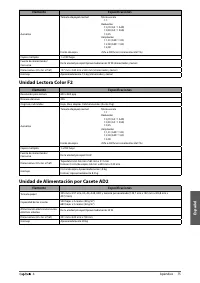
Page 77 - Color Image Reader Unit-F2
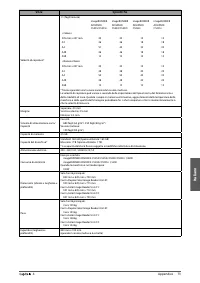
English 75 Appendix 4 Item Specifi cations Magnifi cation Regular paper size: Same Ratio 1:1 Reduction 1:0.70 (A3 → A4R) 1:0.50 (A3 → A5R) 1:0.25 Enlargement 1:1.41 (A4R → A3) 1:2.00 (A5R → A3) 1:4.00 Copy Ratio: 25% to 400% (in 1% increments) Multiple Copies 1 to 999 sheets Power Source/Consumption...
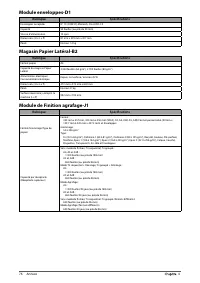
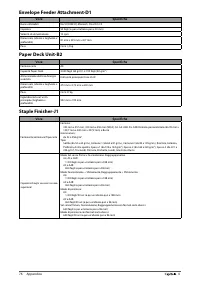
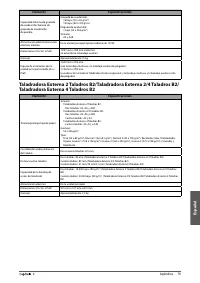
Page 78 - Envelope Feeder Attachment-D1
76 Appendix 4 Envelope Feeder Attachment-D1 Item Specifi cations Acceptable Envelopes No.10(COM10), Monarch, DL, and ISO-C5 Capacity 50 sheets (or 30 mm in height) Feeding Speed 10 cpm Dimensions (H x W x D) 81 mm x 439 mm x 307 mm Weight Approximately 1.2 kg Paper Deck Unit-B2 Item Specifi cations ...
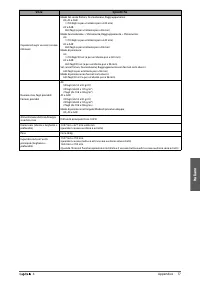
Page 80 - Booklet Finisher-J1
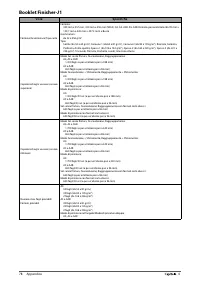
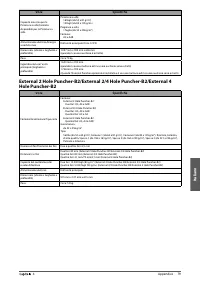
78 Appendix 4 Booklet Finisher-J1 Item Specifi cations Paper Size/Weight/Type Size: 305 mm x 457 mm, 320 mm x 450 mm (SRA3), A3, A4, A4R, A5, A5R, Custom size (99 mm x 139.7 mm to 320 mm x 457.2 mm), and Envelopes Weight: 52 to 256 g/m 2 Type: Thin (52 to 63 g/m 2 ), Plain 1 (64 to 81 g/m 2 ), Plain...
Page 83 - Inner Finisher Additional Tray-A1
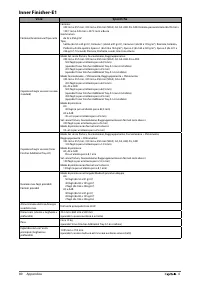
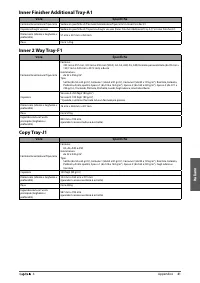
English 81 Appendix 4 Inner Finisher Additional Tray-A1 Item Specifi cations Paper Size/Weight/Type See specifi cations of “Paper Size/Weight/Type” in Inner Finisher-E1. Capacity Per Tray See the specifi cations of “Capacity Per Tray (Inner Finisher Additional Tray-A1)” in Inner Finisher-E1. Dimensi...
Page 84 - Copy Card Reader-F1; Super G3 FAX Board-AE2
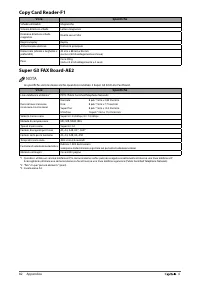
82 Appendix 4 Copy Card Reader-F1 Item Specifi cations Available Cards Magnetic Card Readout Method Magnetic readout Magnetic Card Reading Direction Face up Store/Replay Replay Power Source From the main unit Dimensions (H x W x D) 40 mm x 88 mm x 96 mm(excluding the attachment kit and cable) Weight...
Page 85 - Send Function; Scan Features
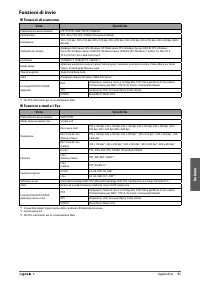
English 83 Appendix 4 Send Function ● Scan Features Item Specifi cations Communication Protocol FTP (TCP/IP), SMB (TCP/IP), WebDAV Data Format TIFF, JPEG, PDF, XPS, OOXML (PowerPoint/Word) Resolution 100 x 100 dpi, 150 x 150 dpi, 200 x 100 dpi, 200 x 200 dpi, 200 x 400 dpi, 300 x 300 dpi, 400 x 400 ...
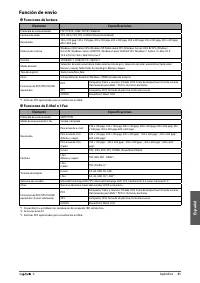
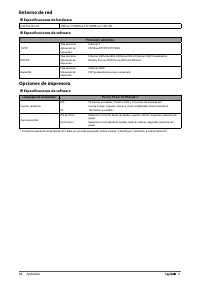
Page 86 - Network Environment; Hardware Specifi cations; Printer Settings; Software Specifi cations
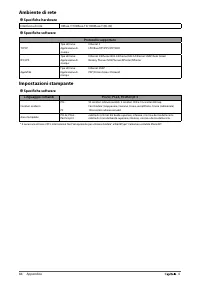
84 Appendix 4 Network Environment ● Hardware Specifi cations Network Interface 10Base-T/100Base-TX/1000Base-T (RJ-45) ● Software Specifi cations Protocol Supported TCP/IP Frame type: Ethernet II Print application: LPD/Raw/IPP/IPPS/FTP/WSD IPX/SPX Frame type: Ethernet II/Ethernet 802.2/Ethernet 802.3...
Page 87 - rançais
F rançais 1 0 imageRUNNER ADVANCE C5255/C5255i/C5250/C5250i/ C5240i/C5235i User’s Guide
Page 88 - Guides de la machine; Guide d’installation des pilotes
Guides de la machine Les guides de cette machine sont les suivants. Les consulter pour obtenir des informations détaillées. Les guides signalés par ce symbole sont disponibles en version imprimée. Les guides signalés par ce symbole sont fournis sur le CD-ROM qui accompagne la machine. Pour visualise...
Page 89 - Sommaire; Préface
3 Sommaire 1 Préface Présentation du guide . . . . . . . . . . . . . . . . . . . . . . . . . . . . . . . . . . . . . . . . . . . . . . . . . . . . . . . . . . . . . . . . . . . . . . . . . . . . . . . . . 6 Conventions adoptées . . . . . . . . . . . . . . . . . . . . . . . . . . . . . . . . . . . . ...
Page 90 - Annexe
4 Accès aux fi chiers enregistrés . . . . . . . . . . . . . . . . . . . . . . . . . . . . . . . . . . . . . . . . . . . . . . . . . . . . . . . . . . . . . . . . . . . . . . . . 45 Fonctionnement de la machine à partir d’un ordinateur (interface utilisateur distante). . . . . . . . . . . . . . . . ....
Page 91 - Préface
5 1 Préface Merci d’avoir porté votre choix sur une machine Canon imageRUNNER ADVANCE C5255/C5255i/C5250/C5250i/C5240i/C5235i. Nous vous invitons à lire attentivement ce guide avant toute manipulation, afi n de tirer le meilleur parti des avantages off erts par la machine. Pour plus d’informations s...
Page 92 - Présentation du guide; Conventions adoptées
6 Préface 1 Présentation du guide Conventions adoptées Des symboles sont utilisés dans ce guide pour attirer l’attention sur les procédures, restrictions, précautions d’emploi et consignes de sécurité à observer. Avertissement concernant les opérations susceptibles de représenter un danger de mort o...
Page 93 - Marques
F rançais 7 Préface 1 Marques MEAP et le logo MEAP sont des marques de Canon Inc. Ce produit contient la technologie Universal Font Scaling Technology ou UFST ® sous licence de Monotype Imaging, Inc. UFST ® est une marque déposée de Monotype Imaging, Inc. auprès du United States Patent and Trademark...
Page 94 - Présentation du Manuel électronique; Installation du Manuel électronique; Procéder comme suit pour installer le Manuel électronique.; Si le Manuel électronique ne s’affi
8 Préface 1 Présentation du Manuel électronique Installation du Manuel électronique ● Procéder comme suit pour installer le Manuel électronique. ❏ Windows 1. Insérer le CD-ROM du Manuel électronique dans le lecteur de l’ordinateur. 2. Sélectionner la langue dans laquelle on souhaite consulter le Man...
Page 95 - Page d’accueil du Manuel électronique; Lancement d’une recherche
F rançais 9 Préface 1 Page d’accueil du Manuel électronique 2 1 3 4 5 6 7 8 9 10 11 12 Saisir mot(s) clé(s) ici Saisir un mot clé dans la boîte de dialogue de recherche et appuyer sur . La page des résultats de la recherche s’affi che. Sélectionnez une fonction Les instructions de chaque fonction et...
Page 96 - Mentions légales; Nom du produit
10 Préface 1 Mentions légales Nom du produit Conformément aux règlements en matière de sécurité, le nom du produit doit être déposé. Dans certaines des zones de commercialisation du produit, il se peut que le nom déposé soit celui indiqué entre parenthèses ci-dessous. • imageRUNNER ADVANCE C5255/C52...
Page 97 - Directive DEEE
F rançais 11 Préface 1 Directive DEEE Union européenne (et Espace économique européen) uniquement. Ces symboles indiquent que ce produit ne doit pas être mis au rebut avec les ordures ménagères, comme le spécifi ent la Directive européenne DEEE (2002/96/EC), la Directive européenne relative à l’élim...
Page 98 - Limites de responsabilité; REMARQUE
12 Préface 1 (9) Vous ne recevez pas en licence la portion lisible par un humain (le code source) du LOGICIEL. Nonobstant les points (1) à (9) énoncés ci-dessus, si les autres conditions s’appliquent aux modules logiciels de tierces parties, ces modules logiciels sont soumis à ces autres conditions....
Page 99 - Consignes de sécurité importantes
F rançais 13 Préface 1 Consignes de sécurité importantes Lire ces consignes de sécurité attentivement avant toute manipulation de la machine. Elles sont destinées à éviter les blessures pour l’utilisateur ou toute autre personne et les dommages matériels. De plus, étant donné que cela peut provoquer...
Page 100 - Manipulation
14 Préface 1 IMPORTANT Laisser un dégagement suffi sant autour de la prise secteur afi n qu’il soit facile de débrancher la machine. Si la prise est obstruée par des objets, elle ne sera pas accessible en cas d’urgence. Manipulation • Ne jamais essayer de démonter ni de modifi er la machine. Celle-c...
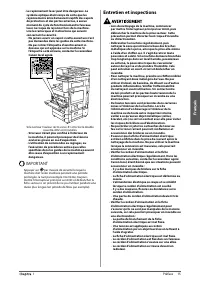
Page 101 - Entretien et inspections
F rançais 15 Préface 1 • Le rayonnement laser peut être dangereux. Le système optique étant conçu de sorte que les rayonnements émis demeurent captifs des capots de protection et des portes externes, à aucun moment du cycle de fonctionnement le faisceau laser ne risque de rayonner hors de la machine...
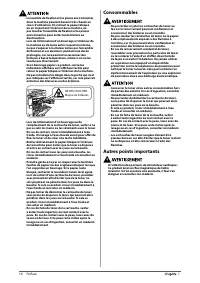
Page 102 - Consommables
16 Préface 1 • L’ensemble de fi xation et les pièces environnantes dans la machine peuvent devenir très chauds en cours d’utilisation. En retirant le papier bloqué ou en inspectant l’intérieur de la machine, ne pas toucher l’ensemble de fi xation ni les pièces environnantes pour éviter toute brûlure...
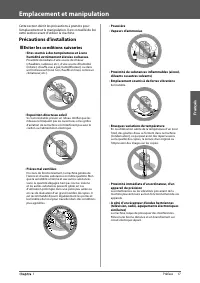
Page 103 - Emplacement et manipulation; Précautions d’installation; Eviter les conditions suivantes
F rançais 17 Préface 1 Emplacement et manipulation Cette section décrit les précautions à prendre pour l’emplacement et la manipulation. Il est conseillé de lire cette section avant d’utiliser la machine. Précautions d’installation ■ Eviter les conditions suivantes • Sites soumis à des températures ...
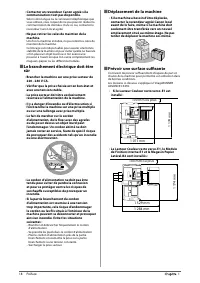
Page 104 - Déplacement de la machine; mm
18 Préface 1 • Contacter un revendeur Canon agréé si la communication n’est pas disponible. Selon votre langue ou la connexion téléphonique que vous utilisez, vous risquez de ne pas pouvoir réaliser la communication de données. Dans ce cas, contacter le revendeur Canon local agréé. • Ne pas retirer ...
Page 105 - Précautions d’emploi
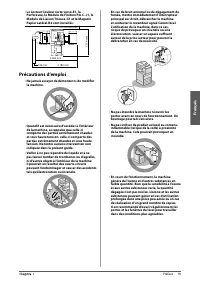
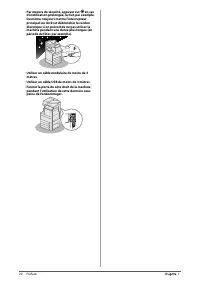
F rançais 19 Préface 1 • Le Lecteur Couleur recto verso-E1, la Perforeuse, le Module de Finition P.A.C.-J1, le Module de Liaison Trieuse-G1 et le Magasin Papier Latéral-B2 sont installés : 2 180 mm 2 062 mm 1 174 mm 118 mm 100 mm ou plus Précautions d’emploi • Ne jamais essayer de démonter ni ...
Page 107 - Inspection périodique du disjoncteur; Vérifi cation du disjoncteur; Mettre l’interrupteur principal sur Marche.
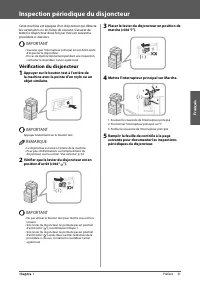
F rançais 21 Préface 1 Inspection périodique du disjoncteur Cette machine est équipée d’un disjoncteur qui détecte les surtensions ou les fuites de courant. S’assurer de tester le disjoncteur deux fois par mois en suivant la procédure ci-dessous. IMPORTANT • S’assurer que l’interrupteur principal es...
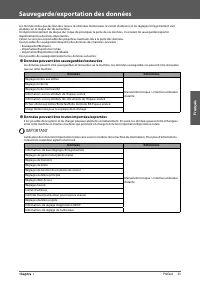
Page 109 - Sauvegarde/exportation des données; Données pouvant être sauvegardées/restaurées; Données pouvant être toutes importées/exportées
F rançais 23 Préface 1 Sauvegarde/exportation des données Les données telles que les données reçues, les données mémorisées, le carnet d’adresses et les réglages/enregistrement sont stockées sur le disque dur de la machine. Un dysfonctionnement du disque dur risque de provoquer la perte de ces donné...
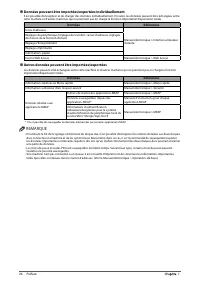
Page 110 - Données pouvant être importées/exportées individuellement; Autres données pouvant être importées/exportées
24 Préface 1 ● Données pouvant être importées/exportées individuellement Il est possible d’enregistrer et de charger des données individuellement. En outre, les données peuvent être échangées entre cette machine et d’autres machines qui ne prennent pas en charge la fonction Importation/Exportation t...
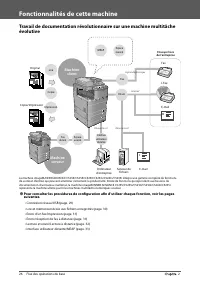
Page 112 - Fonctionnalités de cette machine; Machine
26 Flux des opérations de base 2 Fonctionnalités de cette machine Travail de documentation révolutionnaire sur une machine multitâche évolutive 3 2 4 1 3 2 4 1 Internet Original Copie/Impression I-Fax E-mail Fax Envoi Ordinateur d'entreprise Serveur de fichiers E-mail Envoyer hors de l'entreprise Co...
Page 114 - Paramétrage pour utiliser les fonctions souhaitées
28 Flux des opérations de base 2 Paramétrage pour utiliser les fonctions souhaitées Connexion en tant qu’administrateur Pour spécifi er les paramètres, il faut se connecter à la machine en tant qu’administrateur. Il existe deux méthodes de connexion : à partir de l’affi cheur tactile de la machine o...
Page 115 - Connexion réseau/USB
F rançais 29 Flux des opérations de base 2 Connexion réseau/USB TCP/IP AppleTalk NetWare Connexion USB Avec un câble du réseau Avec un câble USB Paramètres réseau ● Appuyer sur → [Préférences] → [Réseau]. Spécifi er [Confi rmer modif. régl. connexion réseau], [Réglages du pilote Ethernet], [Réglages...
Page 116 - Lire et mémoriser/Accès aux fi chiers enregistrés; Utilisation d’une
30 Flux des opérations de base 2 Lire et mémoriser/Accès aux fi chiers enregistrés Options obligatoires : pour imprimer, le Kit d’impression PS ou le Kit d’impression (pour PDF/XPS) est obligatoire. Le Kit d’impression PS est équipé en standard pour l’imageRUNNER ADVANCE C5255i/C5250i. Connexion à l...
Page 117 - Envoi d’un fax/impression; Envoi/réception de fax à distance
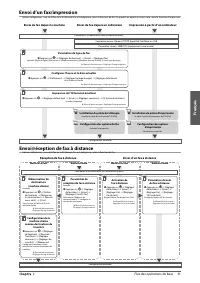
F rançais 31 Flux des opérations de base 2 Envoi d’un fax/impression Options obligatoires : une carte fax ou le Kit Remote Fax est obligatoire, selon la fonction de fax. Un produit en option est nécessaire selon la fonction d’impression. Envoi de fax depuis la machine Impression à partir d’un ordina...
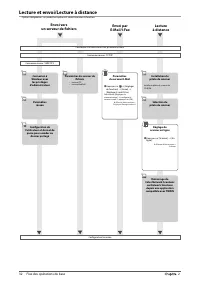
Page 118 - Lecture et envoi/Lecture à distance; Envoi vers
32 Flux des opérations de base 2 Lecture et envoi/Lecture à distance Options obligatoires : un produit en option est nécessaire selon la fonction. Envoi vers un serveur de fi chiers Envoi par E-Mail/I-Fax Lecture à distance Connexion à la machine en tant qu’administrateur Connexion réseau : TCP/IP C...
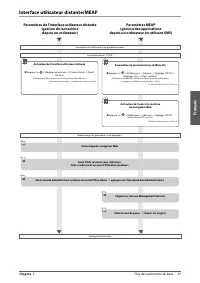
Page 119 - Interface utilisateur distante/MEAP
F rançais 33 Flux des opérations de base 2 Interface utilisateur distante/MEAP Paramètres de l’interface utilisateur distante (gestion de la machine depuis un ordinateur) Paramètres MEAP (gestion des applications depuis un ordinateur en utilisant SMS) Connexion à la machine en tant qu’administrateur...
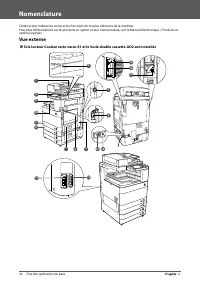
Page 120 - Nomenclature; Vue externe
34 Flux des opérations de base 2 Nomenclature Cette section indique les noms et les fonctions de tous les éléments de la machine. Pour plus d’informations sur les produits en option et leur nomenclature, voir le Manuel électronique > Produits en option/Logiciels. Vue externe ● Si le Lecteur Coule...
Page 122 - Vue interne
36 Flux des opérations de base 2 Vue interne ● Si le Lecteur Couleur recto verso-E1 et le Socle double cassette-AD2 sont installés 1 2 3 4 5 6 Vitre d’exposition Utiliser la vitre d’exposition lors de la lecture de livres, d’originaux épais, d’originaux fi ns, de transparents, etc. Capot supérieur d...
Page 123 - Panneau de commande
F rançais 37 Flux des opérations de base 2 Panneau de commande 3 4 5 8 9 10 2 6 7 11 12 14 13 15 16 19 18 17 1 Touche d’économie d’énergie Appuyer pour activer ou désactiver le mode Veille. S’allume si la machine passe en mode Veille. Touche Réglages/Enregistrement Appuyer sur cette touche pour indi...
Page 124 - Utilisation du panneau de commande; Utilisation du Menu rapide
38 Flux des opérations de base 2 Utilisation du panneau de commande ● Utilisation du Menu rapide Les fonctions fréquemment utilisées peuvent être rappelées en appuyant sur si elles sont confi gurées au préalable dans le Menu rapide. Avec un service de connexion, un jeu de Menu rapide pour chaque uti...
Page 125 - Utilisation de l’affi; Si l’affi; Sélection de chaque fonction; Utilisation de l’aide
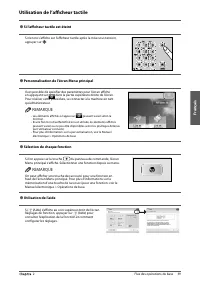
F rançais 39 Flux des opérations de base 2 Utilisation de l’affi cheur tactile ● Si l’affi cheur tactile est éteint Si rien ne s’affi che sur l’affi cheur tactile après la mise sous tension, appuyer sur . ● Personnalisation de l’écran Menu principal Il est possible de spécifi er des paramètres pour ...
Page 126 - Mise sous tension de la machine; Touche d’économie d’énergie
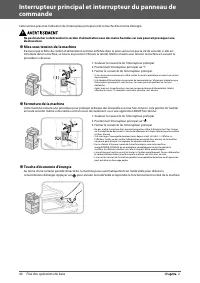
40 Flux des opérations de base 2 Interrupteur principal et interrupteur du panneau de commande Cette section présente l’utilisation de l’interrupteur principal et de la touche d’économie d’énergie. Ne pas brancher ni débrancher le cordon d’alimentation avec des mains humides car cela pourrait provoq...
Page 127 - Comment faire une copie; Placement des originaux; Sélection d’une fonction; Confi guration du nombre d’exemplaires; Début de la copie
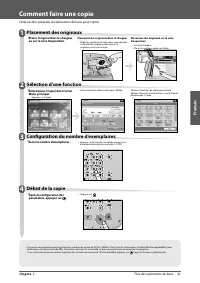
F rançais 41 Flux des opérations de base 2 Comment faire une copie Cette section présente les opérations de base pour copier. 1 Placement des originaux ● Placer l’original dans le chargeur ou sur la vitre d’exposition. Placement des originaux dans le chargeur • Régler les guides coulissants pour cor...
Page 128 - Envoi d’un fax; Début de l’envoi du fax
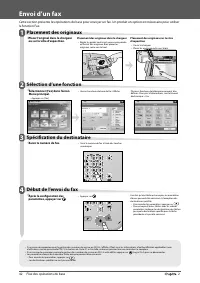
42 Flux des opérations de base 2 Envoi d’un fax Cette section présente les opérations de base pour envoyer un fax. Un produit en option est nécessaire pour utiliser la fonction Fax. 1 Placement des originaux ● Placer l’original dans le chargeur ou sur la vitre d’exposition. Placement des originaux d...
Page 129 - Début de l’envoi
F rançais 43 Flux des opérations de base 2 Envoi de données lues (E-Mail/I-Fax/Serveur de fi chiers) Cette section présente les opérations de base pour lire et envoyer des données. 1 Placement des originaux ● Placer l’original dans le chargeur ou sur la vitre d’exposition. Placement des originaux da...
Page 130 - Mémorisation des données lues; Sélection du stockage; Début de la lecture
44 Flux des opérations de base 2 Mémorisation des données lues Cette section présente les opérations de base pour lire et mémoriser des données. Elle présente également un exemple de la manière de mémoriser des données lues dans une boîte aux lettres. 1 Placement des originaux ● Placer l’original da...
Page 131 - Accès aux fi chiers enregistrés; Sélection d’un fi chier; Début de l’impression ou de l’envoi
F rançais 45 Flux des opérations de base 2 Accès aux fi chiers enregistrés Cette section présente les opérations de base pour accéder aux fi chiers enregistrés. La procédure d’impression ou d’envoi de fi chiers enregistrés dans une boîte aux lettres est utilisée ici en exemple. 1 Sélection d’une fon...
Page 132 - Accès à l’interface utilisateur distante d’un navigateur Web.
46 Flux des opérations de base 2 Fonctionnement de la machine à partir d’un ordinateur (interface utilisateur distante) L’interface utilisateur distante, un logiciel préinstallé dans la machine, permet d’accéder aux fonctions de la machine depuis le navigateur Web de l’ordinateur. Par exemple, elle ...
Page 133 - Impression à partir d’un ordinateur
F rançais 47 Flux des opérations de base 2 Impression à partir d’un ordinateur Après l’installation d’un pilote d’imprimante sur l’ordinateur, il est possible d’utiliser la machine pour imprimer les données créées par le logiciel. Cette section présente les opérations de base pour imprimer des donné...
Page 136 - Chargement du papier; Préparer le papier à charger.
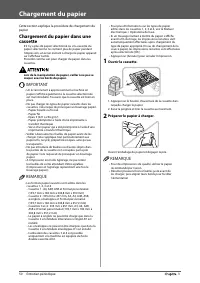
50 Entretien périodique 3 Chargement du papier Cette section explique la procédure de chargement du papier. Chargement du papier dans une cassette S’il n’y a plus de papier sélectionné ou si la cassette du papier sélectionné ne contient plus de papier pendant l’impression, un écran invitant à charge...
Page 137 - Charger la pile de papier dans la cassette.
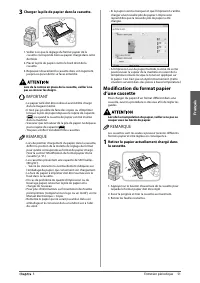
F rançais 51 Entretien périodique 3 3 Charger la pile de papier dans la cassette. 3 1, 2 1. Veiller à ce que le réglage du format papier de la cassette corresponde bien au papier chargé dans cette dernière. 2. Placer la pile de papier contre le bord droit de la cassette. 3. Repousser doucement la ca...
Page 139 - Lecteur Couleur recto verso-E1; Ouvrir le capot du cachet.; Fermer le capot du cachet.
F rançais 53 Entretien périodique 3 Remplacement de la cartouche d’agrafes (Chargeur) (en option) Il est possible de marquer les originaux transmis par l’intermédiaire du chargeur pour confi rmer leur envoi. La cartouche doit être remplacée lorsque le marquage est faible ou invisible. Lors du rempla...
Page 140 - Lecteur Couleur-F1; Charger la cartouche du cachet.
54 Entretien périodique 3 7 Fermer le capot de la zone de lecture de documents jusqu’à ce qu’il s’enclenche. Lors de la fermeture du capot, veiller à ne pas se blesser en se pinçant les doigts. 8 Fermer le chargeur. • Lors de la fermeture du chargeur, veiller à ne pas se blesser en se pinçant les do...
Page 142 - chage sur le panneau de; Préparer la nouvelle cartouche de toner.
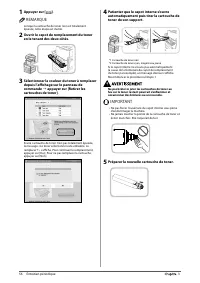
56 Entretien périodique 3 1 Appuyer sur [ ]. REMARQUE Lorsque la cartouche de toner noir est totalement épuisée, cette étape est inutile. 2 Ouvrir le capot de remplacement du toner en le tenant des deux côtés. 3 Sélectionner la couleur du toner à remplacer depuis l’affi chage sur le panneau de comma...
Page 143 - Fermer le capot interne.
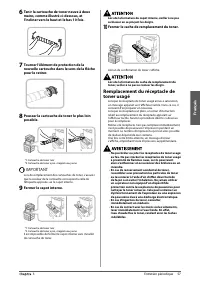
F rançais 57 Entretien périodique 3 6 Tenir la cartouche de toner neuve à deux mains, comme illustré ci-dessous, et l’incliner vers le haut et le bas 10 fois. 7 Tourner l’élément de protection de la nouvelle cartouche dans le sens de la fl èche pour le retirer. 8 Pousser la cartouche de toner le plu...
Page 144 - Ouvrir le capot avant de la machine.; Fermer le capot avant de la machine.
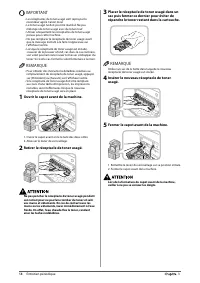
58 Entretien périodique 3 IMPORTANT • Les réceptacles de toner usagé sont repris par le revendeur agréé Canon local. • Le toner usagé ne doit pas être réutilisé. Ne pas mélanger de toner usagé avec du toner neuf. • Utiliser uniquement les réceptacles de toner usagé prévus pour cette machine. • Ne pa...
Page 145 - Entretien courant; Vitre d’exposition; Nettoyage manuel du chargeur
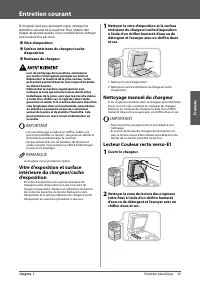
F rançais 59 Entretien périodique 3 Entretien courant Si l’original n’est pas clairement copié, nettoyer les éléments suivants de la machine. Pour obtenir des tirages de grande qualité, il est conseillé de les nettoyer une ou deux fois par mois. ● Vitre d’exposition ● Surface intérieure du chargeur/...
Page 146 - Ouvrir le capot interne.
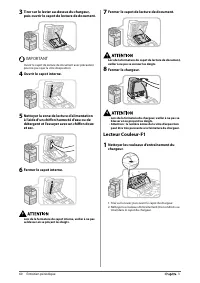
60 Entretien périodique 3 3 Tirer sur le levier au-dessus du chargeur, puis ouvrir le capot de lecture de document. IMPORTANT Ouvrir le capot de lecture de document avec précaution pour ne pas rayer la vitre d’exposition. 4 Ouvrir le capot interne. 5 Nettoyer la zone de lecture d’alimentation à l’ai...
Page 147 - Nettoyer la zone de lecture du chargeur.; Fermer le capot du chargeur.
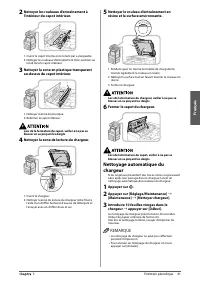
F rançais 61 Entretien périodique 3 2 Nettoyer les rouleaux d’entraînement à l’intérieur du capot intérieur. 2 1 1. Ouvrir le capot interne en le tenant par sa languette. 2. Nettoyer les rouleaux d’entraînement (trois endroits au total) dans le capot intérieur. 3 Nettoyer la zone en plastique transp...
Page 148 - Appuyer sur
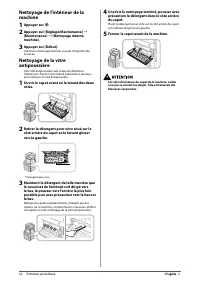
62 Entretien périodique 3 Nettoyage de l’intérieur de la machine 1 Appuyer sur . 2 Appuyer sur [Réglage/Maintenance] → [Maintenance] → [Nettoyage interne machine]. 3 Appuyer sur [Début]. Une fois le nettoyage terminé, essayer d’imprimer de nouveau. Nettoyage de la vitre antipoussière Une vitre antip...
Page 149 - Papier recommandé
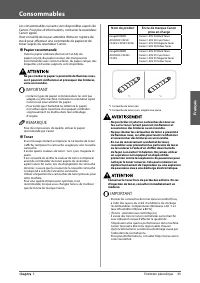
F rançais 63 Entretien périodique 3 Consommables Les consommables suivants sont disponibles auprès de Canon. Pour plus d’informations, contacter le revendeur Canon agréé. Il est conseillé de ne pas attendre d’être en rupture de stock pour eff ectuer une commande de papier et de toner auprès du reven...
Page 150 - Cartouche du cachet; Cartouche d’agrafes; Consommables Canon
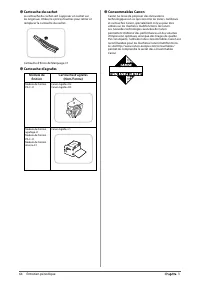
64 Entretien périodique 3 ● Cartouche du cachet La cartouche du cachet sert à apposer un cachet sur les originaux. Utiliser les pinces fournies pour retirer et remplacer la cartouche du cachet. Cartouche d’Encre de Marquage-C1 ● Cartouche d’agrafes Module de fi nition Cartouche d’agrafes (Nom/Forme)...
Page 151 - che; Lorsqu’un code d’erreur s’affi
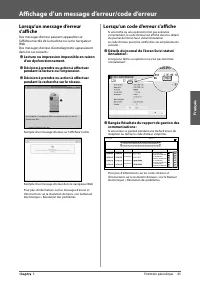
F rançais 65 Entretien périodique 3 Affi chage d’un message d’erreur/code d’erreur Lorsqu’un message d’erreur s’affi che Des messages d’erreur peuvent apparaître sur l’affi cheur tactile de la machine ou sur le navigateur Web. Des messages d’erreur d’autodiagnostic apparaissent dans les cas suivants...
Page 152 - Message d’incident de fonctionnement; Si un message d’appel de service s’affi
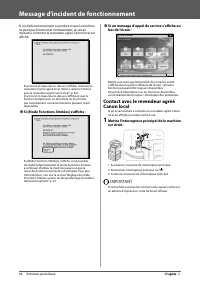
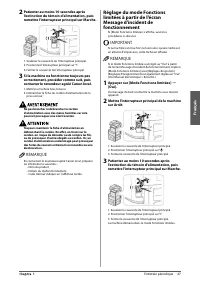
66 Entretien périodique 3 Message d’incident de fonctionnement Si un dysfonctionnement se produit et que la machine ne peut pas fonctionner normalement, un écran invitant à contacter le revendeur agréé Canon local est affi ché. Si un écran tel que celui ci-dessus s’affi che, contacter le revendeur C...
Page 154 - Emplacements des bourrages papier/d’agrafes; Emplacements des bourrages papier
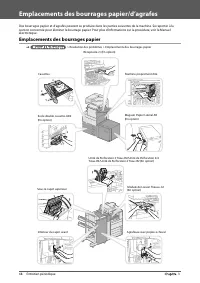
68 Entretien périodique 3 Emplacements des bourrages papier/d’agrafes Des bourrages papier et d’agrafes peuvent se produire dans les parties suivantes de la machine. Se reporter à la section concernée pour éliminer le bourrage papier. Pour plus d’informations sur la procédure, voir le Manuel électro...
Page 155 - Emplacements des bourrages d’agrafes
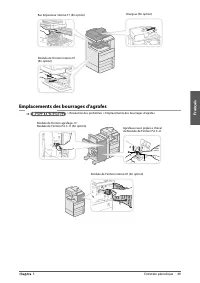
F rançais 69 Entretien périodique 3 Emplacements des bourrages d’agrafes > Résolution des problèmes > Emplacements des bourrages d’agrafes A B 1 2 1 2 2 1 Bac Séparateur interne-F1 (En option) Module de Finition interne-E1 (En option) Chargeur (En option) Agrafeuse avec piqûre à cheval du Modu...
Page 157 - Annexe
71 4 Annexe ■ Spécifi cations . . . . . . . . . . . . . . . . . . . . . . . . . . . . . . . . . . . . . . . . . . . . . . . . . . . . . . . . . . . . . . . . . . . . . . . . . . . . . . . . . . . . 72 Machine proprement dite . . . . . . . . . . . . . . . . . . . . . . . . . . . . . . . . . . . . . ....
Page 158 - Spécifi cations; Machine proprement dite
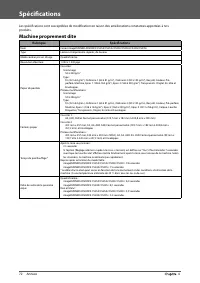
72 Annexe 4 Spécifi cations Les spécifi cations sont susceptibles de modifi cation en raison des améliorations constantes apportées à nos produits. Machine proprement dite Rubrique Spécifi cations Nom Canon imageRUNNER ADVANCE C5255/C5255i/C5250/C5250i/C5240i/C5235i Type Lecteur et imprimante séparé...
Page 161 - Lecteur Couleur-F2
F rançais 75 Annexe 4 Elément Spécifi cations Agrandissement/réduction Format papier régulier : Mêmes proportions 1:1 Réduction 1:0,70 (A3 → A4R) 1:0,50 (A3 → A5R) 1:0,25 Agrandissement 1:1,41 (A4R → A3) 1:2,00 (A5R → A3) 1:4,00 Taux de reproduction des copies : 25 % à 400 % (par pas de 1 %) Multico...
Page 162 - Module enveloppes-D1
76 Annexe 4 Module enveloppes-D1 Rubrique Spécifi cations Enveloppes acceptées N° 10 (COM10), Monarch, DL et ISO-C5 Capacité 50 feuilles (ou pile de 30 mm) Vitesse d’alimentation 10 cpm Dimensions (H x L x P) 81 mm x 439 mm x 307 mm Poids Environ 1,2 kg Magasin Papier Latéral-B2 Rubrique Spécifi cat...
Page 166 - Module de Finition interne-E1
80 Annexe 4 Module de Finition interne-E1 Rubrique Spécifi cations Format/Grammage/Type de papier Format : 305 mm x 457 mm, 320 mm x 450 mm (SRA3), A3, A4, A4R, A5, A5R, Format personnalisé (99 mm x 139,7 mm à 320 mm x 457,2 mm) et Enveloppes Grammage : 52 à 256 g/m 2 Type : Fin (52 à 63 g/m 2 ), Or...
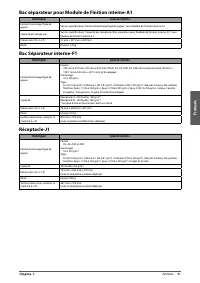
Page 167 - Bac séparateur pour Module de Finition interne-A1
F rançais 81 Annexe 4 Bac séparateur pour Module de Finition interne-A1 Rubrique Spécifi cations Format/Grammage/Type de papier Voir les spécifi cations “Format/Grammage/Type de papier” sous Module de Finition interne-E1. Capacité par réceptacle Voir les spécifi cations “Capacité par réceptacle (Bac...
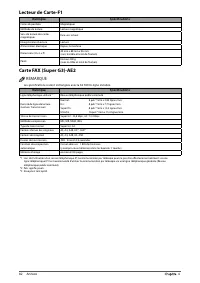
Page 168 - Lecteur de Carte-F1
82 Annexe 4 Lecteur de Carte-F1 Rubrique Spécifi cations Cartes disponibles Magnétiques Méthode de lecture Lecture magnétique Sens de lecture des cartes magnétiques face vers le haut Enregistrement/Lecture Lecture Alimentation électrique Depuis la machine Dimensions (H x L x P) 40 mm x 88 mm x 96 mm...
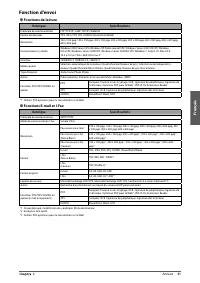
Page 169 - Fonction d’envoi; Fonctions de lecture
F rançais 83 Annexe 4 Fonction d’envoi ● Fonctions de lecture Rubrique Spécifi cations Protocole de communication FTP (TCP/IP), SMB (TCP/IP), WebDAV Format de données TIFF, JPEG, PDF, XPS, OOXML (PowerPoint/Word) Résolution 100 x 100 ppp, 150 x 150 ppp, 200 x 100 ppp, 200 x 200 ppp, 200 x 400 ppp, 3...
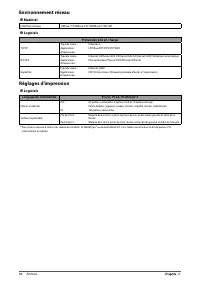
Page 170 - Environnement réseau; Matériel; Réglages d’impression; Logiciels
84 Annexe 4 Environnement réseau ● Matériel Interface réseau 10Base-T/100Base-TX/1000Base-T (RJ-45) ● Logiciels Protocoles pris en charge TCP/IP Type de trame : Ethernet II Applications d’impression : LPD/Raw/IPP/IPPS/FTP/WSD IPX/SPX Type de trame : Ethernet II/Ethernet 802.2/Ethernet 802.3/Ethernet...
Page 171 - Deutsch
Deutsch 1 0 imageRUNNER ADVANCE C5255/C5255i/C5250/C5250i/ C5240i/C5235i User’s Guide
Page 172 - Handbücher für das System; Treiber-Installationshandbuch; Anwenderhandbuch (vorliegendes Handbuch)
Handbücher für das System Zu diesem System gibt es folgende Handbücher. Bitte schlagen Sie zu den jeweiligen Themen dort nach. Handbücher mit diesem Symbol liegen als gedruckte Bücher vor. Handbücher mit diesem Symbol fi nden Sie auf der mitgelieferten CD-ROM. Zum Anzeigen dieses Handbuchs im PDF-Fo...
Page 173 - Inhalt; Vorwort
3 Inhalt 1 Vorwort Aufbau der Anleitungen . . . . . . . . . . . . . . . . . . . . . . . . . . . . . . . . . . . . . . . . . . . . . . . . . . . . . . . . . . . . . . . . . . . . . . . . . . . . . . . 6 Markierungen und Symbole in dieser Anleitung . . . . . . . . . . . . . . . . . . . . . . . . . . ....
Page 175 - Vorwort
5 1 Vorwort Wir freuen uns, dass Sie sich für den imageRUNNER ADVANCE C5255/C5255i/C5250/C5250i/C5240i/C5235i entschieden haben. Lesen Sie diese Anleitung sorgfältig durch, bevor Sie mit dem System arbeiten. So können Sie sich mit dessen Möglichkeiten vertraut zu machen und seine vielfältigen Funkti...
Page 176 - Aufbau der Anleitungen; WARNUNG; WICHTIG
6 Vorwort 1 Aufbau der Anleitungen Markierungen und Symbole in dieser Anleitung Folgende Symbole werden in den Handbüchern als Markierung für Einschränkungen und Vorsichtsmaßnahmen sowie Sicherheitshinweise verwendet. Bitte beachten Sie solche Hinweise aus Gründen der Sicherheit. WARNUNG Wenn Sie ei...
Page 177 - Warenzeichen
Deutsch 7 Vorwort 1 Warenzeichen MEAP und das MEAP-Logo sind Warenzeichen von Canon Inc. Dieses Produkt enthält Universal Font Scaling Technology (UFST®) unter Lizenz von Monotype Imaging, Inc. UFST® ist ein im United States Patent and Trademark Offi ce eingetragenes Warenzeichen von Monotype Imagin...
Page 178 - Anweisung zum Installieren der e-Anleitung; Gehen Sie zum Installieren der e-Anleitung folgendermaßen vor.
8 Vorwort 1 Aufbau der Anleitungen (e-Anleitung) Anweisung zum Installieren der e-Anleitung ● Gehen Sie zum Installieren der e-Anleitung folgendermaßen vor. ❏ Windows 1. Legen Sie die CD-ROM mit der e-Anleitung in den Computer ein. 2. Wählen Sie die Sprache für die e-Anleitung aus. 3. Wählen Sie [In...
Page 179 - Die oberste Seite der e-Anleitung; Eine Suche ausführen
Deutsch 9 Vorwort 1 Die oberste Seite der e-Anleitung 2 1 3 4 5 6 7 8 9 10 11 12 Schlüsselwörter hier eingeben Geben Sie ein Suchwort in den Suchdialog ein und klicken Sie auf . Die Seite mit den Suchergebnissen erscheint. Funktion wählen Die Anweisungen für die jeweilige Funktion und Vorgangsmethod...
Page 180 - Rechtliche Hinweise; Name des Systems
10 Vorwort 1 Rechtliche Hinweise Name des Systems Für die Sicherheitsregeln muss der Produktname registriert sein. In einigen Regionen, in denen dieses Produkt verkauft wird, können statt des hier verwendeten Namen der (die) folgende(n) Name(n) in Klammern gebräuchlich sein. • imageRUNNER ADVANCE C5...
Page 181 - WEEE Direktive
Deutsch 11 Vorwort 1 WEEE Direktive Nur Europäische Union (und EWR) Diese Symbole weisen darauf hin, dass dieses Produkt gemäß WEEE-Richtlinie 2002/96/EG (Richtlinie über Elektro- und Elektronik-Altgeräte), Batterien-Richtlinie (2006/66/EG) und/oder nationalen Gesetzen zur Umsetzung dieser Richtlini...
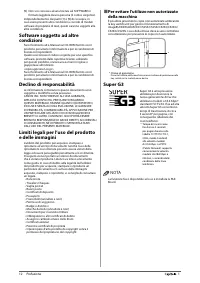
Page 182 - Hinweise zum Haftungsausschluss; Super G3; HINWEIS
12 Vorwort 1 (8) Die SOFTWARE darf nicht aus dem PRODUKT entfernt werden, und es dürfen keine separaten Kopien der SOFTWARE angefertigt werden. (9) Der menschenlesbare Anteil (Quellcode) der SOFTWARE ist nicht Bestandteil Ihrer Lizenz. Ungeachtet der vorangehenden Bestimmungen (1) bis (9) unterliege...
Page 183 - Hinweise zum sicheren Betrieb; Stromversorgung
Deutsch 13 Vorwort 1 Hinweise zum sicheren Betrieb Bitte lesen Sie diese “Hinweise zum sicheren Betrieb” gründlich, bevor Sie mit dem System arbeiten. Beachten Sie diese Informationen unbedingt immer, um Verletzungen von Personen, Sachschäden und Beschädigungen des Produkts zu verhindern. Führen Sie...
Page 184 - Umgang
14 Vorwort 1 WICHTIG Lassen Sie bitte unbedingt genug Platz an der Netzsteckdose, so dass Sie den Netzstecker jederzeit leicht herausziehen können. Wenn Sie die Netzsteckdose blockieren, können Sie den Netzstecker in einem Notfall nicht schnell genug erreichen. Umgang WARNUNG • Bitte versuchen Sie n...
Page 185 - Wartung und Inspektion
Deutsch 15 Vorwort 1 • Der Laserstrahl ist schädlich für den menschlichen Körper. Da die Strahlung im System vollständig durch Schutzgehäuse und Abdeckungen abgeschirmt ist, kann er während der normalen Bedienung durch den Anwender in keiner Phase nach außen gelangen. Lesen Sie zu Ihrer Sicherheit f...
Page 186 - Verbrauchsmaterialien; Andere Warnhinweise
16 Vorwort 1 • Die Fixiereinheit und ihre Umgebung werden sehr heiß, während das System in Gebrauch ist. Wenn Sie Papierstaus entfernen oder andere Arbeiten im Systeminneren ausführen, berühren Sie die Fixiereinheit und ihre Umgebung nicht, Sie können sonst Verbrennungen und elektrischen Schlag veru...
Page 187 - Informationen zur Aufstellung und Handhabung; Installationsbedingungen
Deutsch 17 Vorwort 1 Informationen zur Aufstellung und Handhabung In diesem Abschnitt fi nden Sie Informationen zu Vorsichtsmaßnahmen beim Installieren und in der Handhabung des Systems. Sie sollten diesen Abschnitt lesen, bevor Sie mit dem System arbeiten. Installationsbedingungen ■ Vermeiden Sie d...
Page 188 - Transport des Systems
18 Vorwort 1 • Wenden Sie sich an einen autorisierten Canon Vertriebspartner, wenn keine Datenkommunikation verfügbar ist. Abhängig von der eingerichteten Umgebung und Ihrer Telefonverbindung kann möglicherweise keine Datenkommunikation durchgeführt werden. In diesem Fall benachrichtigen Sie bitte I...
Page 189 - Handhabung
Deutsch 19 Vorwort 1 • Die Duplex Scanner + Originaleinzug D-ADF E1, Locher, Broschüren Finisher J1, Buff er Pass Unit G1 und Papiermagazin B2 sind angeschlossen: 2 . 180 mm 2 . 062 mm 1 . 174 mm 118 mm 100 mm oder mehr Handhabung • Bitte versuchen Sie nicht, das System auseinander zu bauen oder zu ...
Page 191 - Die regelmäßige Überprüfung des Schutzschalters; Prüfen des Schutzschalters; Schalten Sie den Hauptschalter EIN.
Deutsch 21 Vorwort 1 Die regelmäßige Überprüfung des Schutzschalters Dieses System ist als Maßnahme gegen Überspannungen und Spannungsverlusten mit einem Schutzschalter ausgestattet. Prüfen Sie den Schutzschalter unbedingt ein- oder zweimal im Monat und gehen Sie dabei folgendermaßen vor. WICHTIG • ...
Page 193 - Sichern/Exportieren von Daten; Daten, die Sie sichern/wiederherstellen können; Daten, die Sie alle importieren/exportieren können
Deutsch 23 Vorwort 1 Sichern/Exportieren von Daten Daten wie empfangene Daten, gespeicherte Daten, das Adressbuch und die unter Einstellungen/Speicherung erfolgten Einstellungen werden auf der Festplatte des Systems gespeichert. Ein Festplattenschaden kann zum Verlust dieser Daten führen. Sie sollte...
Page 194 - Daten, die Sie einzeln importieren/exportieren können; Andere Daten, die Sie importieren/exportieren können
24 Vorwort 1 ● Daten, die Sie einzeln importieren/exportieren können Sie können Daten einzeln speichern/laden. Außerdem können Sie Daten mit diesem System und anderen Systemen austauschen, die die Funktion Alles importieren/exportieren nicht unterstützen. Daten Verweise Adresslisten e-Anleitung >...
Page 196 - Möglichkeiten dieses Systems; System
26 Arbeitsablauf für einfache Vorgänge 2 Möglichkeiten dieses Systems Revolutionäre Dokumentationsarbeit mit einem ständig weiterentwickelten Multitaskingsystem 3 2 4 1 3 2 4 1 Internet Original Kopie/Druck I-Fax E-Mail Fax Senden Computer im Unternehmen Dateiserver E-Mail Versand vom Unternehmen na...
Page 198 - Einloggen als Administrator; Einloggen vom System; Berühren Sie die Taste
28 Arbeitsablauf für einfache Vorgänge 2 Programmieren der Einstellungen für die gewünschten Funktionen Einloggen als Administrator Um die Einstellungen festzulegen, müssen Sie sich beim System als Administrator anmelden. Es gibt zwei Methoden, um sich anzumelden; Einloggen über das Sensordisplay de...
Page 200 - Scannen und Speichern/Zugang zu gespeicherten Dateien
30 Arbeitsablauf für einfache Vorgänge 2 Scannen und Speichern/Zugang zu gespeicherten Dateien Erforderliche Optionen: Zum Ausführen des Druckens ist PS Printer Kit oder Direct Print Kit (für PDF/XPS) erforderlich. Das PS Printer Kit ist standardmäßig beim imageRUNNER ADVANCE C5255i/C5250i vorhanden...
Page 201 - Senden von Faxen/Drucken; Senden/Empfangen von Remote Fax
Deutsch 31 Arbeitsablauf für einfache Vorgänge 2 Senden von Faxen/Drucken Erforderliche Optionen: Faxkarte oder Remote Fax Kit ist erforderlich, je nach der Faxfunktion. Ein optionales Produkt ist erforderlich, je nach der Druckfunktion. Senden von Faxen vom System Drucken von einem Computer Senden ...
Page 202 - Scannen und Senden/Remote Scan; Senden zu
32 Arbeitsablauf für einfache Vorgänge 2 Scannen und Senden/Remote Scan Erforderliche Optionen: Je nach der Funktion ist ein optionales Produkt erforderlich. Senden zu einem Dateiserver Senden mit E-Mail/I-Faxen Remote Scannen Einloggen im System als Administrator Netzwerkverbindung: TCP/IP Einstell...
Page 203 - Remote UI Einstellungen
Deutsch 33 Arbeitsablauf für einfache Vorgänge 2 Remote UI/MEAP Remote UI Einstellungen (Verwalten des Systems von einem Computer) MEAP-Einstellungen (Verwalten von Anwendungen von einem Computer mit SMS) Einloggen im System als Administrator Netzwerkverbindung: TCP/IP Aktivieren von Remote UI ● Ber...
Page 204 - Aufbau und Funktionen; Außenansicht
34 Arbeitsablauf für einfache Vorgänge 2 Aufbau und Funktionen Hier fi nden Sie Informationen zu den Bezeichnungen und Funktionen aller Teile des Geräts. Nähere Informationen zu Zusatzprodukten, Teilen, ihrem Aufbau und ihren Funktionen fi nden Sie in der e-Anleitung > Zusatzprodukte/Software. Au...
Page 206 - Innenansicht
36 Arbeitsablauf für einfache Vorgänge 2 Innenansicht ● Wenn der Duplex Scanner + Originaleinzug D-ADF E1 und Kassetteneinheit AD2 angeschlossen sind. 1 2 3 4 5 6 Vorlagenglas Hier legen Sie Bücher, dicke und dünne Originale, Folien etc. zum Scannen auf. Obere Abdeckung der Fixiereinheit Öff nen Sie...
Page 207 - Bedienfeld: Aufbau und Funktionen
Deutsch 37 Arbeitsablauf für einfache Vorgänge 2 Bedienfeld: Aufbau und Funktionen 3 4 5 8 9 10 2 6 7 11 12 14 13 15 16 19 18 17 1 Energiespartaste Über diesen Schalter wird der Schlafmodus aktiviert oder deaktiviert. Leuchtet, wenn das System in den Schlafmodus wechselt. Taste Einstellungen/Speiche...
Page 208 - Verwendung des Bedienfelds; Expressmenü verwenden
38 Arbeitsablauf für einfache Vorgänge 2 Verwendung des Bedienfelds ● Expressmenü verwenden Wurden häufi g zu verwendende Funktionen vorher im Expressmenü festgelegt, können Sie diese Funktionen durch Betätigen von zurückrufen. Wenn Sie einen Login Service verwenden, wird das entsprechende Expressme...
Page 209 - Verwendung des Sensordisplays; Wenn das Sensordisplay ausgeschaltet wird; Wählen jeder Funktion; Hilfe verwenden
Deutsch 39 Arbeitsablauf für einfache Vorgänge 2 Verwendung des Sensordisplays ● Wenn das Sensordisplay ausgeschaltet wird Wird nach dem Einschalten des Systems auf dem Sensordisplay nichts angezeigt, berühren Sie . ● Benutzeranpassung des Hauptmenüdisplays Sie können die Einstellungen für das angez...
Page 210 - Stromzufuhr für System und Bedienfeld; Einschalten des Systems am Hauptschalter
40 Arbeitsablauf für einfache Vorgänge 2 Stromzufuhr für System und Bedienfeld In diesem Abschnitt fi nden Sie Informationen zum Hauptschalter und der Energiespartaste. WARNUNG Bitte stecken Sie den Netzstecker nicht mit nassen oder feuchten Händen in die Steckdose oder ziehen ihn heraus. Dies kann ...
Page 211 - Kopien erstellen; Einlegen von Originalen; Funktion auswählen
Deutsch 41 Arbeitsablauf für einfache Vorgänge 2 Kopien erstellen In diesem Abschnitt fi nden Sie Informationen zum grundlegenden Vorgehen beim Kopieren. 1 Einlegen von Originalen ● Legen Sie das Original auf den Einzug oder das Vorlagenglas. Einlegen von Originalen in den Einzug • Richten Sie die F...
Page 212 - Senden eines Fax; Starten der Faxsendung
42 Arbeitsablauf für einfache Vorgänge 2 Senden eines Fax In diesem Abschnitt fi nden Sie Informationen zum grundlegenden Vorgehen beim Übertragen von Faxdokumenten. Ein optionales Produkt ist zur Verwendung der Faxfunktion erforderlich. 1 Einlegen von Originalen ● Legen Sie das Original auf den Ein...
Page 213 - Senden starten
Deutsch 43 Arbeitsablauf für einfache Vorgänge 2 Senden der gescannten Daten (E-Mail/I-Fax/Dateiserver) In diesem Abschnitt fi nden Sie Informationen zum grundlegenden Vorgehen bei Scan- und Sendevorgängen. 1 Einlegen von Originalen ● Legen Sie das Original auf den Einzug oder das Vorlagenglas. Einl...
Page 214 - Speichern gescannter Daten; Wählen Sie die Speicherung; Scanstart
44 Arbeitsablauf für einfache Vorgänge 2 Speichern gescannter Daten In diesem Abschnitt fi nden Sie Informationen zum grundlegenden Vorgehen beim Scannen und Speichern. Außerdem wird ein Beispiel zum Speichern gescannter Daten in der Mailbox gegeben. 1 Einlegen von Originalen ● Legen Sie das Origina...
Page 215 - Zugang zu gespeicherten Dateien; Datei wählen; Drucken oder Senden starten
Deutsch 45 Arbeitsablauf für einfache Vorgänge 2 Zugang zu gespeicherten Dateien In diesem Abschnitt fi nden Sie Informationen zum grundlegenden Vorgehen beim Zugreifen auf gespeicherte Dateien. Das Verfahren zum Drucken oder Senden von Dateien aus einer Mailbox wird hier als Beispiel verwendet. 1 F...
Page 216 - Das Remote UI ist in den folgenden Situationen nützlich; Zugriff auf das Remote UI von einem Webbrowser
46 Arbeitsablauf für einfache Vorgänge 2 Bedienen des Systems von einem Computer (Remote UI) Das Remote UI (User Interface = Anwenderschnittstelle) ist eine im System vorinstallierte Software, mit der Sie über den Webbrowser Ihres Computers auf die Funktionen des Systems zugreifen können. Mit Remote...
Page 217 - Drucken von einem Computer; Druckeinstellungen-Display anzeigen
Deutsch 47 Arbeitsablauf für einfache Vorgänge 2 Drucken von einem Computer Wenn Sie einen Druckertreiber in Ihrem Computer installieren, können Sie das System verwenden, um mit Anwendungssoftware erstellte Daten zu drucken. In diesem Abschnitt fi nden Sie Informationen zum grundlegenden Vorgehen be...
Page 220 - Einlegen von Papier; Öff nen Sie die Kassette.
50 Routinemäßige Wartung 3 Einlegen von Papier In diesem Abschnitt fi nden Sie Informationen zum Einlegen von Papier. Einlegen von Papier in eine Papierkassette Wenn der Vorrat des gewählten Papiers oder der Papiervorrat in der ausgewählten Kassette während eines laufenden Druckvorgangs erschöpft is...
Page 223 - Öff nen Sie die Stempelabdeckung.; Schließen Sie die Stempelabdeckung.
Deutsch 53 Routinemäßige Wartung 3 Austauschen der Stempelpatrone (Einzug) (Zusatzprodukt) Über den Einzug gesendete Originale können gestempelt werden, um anzugeben, dass sie gesendet wurden. Tauschen Sie die Stempelpatrone aus, wenn der Stempelabdruck blass oder nicht mehr sichtbar ist. Achten Sie...
Page 224 - Schließen Sie den Einzug.; Color Scanner F1; Öff nen Sie die Abdeckungen.; Schließen Sie die Abdeckungen.
54 Routinemäßige Wartung 3 7 Schließen Sie die Abdeckung des Dokumentenscanners. Sie muss hörbar einrasten. Schließen Sie die Abdeckung vorsichtig, damit Sie sich nicht die Finger klemmen und sich nicht verletzen. 8 Schließen Sie den Einzug. • Bitte senken Sie den Einzug vorsichtig und achten Sie da...
Page 225 - Ersetzen der Tonerpatrone/des Alttonerbehälters; Ersetzen der Tonerpatrone
Deutsch 55 Routinemäßige Wartung 3 Ersetzen der Tonerpatrone/des Alttonerbehälters Ersetzen der Tonerpatrone Wenn die Nachricht <Tonerpatrone tauschen (Schwarz).> am Sensordisplay angezeigt wird, berühren Sie unten rechts die Taste und tauschen Sie die Tonerpatrone der angezeigten Farbe aus. W...
Page 226 - Betätigen Sie die Taste [; Bereiten Sie die neue Tonerpatrone vor.
56 Routinemäßige Wartung 3 1 Betätigen Sie die Taste [ ]. HINWEIS Ist der schwarze Toner oder sind die Tonervorräte aller Farben verbraucht, ist dieser Schritt nicht erforderlich. 2 Öff nen Sie die Toneraustauschabdeckung, indem Sie beide Seiten halten. 3 Wählen Sie die Tonerfarbe, deren Patrone Sie...
Page 227 - Schließen Sie die interne Abdeckung.; Ersetzen des Alttonerbehälters
Deutsch 57 Routinemäßige Wartung 3 6 Halten Sie die neue Tonerpatrone wie auf der Abbildung unten dargestellt, und kippen Sie sie vorsichtig zehnmal nach oben und unten. 7 Drehen Sie die Schutzkappe der neuen Tonerpatrone in Pfeilrichtung, um sie zu entfernen. 8 Schieben Sie die neue Tonerpatrone vo...
Page 228 - Entfernen Sie den Alttonercontainer.; Setzen Sie den neuen Alttonerbehälter ein.
58 Routinemäßige Wartung 3 WICHTIG • Gebrauchte Alttonercontainer können Sie bei Ihrem Canon-Vertriebspartner entsorgen lassen. • Alttoner kann nicht wieder verwendet werden. Bitte mischen Sie nie Alttoner mit neuem Toner. • Bitte verwenden Sie nur für dieses System empfohlene Alttonerbehälter. • Er...
Page 229 - Regelmäßige Reinigung; Vorlagenglas; Manuelles Reinigen des Einzugs
Deutsch 59 Routinemäßige Wartung 3 Regelmäßige Reinigung Wenn die Scans der Originale nicht sauber sind, reinigen Sie bitte die folgenden Bereiche. Zur Erhaltung der hohen Druckqualität sollten Sie diese Bereiche ein- bis zweimal monatlich reinigen. ● Vorlagenglas ● Unterseite von Einzug/Originalabd...
Page 230 - Öff nen Sie die innere Abdeckung.
60 Routinemäßige Wartung 3 2 Reinigen Sie den Original-Scanbereich (schmaler Glasbereich) mit einem Tuch, das Sie mit Wasser oder einem milden Reinigungsmittel befeuchtet und dann gut ausgewrungen haben haben, und wischen Sie mit einem weichen, trockenen Tuch nach. 3 Ziehen Sie den Hebel über dem Ei...
Page 231 - Reinigen Sie die Walzen des Einzugs.
Deutsch 61 Routinemäßige Wartung 3 Color Scanner F1 1 Reinigen Sie die Walzen des Einzugs. 2 1 1 1. Ziehen Sie den Hebel und öff nen Sie die Abdeckung des Einzugs. 2. Reinigen Sie die Walzen (an insgesamt drei Stellen) innerhalb der Einzugsabdeckung. 2 Reinigen Sie die Walzen auf der Innenseite der ...
Page 232 - Reinigen der Haupteinheit innen; Reinigen des Staubschutzglases
62 Routinemäßige Wartung 3 Automatisches Reinigen des Einzugs Wenn Ihre Originale schwarze Streifen haben oder schmutzig sind, nachdem Sie sie über den Einzug zugeführt haben, starten Sie eine automatische Reinigung der Walzen im Einzug. 1 Betätigen Sie die Taste . 2 Betätigen Sie die Taste [Justage...
Page 233 - Empfohlenes Papier
Deutsch 63 Routinemäßige Wartung 3 Verbrauchsmaterialien Es gibt für dieses System folgende Verbrauchsmaterialien von Canon. Nähere Informationen erfragen Sie bitte bei Ihrem Canon Servicepartner. Wir empfehlen Ihnen, rechtzeitig daran zu denken, sich einen Vorrat an Druckmaterialien und Toner bei I...
Page 234 - Stempelpatrone; Heftpatrone; Orignal-Verbrauchsmaterialien
64 Routinemäßige Wartung 3 WICHTIG • Bitte lagern Sie Toner kühl und trocken außerhalb direkter Sonneneinstrahlung. (Empfohlene Lagerungsbedingungen: Temperatur unter 30°C und Luftfeuchtigkeit unter 80 %.) • [ Vorsicht vor gefälschten Toner] Wir weisen Sie darauf hin, dass gefälschte Toner auf dem M...
Page 236 - Serviceruf-Meldung
66 Routinemäßige Wartung 3 Serviceruf-Meldung Wenn eine Störung auftritt und das System nicht normal arbeiten kann, werden Sie auf einem Display aufgefordert, sich an Ihren Canon-Vertriebspartner zu wenden. Wenn ein Display wie das obige angezeigt wird, nehmen Sie Kontakt zu Ihrem Canon-Vertriebspar...
Page 238 - Orte für Papierstaus
68 Routinemäßige Wartung 3 Orte für Heftklammern-/Papierstaus Papierstaus und Heftklammernstaus können in den folgenden Bereichen des Systems auftreten. Hinweise zur Beseitigung eines Papierstaus fi nden Sie im jeweiligen Abschnitt. Einzelheiten zum Verfahren fi nden Sie in der e-Anleitung. Orte für...
Page 239 - Orte für Heftklammerstaus
Deutsch 69 Routinemäßige Wartung 3 Orte für Heftklammerstaus > Problemlösung > Orte für Heftklammernstaus A B 1 2 1 2 2 1 Internes Zusatzausgabefach F1 (Zusatzausstattung) Finisher (intern) E1 (Zusatzausstattung) Einzug (Zusatzausstattung) Sattelhefteinheit des Broschüren Finisher J1 Finisher ...
Page 241 - Anhang
71 4 Anhang ■ Technische Daten . . . . . . . . . . . . . . . . . . . . . . . . . . . . . . . . . . . . . . . . . . . . . . . . . . . . . . . . . . . . . . . . . . . . . . . . . . . . . . . . 72 Haupteinheit. . . . . . . . . . . . . . . . . . . . . . . . . . . . . . . . . . . . . . . . . . . . . . . ...
Page 242 - Technische Daten; Haupteinheit
72 Anhang 4 Technische Daten Veränderungen der technischen Daten wegen Produktverbesserungen oder Weiterentwicklungen vorbehalten. Haupteinheit Einstellung Technische Daten Name Canon imageRUNNER ADVANCE C5255/C5255i/C5250/C5250i/C5240i/C5235i Typ Scanner-Drucker getrennt, Desktop Unterstützte Farbe...
Page 245 - Color Scanner F2
Deutsch 75 Anhang 4 Einstellung Technische Daten Vergrößerung Reguläres Papierformat: Gleicher Faktor 1:1 Verkleinerung 1:0,70 (A3 → A4R) 1:0,50 (A3 → A5R) 1:0,25 Vergrößerung 1:1,41 (A4R → A3) 1:2,00 (A5R → A3) 1:4,00 Kopierfaktor: 25% bis 400% (in 1%-Schritten) Vorwählbare Kopienanzahl 1 bis 999 B...
Page 246 - Briefumschlagzuführung D1
76 Anhang 4 Briefumschlagzuführung D1 Einstellung Technische Daten Geeignete Briefumschläge Nr.10(COM10), Monarch, DL und ISO-C5 Kapazität 50 Blatt (oder Stapelhöhe 30 mm) Einzuggeschwindigkeit 10 Exemplare pro Minute Abmessungen (H x B x T ) 81 mm x 439 mm x 307 mm Gewicht ca. 1,2 kg Papiermagazin ...
Page 248 - Broschüren Finisher J1
78 Anhang 4 Broschüren Finisher J1 Einstellung Technische Daten Papierformat/Gewicht/Typ Format: 305 mm x 457 mm, 320 mm x 450 mm (SRA3), A3, A4, A4R, A5, A5R, anwenderdefi niertes Format (99 mm x 139,7 mm bis 320 mm x 457,2 mm) und Briefumschläge Gewicht: 52 bis 256 g/m 2 Typ: Dünn (52 bis 63 g/m 2...
Page 251 - Zusätzliches Finisherfach A1
Deutsch 81 Anhang 4 Zusätzliches Finisherfach A1 Einstellung Technische Daten Papierformat/Gewicht/Typ Vgl. technische Daten von “Papierformat/Gewicht/Typ” in Finisher (intern) E1. Kapazität pro Fach Vgl. technische Daten von “Kapazität pro Fach (Zusätzliches Finisherfach A1)” in Finisher (intern) E...
Page 252 - Kontrollzähler F1; Super G3 Faxkarte AE2
82 Anhang 4 Kontrollzähler F1 Einstellung Technische Daten Verfügbare Karten Magnetisch Kartenlesemethode Magnetisches Lesen Leserichtung für die magnetische Karte Druckseite oben Speichern/Wiedergabe Wiedergabe Stromversorgung Von der Haupteinheit aus Abmessungen (H x B x T ) 40 mm x 88 mm x 96 mm(...
Page 253 - Sendefunktion; Scanmerkmale
Deutsch 83 Anhang 4 Sendefunktion ● Scanmerkmale Einstellung Technische Daten Kommunikationsprotokoll FTP (TCP/IP), SMB (TCP/IP), WebDAV Datenformat TIFF, JPEG, PDF, XPS, OOXML (PowerPoint/Word) Aufl ösung 100 x 100 dpi, 150 x 150 dpi, 200 x 100 dpi, 200 x 200 dpi, 200 x 400 dpi, 300 x 300 dpi, 400 ...
Page 254 - Netzwerkumgebung; Hardwaredaten; Druckereinstellungen; Softwaredaten
84 Anhang 4 Netzwerkumgebung ● Hardwaredaten Netzwerkschnittstelle 10Base-T/100Base-TX/1000Base-T (RJ-45) ● Softwaredaten Unterstütztes Protokoll TCP/IP Rahmentyp: Ethernet II Druckanwendung: LPD/Raw/IPP/IPPS/FTP/WSD IPX/SPX Rahmentyp: Ethernet II/Ethernet 802.2/Ethernet 802.3/Ethernet SNAP/Autom. E...
Page 255 - Italiano
Italiano 1 0 imageRUNNER ADVANCE C5255/C5255i/C5250/C5250i/ C5240i/C5235i User’s Guide
Page 256 - Manuali per questa apparecchiatura; Guida di Installazione del Driver
Manuali per questa apparecchiatura I manuali relativi a questa macchina sono strutturati nel modo descritto di seguito. Consultare i manuali per avere informazioni dettagliate sull’argomento desiderato. Questo simbolo indica i manuali stampati. Questo simbolo indica i manuali inclusi nel CD-ROM forn...
Page 257 - Contenuto; Prefazione
3 Contenuto 1 Prefazione Come utilizzare il presente manuale . . . . . . . . . . . . . . . . . . . . . . . . . . . . . . . . . . . . . . . . . . . . . . . . . . . . . . . . . . . . . . . . . . . . 6 Simboli utilizzati nel manuale . . . . . . . . . . . . . . . . . . . . . . . . . . . . . . . . . . . ...
Page 259 - Prefazione
5 1 Prefazione Grazie per aver acquistato il prodotto Canon imageRUNNER ADVANCE C5255/C5255i/C5250/C5250i/C5240i/C5235i. Leggere attentamente il manuale prima di utilizzare la macchina, in modo da familiarizzare con l’apparecchiatura e poter sfruttare al meglio le sue molteplici funzioni. Per inform...
Page 260 - Come utilizzare il presente manuale; Simboli utilizzati nel manuale; ATTENZIONE; IMPORTANTE; Illustrazioni utilizzate nel manuale
6 Prefazione 1 Come utilizzare il presente manuale Simboli utilizzati nel manuale I simboli riportati nel manuale e descritti di seguito indicano particolari procedure, limiti, precauzioni e operazioni da eseguire per utilizzare la macchina in condizioni di sicurezza. Indica operazioni che potrebber...
Page 261 - Marchi di fabbrica
Italiano 7 Prefazione 1 Marchi di fabbrica MEAP e il logo MEAP sono marchi di fabbrica Canon Inc. Questo prodotto comprende la Universal Font Scaling Technology o UFST ® sotto licenza di Monotype Imaging, Inc. UFST ® è un marchio di fabbrica di Monotype Imaging, Inc. registrato presso l’Uffi cio sta...
Page 262 - Come installare l’e-Manual
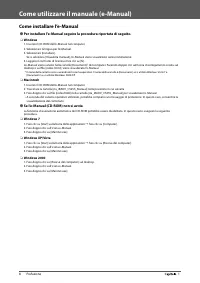
8 Prefazione 1 Come utilizzare il manuale (e-Manual) Come installare l’e-Manual ● Per installare l’e-Manual seguire la procedura riportata di seguito. ❏ Windows 1. Inserire il CD-ROM dell’e-Manual nel computer. 2. Selezionare la lingua per l’e-Manual. 3. Selezionare [Installare]. Se si seleziona [ V...
Page 263 - Prima pagina dell’e-Manual; Esecuzione di una ricerca
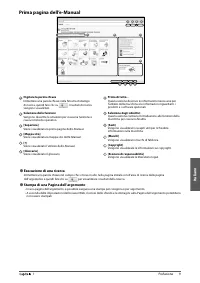
Italiano 9 Prefazione 1 Prima pagina dell’e-Manual 2 1 3 4 5 6 7 8 9 10 11 12 Digitare la parola chiave Immettere una parola chiave nella fi nestra di dialogo di ricerca, quindi fare clic su . I risultati di ricerca vengono visualizzati. Selezione dalle funzioni Vengono descritte le istruzioni per ...
Page 264 - Note legali; Nome del prodotto
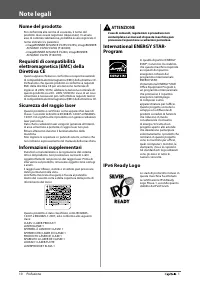
10 Prefazione 1 Note legali Nome del prodotto Per conformità alle norme di sicurezza, il nome del prodotto deve essere registrato (depositato). In alcune aree di commercializzazione, potrebbe essere registrato il nome indicato tra parentesi. • imageRUNNER ADVANCE C5255/C5255i, imageRUNNER ADVANCE C5...
Page 265 - Diritti d’autore
Italiano 11 Prefazione 1 Direttiva WEEE (RAEE) Solo per l’Unione Europea e lo Spazio Economico Europeo. Questi simboli indicano che il prodotto non può essere smaltito con i rifi uti domestici, ai sensi della Direttiva RAEE (2002/96/CE), della Direttiva sulle Batterie (2006/66/CE) e/o delle leggi na...
Page 266 - Declino di responsabilità; NOTA
12 Prefazione 1 (9) Non vi è concessa alcuna licenza sul SOFTWARE in formato leggibile da una persona (il codice sorgente). Indipendentemente dai punti (1) e (9) di cui sopra, in caso siano presenti altre condizioni a corredo di moduli software di proprietà di terzi, questi saranno soggetti alle alt...
Page 267 - Importanti istruzioni di sicurezza; Installazione; Alimentazione elettrica
Italiano 13 Prefazione 1 Importanti istruzioni di sicurezza Leggere con attenzione queste “Importanti istruzioni di sicurezza” prima di iniziare ad utilizzare la macchina. Prestare molta attenzione a queste istruzioni, che hanno lo scopo di evitare che l’operatore o altre persone si feriscano durant...
Page 268 - Precauzioni
14 Prefazione 1 IMPORTANTE Lasciare spazio suffi ciente intorno alla presa, in modo da poter scollegare facilmente il cavo all’occorrenza. Se si posizionano degli oggetti intorno alla presa, il cavo non potrà essere scollegato facilmente in caso di emergenza. Precauzioni • Non tentare di smontare o ...
Page 269 - Manutenzione e controlli
Italiano 15 Prefazione 1 • Il raggio laser può essere pericoloso. Dato che le radiazioni laser vengono generate all’interno di aree schermate e protette, il raggio laser non può fi ltrare all’esterno durante il funzionamento della macchina. Leggere le seguenti note e precauzioni. - Non aprire i pann...
Page 270 - Materiali di consumo; Altre avvertenze
16 Prefazione 1 ATTENZIONE • Il gruppo di fi ssaggio e gli elementi circostanti all’interno della macchina potrebbero scaldarsi durante l’utilizzo. Quando si rimuove la carta inceppata o si ispeziona l’interno della macchina, non toccare il gruppo di fi ssaggio e gli elementi circostanti, perché pot...
Page 271 - Luogo di installazione e precauzioni; Precauzioni per l’installazione
Italiano 17 Prefazione 1 Luogo di installazione e precauzioni Questo capitolo riporta le precauzioni da osservare durante l’installazione e l’uso. Leggere questo capitolo prima di iniziare ad utilizzare la macchina. Precauzioni per l’installazione ■ Evitare di installare la macchina in presenza dell...
Page 272 - Spostamento della macchina
18 Prefazione 1 • Se la comunicazione non è disponibile, contattare un rivenditore autorizzato Canon. In base all’area geografi ca o al collegamento telefonico posseduto, la comunicazione dati potrebbe non essere possibile. In tal caso, contattare il rivenditore autorizzato Canon. • Non rimuovere i ...
Page 273 - Precauzioni per l’uso
Italiano 19 Prefazione 1 • La Duplex Color Image Reader Unit-E1, la Foratrice, il Booklet Finisher-J1, la Buff er Pass Unit-G1 e la Paper Deck Unit-B2 sono installati: 2.180 mm 2.062 mm 1.174 mm 118 mm 100 mm o più Precauzioni per l’uso • Non tentare di smontare o di modifi care la macchina. • Alcun...
Page 275 - Controllo periodico dell’interruttore di sicurezza
Italiano 21 Prefazione 1 Controllo periodico dell’interruttore di sicurezza Questa macchina è dotata di un interruttore di sicurezza che rileva la corrente in eccesso o la corrente di dispersione. Testare l’interruttore di sicurezza una o due volte al mese seguendo la procedura descritta di seguito....
Page 276 - Come compilare il foglio di raccolta dati
22 Prefazione 1 Foglio di raccolta dati per il controllo periodico dell’interruttore di sicurezza Copiare questa pagina per un utilizzo futuro e conservarla in un luogo sicuro accanto alla macchina per documentare i controlli periodici dell’interruttore di sicurezza. ● Come eseguire i controlli peri...
Page 277 - Backup/esportazione dei dati; Dati di cui si può eseguire il backup/ripristino; Dati che consentono la funzione Importa/Esporta tutti
Italiano 23 Prefazione 1 Backup/esportazione dei dati Sul disco fi sso della macchina vengono memorizzati vari tipi di dati, quali i dati ricevuti, i dati memorizzati, la rubrica e le impostazioni di Impostazioni/Registrazione. Un problema di funzionamento del disco fi sso può provocare la perdita d...
Page 278 - Altri dati che consentono la funzione Importa/Esporta
24 Prefazione 1 ● Dati che consentono la funzione Importa/Esporta individualmente È possibile salvare/caricare i dati individualmente. Inoltre, è possibile scambiare i dati tra questa macchina e altre macchine che non supportano la funzione Importa/Esporta tutti. Dati Riferimenti Elenchi indirizzi e...
Page 280 - Possibilità dell’apparecchiatura; Macchina
26 Flusso delle operazioni principali 2 Possibilità dell’apparecchiatura Un lavoro di documentazione rivoluzionario con una macchina multifunzione in evoluzione 3 2 4 1 3 2 4 1 Internet Originale Copia/Stampa I-Fax E-mail Fax Invio Computer d'azienda File server E-mail Invio al di fuori dell'azienda...
Page 282 - Accesso come amministratore; Accesso dalla macchina; Accesso da un computer; Avviare il browser Web nel computer.
28 Flusso delle operazioni principali 2 Flusso delle impostazioni per l’utilizzo delle funzioni desiderate Accesso come amministratore Per specifi care le impostazioni, è necessario accedere alla macchina come amministratore. Esistono due metodi di accesso: accesso dal pannello digitale della macchi...
Page 283 - Connessione di rete/USB
Italiano 29 Flusso delle operazioni principali 2 Connessione di rete/USB TCP/IP AppleTalk Netware Connessione USB Utilizzo di un cavo di rete Utilizzo di un cavo USB Impostazioni di rete ● Premere → [Preferenze] → [Rete]. Specifi care [Conferma modifi che impostaz. conness. rete], [Impostazioni driv...
Page 284 - Scansione e memorizzazione/Accesso a fi le memorizzati; Utilizzo della
30 Flusso delle operazioni principali 2 Scansione e memorizzazione/Accesso a fi le memorizzati Opzioni richieste: per l’esecuzione di stampe, è richiesto il PS Printer Kit o il Direct Print Kit (for PDF/XPS). Il PS Printer Kit è una dotazione di serie per imageRUNNER ADVANCE C5255i/C5250i. Accesso a...
Page 285 - Invio di fax/Stampa; Invio/Ricezione Remote Fax
Italiano 31 Flusso delle operazioni principali 2 Invio di fax/Stampa Opzioni richieste: a seconda della funzione del fax, è richiesto il Fax board o il Remote Fax Kit. A seconda della funzione di stampa, è richiesto un prodotto opzionale. Invio di fax dalla macchina Stampa da un computer Invio di fa...
Page 286 - Scansione e invio/Scansione remota; Invio a
32 Flusso delle operazioni principali 2 Scansione e invio/Scansione remota Opzioni richieste: a seconda della funzione, è richiesto un prodotto opzionale. Invio a un fi le server Invio per E-Mail/I-Fax Scansione remota Accesso alla macchina come amministratore Connessione di rete: TCP/IP Impostazion...
Page 287 - Impostazioni IU remota
Italiano 33 Flusso delle operazioni principali 2 IU remota/MEAP Impostazioni IU remota (gestione della macchina da un computer) Impostazioni MEAP (gestione delle applicazioni da un computer mediante SMS) Accesso alla macchina come amministratore Connessione di rete: TCP/IP Abilitazione della IU remo...
Page 288 - Parti e relative funzioni; Parti esterne
34 Flusso delle operazioni principali 2 Parti e relative funzioni In questa parte del manuale vengono riportati i nomi e le funzioni di tutti i componenti della macchina. Per maggiori informazioni sugli accessori opzionali, sui componenti e le relative funzioni, vedere e-Manual > Prodotti opziona...
Page 290 - Parti interne
36 Flusso delle operazioni principali 2 Parti interne ● Se la Duplex Color Image Reader Unit-E1 e la Cassette Feeding Unit-AD2 sono installate 1 2 3 4 5 6 Vetro di lettura Utilizzare il vetro di lettura quando occorre eseguire la scansione di libri, originali di grande spessore, originali in carta s...
Page 291 - Pannello comandi - Parti e relative funzioni
Italiano 37 Flusso delle operazioni principali 2 Pannello comandi - Parti e relative funzioni 3 4 5 8 9 10 2 6 7 11 12 14 13 15 16 19 18 17 1 Tasto risparmio energetico Premere per impostare o annullare il modo Riposo. Si accende quando la macchina entra in modo Riposo. Tasto Impostazioni/Registrazi...
Page 292 - Utilizzo del pannello comandi; Utilizzo del Menu rapido; Collegamento/Disconnessione
38 Flusso delle operazioni principali 2 Utilizzo del pannello comandi ● Utilizzo del Menu rapido Se le funzioni utilizzate con frequenza vengono impostate in anticipo nel Menu rapido, è possibile richiamarle premendo . Se si utilizza un servizio di accesso, viene visualizzata la schermata del Menu r...
Page 293 - Utilizzo del pannello digitale; Se il pannello digitale è spento; Selezione di ogni funzione; Utilizzo di Guida
Italiano 39 Flusso delle operazioni principali 2 Utilizzo del pannello digitale ● Se il pannello digitale è spento Se dopo l’accensione mediante l’interruttore principale sul pannello digitale non viene visualizzato niente, premere . ● Personalizzazione della schermata del menu principale È possibil...
Page 294 - Come accendere la macchina con l’interruttore principale
40 Flusso delle operazioni principali 2 Interruttore principale di accensione e interruttore sul pannello comandi In questa sezione è descritto come utilizzare l’interruttore principale e il tasto di risparmio energetico. Per evitare il rischio di scosse elettriche, non collegare o scollegare il cav...
Page 295 - Come eseguire una copia; Posizionamento degli originali; Selezione della funzione; Avvio copiatura
Italiano 41 Flusso delle operazioni principali 2 Come eseguire una copia In questa sezione è descritto il fl usso delle operazioni principali di copia. 1 Posizionamento degli originali ● Posizionare l’originale sull’alimentatore o sul vetro di lettura. Posizionamento degli originali nell’alimentator...
Page 296 - Invio di un fax; Avvio dell’invio del fax
42 Flusso delle operazioni principali 2 Invio di un fax In questa sezione è descritto il fl usso delle operazioni principali per l’invio di un fax. Per utilizzare la funzione fax è richiesto un prodotto opzionale. 1 Posizionamento degli originali ● Posizionare l’originale sull’alimentatore o sul vet...
Page 297 - Avvio invio
Italiano 43 Flusso delle operazioni principali 2 Invio di dati acquisiti (E-Mail/I-Fax/File Server) In questa sezione è descritto il fl usso delle operazioni principali di scansione e invio. 1 Posizionamento degli originali ● Posizionare l’originale sull’alimentatore o sul vetro di lettura. Posizion...
Page 298 - Memorizzazione dei dati acquisiti; Selezione della memorizzazione; Avvio scansione
44 Flusso delle operazioni principali 2 Memorizzazione dei dati acquisiti In questa sezione è descritto il fl usso delle operazioni principali di scansione e memorizzazione. Viene inoltre riportato un esempio di come memorizzare i dati acquisiti in una mailbox. 1 Posizionamento degli originali ● Pos...
Page 299 - Accesso a fi le memorizzati; Selezione del fi le; Avvio stampa o invio
Italiano 45 Flusso delle operazioni principali 2 Accesso a fi le memorizzati In questa sezione è descritto il fl usso delle operazioni principali per l’accesso ai fi le memorizzati. La procedura per la stampa o l’invio di fi le memorizzati in una mailbox è utilizzata come esempio. 1 Selezione della ...
Page 300 - Utilizzo della macchina da un computer (IU remota); La IU remota è utile nelle seguenti situazioni; Accesso alla IU remota da un browser Web.
46 Flusso delle operazioni principali 2 Utilizzo della macchina da un computer (IU remota) La IU remota (interfaccia utente) è un software preinstallato nella macchina che consente l’accesso alle funzioni della macchina mediante il browser Web di un computer. Per esempio, la IU remota consente di ac...
Page 301 - Stampa da un computer; Visualizzazione della schermata delle impostazioni di stampa; Avvio stampa
Italiano 47 Flusso delle operazioni principali 2 Stampa da un computer Installando un driver della stampante nel proprio computer, è possibile utilizzare la macchina per stampare dati creati mediante il software applicativo. In questa sezione è descritto il fl usso delle operazioni principali per la...
Page 304 - Caricamento della carta; Preparare la carta da caricare.
50 Manutenzione periodica 3 Caricamento della carta Questa sezione descrive come caricare la carta. Caricamento della carta nei cassetti Se la carta selezionata fi nisce o se la carta presente nel cassetto selezionato fi nisce durante la stampa, viene visualizzato un messaggio che chiede di caricare...
Page 305 - Caricare i fogli nel cassetto.; Rimuovere la carta caricata nel cassetto.
Italiano 51 Manutenzione periodica 3 3 Caricare i fogli nel cassetto. 3 1, 2 1. Accertarsi che l’impostazione del formato di carta del cassetto corrisponda al formato di carta da caricare. 2. Caricare i fogli facendoli aderire alla parete destra del cassetto. 3. Spingere delicatamente il cassetto ri...
Page 307 - Aprire l’alimentatore.; Aprire il pannello del timbro.; Chiudere il pannello del timbro.
Italiano 53 Manutenzione periodica 3 Sostituzione della cartuccia del timbro (alimentatore) (opzionale) È possibile contrassegnare con un timbro gli originali inviati tramite l’alimentatore, al fi ne di indicare che sono stati inviati. Sostituire la cartuccia quando il timbro appare sbiadito o illeg...
Page 308 - Chiudere l’alimentatore.; Caricare la cartuccia del timbro.; Chiudere i pannelli.
54 Manutenzione periodica 3 7 Chiudere il pannello dell’area di scansione dei documenti fi nché si blocca in posizione con uno scatto. ATTENZIONE Quando si chiude il pannello, fare attenzione a non intrappolare le dita, per evitare lesioni personali. 8 Chiudere l’alimentatore. ATTENZIONE • Quando si...
Page 309 - Sostituire la cartuccia del toner
Italiano 55 Manutenzione periodica 3 Sostituzione della cartuccia del toner/contenitore del toner di scarto Sostituire la cartuccia del toner Quando sul pannello digitale viene visualizzato il messaggio <Sostituire cartuccia toner. (Nero)>, premere in basso a destra e sostituire la cartuccia ...
Page 310 - premere [Rimozione cartucce; Preparare la nuova cartuccia di toner.
56 Manutenzione periodica 3 1 Premere [ ]. NOTA Se il toner nero o tutti i toner sono completamente esauriti, questa operazione non è necessaria. 2 Aprire il pannello per la sostituzione del toner tenendo entrambi i lati. 3 Selezionare il colore del toner che si desidera sostituire dal display sul p...
Page 311 - Chiudere il pannello interno.
Italiano 57 Manutenzione periodica 3 6 Tenere in mano la nuova cartuccia di toner, come indicato sotto, e inclinarla delicatamente verso l’alto e verso il basso 10 volte. 7 Far ruotare il cappuccio protettivo rosso della nuova cartuccia nella direzione della freccia fi no a rimuoverlo. 8 Inserire il...
Page 312 - Aprire il pannello anteriore della macchina.
58 Manutenzione periodica 3 IMPORTANTE • Il rivenditore autorizzato Canon provvederà a smaltire i serbatoi del toner di scarto. • Il toner usato non può essere riutilizzato. Non aggiungere toner usato a toner nuovo. • Utilizzare esclusivamente i serbatoi del toner di scarto adatti per questa macchin...
Page 313 - Pulizia periodica; Pulizia manuale dell’alimentatore
Italiano 59 Manutenzione periodica 3 Pulizia periodica Se l’originale non viene riprodotto in modo nitido, pulire le parti della macchina indicate di seguito. Per ottenere stampe di qualità, si consiglia di pulire queste parti una o due volte al mese. ● Vetro di lettura ● Parte inferiore dell’alimen...
Page 314 - Aprire il pannello interno.
60 Manutenzione periodica 3 2 Pulire l’area di scansione degli originali (striscia di vetro sottile) con un panno strizzato dopo essere stato inumidito con acqua o un detergente delicato, quindi asciugarla con un panno morbido e asciutto. 3 Tirare la leva sopra l’alimentatore e aprire il pannello di...
Page 315 - Pulizia dei rulli dell’alimentatore.; Pulire l’area di scansione dell’alimentatore.; Chiudere il pannello dell’alimentatore.
Italiano 61 Manutenzione periodica 3 Color Image Reader Unit-F1 1 Pulizia dei rulli dell’alimentatore. 2 1 1 1. Tirare la leva e aprire il pannello dell’alimentatore. 2. Pulire i rulli (3 in totale) sotto il coperchio dell’alimentatore. 2 Pulizia dei rulli sotto il pannello interno. 2 1 1. Aprire il...
Page 316 - Pulizia del vetro antipolvere
62 Manutenzione periodica 3 Pulizia automatica dell’alimentatore Se si notano delle strisce nere sugli originali o se gli originali sono macchiati dopo essere passati nell’alimentatore, eseguire una pulizia automatica dei rulli dell’alimentatore. 1 Premere . 2 Premere [Regolazione/Manutenzione] → [M...
Page 317 - Materiali di consumo; Carta consigliata
Italiano 63 Manutenzione periodica 3 Materiali di consumo Sono disponibili i seguenti materiali di consumo Canon. Per maggiori informazioni al riguardo, contattare un rivenditore autorizzato Canon. Si consiglia di avere sempre una scorta di carta e toner. ● Carta consigliata Oltre alla carta comune ...
Page 318 - Cartuccia del timbro; Cartuccia punti; Consumabili originali
64 Manutenzione periodica 3 ● Cartuccia del timbro Questa cartuccia viene utilizzata per apporre un timbro sugli originali. Per rimuovere ed inserire la cartuccia del timbro, utilizzare le pinzette fornite. Cartuccia inchiostro per timbro-C1 ● Cartuccia punti Finisher Cartuccia punti (Nome/Forma) Bo...
Page 320 - Messaggio di richiesta di un intervento di assistenza
66 Manutenzione periodica 3 Messaggio di richiesta di un intervento di assistenza Se si presenta un problema di funzionamento e la macchina non è in grado di funzionare in modo corretto, viene visualizzata una schermata che chiede di rivolgersi al rivenditore autorizzato Canon locale. Se viene visua...
Page 322 - Posizioni degli inceppamenti carta
68 Manutenzione periodica 3 Posizione degli inceppamenti carta e punti di pinzatura Gli inceppamenti della carta e dei punti di pinzatura possono verifi carsi nelle seguenti parti della macchina. Per eliminare l’inceppamento vedere la sezione pertinente. Per i dettagli della procedura, vedere l’e-Ma...
Page 323 - Posizioni degli inceppamenti punti
Italiano 69 Manutenzione periodica 3 Posizioni degli inceppamenti punti > Soluzione dei problemi > Posizioni degli inceppamenti punti A B 1 2 1 2 2 1 Inner 2 Way Tray-F1 (opzionale) Inner Finisher-E1 (opzionale) Alimentatore (opzionale) Unità di pinzatura a sella del Booklet Finisher-J1 Staple...
Page 325 - Appendice
71 4 Appendice ■ Specifi che . . . . . . . . . . . . . . . . . . . . . . . . . . . . . . . . . . . . . . . . . . . . . . . . . . . . . . . . . . . . . . . . . . . . . . . . . . . . . . . . . . . . . . . . 72 Unità principale . . . . . . . . . . . . . . . . . . . . . . . . . . . . . . . . . . . . . ....
Page 326 - Specifi che; Unità principale
72 Appendice 4 Specifi che Le specifi che potrebbero cambiare senza preavviso per miglioramenti del prodotto o per futuri/e lanciamenti/distribuzioni. Unità principale Voce Specifi che Nome Canon imageRUNNER ADVANCE C5255/C5255i/C5250/C5250i/C5240i/C5235i Tipo Reader e stampante separati, Desktop Co...
Page 329 - Cassette Feeding Unit-AD2
Italiano 75 Appendice 4 Voce Specifi che Ingrandimento Formato carta normale: Stesso rapporto 1:1 Riduzione 1:0,70 (A3 → A4R) 1:0,50 (A3 → A5R) 1:0,25 Ingrandimento 1:1,41 (A4R → A3) 1:2,00 (A5R → A3) 1:4,00 Rapporto riproduzione: da 25% a 400% (in incrementi 1%) Copiatura continua Da 1 a 999 fogli ...
Page 330 - Staple Finisher-J1
76 Appendice 4 Envelope Feeder Attachment-D1 Voce Specifi che Buste utilizzabili No.10(COM10), Monarch, DL e ISO-C5 Capienza 50 fogli (o per un’altezza pari a 30 mm) Velocità di alimentazione 10 cpm Dimensioni (altezza x larghezza x profondità) 81 mm x 439 mm x 307 mm Peso Circa 1,2 kg Paper Deck Un...
Page 335 - Inner 2 Way Tray-F1
Italiano 81 Appendice 4 Inner Finisher Additional Tray-A1 Voce Specifi che Formato/Grammatura/Tipo carta Vedere le specifi che di “Formato/Grammatura/Tipo carta” in Inner Finisher-E1. Capienza di ogni vassoio Vedere le specifi che di “Capienza di ogni vassoio (Inner Finisher Additional Tray-A1)” in ...
Page 337 - Funzioni di invio; Funzioni di scansione
Italiano 83 Appendice 4 Funzioni di invio ● Funzioni di scansione Voce Specifi che Protocollo di comunicazione FTP ( TCP/IP), SMB ( TCP/IP), WebDAV Formato dati TIFF, JPEG, PDF, XPS, OOXML (PowerPoint/Word) Risoluzione 100 x 100 dpi, 150 x 150 dpi, 200 x 100 dpi, 200 x 200 dpi, 200 x 400 dpi, 300 x ...
Page 338 - Ambiente di rete; Specifi che hardware; Impostazioni stampante; Specifi che software
84 Appendice 4 Ambiente di rete ● Specifi che hardware Interfaccia di rete 10Base-T/100Base-TX/1000Base-T (RJ-45) ● Specifi che software Protocollo supportato TCP/IP Tipo di frame: Ethernet II Applicazione di stampa: LPD/Raw/IPP/IPPS/FTP/WSD IPX/SPX Tipo di frame: Ethernet II/Ethernet 802.2/Ethernet...
Page 339 - Español
Español 1 0 imageRUNNER ADVANCE C5255/C5255i/C5250/C5250i/ C5240i/C5235i User’s Guide
Page 340 - Manuales del equipo; Guía de instalación de controladores
Manuales del equipo Los manuales de este equipo se dividen de la siguiente forma. Consúltelos para obtener información detallada. Las guías señaladas con este símbolo son manuales impresos. Las guías señaladas con este símbolo están incluidas en el CD-ROM entregado con el equipo. Para ver el manual ...
Page 341 - Contenido; Prefacio
3 Contenido 1 Prefacio Cómo utilizar este manual . . . . . . . . . . . . . . . . . . . . . . . . . . . . . . . . . . . . . . . . . . . . . . . . . . . . . . . . . . . . . . . . . . . . . . . . . . . . . 6 Símbolos utilizados en este manual . . . . . . . . . . . . . . . . . . . . . . . . . . . . . . ...
Page 343 - Prefacio
5 1 Prefacio Muchas gracias por la adquisición de imageRUNNER ADVANCE C5255/C5255i/C5250/C5250i/C5240i/C5235i Canon, Antes de utilizar el equipo, lea atentamente este manual con el fi n de familiarizarse con las prestaciones del equipo y aprovechar al máximo sus muchas funciones. Para la información...
Page 344 - Cómo utilizar este manual; ADVERTENCIA
6 Prefacio 1 Cómo utilizar este manual Símbolos utilizados en este manual En este manual se utilizan los siguientes símbolos para explicar procedimientos, limitaciones, precauciones de manipulación e instrucciones que deben ser observadas por razones de seguridad. ADVERTENCIA Indica una advertencia ...
Page 345 - Marcas comerciales
Español 7 Prefacio 1 Marcas comerciales MEAP y el logotipo de MEAP son marcas comerciales de Canon Inc. Este producto contiene la tecnología de escalado de fuentes universal o UFST® bajo licencia de Monotype Imaging, Inc. UFST® es una marca comercial de Monotype Imaging, Inc. registrada en la Ofi ci...
Page 346 - Cómo instalar el e-Manual
8 Prefacio 1 Cómo utilizar este manual (e-Manual) Cómo instalar el e-Manual ● Siga el procedimiento que se indica a continuación para instalar el e-Manual. ❏ Windows 1. Inserte el CD-ROM del e-Manual en su ordenador. 2. Seleccione el idioma del e-Manual. 3. Seleccione [Instalar]. Si selecciona [Most...
Page 347 - Página de inicio del e-Manual; Realización de una búsqueda
Español 9 Prefacio 1 Página de inicio del e-Manual 2 1 3 4 5 6 7 8 9 10 11 12 Introduzca aquí la(s) palabra(s) clave Introduzca una palabra clave en el cuadro de diálogo de búsqueda y pulse . Se mostrarán los resultados de la búsqueda. Seleccionar entre funciones Se describen las instrucciones de c...
Page 348 - Avisos legales; Nombre del producto
10 Prefacio 1 Avisos legales Nombre del producto Las regulaciones de seguridad requieren el registro del nombre del producto. En ciertas zonas donde se comercializa este equipo, es posible que fi gure registrado con una de las denominaciones que aparecen a continuación entre paréntesis. • imageRUNNE...
Page 349 - Directiva WEEE
Español 11 Prefacio 1 Directiva WEEE Sólo para la Unión Europea (y el Área Económica Europea). Estos símbolos indican que este producto no debe desecharse con los residuos domésticos de acuerdo con la Directiva sobre RAEE (2002/96/CE) y la Directiva sobre Pilas y Acumuladores (2006/66/CE) y/o la leg...
Page 350 - Descargo de responsabilidad
12 Prefacio 1 (8) No tiene derecho a retirar ni hacer copias separadas del SOFTWARE del PRODUCTO. (9) La parte legible por las personas (el código fuente) del SOFTWARE no está incluida en la licencia que se le concede. No obstante lo estipulado en las cláusulas (1) a (9), en caso de que otras condic...
Page 351 - Instrucciones importantes de seguridad; Instalación; Alimentación eléctrica
Español 13 Prefacio 1 Instrucciones importantes de seguridad Lea todas estas “Instrucciones importantes de seguridad” antes de usar el equipo. Preste siempre atención a estas instrucciones ya que están pensadas para evitar lesiones al usuario u otras personas, así como el deterioro del equipo. Ademá...
Page 352 - Manejo
14 Prefacio 1 IMPORTANTE Deje un espacio sufi ciente alrededor de la clavija de alimentación para poder desenchufarla fácilmente. Si hay objetos alrededor de la clavija de alimentación, no podrá desenchufarla con rapidez en caso de emergencia. Manejo ADVERTENCIA • No intente desmontar o modifi car l...
Page 353 - Mantenimiento e inspecciones
Español 15 Prefacio 1 • El rayo láser puede ser perjudicial para las personas. Dado que la radiación emitida en el interior del equipo queda completamente confi nada en el alojamiento protector y por medio de las tapas exteriores, el rayo láser no puede salir al exterior del equipo durante ninguna d...
Page 354 - Consumibles; Otras advertencias
16 Prefacio 1 • La unidad de fi jación y sus alrededores del interior del equipo alcanzan altas temperaturas durante el uso. Al extraer papel atascado o inspeccionar el interior del equipo, no toque la unidad de fi jación y sus alrededores, ya que puede producirse quemaduras o recibir una descarga e...
Page 355 - Lugar de instalación y manipulación; Precauciones de instalación
Español 17 Prefacio 1 Lugar de instalación y manipulación Esta sección describe las precauciones acerca del lugar de instalación y la manipulación del equipo. Recomendamos que lea esta sección antes de usar este equipo. Precauciones de instalación ■ Evite instalar el equipo en los siguientes lugares...
Page 356 - Seleccione un enchufe seguro; Trasladar el equipo
18 Prefacio 1 • Póngase en contacto con un distribuidor Canon autorizado si la comunicación no está disponible. Según el entorno o la conexión de teléfono, es posible que no pueda realizar la comunicación de datos. En ese caso, póngase en contacto con su distribuidor de Canon autorizado. • No quite ...
Page 357 - Precauciones de manejo
Español 19 Prefacio 1 • La Unidad Lectora Color Dúplex E1, Taladradora Unidad de Acabado de Cuadernillos J1, Unidad de Alimentación Intermedia G1, y Depósito de Papel B2 estén instaladas: 2 . 180 mm 2 . 062 mm 1 . 174 mm 118 mm 100 mm o más Precauciones de manejo • No intente desmontar o modifi car ...
Page 359 - Inspección periódica del interruptor diferencial; Encienda la alimentación principal.
Español 21 Prefacio 1 Inspección periódica del interruptor diferencial Este equipo dispone de un interruptor diferencial que detecta el exceso de corriente o corriente de fuga. Asegúrese de probar el interruptor diferencial una o dos veces alo mes utilizando el procedimiento siguiente. IMPORTANTE • ...
Page 361 - Hacer copias de seguridad de datos/exportar datos; Datos de los que se puede hacer copia de seguridad/Restauración; Datos con los que se puede importar/exportar todo
Español 23 Prefacio 1 Hacer copias de seguridad de datos/exportar datos Los diferentes datos, como los datos recibidos, los datos guardados, la libreta de direcciones y las opciones de confi guración, se guardan en el disco duro del equipo. Una avería del disco duro puede causar la pérdida de estos ...
Page 362 - Datos con los que se puede importar/exportar individualmente; Otros datos que se pueden importar/exportar
24 Prefacio 1 ● Datos con los que se puede importar/exportar individualmente Puede guardar/cargar datos individualmente. Además, puede intercambiar datos con este equipo y otros equipos que admitan la función Importar/Exportar todo. Datos Referencias Listas de direcciones e-Manual > IU remota Opc...
Page 364 - Qué puede hacer este equipo; Equipo
26 Flujo de funciones básicas 2 Qué puede hacer este equipo Trabajo revolucionario de documentación con un equipo multitarea en evolución 3 2 4 1 3 2 4 1 Internet Original Copiar/Imprimir I-fax E-mail Fax Enviar Ordenador en la empresa Servidor de archivos E-mail Enviar fuera de la empresa Copia MEA...
Page 366 - Flujo de opciones para utilizar las funciones deseadas; Inicio de sesión en el equipo; Inicio de sesión desde un ordenador; Inicie el navegador Web en su ordenador.
28 Flujo de funciones básicas 2 Flujo de opciones para utilizar las funciones deseadas Inicio de sesión como administrador Para especifi car las opciones, tendrá que iniciar sesión en el equipo como administrador. Existen dos métodos de inicio de sesión; inicio de sesión desde la pantalla táctil del...
Page 367 - Red/Conexión USB
Español 29 Flujo de funciones básicas 2 Red/Conexión USB TCP/IP AppleTalk NetWare Conexión USB Utilización de un cable de red Utilización de un cable USB Opciones de red ● Pulse → [Preferencias] → [Red]. Especifi que [Confi rmar cambios en la conexión de red], [Opciones del controlador Ethernet], [O...
Page 368 - Leer y guardar/Archivos guardados
30 Flujo de funciones básicas 2 Leer y guardar/Archivos guardados Opciones requeridas: Para imprimir, se requiere el Kit de Impresora PS o Kit de Impresión Directa (para PDF/XPS). El Kit de Impresora PS es un equipo estándar para imageRUNNER ADVANCE C5255i/C5250i. Inicio de sesión en el equipo como ...
Page 369 - Envío de faxes/Impresión; Envío/recepción de fax remoto
Español 31 Flujo de funciones básicas 2 Envío de faxes/Impresión Opciones requeridas: Se requiere tarjeta de fax o Kit de Fax Remoto, dependiendo de la función de fax. Se requiere un producto opcional, dependiendo de la función de impresión. Envío de faxes desde el equipo Impresión desde un ordenado...
Page 370 - Leer y enviar/Lectura remota; Envío a
32 Flujo de funciones básicas 2 Leer y enviar/Lectura remota Opciones requeridas: Se requiere un producto opcional, dependiendo de la función. Envío a un servidor de archivos Envío por E-Mail/I-Faxes Lectura remota Inicio de sesión en el equipo como administrador Conexión a la red: TCP/IP Opciones d...
Page 371 - Opciones de IU remota
Español 33 Flujo de funciones básicas 2 IU remota/MEAP Opciones de IU remota (Gestión del equipo desde un ordenador) Opciones de MEAP (Gestión de aplicaciones desde un ordenador utilizando SMS) Inicio de sesión en el equipo como administrador Conexión a la red: TCP/IP Habilitación de IU remota ● Pul...
Page 372 - Unidades y sus funciones; Vista exterior
34 Flujo de funciones básicas 2 Unidades y sus funciones Esta sección incluye los nombres y funciones de todas las partes del equipo. Para más información acerca de los equipos opcionales, sus unidades y funciones, consulte el e-Manual > Productos opcionales/Software. Vista exterior ● Cuando la U...
Page 374 - Vista interior
36 Flujo de funciones básicas 2 Vista interior ● Cuando la Unidad Lectora Color Dúplex E1 y Unidad de Alimentación por Casete AD2 estén instaladas 1 2 3 4 5 6 Cristal de copia Utilice el cristal de copia cuando vaya a leer libros, originales gruesos, originales fi nos, transparencias, etc. Tapa supe...
Page 375 - Secciones y funciones del panel de control
Español 37 Flujo de funciones básicas 2 Secciones y funciones del panel de control 3 4 5 8 9 10 2 6 7 11 12 14 13 15 16 19 18 17 1 Tecla de Ahorro de energía Se pulsa para establecer o cancelar el modo de reposo. Se encenderá cuando el equipo entre en el modo de reposo. Tecla de confi guración Se pu...
Page 376 - Utilización del panel de control; Utilización del menú rápido; Inicio/fi nalización de sesión
38 Flujo de funciones básicas 2 Utilización del panel de control ● Utilización del menú rápido Si establece con antelación las funciones más frecuentemente utilizadas en el menú rápido, podrá activarlas pulsando . Si está utilizando un servicio de inicio de sesión, aparecerá la pantalla Menú rápido ...
Page 377 - Utilización de la pantalla táctil; Si la pantalla táctil está desactivada; Selección de cada función; Uso de la ayuda
Español 39 Flujo de funciones básicas 2 Utilización de la pantalla táctil ● Si la pantalla táctil está desactivada Si no se visualiza nada en la pantalla táctil después de haber puesto en ON el interruptor de alimentación principal, pulse . ● Personalización de la pantalla Menú principal Puede espec...
Page 378 - Cómo encender la alimentación principal; Tecla de Ahorro de energía
40 Flujo de funciones básicas 2 Alimentación principal y alimentación del panel de control Esta sección describe cómo usar el interruptor de alimentación principal y la tecla de ahorro de energía. ADVERTENCIA No enchufe ni desenchufe la clavija de alimentación con las manos húmedas ya que puede reci...
Page 379 - Cómo realizar una copia; Colocación de originales; Selección de funciones; Iniciar copia
Español 41 Flujo de funciones básicas 2 Cómo realizar una copia En esta sección se describe el fl ujo de las operaciones básicas de copia. 1 Colocación de originales ● Ponga los originales en el alimentador o el cristal de copia. Colocación de originales en el alimentador • Ajuste las guías deslizan...
Page 380 - Envío de un fax; Inicio del envío de un fax
42 Flujo de funciones básicas 2 Envío de un fax En esta sección se describe el fl ujo de las operaciones básicas de fax. Para utilizar la función de fax se requiere un producto opcional. 1 Colocación de originales ● Ponga los originales en el alimentador o el cristal de copia. Colocación de original...
Page 381 - Iniciar envío
Español 43 Flujo de funciones básicas 2 Envío de datos leídos (Servidores de E-Mail/I-Fax/File) En esta sección se describe el fl ujo de las operaciones básicas de lectura y envío. 1 Colocación de originales ● Ponga los originales en el alimentador o el cristal de copia. Colocación de originales en ...
Page 382 - Almacenamiento de datos leídos; Selección de almacenamiento; Iniciar lectura
44 Flujo de funciones básicas 2 Almacenamiento de datos leídos En esta sección se describe el fl ujo de las operaciones básicas de leer y guardar. También se describe un ejemplo de cómo guardar datos leídos en un buzón. 1 Colocación de originales ● Ponga los originales en el alimentador o el cristal...
Page 383 - Archivos guardados; Selección de archivo; Iniciar impresión o envío
Español 45 Flujo de funciones básicas 2 Archivos guardados En esta sección se describe el fl ujo de las operaciones básicas de archivos guardados. Aquí se utiliza, a modo de ejemplo, el procedimiento para imprimir o enviar archivos guardados en un buzón. 1 Selección de funciones ● Seleccione [Archiv...
Page 384 - Operación del equipo desde un ordenador (IU remota); La IU remota es útil en las situaciones siguientes; Acceso a la IU remota desde un navegador Web
46 Flujo de funciones básicas 2 Operación del equipo desde un ordenador (IU remota) La IU (interfaz de usuario) remota es software preinstalado en el equipo que le permite acceder a las funciones del equipo utilizando el navegador Web de su ordenador. Por ejemplo, la IU remota le permite acceder al ...
Page 385 - Impresión desde un ordenador; Visualización de la pantalla de opciones de impresión; Especifi cación de opciones de impresión; Iniciar impresión
Español 47 Flujo de funciones básicas 2 Impresión desde un ordenador Si instala un controlador de impresora en su ordenador, podrá utilizar el equipo para imprimir datos creados utilizando software de aplicación. En esta sección se describe el fl ujo de operaciones básicas para imprimir datos desde ...
Page 388 - Cargar papel; Cargar papel en un casete; Prepare el papel que se debe cargar.
50 Mantenimiento periódico 3 Cargar papel Esta sección describe cómo cargar papel. Cargar papel en un casete Si se agota el papel seleccionado o se agota el papel del casete durante la impresión, en la pantalla aparece un mensaje indicando que debe cargar papel. Siga el procedimiento descrito a cont...
Page 389 - Cargue el papel en el casete.; Retire el papel que hay cargado en el casete.
Español 51 Mantenimiento periódico 3 3 Cargue el papel en el casete. 3 1, 2 1. Asegúrese de que el valor de tamaño de papel del casete esté ajustado al tamaño de papel que se va a cargar en el casete. 2. Coloque el papel contra el lateral derecho del casete de papel. 3. Introduzca con cuidado el cas...
Page 390 - Ajuste la posición de las guías del casete.
52 Mantenimiento periódico 3 2 Ajuste la posición de las guías del casete. 1 2 2 1. Desplace la guía izquierda mientras presiona su parte superior para alinearla con la marca correspondiente al tamaño de papel deseado. 2. Desplace la guía frontal mientras presiona su parte superior para alinearla co...
Page 391 - Abra la tapa del sello.; Cierre la tapa del sello.
Español 53 Mantenimiento periódico 3 Sustituir el cartucho del sello (Alimentador) (opcional) Los originales enviados por medio del alimentador se pueden sellar para indicar que se han enviado. Sustituya el cartucho del sello cuando la marca del sello se imprima débilmente o ya no sea visible. Al su...
Page 392 - Cierre el alimentador.; Unidad Lectora Color F1; Cargue el cartucho del sello.
54 Mantenimiento periódico 3 7 Cierre la tapa del área de lectura de documentos hasta que encaje. Para evitar lesiones, tenga cuidado con los dedos al cerrar la tapa. 8 Cierre el alimentador. • Para evitar lesiones personales, tenga cuidado con los dedos al cerrar el alimentador. • Tenga en cuenta q...
Page 393 - Sustituir el cartucho de tóner
Español 55 Mantenimiento periódico 3 Sustituir el cartucho de tóner/depósito de tóner residual Sustituir el cartucho de tóner Cuando aparezca el mensaje <Cambie cartucho de tóner. (Negro)> en la pantalla táctil, pulse del botón derecho y sustituya el cartucho de tóner, cambie el cartucho de tó...
Page 394 - Prepare el nuevo cartucho de tóner.
56 Mantenimiento periódico 3 1 Pulse [ ]. NOTA Si se agota el tóner negro y otros tóneres, este paso no será necesario. 2 Abra la tapa de cambio de tóner sujetando ambos lados. 3 Seleccione el color del tóner que desee sustituir en la pantalla del panel de control → pulse [Quitar cartuchos de tóner]...
Page 395 - Cierre la tapa interna.
Español 57 Mantenimiento periódico 3 6 Sujete el nuevo cartucho de tóner con sus manos, como se muestra a continuación, e inclínelo suavemente hacia arriba y abajo 10 veces. 7 Gire la tapa protectora roja del cartucho de tóner nuevo en la dirección de la fl echa para quitarla. 8 Empuje el nuevo cart...
Page 396 - Abra la tapa frontal del equipo.; Cierre la tapa frontal del equipo.
58 Mantenimiento periódico 3 IMPORTANTE • Su distribuidor Canon autorizado eliminará debidamente los depósitos de tóner residual usado. • No se puede volver a utilizar el tóner usado. No mezcle tóner nuevo y usado. • Utilice únicamente depósitos de tóner residual diseñados para su empleo en este equ...
Page 397 - Limpieza periódica; Cristal de copia; Limpieza manual del alimentador
Español 59 Mantenimiento periódico 3 Limpieza periódica Si el original no se copia con claridad, limpie las siguientes piezas del equipo. Para obtener impresiones de alta calidad, se recomienda limpiar estas piezas una o dos veces al mes. ● Cristal de copia ● Parte inferior del alimentador/tapa de c...
Page 398 - Abra la tapa interior.; Limpie los rodillos del alimentador.
60 Mantenimiento periódico 3 4 Abra la tapa interior. 5 Limpie el área de lectura del alimentador con un paño escurrido después de humedecerlo en agua o detergente suave, y a continuación, limpie el área con un paño seco y suave. 6 Cierre la tapa del interior. Para evitar lesiones, tenga cuidado con...
Page 400 - Limpiar el cristal guardapolvo; Abra la tapa frontal, sujetando ambos lados.; Cierre la tapa frontal de la unidad principal.
62 Mantenimiento periódico 3 Limpiar el cristal guardapolvo Si el cristal guardapolvo está sucio, pueden producirse defectos en la impresión. Siga los procedimientos descritos a continuación para limpiar el cristal guardapolvo. 1 Abra la tapa frontal, sujetando ambos lados. 2 Retire el limpiador del...
Page 401 - Papel recomendado; Tóner
Español 63 Mantenimiento periódico 3 Consumibles Canon dispone de los siguientes consumibles. Para más información, consulte a su distribuidor local Canon. Recomendamos que pida papel y tóner a su distribuidor local Canon antes de que se agote el que posee. ● Papel recomendado Además del papel norma...
Page 402 - Cartucho del sello; Cartucho de grapas; Consumibles genuinos
64 Mantenimiento periódico 3 ● Cartucho del sello El cartucho del sello se utiliza para sellar los originales. Utilice las pinzas suministradas para sacar y sustituir el cartucho del sello. Cartucho de Tinta para Sello C1 ● Cartucho de grapas Unidad de acabado Cartucho de grapas (Nombre/Forma) Unida...
Page 404 - Mensaje de aviso al servicio técnico
66 Mantenimiento periódico 3 Mensaje de aviso al servicio técnico Si se produce una avería y el equipo no puede funcionar con normalidad, aparece una pantalla que le pide que se ponga en contacto con su distribuidor Canon autorizado. Si se se muestra una pantalla como la de arriba, consulte a su dis...
Page 406 - Ubicación de los atascos de grapas/papel; Ubicaciones de los atascos de papel
68 Mantenimiento periódico 3 Ubicación de los atascos de grapas/papel Los atascos de papel y grapas pueden producirse en las siguientes partes del equipo. Para eliminar el atasco de papel, consulte la sección que corresponda. Para los detalles sobre el procedimiento, consulte el e-Manual. Ubicacione...
Page 407 - Ubicaciones de los atascos de grapas
Español 69 Mantenimiento periódico 3 Ubicaciones de los atascos de grapas > Resolución de problemas > Ubicaciones de los atascos de grapas A B 1 2 1 2 2 1 Bandeja Interna de 2 Vías F1 (Opcional) Unidad de Acabado Interna E1 (Opcional) Alimentador (Opcional) Unidad grapad. cuadernillos de la Un...
Page 409 - Apéndice
71 4 Apéndice ■ Especifi caciones . . . . . . . . . . . . . . . . . . . . . . . . . . . . . . . . . . . . . . . . . . . . . . . . . . . . . . . . . . . . . . . . . . . . . . . . . . . . . . . . . . 72 Unidad principal . . . . . . . . . . . . . . . . . . . . . . . . . . . . . . . . . . . . . . . . . ...
Page 410 - Especifi caciones; Unidad principal
72 Apéndice 4 Especifi caciones Las especifi caciones pueden cambiar sin previo aviso si hay mejoras del producto o futuros lanzamientos. Unidad principal Elemento Especifi caciones Nombre imageRUNNER ADVANCE C5255/C5255i/C5250/C5250i/C5240i/C5235i Canon Tipo Lector e impresora separados, Escritorio...
Page 413 - Unidad Lectora Color F2
Español 75 Apéndice 4 Elemento Especifi caciones Aumento Tamaño de papel normal: Misma escala 1:1 Reducción 1:0,70 (A3 → A4R) 1:0,50 (A3 → A5R) 1:0,25 Ampliación 1:1,41 (A4R → A3) 1:2,00 (A5R → A3) 1:4,00 Escala de copia: 25% a 400% (en incrementos del 1%) Copias múltiples 1 a 999 hojas Fuente de al...
Page 414 - Alimentador de Sobres D1
76 Apéndice 4 Alimentador de Sobres D1 Elemento Especifi caciones Sobres admitidos No.10(COM10), Monarch, DL, e ISO-C5 Capacidad 50 hojas (o 30 mm de altura) Velocidad de alimentación 10 cpm Dimensiones (Al x An x Prof ) 81 mm x 439 mm x 307 mm Gramaje Aproximadamente 1,2 kg Depósito de Papel B2 Ele...
Page 416 - Unidad de Acabado de Cuadernillos J1
78 Apéndice 4 Unidad de Acabado de Cuadernillos J1 Elemento Especifi caciones Tamaño/gramaje/tipo de papel Tamaño: 305 mm x 457 mm, 320 mm x 450 mm (SRA3), A3, A4, A4R, A5, A5R, tamaño personalizado (99 mm x 139,7 mm a 320 mm x 457,2 mm), y Sobres Gramaje: 52 a 256 g/m 2 Tipo: Fino (52 a 63 g/m 2 ),...
Page 418 - Unidad de Acabado Interna E1
80 Apéndice 4 Unidad de Acabado Interna E1 Elemento Especifi caciones Tamaño/gramaje/tipo de papel Tamaño: 305 mm x 457 mm, 320 mm x 450 mm (SRA3), A3, A4, A4R, A5, A5R, tamaño personalizado (99 mm x 139,7 mm a 320 mm x 457,2 mm), y Sobres Gramaje: 52 a 256 g/m 2 Tipo: Fino (52 a 63 g/m 2 ), Normal ...
Page 419 - Bandeja Adicional de Acabado Interna A1
Español 81 Apéndice 4 Bandeja Adicional de Acabado Interna A1 Elemento Especifi caciones Tamaño/gramaje/tipo de papel Consulte especifi caciones de “Tamaño/gramaje/tipo de papel” en Unidad de Acabado Interna E1. Capacidad de las bandejas Consulte especifi caciones de “Capacidad por bandeja (Bandeja ...
Page 420 - Lector de Tarjetas de Copia F1; Tarjeta de Fax Súper G3 AE2
82 Apéndice 4 Lector de Tarjetas de Copia F1 Elemento Especifi caciones Tarjetas disponibles Magnéticas Método de lectura de las tarjetas Lectura magnética Dirección de lectura de las tarjetas hacia arriba Grabar/reproducir Reproducir Alimentación eléctrica De la unidad principal Dimensiones (Al x A...
Page 421 - Función de envío; Funciones de lectura
Español 83 Apéndice 4 Función de envío ● Funciones de lectura Elemento Especifi caciones Protocolo de comunicación FTP ( TCP/IP), SMB ( TCP/IP), WebDAV Formato de datos TIFF, JPEG, PDF, XPS, OOXML (PowerPoint/Word) Resolución 100 x 100 ppp, 150 x 150 ppp, 200 x 100 ppp, 200 x 200 ppp, 200 x 400 ppp,...
Page 422 - Entorno de red; Especifi caciones de hardware; Opciones de impresora; Especifi caciones de software
84 Apéndice 4 Entorno de red ● Especifi caciones de hardware Interfaz de red 10Base-T/100Base-TX/1000Base-T (RJ-45) ● Especifi caciones de software Protocolo admitido TCP/IP Tipo de trama: Ethernet II Aplicación de impresión: LPD/Raw/IPP/IPPS/FTP/WSD IPX/SPX Tipo de trama: Ethernet II/Ethernet 802.2...