Page 3 - INSTRUCTION MANUAL; Microwave Oven; SAVE THESE INSTRUCTIONS CAREFULLY
INSTRUCTION MANUAL Microwave Oven SAVE THESE INSTRUCTIONS CAREFULLY Read these instructions carefully before using yourmicrowave oven , and keep it carefully.If you follow the instructions, your oven will provide you withmany years of good service. MODEL: MIC440VTX MEC440TX GB
Page 4 - Specifications; ADDENDUM; PRECAUTIONS TO AVOID POSSIBLE EXPOSURE
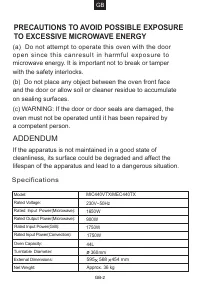
GB Model:Rated Voltage:Rated Input Power(Microwave):Rated Output Power(Microwave): Oven Capacity:Turntable Diameter:External Dimensions:Net Weight: Specifications Rated put Power(Grill): Rated Input Power(Convection): 230V~50Hz 900W 1750W 1750W 44L 360mm Approx. kg 595 MIC440VTX/MEC440TX 1650W (a) D...
Page 10 - CLEANING
CLEANING Be sure to unplug the appliance from thepower supply. 1. Clean the cavity of the oven after using with a slightly damp cloth. 2. Clean the accessories in the usual way in soapy water. 3. The door frame and seal and neighbouring parts must be cleaned carefully with a damp cloth when they are...
Page 11 - Materials you can use in microwave oven; UTENSILS; C A U T I O N; Personal Injury Hazard
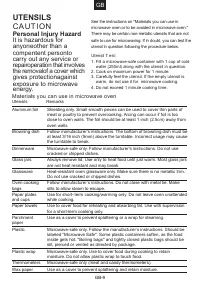
Utensil T est: 1. Fill a microwave-safe container with 1 cup of cold water (250ml) along with the utensil in question. 2. Cook on maximum power for 1 minute. 3. Carefully feel the utensil. If the empty utensil is warm, do not use it for microwave cooking. 4. Do not exceed 1 minute cooking time. Mate...
Page 12 - Materials to be avoided in microwave oven; SETTING UP; Names of Oven Parts and Accessories
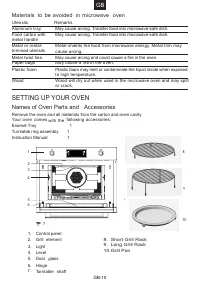
Materials to be avoided in microwave oven Utensils RemarksAluminum tray Food carton with metal handle Metal or metal- trimmed utensilsMetal twist ties Paper bagsPlastic foam Wood SETTING UP YOUR OVEN Names of Oven Parts and Accessories Remove the oven and all materials from the carton and oven cavit...
Page 13 - Important information about installing; • This appliance is NOT intended for use in a commercial
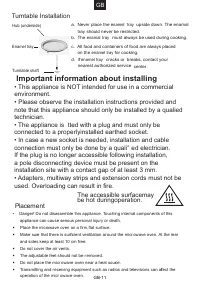
Hub (underside) tray should never be restricted. always be used during cooking. c. All food and containers of food are always placed breaks, contact your nearest authorized service center . Turntable Installation Turntable shaft a. Never place the enamel tray upside down. The enamal must on the enam...
Page 15 - INSTALL THE TRAY
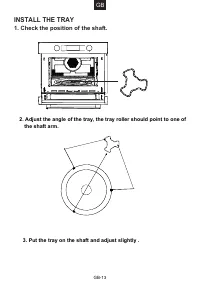
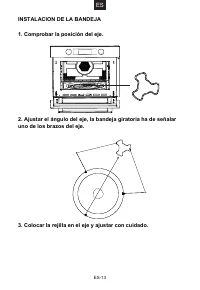
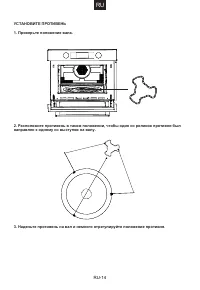
3. Put the tray on the shaft and adjust slightly . the shaft arm. 2. Adjust the angle of the tray, the tray roller should point to one of INSTALL THE TRAY 1. Check the position of the shaft. 5:1 GB GB-13
Page 16 - Control Panel and Features; OPERATION; ) Quickly preheating button
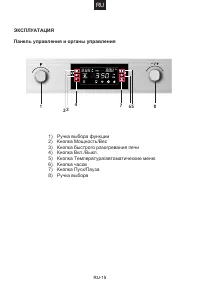
Control Panel and Features OPERATION 5 6 1) Function knob 2) Power/Weight button 3) Quickly preheating button 4) On/Off Button 5) Temperature/automenu button 6) Clock button 7) Start/Pause button 8) Selection knob 1 4 8 3 2 7 GB GB-14
Page 17 - OPERATION INSTRUCTION
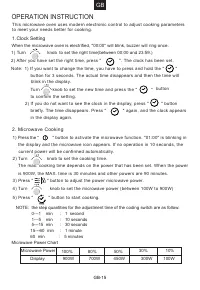
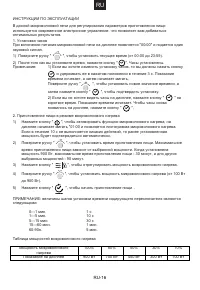
This microwave oven uses modern electronic control to adjust cooking parameters to meet your needs better for cooking. When the microwave oven is electrified, "00:00" will blink, buzzer will ring once. 2) After you have set the right time, press " ". The clock has been set.Note: 1) I...
Page 20 - Convection Cooking
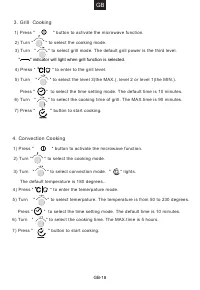
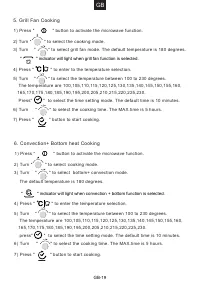
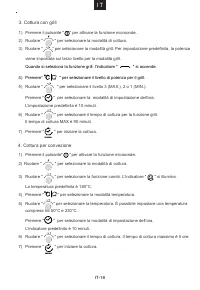
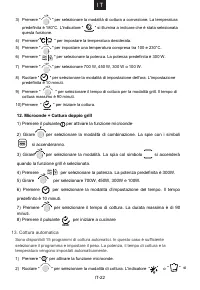
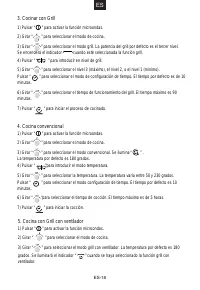
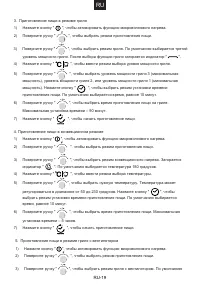
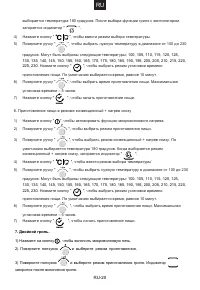
1) Press " " button to activate the microwave function. 2) Turn " " to select the cooking mode. 4) Press " 7) Press " " button to start cooking. 3. Grill Cooking " to enter to the grill level. Press " " to select the time setting mode. The default time is 10 m...
Page 22 - Double Grill Cooking
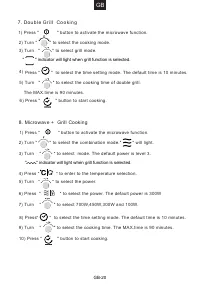
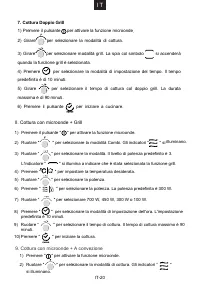
GB 1) Press " " button to activate the microwave function. 2) Turn " " to select the cooking mode. Press " " to select the time setting mode. The default time is 10 minutes. 3) Turn " " to select grill mode. " " indicator will light when grill function is sele...
Page 23 - Microwave + Convection Cooking
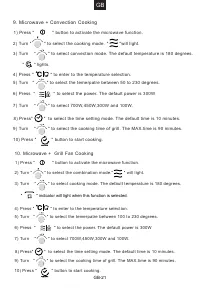
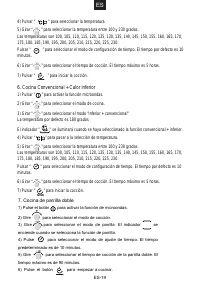
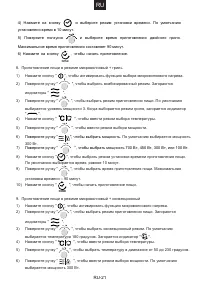
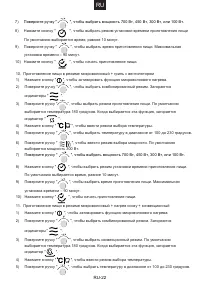
1) Press " " button to activate the microwave function. 4) Press " " to enter to the temperature selection. 10) Press " " button to start cooking. 6) Press " " to select the power. The default power is 300W Microwave + Convection Cooking 2) Turn " " to select ...
Page 24 - Microwave + Double Grill Cooking
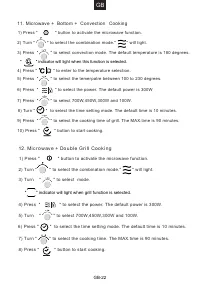
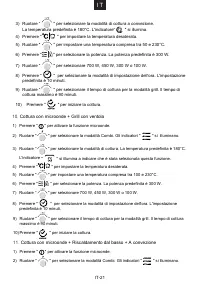
1) Press " " button to activate the microwave function. 2) Turn " " to select the combination mode." " will light. 4) Press " " to enter to the temperature selection. 3) Press " " to select convection mode. The default temperature is 180 degrees. 8) Turn "...
Page 27 - Trouble shooting
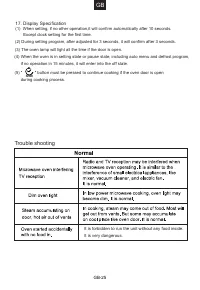
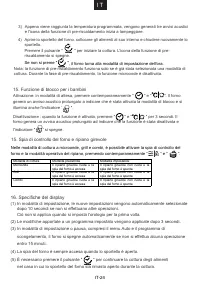
(1) When setting, if no other operation,it will confirm automatically after 10 seconds. Except clock setting for the first time. (2) During setting program, after adjusted for 3 seconds, it will confirm after 3 seconds. during cooking process. 17. Display Specification GB (3) The oven lamp will ligh...
Page 29 - Forno a microonde; Per ottenere prestazioni ottimali nel lungo termine, è; CONSERVARE CON CURA QUESTE ISTRUZIONI; I T
Forno a microonde MANUALE D'USO MODELLO: MIC440VTX MEC440TX Leggere attentamente queste istruzioni prima di utilizzare il forno a microonde e conservarle con cura. Per ottenere prestazioni ottimali nel lungo termine, è indispensabile seguire le istruzioni contenute in questo documento. CONSERVARE CO...
Page 30 - Specifiche; AGGIUNTA; PRECAUZIONI PER EVITARE LA POSSIBILE
Specifiche I T Specifiche Modello MIC440VTX/MEC440TX Tensione nominale 230V~50Hz Potenza nominale in ingresso (microonde) Potenza nominale emessa (microonde) 900 W Potenza nominale in ingresso (grill) 1750 W Potenza nominale emessa (cottura a convezione) 1750 W Capacità del forno 44 L Diametro del r...
Page 37 - Materiali che possono essere utilizzati nel forno a microonde; UTENSILI; AT T E N Z I O N E
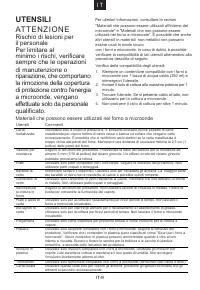
Per ulteriori informazioni, consultare le sezioni "Materiali che possono essere utilizzati all'interno del microonde" e "Materiali che non possono essere utilizzati nel forno a microonde". È possibile che anche altri utensili in materiali non metallici non possano essere usati in mod...
Page 38 - INSTALLAZIONE DEL FORNO; Nomi dei componenti del forno e accessori; Materi ali che non devono essere utilizzati nel microonde
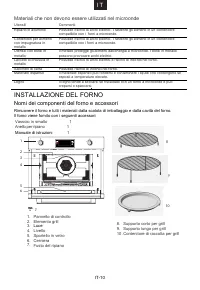
Utensili Commenti Ripiano in alluminio Possibile rischio di archi elettrici. Trasferire gli alimenti in un contenitore compatibile con i forni a microonde. Contenitori per alimenti con impugnatura in metallo Possibile rischio di archi elettrici. Trasferire gli alimenti in un contenitore compatibile ...
Page 39 - Montaggio del ripiano; Informazioni importanti per l'installazione; • Questa unità NON è progettata per l'uso in ambienti
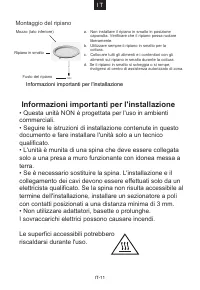
b. Utilizzare sempre il ripiano in smalto per la Montaggio del ripiano Mozzo (lato inferiore) Ripiano in smalto Fusto del ripiano a. Non installare il ripiano in smalto in posizione capovolta. Verificare che il ripiano possa ruotare liberamente. cottura. c. Collocare tutti gli alimenti e i contenito...
Page 40 - Montaggio a incasso
Posizionamento • Pericolo! Non smontare l'unità. Il contatto con i componenti interni potrebbe causare gravi lesioni personali o la morte. • Collocare il forno a microonde su una superficie solida e piana. • Verificare che ci sia un flusso di aria sufficiente attorno al forno a microonde. Lasciare u...
Page 41 - MONTAGGIO DEL RIPIANO; Controllare la posizione del fusto.
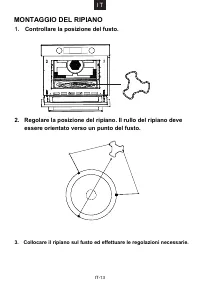
MONTAGGIO DEL RIPIANO 1. Controllare la posizione del fusto. 2. Regolare la posizione del ripiano. Il rullo del ripiano deve essere orientato verso un punto del fusto. 3. Collocare il ripiano sul fusto ed effettuare le regolazioni necessarie. 5:1 I T IT-13
Page 42 - FUNZIONAMENTO; Pannello di controllo e funzioni
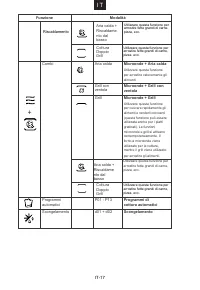
FUNZIONAMENTO Pannello di controllo e funzioni 1) Manopola per la selezione delle funzioni 2) Pulsante per la selezione della potenza/del peso 3) Pulsante per il pre-riscaldamento rapido 4) Pulsante di accensione/spegnimento 5) Pulsante per la selezione della temperatura/del menu Auto 6) Pulsante pe...
Page 43 - ISTRUZIONI PER L'USO
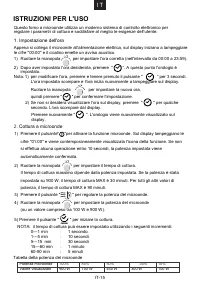
ISTRUZIONI PER L'USO Questo forno a microonde utilizza un moderno sistema di controllo elettronico per regolare i parametri di cottura e soddisfare al meglio le esigenze dell'utente. 1. Impostazione dell'ora Appena si collega il microonde all'alimentazione elettrica, sul display iniziano a lampeggia...
Page 53 - Risoluzione dei problemi; Normale; Problema
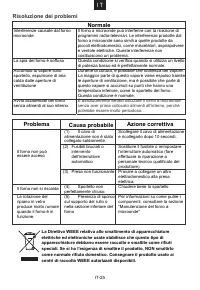
I T Risoluzione dei problemi Normale Interferenze causate dal forno microonde Il forno a microonde può interferire con la ricezione di programmi radio-televisivi. Le interferenze prodotte dal forno a microonde sono simili a quelle prodotte da piccoli elettrodomestici, come miscelatori, aspirapolvere...
Page 54 - SERVIZIO ASSISTENZA CLIENTI
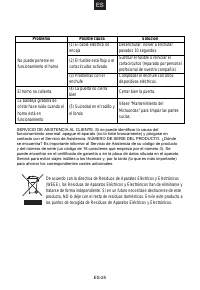
I T SERVIZIO ASSISTENZA CLIENTI CERTIFICATO DI GARANZIA CONVENZIONALE: cosa fare? Il Suo prodotto è garantito, alle condizioni e nei termini riportatisul certificato inserito nel prodotto ed in base alle previsioni deldecreto legislativo 24/02, nonché del decreto legislativo 6 settembre2005, n. 206,...
Page 55 - Horno Microondas; MANUAL DE INSTRUCCIONES; GUARDE LAS INSTRUCCIONES
Horno Microondas MANUAL DE INSTRUCCIONES MODELO: MIC440VTX MEC440TX Lea las instrucciones antes de utilizar el horno microondas y no las tire. Si sigue las instrucciones su microondas durará muchos años. GUARDE LAS INSTRUCCIONES ES
Page 56 - Especificaciones; ADENDA; PRECAUCIONES PARA EVITAR LA POSIBLE
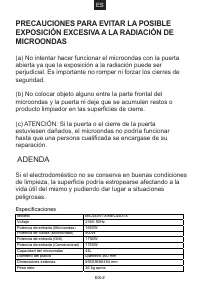
ES Especificaciones Modelo MIC440VTX/MEC440TX Potencia de entrada (Microondas) Potencia de Salida (Microondas) 900W Potencia de entrada (Grill) 1750W Potencia de entrada (Convencional) 1750W Capacidad del microondas 44L Diámetro del platillo Diámetro 360 mm Dimensiones externas 59 X568X454 mm Peso...
Page 63 - Materiales que pueden utilizarse en un horno microondas; UTENSILIOS; P R E C A U C I Ó N
Véanse las instrucciones sobre “Materiales que pueden utilizarse en el microondas o que han de evitarse” Puede haber determinados utensilios no metálicos En caso de duda realizar la comprobación siguiente. que no son seguros para microondas. Prueba: 1. Llenar un recipiente para microondas seguro c...
Page 64 - Materiales que deben evitarse en un horno microondas; CONFIGURACIÓN DEL HORNO; Nombres de las Piezas del Horno y Accesorios
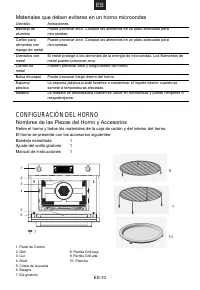
Materiales que deben evitarse en un horno microondas Utensilio Anotaciones Bandeja de aluminio Puede provocar arco. Coloque los alimentos en un plato adecuado para microondas. Cartón para alimentos con mango de metal Puede provocar arco. Coloque los alimentos en un plato adecuado para microondas. ...
Page 65 - Instalación giratoria; La superficie accesible; Información importante sobre la instalación; • Este electrodoméstico NO está destinado a un uso
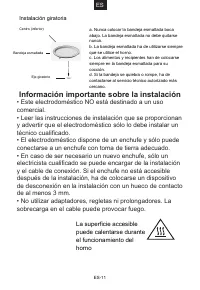
Instalación giratoria Centro (inferior) Bandeja esmaltada Eje giratorio a. Nunca colocar la bandeja esmaltada boca abajo. La bandeja esmaltada no debe quitarse nunca. b. La bandeja esmaltada ha de utilizarse siempre que se utilice el horno. c. Los alimentos y recipientes han de colocarse siempre e...
Page 68 - ) Mando de funcionamiento
FUNCIONAMIENTO Panel de control y características 1) Mando de funcionamiento 2) Botón potencia/peso 3) Botón de precalentamiento rápido 4) Botón encendido/apagado 5) Botón temperatura/menú automático 6) Reloj 7) Mando de Arranque/Pausa 8) Mando de selección ES 5 6 1 4 8 3 2 7 ES-14
Page 69 - INSTRUCCIONES DE FUNCIONAMIENTO; Configuración del reloj
INSTRUCCIONES DE FUNCIONAMIENTO Este microondas utiliza un control electrónico moderno para ajustar los parámetros de cocción y dar una mejor respuesta a las necesidades del usuario. 1. Configuración del reloj Cuando se conecta el horno a la corriente, parpadea “00:00” y suena un único zumbido. 1)...
Page 74 - Cocina Microondas + Grill con ventilador
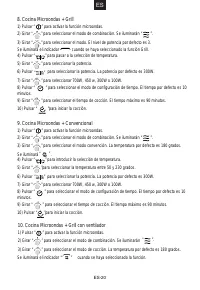
8. Cocina Microondas + Grill 1) Pulsar “ ” para activar la función microondas. 3) Girar “ ” para seleccionar el modo. El nivel de potencia por defecto es 3. Se iluminará el indicador cuando se haya seleccionado la función Grill. 4) Pulsar “ ” para pasar a la selección de temperatura. 5) Girar “ ” ...
Page 76 - Cocina Automática
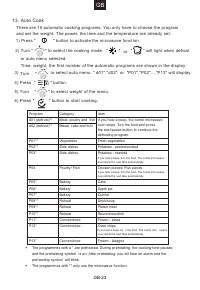
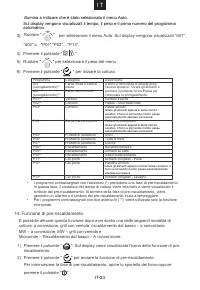
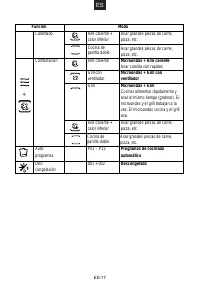
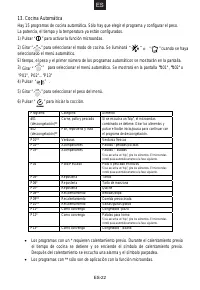
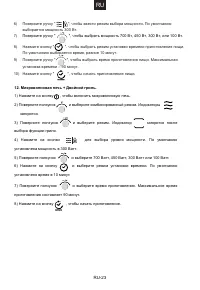
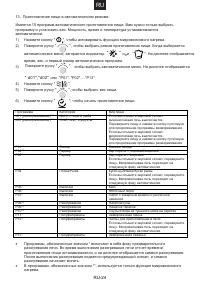
13. Cocina Automática Hay 15 programas de cocina automática. Sólo hay que elegir el programa y configurar el peso. La potencia, el tiempo y la temperatura ya están configurados. 1) Pulsar “ ” para activar la función microondas. cuando se haya seleccionado el menú automático. El tiempo, el peso y e...
Page 78 - . Especificación de pantalla; Resolución de problemas; Normal
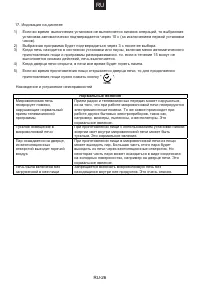
1 . Especificación de pantalla 7 (1) Al configurar, si no se hace toca nada más, la configuración se confirma automáticamente después de 10 segundos. Excepto cuando se configure el reloj por primera vez. (2) Durante el programa de configuración, después de ajustado durante 3 segundos, se confirmar...
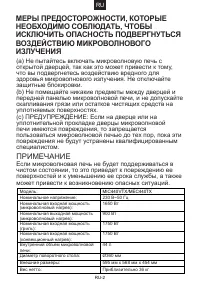
Page 81 - ПРИМЕЧАНИЕ; МЕРЫ ПРЕДОСТОРОЖНОСТИ, КОТОРЫЕ
RU Модель : MIC440 TX /MEC44 TX Номинальное напряжение : 230 В ~50 Гц Номинальная входная мощность ( микроволновый нагрев ): Номинальная выходная мощность ( микроволновый нагрев ): 900 Вт Номинальная входная мощность ( гриль ): 1750 Вт Номинальная входная мощность ( конвекционный нагрев ): 1750 Вт В...
Page 89 - ПОСУДА ДЛЯ ПРИГОТОВЛЕНИЯ ПИЩИ; В Н И М А Н И Е; Опасность получения травмы
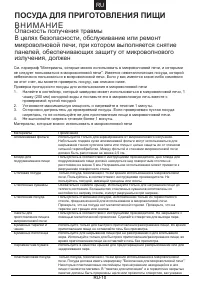
См . параграф " Материалы , которые можно использовать в микроволновой печи , и которыми не следует пользоваться в микроволновой печи ". Имеется неметаллическая посуда , которой небезопасно пользоваться в микроволновой печи . Если у вас имеются какие - либо сомнения на этот счет , вы можете ...
Page 91 - Важная информация о выполнении
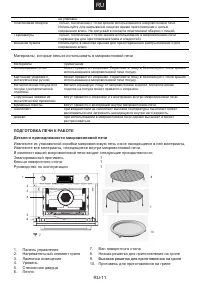
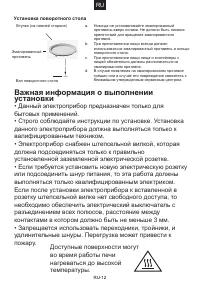
Вал поворотного стола b. При приготовлении пищи всегда должен использоваться эмалированный противень и кольцо поворотного стола . c. При приготовлении пищи пища и контейнеры с пищей обязательно должны располагаться на эмалированном противне . d. В случае появления на эмалированном противне трещин ил...