Page 2 - Flued Indoor Gas Heater - Instruction Manual; P LU M B I N G & G AS; by the following safety alert symbols:; MODEL; BRAHMA STRATOS 3.0 NG
Flued Indoor Gas Heater - Instruction Manual 2 July 2019 - V1 P LU M B I N G & G AS 2 GENERAL COMPLIANCE ...
Page 3 - • ventilate the premises by opening the doors
Wireless Controller - Instruction Manual 3 BASIC SAFETY PRECAUTIONS Please remember that certain basic safety pre- cautions must be taken when using products requiring gas and electricity: - The appliance must not be used by children and disabled persons if unassisted. - If you smell gas, do not sta...
Page 4 - • position the master switch of the system, if fit
Wireless Controller - Instruction Manual 4 GENERAL INFORMATION This booklet and that for the Installer and After-Sales Centre are an integral part of the appliance and consequently must be looked after carefully and ALWAYS accompany it even when it is transferred to another owner or user or to anoth...
Page 6 - Wireless radio chronothermostat; WIRELESS; For the use and control of all gas appliances
Wireless Controller - Instruction Manual 6 Wireless radio chronothermostat WIRELESS (optional, can also be purchased subsequently) For the use and control of all gas appliances in the range made by the Manufacturer. 7
Page 7 - ABOUT THE RADIO WIRELESS CHRONOTHERMOSTAT
Wireless Controller - Instruction Manual 7 ABOUT THE RADIO WIRELESS CHRONOTHERMOSTAT The use of this control allows: - the best positioning of the detection sensor (on wall or table base) for controlling the actual room temperature; - the possibility of controlling several appliances in the same roo...
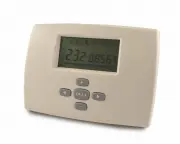
Page 8 - DIMENSIONS
Wireless Controller - Instruction Manual 8 DIMENSIONS The Remote Digital Control features a special elegant, compact and easy to use design. This product, like all our products, has been made with special attention to detail, but also as regards the materials used. It will provide the user with exce...
Page 10 - • Required setting
Wireless Controller - Instruction Manual 10 USING THE WIRELESS CONTROL DESCRIPTION OF KEYS note: the keys acquire different functions in the different menus. 1 - Selection, increase value, etc.; 2 - Change MENU; 3 - OK, synchronisation, display, setting and next parameter; 4 - Selection, decrease va...
Page 12 - • WIRELESS CONTROL START
Wireless Controller - Instruction Manual 12 13 • WIRELESS CONTROL START - Press the On/Off key (7) to start the appliance. - Press the Wireless key (5) of the control for 2 seconds: the LED (4) flashes. T h e a p p l i a n c e w a i t s f o r t h e s i g n a l f r o m Wireless control for 60 seconds...
Page 13 - PROGRAMMING; • TIME AND DAY OF WEEK
Wireless Controller - Instruction Manual 13 PROGRAMMING If no type of operation is selected/set, after 30 seconds the Wireless automatically positions on the AUTO menu. • TIME AND DAY OF WEEK - Press the RIGHT or LEFT keys to enter this menu. - Press + or – to set minutes. - Press OK to confirm. - P...
Page 14 - • REDUCED OPERATION
Wireless Controller - Instruction Manual 14 • REDUCED OPERATION - Press the RIGHT or LEFT keys to enter this MENU. - Press + or – to set the value. - Press OK to confirm. The room remperature reappears immediately after. The appliance maintains the set temperature in continuous mode (for hours or da...
Page 15 - • PROGRAM MENU
Wireless Controller - Instruction Manual 15 • PROGRAM MENU This mode allows setting a program and relating it to the days of the week (e.g., it is possible to have a different pro- gram for each day of the week). The programs from P1 to P9 are preset and cannot be changed by the user. P1) Morning, e...
Page 16 - Every time a program is set/changed in the
Wireless Controller - Instruction Manual 16 Personalisable programs: U1, U2, U3 and U4 - Press the RIGHT or LEFT keys to enter this MENU. - U1 flashing: press the + or – keys to select the required program (U1, U2, U3 or U4). - Press OK to confirm. - Flashing time: start programming day 1. - Press t...
Page 17 - • SPECIAL FUNCTIONS
Wireless Controller - Instruction Manual 17 • SPECIAL FUNCTIONS HOLIDAY - Press the RIGHT or LEFT keys to enter this MENU: immedia- tely after menu P. In the example alongside, the departure point of the HOLIDAY mode is shown – “NO” indicates the mode is not operative. - Press + or – to decide how m...
Page 18 - • HIDDEN FUNCTIONS
Wireless Controller - Instruction Manual 18 19 • HIDDEN FUNCTIONS This series of hidden MENUS controls: - Gas heating output - Ventilation speed - Electric heating (function disabled) - Press the LH arrow and + OK keys together to enter the hid- den MENUS. 1 - OPERATION - Press + or – to select prog...
Page 20 - • SPECIFICATIONS
Wireless Controller - Instruction Manual 20 • SPECIFICATIONS Operating temperature: 0°C - 50°C (32°F - 122°F). Tolerance in set temperature values: 0.5°C (0.5°F). Temperature ranges that can be set: comfort (35°C - 95°F) and reduced (5°C - 41°F). Adjustment characteristics: cycle (30 minutes) and cy...
Page 21 - ON
Wireless Controller - Instruction Manual 21 COMMISSIONING This appliance must only be installed by an authorised person. WINTER OPERATION - Open the gas tap. - Operate the master switch of the power mains or connect the power plug to the appliance. - Press the On/Off key to start the appliance. - Pr...
Page 22 - WINTER OPERATION WITH “ANTIFREEZE” (only with Wireless)
Wireless Controller - Instruction Manual 22 IGNITION FAILURE If the RED LED comes on steady after about 40 seconds, this means the appliance has not com- pleted the standard ignition procedure (BLOCKED burner). - Make sure the gas tap is open. - Reset the appliance by turning it off and on by means ...
Page 23 - * With flame Off, an icon appears on the Display unit with 1 base notch.
Wireless Controller - Instruction Manual 23 - Press the - or + key to select “GAS LO*” operation; * With the flame On, an icon appears on the Display unit with 1 base notch + flame. * With flame Off, an icon appears on the Display unit with 1 base notch. - Press the OK key to confirm and continue; -...
Page 24 - - Press the On/Off key on board the machine to
Wireless Controller - Instruction Manual 24 SWITCHING OFF FOR LONG PERIODS If the appliance is not used for a long period of time, the following operations should be per- formed: - Press the On/Off key on board the machine to switch off the appliance. - Remove the plug from the socket on the appli- ...
Page 25 - • No power supply
Wireless Controller - Instruction Manual 25 TROUBLESHOOTING • No power supply If the appliance fails to start after pressing the On/ Off key on the control: - Make sure the appliance plug is properly inserted in the power socket. - Make sure the master switch, if fitted, is in “on” position. If the ...