Bromic 2620635 - User Manual
Bromic 2620635 Heater – User Manual, read for free online in PDF format. We hope this helps you resolve any issues you may have. If you have further questions, please contact us through the contact form.


Table of Contents:
- Page 2 – IMPORTANT INSTRUCTIONS; DANGER, WARNING, IMPORTANT; Correct disposal of this product
- Page 3 – CONTENT
- Page 4 – IMPORTANT NOTES & WARNINGS; WARNING
- Page 5 – IMPORTANT NOTES AND WARNINGS; CONTINUED; SAVE THESE INSTRUCTIONS
- Page 6 – SPECIFICATIONS
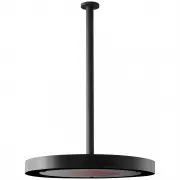
- Page 7 – KEY DIMENSIONS & CLEARANCES
- Page 8 – INSTALLATION INSTRUCTIONS - CEILING MOUNTED HEATER; Box 1 Contents
- Page 9 – Eclipse Pendant Control; IMPORTANT; Box 3 Contents; Bolts for fastening to Ceiling surface; Caution – Glass – Handle with care
- Page 11 – All packaging materials must be removed before
- Page 14 – tighten all four screws, to lock heater in place.; Insert the Heater Bracket into the Twin
- Page 15 – Installation Instructions – Wall Mounted Heater; INSTALLATION INSTRUCTIONS - WALL MOUNTED HEATER
- Page 18 – desired location, using appropriately sized
- Page 24 – ELECTRICAL INSTALLATION – PENDANT HEATERS CONTROL; installing the Eclipse Control Box.; DANGER; per the wiring diagram. The Live, Neutral
- Page 26 – FOR INSTALLATION USING; (Bromic Eclipse Pendant Control supplied separately); ONLY TO BE INSTALLED & SERVICED BY LICENSED & AUTHORIZED TECHNICIAN.; PENDANT HEATER CONTROL WIRING DIAGRAM
- Page 28 – OPERATING INSTRUCTIONS; TURNING THE APPLIANCE ON; REMOTE CONTROL FUNCTIONS; (SUPPLIED WITH BROMIC ECLIPSE PENDANT CONTROL)
- Page 29 – REMOTE CONTROL BATTERY
- Page 30 – PAIRING REMOTE CONTROL TO LED PCB (BOTTOM 3 BUTTONS OF REMOTE).
- Page 31 – MAINTENANCE & SERVICING; MAINTENANCE; DO NOT
- Page 32 – TROUBLESHOOTING; REPLACEMENT PARTS; SYMPTOM
VERSION 1.3 AU
ECLIPSE SMART-HEAT™
ELECTRIC
BY BROMIC
INSTRUCTION MANUAL
WARNING
PLEASE READ AND SAVE THESE
INSTRUCTIONS FOR FUTURE REFERENCE
!
"Loading the manual" means you need to wait until the file loads and becomes available for online reading. Some manuals are very large, and the time they take to appear depends on your internet speed.
Summary
2 bromic.com/heat ! IMPORTANT INSTRUCTIONS This manual contains important information about the installation, operation, and maintenance of Eclipse Smart-Heat TM Electric Heaters. Please pay close attention to the important safety information shown throughout this instruction manual. Any safety info...
3 bromic.com/heat CONTENT IMPORTANT NOTES & WARNINGS 4-5 PRODUCT OVERVIEW 6 PRODUCT DESCRIPTION 6 SPECIFICATIONS 6 PRODUCT FEATURES 6 KEY DIMENSIONS & CLEARANCES 7 INSTALLATION INSTRUCTIONS - CEILING MOUNTED HEATER 8-14 BOX CONTENTS 8-9 WARNING 9 INSTRUCTIONS FOR SINGLE POLE OPTIONS 10-11 IN...
4 bromic.com/heat IMPORTANT NOTES & WARNINGS WARNING • IMPORTANT - Installation MUST be carried out by a licensed electrical contractor. • Heater must be installed by 2 persons. • Improper installation, adjustment, or alteration and failure to follow the warnings and instructions in this manual ...