Page 2 - CONTENTS; CONGRATULATIONS; on the purchase of your Breville product; Register online for product support
3 CONTENTS 4 Breville recommends safety fi rst 6 Know your Breville product 10 Operating your Breville product 21 Coffee making tips & preparation 26 Care & cleaning 33 Troubleshooting 42 Coffees to try 44 French CONGRATULATIONS on the purchase of your Breville product * Registering is not a ...
Page 3 - WARNING; SHORT CORD INSTRUCTIONS; IMPORTANT SAFEGUARDS
4 5 BREVILLE RECOMMENDS SAFETY FIRST SAVE THESE INSTRUCTIONS BREVILLE RECOMMENDS SAFETY FIRST At Breville we are very safety conscious. We design and manufacture consumer products with the safety of you, our valued customer, foremost in mind. In addition we ask that you exercise a degree of care whe...
Page 4 - KNOW YOUR BREVILLE PRODUCT; KNOW; your Breville product
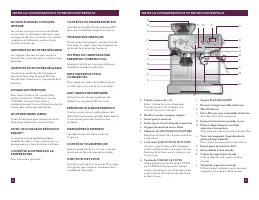
7 KNOW YOUR BREVILLE PRODUCT INTEGRATED CONICAL BURR GRINDER Stainless steel conical burrs maximize ground coffee surface area for a full espresso fl avor. Upper and lower burrs are removable for cleaning. ADJUSTABLE GRIND SIZE Espresso grind settings from fi ne to coarse for optimal extraction. ADJUS...
Page 5 - ACCESSORIES
8 9 KNOW YOUR BREVILLE PRODUCT KNOW YOUR BREVILLE PRODUCT I. POWER button J. Integrated removable 54mm tamper K. Group head L. 54mm stainless steel portafi lter With commercial style spouts. M. Extra-tall cup clearance for tall mugs N. Removable wet & dry coffee separator drip tray With Empty Me!...
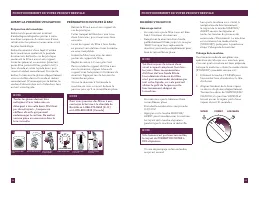
Page 6 - CONDITIONING THE WATER FILTER; OPERATING
11 OPERATING BEFORE FIRST USE Machine Preparation Remove and discard all labeling and packaging materials attached to your espresso machine. Ensure you have removed all parts and accessories before discarding the packaging. Remove the water tank located at the back of the machine by lifting the wate...
Page 8 - Razor
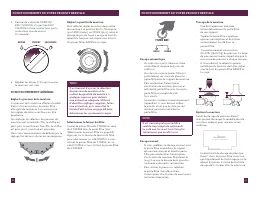
14 15 OPERATING Inserting the Portafi lter Place the portafi lter underneath the group head so that the handle is aligned with the INSERT position. Insert the portafi lter into the group head and rotate the handle towards the center until resistance is felt. LOCK INSERT Preset Shot Volume - 1 CUP butto...
Page 9 - ESPRESSO PRESSURE GAUGE
16 17 OPERATING OPERATING Resetting Default Volumes To reset the machine to the default 1 CUP and 2 CUP shot volumes, press and hold the PROGRAM button until the machine beeps three times. Release the PROGRAM button. The machine will return to its original default volume settings and default espress...
Page 10 - AUTO PURGE; SLEEP & AUTO OFF MODE
18 19 OPERATING OPERATING NOTE After 5 minutes of continuous steaming, the machine will automatically disable the steam function. The STEAM/HOT WATER light will fl ash. When this occurs return the dial to the STANDBY position. Hot Water • Turn the STEAM/HOT WATER dial to the HOT WATER position. The S...
Page 11 - COFFEE MAKING TIPS
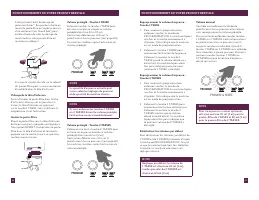
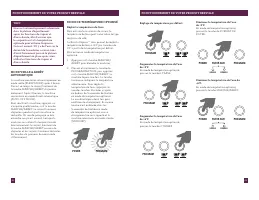
20 COFFEE MAKING TIPS & PREPARATION Decrease Water Temperature -2˚F: In Advanced Temperature Mode, press the FILTER SIZE button. SINGLE FILTER SIZE DOUBLE PROGRAM POWER Decrease Water Temperature -4˚F: In Advanced Temperature Mode, press the POWER button. SINGLE FILTER SIZE DOUBLE PROGRAM POWER ...
Page 12 - COFFEE MAKING TIPS & PREPARATION
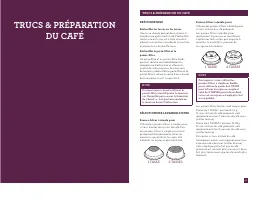
22 23 PAGE HEADER..... PAGE HEADER..... COFFEE MAKING TIPS & PREPARATION PRE-HEATING Heating your cup or glass A warm cup will help maintain the coffee’s optimal temperature. Pre-heat your cup by rinsing with hot water from the hot water outlet and place on the cup warming tray. Heating the port...
Page 13 - EXTRACTION GUIDE
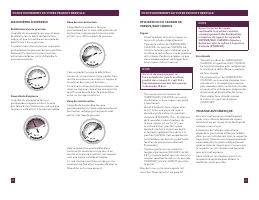
24 PAGE HEADER..... COFFEE MAKING TIPS & PREPARATION The STEAM/HOT WATER light will fl ash to indicate the machine is heating to create steam. During this time, condensed water may purge from the steam wand. This is normal. When the STEAM/HOT WATER light stops fl ashing the steam wand is ready for...
Page 14 - CLEANING CYCLE
CARE & CLEANING 27 CARE & CLEANING The provided water fi lter helps prevent scale build-up in and on many of the inner functioning components. Replacing the water fi lter every two months will reduce the need to decalcify the machine. If you live in a hard water area, we recommend you change t...
Page 15 - DECALCIFYING; CLEANING THE CONICAL BURR GRINDER
28 29 CARE & CLEANING DECALCIFYING After regular use, hard water can causemineral build up in and on many of theinner functioning components, reducingthe brewing fl ow, brewing temperature, power of the machine, and taste of the espresso. We advise decalcifying the machine every month and especia...
Page 16 - STORING YOUR MACHINE
30 31 PAGE HEADER..... CARE & CLEANING CLEANING THE STEAM WAND • The steam wand should always be cleaned after texturing milk. Wipe the steam wand with a damp cloth. Then with the steam wand tip directed over the drip tray, briefl y set the STEAM/HOT WATER dial to the STEAM position. This will cl...
Page 17 - USING THE ALLEN KEY; TROUBLESHOOTING
32 USING THE ALLEN KEY Over time, the silicone seal surrounding theshower screen will need to be replaced toensure optimum brewing performance. 1. Press the POWER button to switch the machine off and unplug the cord from the power outlet. 2. Carefully remove the water tank and drip tray, taking part...
Page 22 - COFFEES TO TRY
COFFEES TO TRY 43 COFFEES TO TRY CAPPUCCINO A single shot of espresso with textured milk, garnished with drinking chocolate. ESPRESSO Intense and aromatic, it is also known as a short black and is served in a small cup or glass. LATTÉ A latté consists of a single espresso with textured milk and appr...
Page 23 - Consommateurs américains:; Inscrivez-vous en ligne pour le soutien; FÉLICITATIONS; pour l’achat de votre produit Breville; TABLE DES MATIÈRES
* L’e n re g is t re me n t n ’e s t pas u n sub s t i t u t à la p reu ve d ’ac hat l o r sq u e vou s sou me t t ez u ne ré c la ma t i o n d e ga r a n t i e. Consommateurs américains: www.brevilleusa.com Consommateurs canadiens: www.breville.ca Inscrivez-vous en ligne pour le soutien technique e...
Page 24 - ATTENTION
46 47 BREVILLE VOUS RECOMMANDE LA SÉCURITÉ AVANT TOUT Chez Breville, la sécurité occupe une place de choix. Nous concevons et fabriquons des produits de consommation sans jamais perdre de vue la sécurité de notre précieuse clientèle. De plus, nous vous demandons d’être très vigilant lorsque vous uti...
Page 25 - BREVILLE VOUS RECOMMANDE LA SÉCURITÉ AVANT TOUT; CONSERVEZ CES INSTRUCTIONS; FICHE ASSIST; DE BREVILLE; FAITES LA; de votre produit Breville
48 PAGE HEADER..... BREVILLE VOUS RECOMMANDE LA SÉCURITÉ AVANT TOUT CONSERVEZ CES INSTRUCTIONS COURT CORDOND’ALIMENTATION Votre appareil Breville est muni d’un court cordon d’alimentation très sécuritaire qui prévient les blessures corporelles ou dommages résultant du fait de tirer, trébucher ou s’e...
Page 26 - FAITES LA CONNAISSANCE DE VOTRE PRODUIT BREVILLE
50 51 FAITES LA CONNAISSANCE DE VOTRE PRODUIT BREVILLE 50 MOULIN À MEULES CONIQUES INTÉGRÉ Les meules coniques en acier inoxydable maximisent la surface de café moulu, pour un espresso des plus savoureux. Les meules supérieure et inférieure se retirent pour faciliter le nettoyage. GROSSEUR DE MOUTUR...
Page 27 - FONCTONNEMENT
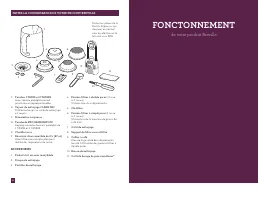
52 52 T. Touches 1 TASSE et 2 TASSES Avec volume préréglé, manuel prioritaire ou reprogrammable. U. Voyant de nettoyage CLEAN ME! S’illumine lorsqu’un cycle de nettoyage est requis. V. Manomètre à espresso W. Touche de PROGRAMMATION Reprogramme les formats préréglés de1 TASSE et 2 TASSES. X. Chauffe...
Page 28 - PRÉPARATION DU FILTRE À EAU; FONCTIONNEMENT DE VOTRE PRODUIT BREVILLE
54 FONCTIONNEMENT DE VOTRE PRODUIT BREVILLE 54 AVANT LA PREMIÈRE UTILISATION Préparation de la machine Retirez et disposez de tout matériel d’emballage et étiquettes jointes à votre machine à espresso. Assurez-vous d’avoir retiré toutes les pièces et accessoires avant de jeter l’emballage. Retirez l...
Page 29 - FONCTIONNEMENT GÉNÉRAL
56 57 3. Tournez le cadran de VAPEUR/EAU CHAUDE à la position EAU CHAUDE et faites couler l’eau par la sortie d’eau chaude durant 10 secondes. VAPEUR STANDBY EAU CHAUDE 4. Répétez les étapes 1–3 jusqu’à ce que le réservoir soit vide. FONCTIONNEMENT GÉNÉRAL Régler la grosseur de la mouture La grosseu...
Page 31 - MANOMÈTRE À ESPRESSO; VIDANGE AUTOMATIQUE
60 61 MANOMÈTRE À ESPRESSO Préinfusion à basse pression L’aiguille du manomètre sera dans la zone de préinfusion au début de l’extraction, indiquant que la machine est en mode de préinfusion à basse pression. La préinfusion à basse pression augmente graduellement la pression de l’eau, gonfl ant lente...
Page 32 - MODE DE TEMPÉRATURE OPTIMISÉ
62 63 TRUC L’eau est automatiquement acheminée dans le plateau d’égouttement après les fonctions de vapeur et d’eau chaude, afi n d’assurer que le serpentin est à la température optimale pour extraire l’espresso. Cela est normal. S’il y a de l’eau sur le devant de la machine, assurez-vous d’avoir fer...
Page 33 - DU CAFÉ; TRUCS & PRÉPARATION DU CAFÉ; SÉLECTIONNER LE PANIER-FILTRE; TASSE
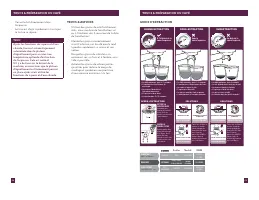
TRUCS & PRÉPARATION DU CAFÉ 65 TRUCS & PRÉPARATION DU CAFÉ PRÉCHAUFFAGE Réchauffer les tasses ou les verres Une tasse chaude permet de maintenir la température optimale du café. Préchauffez votre tasse en la rinçant à l’eau chaude à même la sortie d’eau chaude de la machine, et placez-la sur...
Page 35 - GUIDE D’EXTRACTION
68 69 PAGE HEADER..... TRUCS & PRÉPARATION DU CAFÉ • Versez le lait directement dans l’espresso. • Le truc est d’agir rapidement avant que le lait ne se sépare. TRUC Après les fonctions de vapeur et d’eau chaude, l’eau est automatiquement acheminée dans le plateau d’égouttement pour assurer une ...
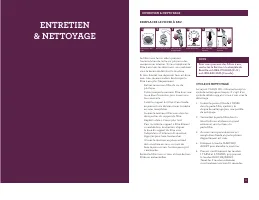
Page 36 - ENTRETIEN; CYCLE DE NETTOYAGE; ENTRETIEN & NETTOYAGE
71 ENTRETIEN & NETTOYAGE Le fi ltre à eau fourni aide à prévenir l’accumulation de tartre sur plusieurs des composantes internes. Si vous remplacez le fi ltre à eau tous les deux mois, vous réduirez ainsi le besoin de détartrer la machine. Si vous habitez une région où l’eau est dure, nous vous re...
Page 37 - NETTOYAGE DU MOULIN À MEULES CONIQUES
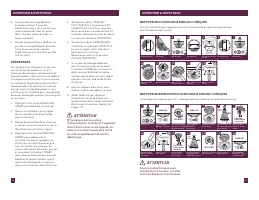
72 73 ENTRETIEN & NETTOYAGE ENTRETIEN & NETTOYAGE 6. Le cycle de nettoyage débutera et durera environ 5 minutes. Pendant ce temps, l’eau coulera par intermittence des becs du porte-fi ltre. Une fois terminé, 3 bips se feront entendre. 7. Retirez le porte-fi ltre et vérifi ez si la pastille est ...
Page 38 - RANGEMENT DE LA MACHINE
74 75 PAGE HEADER..... ENTRETIEN & NETTOYAGE ENTRETIEN & NETTOYAGE NETTOYER LA BUSE VAPEUR • La buse vapeur doit être nettoyée après chaque moussage. Essuyez la buse avec un chiffon humide. Puis, avec l’embout de la buse dirigé sur le plateau d’égouttement, tournez brièvement le cadran de VA...
Page 39 - GUIDE DE DÉPANNAGE
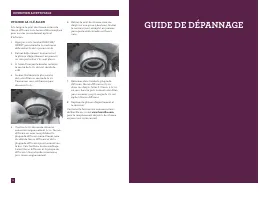
76 UTILISER LA CLÉ ALLEN À la longue, le joint de silicone autour de l’écran diffuseur aura besoin d’être remplacé pour assurer un rendement optimal d’infusion. 1. Appuyez sur la touche MARCHE/ARRÊT pour éteindre la machine et débranchez-la de la prise murale. 2. Retirez délicatement le réservoir et...
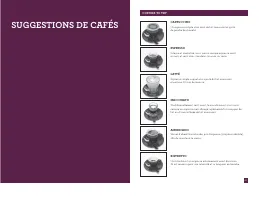
Page 44 - SUGGESTIONS DE CAFÉS
SUGGESTIONS DE CAFÉS 87 COFFEES TO TRY CAPPUCCINO Un espresso simple avec ajout de lait mousseux et garni de poudre de chocolat. ESPRESSO Intense et aromatisé, aussi connu comme espresso court ou noir, et servi dans une demi-tasse ou un verre. LATTÉ Espresso simple auquel on a ajouté du lait mousseu...