Zigmund & Shtain GN 238.451 B - Manuals
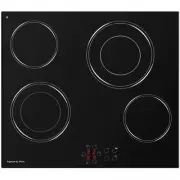
User Manual Zigmund & Shtain GN 238.451 B


Summary
2 Dear User, Our objective is to make this product provide you with the best output which is manufactured in our modern facilities in a careful working environment, in compliance with total quality concept. Therefore, we suggest you to read the user manual carefully before using the product and, kee...
3 CONTENTS Important Warnings 4 Introduction Of The Appliance 6 Control Panel 7 Electrical Connection Scheme 7 Important Warnings 8 If Built-In Oven Is Placed Under Cooktop 10 Installation Of Cookstop 10 Counter Cutting Sizes And Installation Of Your Cooktop 12 Correct Place For Installation 13 Vent...
4 IMPORTANT WARNINGS1. WARNING: Before touching the connection terminals, all supply circuit should be disconnected. 2. WARNING: Any inadvertent cooking made with fats and oils can be dangerous and cause fire. 3. WARNING: Risk of fire; do not store the food materials on the cooking surface. 4. WARNI...
Zigmund & Shtain Hobs Manuals
-
 Zigmund & Shtain CIS 029.45 BX
User Manual
Zigmund & Shtain CIS 029.45 BX
User Manual
-
Zigmund & Shtain CIS 029.45 BX
Manual
-
 Zigmund & Shtain CIS 029.45 WX
User Manual
Zigmund & Shtain CIS 029.45 WX
User Manual
-
 Zigmund & Shtain CIS 199.45 BX
User Manual
Zigmund & Shtain CIS 199.45 BX
User Manual
-
 Zigmund & Shtain CIS 299.60 BX
User Manual
Zigmund & Shtain CIS 299.60 BX
User Manual
-
 Zigmund & Shtain CIS 299.60 WX
User Manual
Zigmund & Shtain CIS 299.60 WX
User Manual
-
 Zigmund & Shtain CIS 321.60 BX
User Manual
Zigmund & Shtain CIS 321.60 BX
User Manual
-
 Zigmund & Shtain CNS 021.60 DX
User Manual
Zigmund & Shtain CNS 021.60 DX
User Manual
-
 Zigmund & Shtain CNS 024.60 BX
User Manual
Zigmund & Shtain CNS 024.60 BX
User Manual
-
 Zigmund & Shtain CNS 147.30 BX
User Manual
Zigmund & Shtain CNS 147.30 BX
User Manual
-
 Zigmund & Shtain CNS 249.45 WX
User Manual
Zigmund & Shtain CNS 249.45 WX
User Manual
-
 Zigmund & Shtain CNS 249.60 BX
User Manual
Zigmund & Shtain CNS 249.60 BX
User Manual
-
 Zigmund & Shtain CNS 249.60 WX
User Manual
Zigmund & Shtain CNS 249.60 WX
User Manual
-
 Zigmund & Shtain CNS 269.60 BX
User Manual
Zigmund & Shtain CNS 269.60 BX
User Manual
-
 Zigmund & Shtain CNS 302.45 BX
User Manual
Zigmund & Shtain CNS 302.45 BX
User Manual
-
 Zigmund & Shtain CNS 302.45 WX
User Manual
Zigmund & Shtain CNS 302.45 WX
User Manual
-
 Zigmund & Shtain GN 17.451 A
User Manual
Zigmund & Shtain GN 17.451 A
User Manual
-
 Zigmund & Shtain GN 17.451 M
User Manual
Zigmund & Shtain GN 17.451 M
User Manual
-
 Zigmund & Shtain GN 17.451 X
User Manual
Zigmund & Shtain GN 17.451 X
User Manual
-
 Zigmund & Shtain GN 228.61 B
User Manual
Zigmund & Shtain GN 228.61 B
User Manual