Page 3 - Table of Contents
Table of Contents SAFETY INSTRUCTIONS .................................................................................................. pag. 4 LIST OF MATERIALS ........................................................................................................... pag. 8 DUCTING CALCULATION SHE...
Page 4 - READ AND SAVE THESE INSTRUCTIONS; Safety instructions 1/4
IMPORTANT SAFETY INSTRUCTIONS FOR RESIDENTIAL USE ONLY READ AND SAVE THESE INSTRUCTIONS PLEASE READ ENTIRE INSTRUCTIONS BEFORE PROCEEDING. IMPORTANT : Save these Instructions for the Local Electrical Inspectors use. INSTALLER : Please leave these Instructions with this unit for the owner. OWNER : Pl...
Page 5 - Safety instructions 2/4
ing and greasy spillovers that may ignite. Heat oils slowly on low or medium settings. B. Always turn hood ON when cooking at high heat or when flambeing foods ( i.e. Crepes Suzette, Cherries Jubilee, Peppercorn Beef Flambè ). C. Clean ventilating fans frequently. Grease should not be allowed to acc...
Page 6 - Safety instructions 3/4; Electrical Requirements
B. Sufficient air is needed for proper combustion and exhausting of gases through the flue (chimney) of fuel burning equipment to prevent back drafting. Follow the heating equipment manufacturer’s guideline and safety standards such as those published by the National Fire Protection Association (NFP...
Page 7 - Federal Communication Commission Interface Statement; Safety instructions 4/4
- Do not have a fuse in the neutral or ground circuit.- This appliance requires a 120V 60Hz electrical supply and connected to an individual properly grounded branch circuit protected by a 15 or 20 ampere circuit breaker or time delay fuse. Wiring must be 2 wire with ground. Please also refer to Ele...
Page 8 - List of Materials
Models: DLA-E42ASSX / DLA-M90ASSX Duct Covers Assembly Duct Cover Bracket Panel List of Materials Control Box marked '120 VAC input' Filters Led Light Remote Blower Wiring Harness Remote Blower Wiring Extension Remote Blower Box Electrical System Box Remote Blower Collar with Damper Hardware - 8 -
Page 10 - Ducting Calculation Sheet
Ducting Calculation Sheet Duct pieces Total Equivalent number length x used = 3- 1/ 4” x 10” Rect., straight 1 Ft. x ( ) = Ft. 3- 1/ 4” x 10” Rect. to 6” round transition 5 Ft. x ( ) = Ft. 3- 1/ 4” x 10” Rect. to 6” round transition 90 0 elbow 20 Ft. x ( ) = Ft. 6”, 7”, 8”, 10” Round, 90 0 15 Ft. x ...
Page 11 - Hood Specifications
35-3/8”, 41-15/16” 27-9/16” 9-15/16” 16-1/2” 22” 3-9/16” 5/8” 1-3/4” 14-1/16” 18-1/8” 16-1/2” 3-1/2” (Ø 6'') Internal Blower 4-5/16” (Ø 8" ) Remote Blower 8” 3/4” 9-3/16” 16-15/16” STANDARD min. ducted - 27” min. recirc. - 31” max. - 44-1/2” Z1C-00VS min. ducted - 43-1/2” min. recirc. - 47-1/2” ...
Page 13 - Installation - Internal Blower
The following instructions are for installing the internal blower. CAUTION: To reduce the risk of fire and electric shock, install this rangehood only with internal blower models CBI-290A or CBI-600A. For external and in-line blower prepara-tion please turn to page 15. 1.Remove the 6” round metal kn...
Page 15 - Preparation
The following instructions are for preparing the hood for use with an external or in-line blowers models CBE-1000 or PBN-1000A.CAUTION: To reduce the risk of fire and electric shock, install this rangehood only with remote blowers rated maximum 6.2 A. For internal blower instructions please turn to ...
Page 17 - Installation - Ducting Options
WARNING FIRE HAZARD NEVER exhaust air or terminate duct work into spaces between walls, crawl spaces, ceiling, attics or garages. All exhaust must be ducted to the outside, unless using the recirculating op-tion. Use single wall rigid Metal ductwork only. Fasten all connections with sheet metal scre...
Page 18 - Installation - Mounting the Range Hood
MOUNTING HEIGHTS The range hood must be installed at a minimum height of 24 inches (61cm) from the cooking surface. If a connecting duct work composed of two parts is used, the upper part must be placed outside the lower part. Do not connect the range hood duct to the same duct used to exhaust hot a...
Page 19 - Installation - Power Supply Connection
GENERAL • Carefully read the following important information regarding installationsafety and maintenance. Keep this information booklet accessible for furtherconsultations. POWER SUPPLY CONNECTION For connection to the power supply refer to the following: 1. Lift the bottom part of the duct cover a...
Page 20 - Installation - Mounting the Duct Cover
MOUNTING THE DUCT COVER 1. Install the electrical wiring and test hood for functions prior to installing the duct covers. 2. If using hood in air recirculating mode make sure to install the air diverter plate prior to mounting the duct covers. See the manual included with the recirculating kit for m...
Page 21 - Touch Control
Touch Control A – Lights Button: Lights are three level (high, medium, low). From stand-by-on mode, touch once for high, twice for medium, three times for low, four times to cycle back. B - Delay Off Button: Press the Delay Off Button to enable the ten-minute delay-off function, no matter at what sp...
Page 22 - Optional Remote Control
Optional Remote Control SYNCHRONIZATION: To synchronize the remote control with the range hood for the first time, proceed as follows:1. With the range hood off, press and hold the “Power” on the hood for 4 seconds (Fig.1) until the “3rd speed” indicator on the hood flashes for 3 times.2. Press any ...
Page 23 - Maintenance
Maintenance • It is recommended to operate the appliance prior to cooking. It is recommended to leave the appliance in operation for 5 minutes after cooking is completed in order to completely eliminate cooking vapors and odors. The proper function of the range hood is conditioned by the regularity ...
Page 24 - Wiring Diagram; INTERNAL BLOWER CIRCUIT DIAGRAM
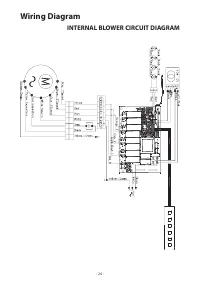
Wiring Diagram INTERNAL BLOWER CIRCUIT DIAGRAM - 24 -
Page 25 - REMOTE BLOWER CIRCUIT DIAGRAM
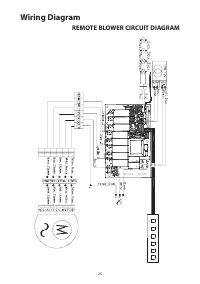
Wiring Diagram REMOTE BLOWER CIRCUIT DIAGRAM - 25 -
Page 26 - List of Parts and Accessories
DESCRIPTION HOOD PART# REPLACEMENT PARTS LED Light 1.3W (each) DLA, DVS Z0B0051 OPTIONAL ACCESSORIES Recirculating Kit DLA, DVS ZRC-00VS Replacement Charcoal Filters DLA, DVS Z0F-C010 Extension Duct Cover DLA, DVS Z1C-00VS Remote Control DLA, DVS 14000010 Internal Blower, 290 CFM DLA, DVS CBI-290A I...
Page 27 - Limited Warranty
Zephyr Ventilation, LLC (referred to herein as “we” or “us”) warrants to the original consumer purchaser (referred to herein as “you” or “your”) of Zephyr products (the “Products”) that such Products will be free from defects in materials or workmanship as follows: Two Year Limited Warranty for Part...
Page 29 - HOTTE PER CUISINE; - Notice d’utilisation
www.zephyronline.com LAYERS WALL DLA-E42ASSX DLA-M90ASSX VISTA WALL DVS-E30ASSX DVS-E36ASSX ENGLISH..........................3FRANÇAIS.......................28 HOTTE PER CUISINE - Notice d’utilisation
Page 30 - Sommaire
INSTRUCTIONS DE SECURITE ................................................................................... pag. 31 LISTE DES MATERIAUX ................................................................................................ pag. 36 FEUILLE POUR CALCULER LES CONDUITS ..........................
Page 31 - LIRE ET CONSERVER LES INSTRUCTIONS; Instructions De Securite 1/5
INSTRUCTIONS DE SECURITE IMPORTANTES POUR UN USAGE DOMESTIQUE EXCLUSIVEMENT LIRE ET CONSERVER LES INSTRUCTIONS COMMENCER PAR LIRE ENTIEREMENT LES INSTRUCTIONS. IMPORTANT: Conserver les Instructions à usage des Inspecteurs Electriques Locaux. A L’ATTENTION DE L’INSTALLATEUR: Laisser les Instructions ...
Page 32 - Instructions De Securite 2/5
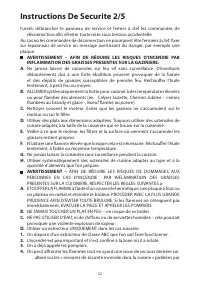
l’unité, débrancher le panneau de service et fermer à clef les commandes de déconnection afin d’éviter toute mise sous tension accidentelle. Au cas où les commandes de déconnection ne pourraient être fermées à clef, fixer sur lepanneau de service un message avertissant du danger, par exemple une pla...
Page 33 - Instructions De Securite 3/5
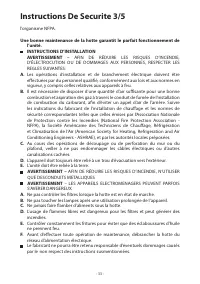
l’organisme NFPA. Une bonne maintenance de la hotte garantit le parfait fonctionnement de l’unité. INSTRUCTIONS D’INSTALLATION AVERTISSEMENT – AFIN DE RÉDUIRE LES RISQUES D’INCENDIE, D’ÉLECTROCUTION OU DE DOMMAGES AUX PERSONNES, RESPECTER LES REGLES SUIVANTES: A. Les opérations d’installation et de ...
Page 34 - Instructions De Securite 4/5
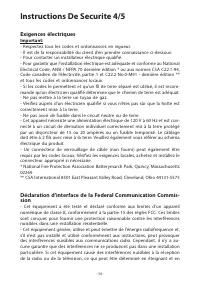
Exigences électriques Important: - Respectez tous les codes et ordonnances en vigueur.- Il est de la responsabilité du client d’en prendre connaissance ci-dessous:- Pour contacter un installateur électrique qualifié.- Pour garantir que l’installation électrique est adéquate et conforme au National E...
Page 35 - Instructions De Securite 5/5
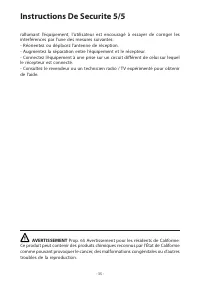
rallumant l’équipement, l’utilisateur est encouragé à essayer de corriger les interférences par l’une des mesures suivantes:- Réorientez ou déplacez l’antenne de réception.- Augmentez la séparation entre l’équipement et le récepteur.- Connectez l’équipement à une prise sur un circuit différent de ce...
Page 36 - Liste Des Materiaux
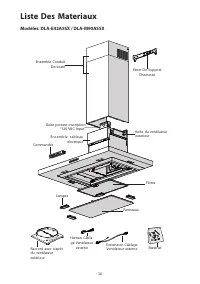
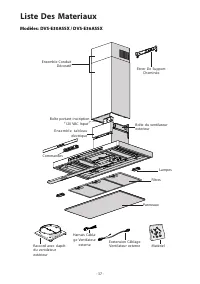
Modèles: DLA-E42ASSX / DLA-M90ASSX Liste Des Materiaux Ensemble Conduit Décoratif Etrier De Support Cheminée Panneaux Commandes Boîte portant inscription “120 VAC Input” Filtres Lampes Harnais Câbla- ge Ventilateur externe Exstension Câblage Ventilateur externe Boîte du ventilateur exterieur E n s e...
Page 38 - Feuille Pour Calculer Les Conduits
Feuille Pour Calculer Les Conduits Total = 3- 1/ 4 po x 10 po 1 pi x ( ) = pi 5 pi x ( ) = pi 20 pi x ( ) = pi 6 po, 7 po, 8 po, 10 po 15 pi x ( ) = pi 6 po, 7 po, 8 po, 10 po 9 pi x ( ) = pi pi 6 po, 7 po, 8 po, 10 po 1 pi x ( ) = pi Total = 6 po, 7 po, 8 po, 10 po 30 pi x ( ) = pi pi pi pi 6 po, 7...
Page 39 - Specifications Techniques
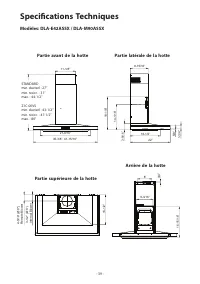
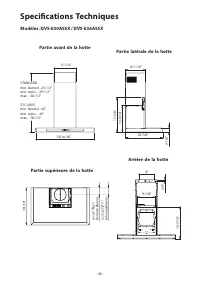
35-3/8”, 41-15/16” 27-9/16” 9-15/16” 16-1/2” 22” 3-9/16” 5/8” 1-3/4” 14-1/16” 18-1/8” 16-1/2” 3-1/2” (Ø 6'') Internal Blower 4-5/16” (Ø 8" ) Remote Blower 8” 3/4” 9-3/16” 16-15/16” STANDARD min. ducted - 27” min. recirc. - 31” max. - 44-1/2” Z1C-00VS min. ducted - 43-1/2” min. recirc. - 47-1/2” ...
Page 41 - Installation – Moteur Interieur
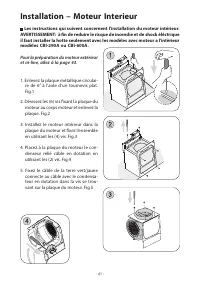
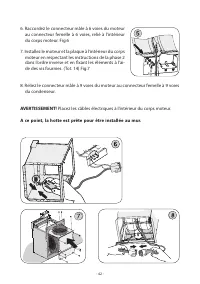
Les instructions qui suivent concernent l’installation du moteur intérieur. AVERTISSEMENT: à fin de reduire le risque de incendie et de shock éléctrique il faut installer la hotte seulement avec les modèles avec moteur a l’intèrieur modèles CBI-290A ou CBI-600A. Pour la préparation du moteur extérie...
Page 43 - Installation – Preparation Moteur Exterieur
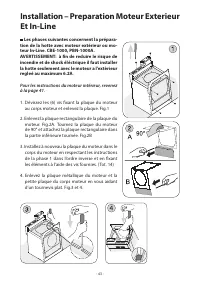
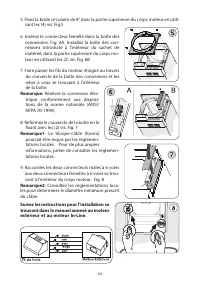
Les phases suivantes concernent la prépara- tion de la hotte avec moteur extérieur ou mo-teur In-Line. CBE-1000, PBN-1000A.AVERTISSEMENT: à fin de reduire le risque de incendie et de shock éléctrique il faut installer la hotte seulement avec le moteur a l'extèrieur regleé au maximum 6.2A . Pour les ...
Page 45 - Installation – Options D’aspiration
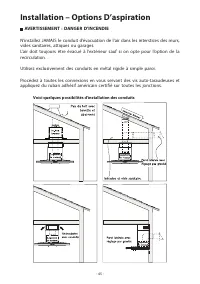
AVERTISSEMENT : DANGER D’INCENDIE N’installez JAMAIS le conduit d’évacuation de l’air dans les interstices des murs, vides sanitaires, attiques ou garages. L’air doit toujours être évacué à l’extérieur sauf si on opte pour l’option de la recirculation. . Utilisez exclusivement des conduits en métal ...
Page 46 - Installation – Fixation De La Hotte
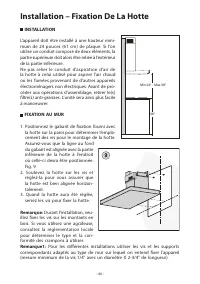
INSTALLATION L’appareil doit être installé à une hauteur mini-mum de 24 pouces (61 cm) de plaque. Si l’on utilise un conduit composé de deux éléments, la partie supérieure doit alors être reliée à l’extérieur de la partie inférieure.Ne pas relier le conduit d’aspiration d’air de la hotte à celui uti...
Page 47 - Installation – Raccordement Au Reseau
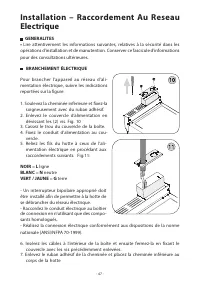
GENERALITES • Lire attentivement les informations suivantes, relatives à la sécurité dans les opérations d’installation et de manutention. Conserver ce fascicule d’informations pour des consultations ultérieures. BRANCHEMENT ÉLECTRIQUE Pour brancher l’appareil au réseau d’ali-mentation électrique, s...
Page 48 - Installation – Fixation Des Cheminees
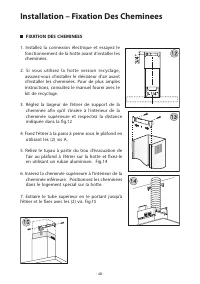
FIXATION DES CHEMINEES 1. Installez la connexion électrique et essayez le fonctionnement de la hotte avant d’installer les cheminées. 2. Si vous utilisez la hotte version recyclage, assurez-vous d’installer le déviateur d’air avant d’installer les cheminées. Pour de plus amples instructions, consult...
Page 49 - Contrôle tactile
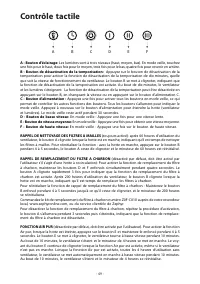
Contrôle tactile A B C D E F A - Bouton d'éclairage: Les lumières sont à trois niveaux (haut, moyen, bas). En mode veille, touchez une fois pour le haut, deux fois pour le moyen, trois fois pour le bas, quatre fois pour revenir en arrière. B - Bouton de désactivation de la temporisation: Appuyez sur...
Page 50 - Télécommande en option
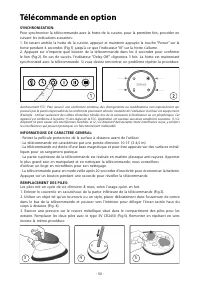
Télécommande en option SYNCHRONISATION: Pour synchroniser la télécommande avec la hotte de la cuisine, pour la première fois, procéder en suivant les indications suivantes:1. En tenant arrêtée la hotte de la cuisine, appuyer et maintenir appuyée la touche “Power” sur la hotte pendant 4 secondes (Fig...
Page 51 - Entretien
Entretien • Il est conseillé d’allumer l’appareil avant de commencer à cuisiner et de le laisser fonctionner pendant 5 minutes après la fin de la cuisson afin d’éliminer complète-ment les vapeurs et les odeurs de cuisine. Le bon fonctionnement de la hotte est déterminé par la régularité des opératio...
Page 52 - Schéma de câblage; SCHÉMA DU CIRCUIT DE MOTEUR INTERIEUR
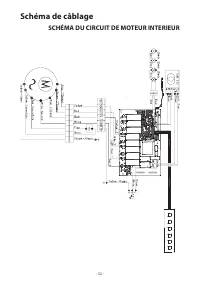
Schéma de câblage SCHÉMA DU CIRCUIT DE MOTEUR INTERIEUR - 52 -
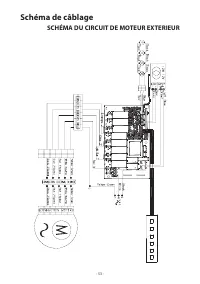
Page 53 - SCHÉMA DU CIRCUIT DE MOTEUR EXTERIEUR
Schéma de câblage SCHÉMA DU CIRCUIT DE MOTEUR EXTERIEUR - 53 -
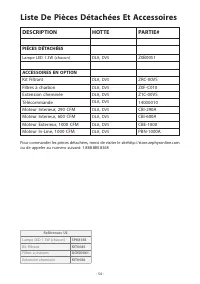
Page 54 - Liste De Pièces Détachées Et Accessoires
DESCRIPTION HOTTE PARTIE# PIÉCES DÉTACHÉES Lampe LED 1.3W (chacun) DLA, DVS Z0B0051 ACCESSOIRES EN OPTION Kit Filtrant DLA, DVS ZRC-00VS Filtres à charbon DLA, DVS Z0F-C010 Extension cheminée DLA, DVS Z1C-00VS Télécommande DLA, DVS 14000010 Moteur Interieur, 290 CFM DLA, DVS CBI-290A Moteur Interieu...
Page 55 - Garantie limitée
Zephyr Ventilation, LLC (désigné aux présentes sous le nom de « nous ») garantit au premier acheteur (désigné aux présentes sous le nom de « vous » ou « votre ») de produits Zephyr (les « Produits ») que lesdits produits sont exempts de défauts de fabrication ou de main-d’oeuvre selon les conditions...
Page 56 - P R O D U C T R E G I S T R AT I O N
3011000132300.00 P R O D U C T R E G I S T R AT I O N Congratulations on your Zephyr range hood purchase! Please take a moment to register your new range hood at www.zephyronline.com/registration IT'S IMPORTANT Prompt registration helps in more ways than one.• Ensures warranty coverage should you ne...


 Zephyr AK1100BB
User Manual
Zephyr AK1100BB
User Manual
 Zephyr AK1100BS
User Manual
Zephyr AK1100BS
User Manual
 Zephyr AK1136BB
User Manual
Zephyr AK1136BB
User Manual
 Zephyr AK1136BS
User Manual
Zephyr AK1136BS
User Manual
 Zephyr AK1136BW
User Manual
Zephyr AK1136BW
User Manual
 Zephyr AK1200CB
User Manual
Zephyr AK1200CB
User Manual
 Zephyr AK1200CBS
User Manual
Zephyr AK1200CBS
User Manual
 Zephyr AK1200CW
User Manual
Zephyr AK1200CW
User Manual
 Zephyr AK1236CBS
User Manual
Zephyr AK1236CBS
User Manual
 Zephyr AK2100CB
User Manual
Zephyr AK2100CB
User Manual
 Zephyr AK2100CS
User Manual
Zephyr AK2100CS
User Manual
 Zephyr AK2100CW
User Manual
Zephyr AK2100CW
User Manual
 Zephyr AK2136CB
User Manual
Zephyr AK2136CB
User Manual