Page 2 - English; DROP DOWN DOOR MICROWAVE OVENS; Product Information; IMPORTANT NOTE
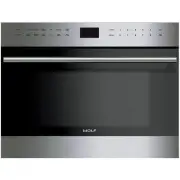
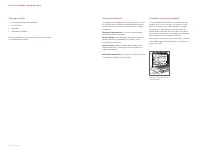
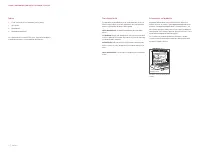
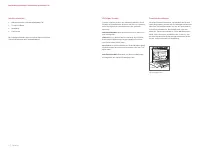
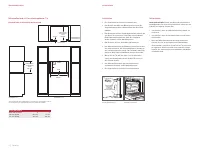
2 | English DROP DOWN DOOR MICROWAVE OVENS Product Information Important product information including the model and serial number are listed on the product rating plate. The rating plate is located on the lower left side of the front face frame. The oven door must be open to view the rating plate. ...
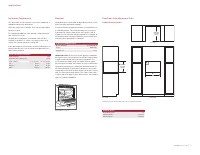
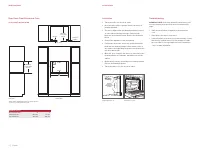
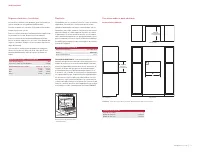
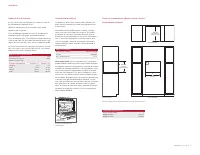
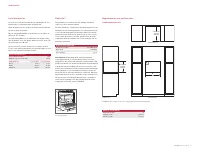
Page 3 - Electrical; ELECTRICAL REQUIREMENTS; Connection of this appliance should be; SPECIFICATIONS; Installation Requirements; INSTALLATION REQUIREMENTS; Drop Down Door Microwave Oven; STANDARD INSTALLATION
wolfappliance.com | 3 Electrical Installation must comply with all applicable electrical codes and be properly grounded (earthed). Locate the electrical supply as shown in the illustrations on the following pages. The receptacle may also be located in an adjacent cabinet within reach of the power co...
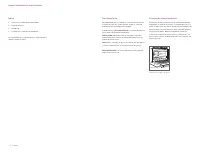
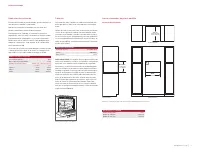
Page 4 - Installation; INSTALLATION; FLUSH INSET INSTALLATION
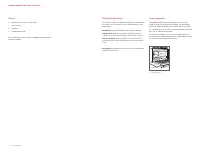
4 | English Installation 1 Turn power off to the electrical outlet. 2 Move the unit near the opening. Remove and recycle packing materials. 3 The unit is shipped with two shipping brackets located on each side, behind the front face. Remove both brackets, then reinstall screws. Refer to the illustra...
Page 6 - Español; HORNOS MICROONDAS DE PUERTA ABATIBLE; Información sobre el producto; NOTA IMPORTANTE
2 | Español HORNOS MICROONDAS DE PUERTA ABATIBLE Información sobre el producto En la placa de datos del producto encontrará información importante, incluyendo el modelo y el número de serie. La placa de datos está ubicada en el lado inferior izquierdo del marco frontal. La puerta del horno debe esta...
Page 7 - Potencia; REQUISITOS ELÉCTRICOS; la conexión de este aparato debe reali-; ESPECIFICACIONES; Requisitos de instalación; REQUISITOS DE INSTALACIÓN; Horno microondas de puerta abatible; INSTALACIÓN ESTÁNDAR
wolfappliance.com | 3 Potencia La instalación debe cumplir con todas las normativas eléc-tricas aplicables y debe estar correctamente conectada a tierra. Ubique la toma eléctrica tal como se muestra en las ilustra-ciones de las siguientes páginas. La toma también puede colocarse en un armario contig...
Page 8 - Instalación; INSTALACIÓN; INSTALACIÓN EMPOTRABLE
4 | Español Instalación 1 Desconecte el aparato de la red eléctrica. 2 Desplace la unidad hasta un lugar cerca de la cavidad. Quite y recicle los materiales de embalaje. 3 La unidad se envía con dos soportes de envío situados en cada lateral, detrás de la parte frontal. Quite ambos soportes y luego ...
Page 10 - Français; FOURS MICRO-ONDES À PORTE ABATTANTE; Information concernant le produit; REMARQUE IMPORTANTE
2 | Français FOURS MICRO-ONDES À PORTE ABATTANTE Information concernant le produit Les renseignements importants concernant le produit, notamment la référence modèle et le numéro de série, figurent sur la plaque des caractéristiques du produit. La plaque des caractéristiques est située sur le côté g...
Page 11 - Électricité; CONFIGURATION ÉLECTRIQUE; Le branchement de cet; SPÉCIFICATIONS; Exigences relatives à l’installation; EXIGENCES RELATIVES À L’INSTALLATION; Four micro-ondes à porte abattante; INSTALLATION STANDARD
wolfappliance.com | 3 Électricité L’installation doit se conformer à tous les codes électriques applicables. Elle doit être correctement mise à la terre. Identifiez l’alimentation électrique comme indiqué sur les illustrations des pages suivantes. La prise peut être placée dans un élément de cuisine...
Page 12 - REMARQUE IMPORTANTE :; INSTALLATION AVEC PANNEAU D’AFFLEUREMENT
4 | Français Installation 1 Coupez le courant à la prise électrique. 2 Placez l’appareil près de l’ouverture. Retirez et recyclez les matériaux d’emballage. 3 L’appareil a été expédié avec deux supports d’expédi- tion situés de chaque côté, derrière la face avant. Retirez les deux supports puis reme...
Page 14 - Italiano; FORNI A MICROONDE CON APERTURA VERSO IL BASSO; Informazioni sul prodotto
2 | Italiano FORNI A MICROONDE CON APERTURA VERSO IL BASSO Informazioni sul prodotto Importanti informazioni sul prodotto, incluso modello e numero di serie, si trovano sulla targhetta identificativa del prodotto. La targhetta identificativa è situata in basso, sul lato sinistro anteriore della corn...
Page 15 - Alimentazione elettrica; REQUISITI ELETTRICI; questo elettrodomestico va collegato; SPECIFICHE; Requisiti di installazione; REQUISITI PER L’INSTALLAZIONE; Forno a microonde con apertura verso il basso; INSTALLAZIONE STANDARD
wolfappliance.com | 3 Alimentazione elettrica L’installazione deve essere conforme alle normative elet-triche vigenti in materia e prevedere un’adeguata linea di messa a terra. Individuare la presa di alimentazione elettrica come illu-strato nelle figure nelle pagine che seguono. È possibile posizio...
Page 16 - Installazione; INSTALLAZIONE; INSTALLAZIONE A FILO
4 | Italiano Installazione 1 Disattivare l’alimentazione dalla presa elettrica. 2 Sostare l’unità vicino al vano di incasso. Rimuovere e smaltire il materiale di imballaggio. 3 L’unità viene spedita con due staffe di trasporto, una su ogni lato, dietro al fronte. Rimuovere entrambe le staffe, quindi...
Page 18 - Deutsch; MIKROWELLENHERD MIT HERUNTERKLAPPBARER TÜR; Produktinformationen; WICHTIGER HINWEIS
2 | Deutsch MIKROWELLENHERD MIT HERUNTERKLAPPBARER TÜR Produktinformationen Wichtige Produktinformationen, einschließlich der Modell- und Seriennummer, sind auf dem Produkttypenschild aufge-führt. Das Typenschild befindet sich auf der unteren linken Seite des Vorderrahmens. Die Herdtür muss offen se...
Page 19 - Elektrik; ELEKTROVORAUSSETZUNGEN; Der Anschluss dieses Geräts sollte; TECHNISCHE DATEN; Installationsvoraussetzungen; INSTALLATIONSVORAUSSETZUNGEN; Mikrowellenherd mit herunterklappbarer Tür; STANDARDINSTALLATION
wolfappliance.com | 3 Elektrik Bei der Installation müssen alle geltenden elektrischen Vorschriften eingehalten werden und die Geräte müssen ordnungsgemäß geerdet werden. Installieren Sie die Stromversorgung im Bereich, der in den Zeichnungen auf den folgenden Seiten dargestellt ist. Die Steckdose k...
Page 20 - BÜNDIGE/VOLL INTEGRIERTE INSTALLATION
4 | Deutsch Installation 1 Die Stromzufuhr zur Steckdose unterbrechen. 2 Das Gerät in der Nähe der Öffnung positionieren. Die Verpackungsmaterialien entfernen und dem Recycling zuführen. 3 Das Gerät wird mit zwei Versandhalterungen geliefert, die sich hinter der Vorderseite auf beiden Seiten befinde...
Page 22 - Nederlands; MAGNETRONOVENS MET VERTICALE DEUR; Productgegevens; BELANGRIJK
2 | Nederlands MAGNETRONOVENS MET VERTICALE DEUR Productgegevens Belangrijke productgegevens zoals het model en serie-nummer staan op het producttypeplaatje. Het typeplaatje bevindt zich links onderaan op het frame aan de voorzijde. De ovendeur moet open staan om het typeplaatje te kunnen zien. Zie ...
Page 23 - Elektriciteit; ELEKTRISCHE VEREISTEN; Dit apparaat dient via een verzekerde; SPECIFICATIES; Installatievereisten.; INSTALLATIEVEREISTEN; Magnetronoven met verticale deur; STANDAARDINSTALLATIE
wolfappliance.com | 3 Elektriciteit De installatie moet voldoen aan alle geldige elektrische codes en correct worden geaard. Zoek de elektrische voeding zoals wordt weergegeven in de illustraties op de volgende pagina's. De ontvanger kan zich ook in een aangrenzende kast bevinden binnen het bereik v...
Page 24 - Installatie; INSTALLA TIE; INSTALLATIE IN INBOUW
4 | Nederlands Installatie 1 Schakel de stroom naar het stopcontact uit. 2 Verplaats het apparaat naar de opening. Verwijder al het verpakkingsmateriaal. 3 Het apparaat wordt geleverd met transporthaken aan elke kant, achter de voorzijde. Verwijder beide haken en draai dan de schroeven weer in. Zie ...
Page 28 - M A D I S O N , W I 5 3 7 4 4 U S A
WO L F A P P L I A N C E , I N C . P O B OX 4 4 8 4 8 M A D I S O N , W I 5 3 7 4 4 U S A W W W. WO L FA P P L I A N C E . C O M 9 0 0 4 7 6 2 R E V - A 5 / 2 0 1 5