Page 2 - CONTENTS; WELCOME 3; To purchase accessories for your tool, visit
13 Operation ....................................................................................................... 13Maintenance ....................................................................................................14Troubleshooting Guide ................................................
Page 3 - INTRODUCTION; safety for both yourself and others.; SPECIFICATIONS
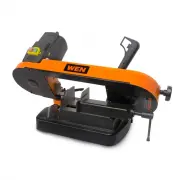
INTRODUCTION Thanks for purchasing the WEN Metal Band Saw. We know you are excited to put your tool to work, but first, please take a moment to read through the manual. Safe operation of this tool requires that you read and understand this operator’s manual and all the labels affixed to the tool. Th...
Page 4 - GENERAL SAFETY RULES; WORK AREA SAFETY
GENERAL SAFETY RULES 4 WORK AREA SAFETY 1. Keep work area clean and well lit. Cluttered or dark areas invite accidents. 2. Do not operate power tools in explosive atmo- spheres, such as in the presence of flammable liq- uids, gases or dust. Power tools create sparks which may ignite the dust or fume...
Page 5 - POWER TOOL USE AND CARE
GENERAL SAFETY RULES 5 7. If devices are provided for the connection of dust extraction and collection facilities, ensure these are connected and properly used. Use of dust collection can reduce dust-related hazards. POWER TOOL USE AND CARE 1. Do not force the power tool. Use the correct power tool ...
Page 6 - SAW BLADE SAFETY; PERSONAL SAFETY; SPECIFIC RULES FOR YOUR METAL BAND SAW
SAW BLADE SAFETY 1. Always wear protective gloves when handling saw blades. 2. Only use blades with correct size and type for both your band saw and your workpiece. • See the blade specifications on page 3. • Make sure the blade is installed in the proper direc- tion. 3. Never use damaged or deforme...
Page 7 - DURING CUTTING OPERATIONS
DURING CUTTING OPERATIONS 1. Always stand to one side when operating the saw. Never have any part of the body in line with the path of the saw. Never hold a workpiece in your hand or across your legs while cutting. 2. Ensure hands are away from the cutting area and blade. 3. Feed work into the blade...
Page 8 - ELECTRICAL INFORMATION; AMPERAGE; GUIDELINES AND RECOMMENDATIONS FOR EXTENSION CORDS; In the event of a malfunction or breakdown; Improper connection
ELECTRICAL INFORMATION 8 AMPERAGE REQUIRED GAUGE FOR EXTENSION CORDS 25 ft. 50 ft. 100 ft. 150 ft. 4.5A 18 gauge 16 gauge 14 gauge 14 gauge 3. Check with a licensed electrician or service personnel if you do not completely understand the grounding instructions or whether the tool is properly grounde...
Page 9 - UNPACKING; PACKING LIST; UNPACKING & PACKING LIST
UNPACKING With the help of a friend or trustworthy foe, carefully remove the metal band saw from the packaging. Make sure to take out all contents and accessories. Do not discard the packaging until everything is removed. Check the packing list below to make sure you have all of the parts and access...
Page 10 - KNOW YOUR METAL BAND SAW; TOOL PURPOSE
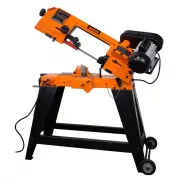
10 KNOW YOUR METAL BAND SAW TOOL PURPOSE Metal band saws are used to cut flat and round pieces of metal. Refer to the following diagrams to become familiar- ized with all the parts and controls of your metal band saw. The components will be referred to later in the manual for assembly and operation ...
Page 11 - ASSEMBLY & ADJUSTMENTS; ASSEMBLING THE METAL BAND SAW
ASSEMBLY & ADJUSTMENTS 11 ASSEMBLING THE METAL BAND SAW 1. Attach the four feet (Fig. 2 - 1) to each respective corner of the base. 2. Place the machine on a work bench, and secure it in place by using the three holes provided in the base (Fig. 3). Use appropriate mounting hardware (not included...
Page 12 - MITER ANGLE ADJUSTMENT
12 ASSEMBLY & ADJUSTMENTS MITER ANGLE ADJUSTMENT This band saw cuts miter angles anywhere from 0 to 60 degrees. To make an adjustment to the cutting angle:1. Loosen the angle lock handle (Fig. 5 - 1).2. Turn the swivel support (Fig. 5 - 2) until the mark on the support matches the desired angle ...
Page 13 - OPERATION; OPERATING THE METAL BAND SAW
13 OPERATION OPERATING THE METAL BAND SAW 1. Pull out the pin (Fig. 9 - 1) from the hole in the saw’s body and tilt the saw to its upper position. Set the blade stop to the desired position (Fig. 10 - 2). NOTE: Never adjust the blade stop bolt so that the blade interferes with any part of the saw. A...
Page 14 - MAINTENANCE; CHANGING THE SAW BLADE
1 14 MAINTENANCE CHANGING THE SAW BLADE Fig. 13 WARNING! Turn off the machine and disconnect the power supply before conducting any maintenance work or adjusting any settings. Fig. 14 WARNING! Band saw blades are extremely sharp! Always wear gloves when handling saw blades. Replace the band saw blad...
Page 15 - TROUBLESHOOTING GUIDE; PROBLEM
15 TROUBLESHOOTING GUIDE PROBLEM CAUSE SOLUTION Saw does not turn on. 1. Saw not plugged in. 2. Incorrect extension cord gauge. 3. Power button not pressed. 4. Circuit breaker tripped to protect machine. 5. Worn carbon brushes. 6. Defective switch, PCB, power cord, or motor. 1. Plug saw in. 2. Use c...
Page 16 - EXPLODED VIEW & PARTS LIST
Page 17 - Description
EXPLODED VIEW & PARTS LIST No. Part No. Description Qty. 1 3975-001 Speed Adjustment Knob 1 2 3975-002 Circuit Breaker 1 3 3975-003 Motor Housing 1 4 3975-004 Self-tapping Screw, ST2.9x13 2 5 3975-005 PCB 1 6 3975-006 Pan Head Screw, M4x8 3 7 3975-007 Pan Head Screw, M4x8 1 8 3975-008 Toothed Wa...