Page 2 - Service Information
2 E If service is required: 1. Call your authorized service agency.2. Have the following information readily available: a. Model number b. Serial number c. Date purchased d. Name of dealer from whom purchased3. Clearly describe the problem that you are having. If you are unable to obtain the name of...
Page 3 - Table of Contents; PRECAUTIONS TO AVOID POSSIBLE
3 E 2 SERVICE INFORMATION 3 TABLE OF CONTENTS 3 PRECAUTIONS TO AVOID POSSIBLE EXPOSURE TO EXCESSIVE MICROWAVE ENERGY 4 IMPORTANT SAFETY INSTRUCTIONS 5 UNPACKING AND EXAMINING YOUR MICROWAVE OVEN 6 CHOOSING A LOCATION 7 GROUNDING INSTRUCTIONS 8-10 INFORMATION YOU NEED TO KNOW 8 About Your Microwave O...
Page 4 - IMPORTANT SAFETY INSTRUCTIONS
E Getting Started When using electrical appliances basic safety precautions should be followed, including the following: WARNING - To reduce the risk of burns, electric shock, fire, injury to persons or exposure to excessive microwave energy: 1. Read all instructions before using the appliance. 2. R...
Page 5 - Unpacking and Examining Your Microwave Oven
E Getting Started Unpacking and Examining Your Microwave Oven Remove all packing materials from inside the microwave oven cavity; however, DO NOT REMOVE THE WAVEGUIDE COVER, which is located on the right cavity wall. Read enclosures and SAVE the Installation/Use and Care Manual.Check the microwave o...
Page 6 - Choosing a Location; Over Oven Installation
E Getting Started Choosing a Location For Your Microwave Oven on the Counter You will use the microwave oven frequently so plan its location for ease of use. It’s wise, if possible, to have counter space on at least one side of the microwave oven. Allow at least 2 inches on the sides, top and at the...
Page 7 - ELECTRICAL REQUIREMENTS; Grounding Instructions; EXTENSION CORD
E Getting Started This appliance must be grounded. This microwave oven is equipped with a cord having a grounding wire with a grounding plug. It must be plugged into a wall receptacle that is properly installed and grounded in accordance with the National Electrical Code and local codes and ordinanc...
Page 8 - ABOUT YOUR MICROWAVE OVEN; Information You Need To Know; DO NOT USE
E Getting Started ABOUT YOUR MICROWAVE OVEN This Installation/Use and Care Manual is valuable: read it carefully and always save it for reference.A good microwave cookbook is a valuable asset. Check it for microwave cooking principles, techniques, hints and recipes. NEVER use the microwave oven with...
Page 9 - ABOUT MICROWAVE COOKING
E Getting Started Information You Need To Know ABOUT UTENSILS AND COVERINGS It is not necessary to buy all new cookware. Many pieces already in your kitchen can be used successfully in your new microwave oven. Make sure the utensil does not touch the interior walls during cooking. USE THESE UTENSILS...
Page 10 - ABOUT FOOD
E Getting Started ABOUT FOOD FOOD DO DON'T Eggs, sausages, nuts, seeds, fruits & vegetables • Puncture egg yolks before cooking to prevent “explosion”. • Pierce skins of potatoes, apples, squash, hot dogs and sausages so that steam escapes. • Cook eggs in shells.• Reheat whole eggs. • Dry nuts o...
Page 11 - MICROWAVE OVEN PARTS; Part Names
11 E E E 11 E Pr oduct Contr ols MICROWAVE OVEN PARTS Part Names 1 One touch door open button Push to open door. 2 Microwave oven door with see-through window 3 Safety door latches The microwave oven will not operate unless the door is securely closed. 4 Door hinges 5 Door seals and sealing surfaces...
Page 12 - CONTROL PANEL
12 E E E 12 E Pr oduct Contr ols Number next to the control panel illustration indicates pages on which there are feature descriptions and usage information. 15-17 27-28 18-26 2729 28 14 13 28 13 Indicators The two-line, Interactive Display spells out operating steps and shows cooking hints. When HE...
Page 13 - TO SET THE CLOCK; LANGUAGE / WEIGHT SELECTION; Before Operating
13 E E E 13 E 13 E Operation 13 • Before operating your new microwave oven make sure you read and understand this Installation/Use and Care Manual completely. • Before the microwave oven can be used, follow these procedures: 1. Plug in the microwave oven. Close the door. The microwave oven display w...
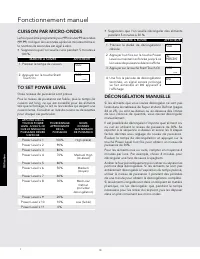
Page 14 - Manual Operation; MANUAL DEFROST; TO SET POWER LEVEL
14 E E E 14 E 14 E Operation Manual Operation 14 • Suppose you want to defrost for 5 minutes at 30%. PROCEDURE DISPLAY 1. Enter defrost time. 5:00 2. Touch Power Level pad eight times or hold down until the desired power appears. 30 PERCENT 3. Touch Start/Touch On pad. 5:00 COOK 4. When the defrost ...
Page 15 - Sensor Options
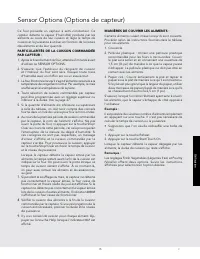
15 E E E 15 E 15 E Operation Sensor Options The Sensor is a semi-conductor device that detects the vapor (moisture and humidity) emitted from the food as it heats. The sensor adjusts the cooking times and power level for various foods and quantities. USING SENSOR SETTINGS: 1. After microwave oven is...
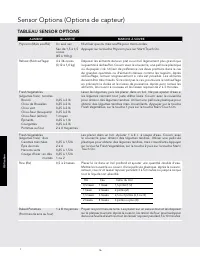
Page 16 - SENSOR OPTIONS CHART
16 E E E 16 E 16 E Operation Sensor Options 16 SENSOR OPTIONS CHART FOOD AMOUNT PROCEDURE Popcorn 1 package Use only popcorn packaged for microwave oven use. 1.5 - 3.5 oz bag Try several brands to decide which you like the best. Do not try to pop unpopped kernels. Touch Popcorn pad and then Start/To...
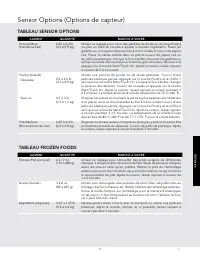
Page 17 - FROZEN FOODS CHART
17 E E E 17 E 17 E Operation Sensor Options FROZEN FOODS CHART FOOD AMOUNT PROCEDURE Entrees 6 - 17 oz Use this pad for frozen convenience foods. It will give satisfactory results for most brands. You may wish to try several and choose your favorite. Remove package from outer wrapping and follow pac...
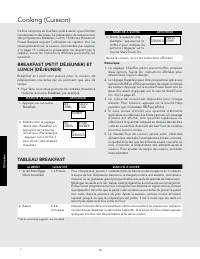
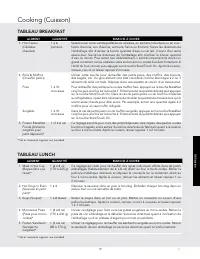
Page 18 - BREAKFAST AND LUNCH; Cooking
18 E E E 18 E 18 E Operation 18 Your microwave oven has 6 convenience pads to assist with meal preparation. There are some foods in the Breakfast, Lunch, 15 Minute Dinners and Preset Recipes that use the sensor. See the sensor cooking information on page 15. For foods not using the sensor, follow th...
Page 19 - BREAKFAST CHART; LUNCH CHART
19 E E E 19 E 19 E Operation 19 BREAKFAST CHART FOOD AMOUNT PROCEDURE 1. Scrambled Eggs 1 - 9 eggs For each egg, use 1 teaspoon of butter or margarine and 1 tablespoon of milk. Place butter or margarine in dish, measuring cup or casserole large enough for the egg to expand. Mix egg and milk together...
Page 20 - 5 MINUTE DINNERS
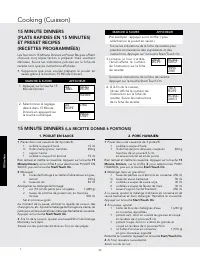
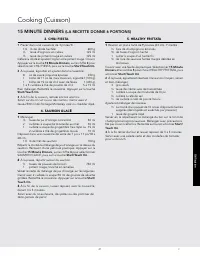
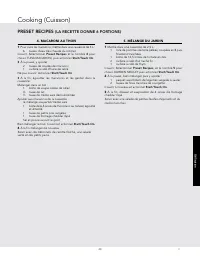
20 E E E 20 E 20 E Operation 20 15 MINUTE DINNERS AND PRESET RECIPES 15 Minute Dinners and Preset Recipes each offer five simple-to-prepare but great tasting meals. Follow the specific directions on the Recipe Card and in the Interactive Display.• Suppose you want to use 15 Minute Dinners to cook Sa...
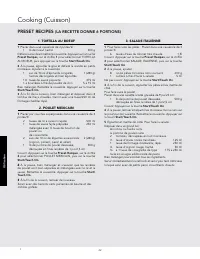
Page 22 - PRESET RECIPES
22 E E E 22 E 22 E Operation 22 1. BEEF WRAPS 1 Place in a 2-quart casserole: 1 pound ground beef Break apart and cover. Touch Preset Recipes, number 1 to select BEEF WRAPS and then touch Start/Touch On. 2 At pause, drain fat and break ground beef into small pieces. Add to casserole: 1 10-ounce pack...
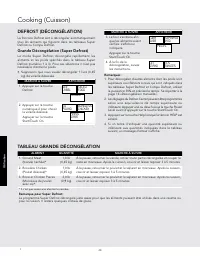
Page 24 - SUPER DEFROST CHART; DEFROST; Super Defrost
24 E E E 24 E 24 E Operation SUPER DEFROST CHART FOOD AMOUNT PROCEDURE 1. Ground Meat* 1.0 lb At pause, turn over, removed any thawed pieces and break remainder apart. At end, let stand, covered, for 3 to 5 minutes. 2. Boneless Chicken* 1.0 lb At pause, turn over and separate into pieces. At end, le...
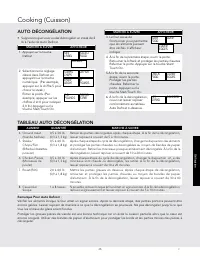
Page 25 - AUTO DEFROST; AUTO DEFROST CHART
25 E E E 25 E 25 E Operation AUTO DEFROST • Suppose you want to defrost a 2.0 pound steak, using Auto Defrost. PROCEDURE DISPLAY 1. Touch Defrost pad. SEE LABEL SELECT FOOD NUMBER 2. Select desired Defrost setting by touching the desired number pad. (Ex: Touch the number pad 5 to select steak.) STEA...
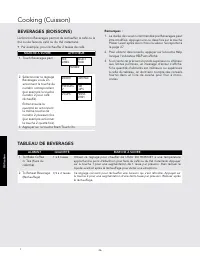
Page 26 - BEVERAGES; BEVERAGES CHART
26 E E E 26 E 26 E Operation BEVERAGES Beverages enables you to reheat coffee or tea to a more suitable drinking temperature or to make instant coffee or tea. • Suppose you want to reheat 2 cups of coffee. PROCEDURE DISPLAY 1. Touch Beverages pad. SEE LABEL SELECT FOOD NUMBER 2. Select desired Bever...
Page 27 - MULTIPLE SEQUENCE COOKING; Other Convenient Features
27 E E E 27 E 27 E Operation WARM / HOLD Warm/Hold allows you to keep food warm up to 30 minutes.To use, simply touch the Warm/Hold pad and enter the appropriate time (up to 30 minutes). You can also program Warm/Hold with manual cooking to keep food warm continuously after cooking. DIRECT USE • Sup...
Page 28 - TOUCH ON
28 E E E 28 E 28 E Operation 2. Touch number 3.3. To enter the start time at 4:30, touch numbers 4, 3 and 0. 4. Touch Timer/Clock pad.5. To enter cooking program, touch numbers 2, 0, 0, and 0 for cooking time and then touch Power Level pad 6 times. 6. Touch Start/Touch On pad. Note: 1. Auto Start ca...
Page 29 - DEMONSTRATION MODE
29 E E E 29 E 29 E Operation DEMONSTRATION MODE To demonstrate, touch Timer/Clock, the number 0 and then touch Start/Touch On pad and hold for 3 seconds. DEMO ON DURING DEMO NO OVEN POWER will appear in the display. Cooking operations and specific special features can now be demonstrated with no pow...
Page 30 - Cleaning and Care
30 E E E 30 E 30 E 30 E Pr oduct Car e 30 WAVEGUIDE COVER The waveguide cover is made from mica so requires special care. Keep the waveguide cover clean to assure good microwave oven performance. Carefully wipe with a damp cloth any food spatters from the surface of the cover immediately after they ...
Page 31 - Specifications
31 E E E 31 E 31 E 31 E Pr oduct Car e 31 Specifications AC Line Voltage: Single phase 120V, 60Hz, AC only AC Power Required: 1500 watts, 13.0 amps. Output Power:* 1100 watts Frequency: 2450 MHz Outside Dimensions: 24"(W) x 13 3 / 8 "(H) x 19 1 / 4 "(D) Cavity Dimensions: 17 3 / 8 "(...
Page 32 - Service Call Check
32 E E E 32 E 32 E 32 E Pr oduct Car e Please check the following before calling for service: Place one cup of water in a glass measuring cup in the microwave oven and close the door securely. Operate the microwave oven for one minute at HIGH 100%.A Does the microwave oven light come on? YES _____ N...
Page 33 - Microwave Oven Warranty
33 E Microwave Oven Warranty TWO YEAR FULL WARRANTY Microwave Oven and all of their component parts and accessories, except as detailed below*, are warranted to be free from defective materials or workmanship in normal household use for a period of two (2) years from the date of original retail purc...
Page 36 - Informations de dépannage
2 F Si du dépannage est requis : 1. Appeler votre une société de dépannage agrée.2. Préparer les informations suivantes à l’avance : a. Numéro de modèle b. Numéro de série c. Date d’achat d. Nom du revendeur où a eu lieu l’achat3. Décrire clairement le problème rencontré. En cas d’impossibilité d’ob...
Page 37 - Table des matières; PRÉCAUTIONS POUR ÉVITER LE RISQUE D’UNE
3 F 2 INFORMATIONS DE DÉPANNAGE 3 TABLE DES MATIÈRES 3 PRÉCAUTIONS POUR ÉVITER LE RISQUE D’UNE EXPOSITION AUX MICRO-ONDES 4 IMPORTANTES CONSIGNES DE SÉCURITÉ 5 DÉBALLAGE ET INSPECTION DU FOUR 6 LE CHOIX D’UN EMPLACEMENT 7 INSTRUCTIONS DE MISE À LA TERRE 8-10 LES INFORMATIONS QUE VOUS DEVEZ SAVOIR 8 ...
Page 38 - IMPORTANTES CONSIGNES DE SÉCURITÉ
4 F A vant de commencer Certaines précautions de sécurité devraient toujours être prises lorsqu’on se sert d’appareils électriques : AVERTISSEMENT — Pour réduire les risques de brûlures, de chocs électriques, de feu, de blessures ou d’exposition aux micro-ondes : 1. Lire toutes les instructions avan...
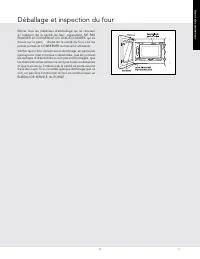
Page 39 - Déballage et inspection du four
5 F A vant de commencer Déballage et inspection du four Retirer tous les matériaux d’emballage qui se trouvent à l’intérieur de la cavité du four; cependant, NE PAS ENLEVER LE COUVERCLE DU GUIDE D’ONDES qui se trouve sur la paroi droite de la cavité du four. Lire les pièces jointes et CONSERVER le m...
Page 40 - Le choix d’un emplacement
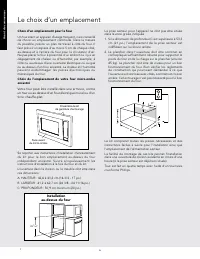
6 F A vant de commencer Choix d’un emplacement pour le four Un four étant un appareil d’usage fréquent, il est conseillé de choisir un emplacement commode. Dans la mesure du possible, prévoir un plan de travail à côté du four. Il faut prévoir un espace d’au moins 5 cm de chaque côté, au-dessus et à ...
Page 41 - INSTALLATION ÉLECTRIQUE; Instructions de mise à la terre; RALLONGE
7 F A vant de commencer Cet appareil doit être mis à la terre. Ce four est équipé d’un cordon d’alimentation avec fil de mise à la terre, et d’une fiche de mise à la terre. Il faut le brancher dans une prise murale qui a été installée correctement et mise à la terre selon le Code national de l’élect...
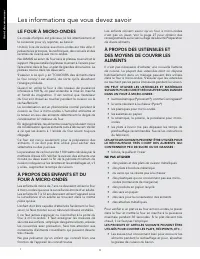
Page 42 - LE FOUR À MICRO-ONDES; Les informations que vous devez savoir
8 F A vant de commencer LE FOUR À MICRO-ONDES Ce mode d’emploi est précieux; le lire attentivement et le conserver pour s’y reporter, au besoin.Un bon livre de cuisine aux micro-ondes est très utile. Il présente les principes, les techniques, des conseils et des recettes de cuisine aux micro-ondes.N...
Page 43 - À PROPOS DE LA SÉCURITÉ
9 F A vant de commencer Les informations que vous devez savoir • Le papier ciré peut être employé pour la cuisson et le réchauffage. • Le film plastique destiné spécialement à être utilisé au four à micro-ondes peut être utilisé pour la cuisson et le réchauffage. Le film plastique ne doit JAMAIS ent...
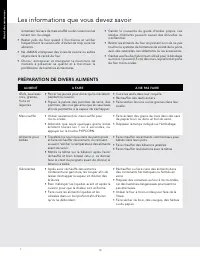
Page 44 - PRÉPARATION DE DIVERS ALIMENTS
10 F A vant de commencer PRÉPARATION DE DIVERS ALIMENTS ALIMENT A FAIRE A NE PAS FAIRE Œufs, saucisses noix, graines, fruits et légumes • Percer les jaunes pour éviter qu’ils n’éclatent pendant la cuisson. • Piquer la pelure des pommes de terre, des pommes, des courges ainsi que les saucisses afin d...
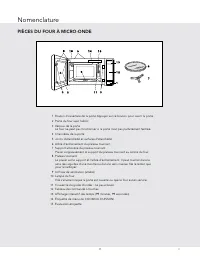
Page 45 - PIÈCES DU FOUR À MICRO-ONDE; Nomenclature
11 F Commandes du pr oduit PIÈCES DU FOUR À MICRO-ONDE Nomenclature 1 Bouton d’ouverture de la porte Appuyer sur ce bouton pour ouvrir la porte. 2 Porte du four avec hublot 3 Verrous de la porte Le four ne peut pas fonctionner si la porte n’est pas parfaitement fermée. 4 Charnières de la porte 5 Joi...
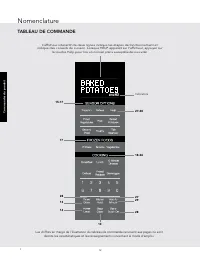
Page 46 - TABLEAU DE COMMANDE
12 F Commandes du pr oduit Les chiffres en marge de l’illustration du tableau de commande renvoient aux pages où sont décrits les caractéristiques et les renseignements concernant le mode d’emploi. 15-17 27-28 18-26 2729 28 14 13 28 13 Indicators L’afficheur interactif de deux lignes indique les éta...
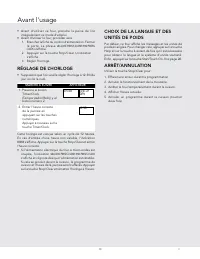
Page 47 - RÉGLAGE DE L’HORLOGE
13 F Utilisation • Avant d’utiliser ce four, prendre la peine de lire intégralement ce mode d’emploi. • Avant d’utiliser le four, procéder ainsi : 1. Brancher la fiche du cordon d’alimentation. Fermer la por te. La phrase WELCOME PRESS CLEAR AND PRESS CLOCK s’affiche. 2. Appuyer sur la touche Stop/C...
Page 48 - Fonctionnement manuel; DÉCONGÉLATION MANUELLE
14 F Utilisation Fonctionnement manuel • Supposons que l’on veuille décongeler des aliments pendant 5 minutes à 30 %. MARCHE À SUIVRE AFFICHEUR 1. Préciser la durée de décongélation désirée. 5:00 2. Appuyer huit fois sur la touche Power Level ou maintenir enfoncée jusqu’à ce le niveau de puissance d...
Page 50 - TABLEAU SENSOR OPTIONS
16 F Utilisation Sensor Options (Options de capteur) TABLEAU SENSOR OPTIONS ALIMENT QUANTITÉ MARCHE À SUIVRE Popcorn (Maïs soufflé) Un seul sac N’utiliser que du maïs soufflé pour micro-ondes. Sac de 1,5 à 3,5 onces (45 à 100 g) Appuyer sur la touche Popcorn puis sur Start/Touch On. Reheat (Réchauff...
Page 51 - TABLEAU FROZEN FOODS
17 F Utilisation Sensor Options (Options de capteur) TABLEAU FROZEN FOODS ALIMENT QUANTITÉ MARCHE À SUIVRE Entrees (Plat principal) 6 à 17 oz (170 à 480 g) Utiliser ce réglage pour réchauffer des plats surgelés de différentes marques. Il sera peut-être nécessaire de faire l’essai de plusieurs marque...
Page 52 - TABLEAU BREAKFAST
18 F Utilisation Ce four comporte six touches « prêt-à-servir » pour faciliter la préparation des repas. La préparation de certains mets des programmes Breakfast, Lunch, 15 Minute Dinners et Preset Recipes requiert l’utilisation du capteur. Voir les renseignements sur la cuisson commandée par capteu...
Page 58 - TABLEAU GRANDE DÉCONGÉLATION
24 F Utilisation TABLEAU GRANDE DÉCONGÉLATION ALIMENT QUANTITÉ MARCHE À SUIVRE 1. Ground Meat (Viande hachée ) * 1,0 lb (0,45 kg) À la pause, retourner la viande, retirer toute partie décongelée et couper le reste en morceaux. Après la cuisson, couvrir et laisser reposer 3 à 5 minutes. 2. Boneless C...
Page 59 - AUTO DÉCONGÉLATION; TABLEAU AUTO DÉCONGÉLATION
25 F Utilisation AUTO DÉCONGÉLATION • Supposons que vous voulez décongeler un steak de 2 lb à l’aide de Auto Defrost. MARCHE À SUIVRE AFFICHEUR 1. Appuyer sur la touche Defrost. SEE LABEL SELECT FOOD NUMBER 2. Sélectionner le réglage désiré dans Defrost en appuyant sur la touche numérique. (Par exem...
Page 60 - TABLEAU DE BEVERAGES
26 F Utilisation BEVERAGES (BOISSONS) La fonction Beverages permet de réchauffer le café ou le thé ou de faire du café ou du thé instantané.• Par exemple, pour réchauffer 2 tasses de café. MARCHE À SUIVRE AFFICHEUR 1. Touch Beverages pad. SEE LABEL SELECT FOOD NUMBER 2. Sélectionner le réglage Bever...
Page 61 - SÉQUENCE DE CUISSON MULTIPLE; Autres particularités pratiques
27 F Utilisation MAINTIEN AU CHAUD (WARM/HOLD) Warm/Hold vous permet de conserver les aliments au chaud jusqu’à 30 minutes.Pour l’utiliser, actionner simplement la touche Warm/Hold et entrer la durée voulue en minutes (jusqu’à 30). Vous pouvez également programmer Warm/Hold avec le mode de cuisson m...
Page 63 - MODE DE DÉMONSTRATION
29 F Utilisation 4. À la fin du cycle de la minuterie (Timer), l’afficheur indiquera le message suivant. TIMER IS FINISHED Remarques : Pour annuler la minuterie durant la programmation, actionner la touche Stop/Clear. HELP (AIDE - INDICATION À L’AFFICHAGE) Chaque réglage de SENSOR OPTIONS et More Fr...
Page 64 - COUVERCLE DU GUIDE D’ONDES; Nettoyage et entretien
30 F Entr etien du pr odui COUVERCLE DU GUIDE D’ONDES Le couvercle du guide d’ondes est en mica et nécessite donc une attention spéciale. Maintenir le couvercle du guide d’ondes propre pour assurer un bon fonctionnement du four. Essuyer immédiatement et délicatement avec un chiffon humide toute écla...
Page 65 - Fiche technique
31 F Entr etien du pr odui Fiche technique Tension d’alimentation : Monophasé 120 V, 60 Hz, courant alternatif seulement Alimentation requise : 1 500 W 13,0 A Puissance micro-ondes de sortie :* 1 100 W* Fréquence : 2 450 MHz Dimensions extérieures : 24 (W) x 13 3 / 8 (H) x 19 1 / 4 (D) po Dimensions...
Page 66 - Appel de service
32 F Entr etien du pr odui Vérifier ce qui suit avant de faire appel à un réparateur : Placer une tasse d’eau dans un verre gradué dans le four et bien fermer la porte. Faire fonctionner le four pendant 1 minute à puissance ÉLEVÉE 100%. A Est-ce que la lumière du four est allumée? OUI _____ NON ____...
Page 67 - Garantie du four micro-ondes
33 F Garantie du four micro-ondes DEUX ANS DE GARANTIE COMPLÈTE Les fours micro-ondes et toutes leurs pièces constituantes et accessoires, sauf les parties listées ci-dessous *, sont garantis être exempts de défauts dus aux matériaux ou à la main d'œuvre pour un fonctionnement normal pendant une pér...
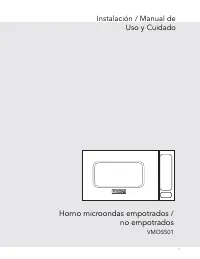
Page 69 - Horno microondas empotrados /
S Instalación / Manual de Uso y Cuidado Horno microondas empotrados / no empotrados VMOS501
Page 70 - Información de servicio
2 S Si se necesita servicio: 1. Llame a su agencia de servicio autorizada.2. Debe tener disponible la siguiente información: a. Número de modelo b. Número de serie c. Fecha de compra d. Nombre del distribuidor al que le realizó la compra3. Describa claramente el problema que tiene. Si no puede obten...
Page 71 - Tabla de contenido; PRECAUCIONES PARA EVITAR POSIBLES EXPOSICIONES
3 S 2 INFORMACIÓN DE SERVICIO 3 TABLA DE CONTENIDO 3 PRECAUCIONES PARA EVITAR POSIBLES EXPOSICIONES AL EXCESO DE ENERGÍA DEL MICROONDAS 4 INSTRUCCIONES DE SEGURIDAD IMPORTANTES 5 DESEMBALAJE Y VERIFICACIÓN DE SU HORNO MICROONDAS 6 ESCOGER UNA UBICACIÓN 7 INSTRUCCIONES PARA CONEXIÓN A TIERRA 8-10 INF...
Page 72 - INSTRUCCIONES DE SEGURIDAD IMPORTANTES
4 S Para comenzar Al usar artefactos eléctricos deben tomarse precauciones de seguridad básicas, incluyendo las siguientes: ADVERTENCIA - Para reducir el riesgo de quemaduras, choque eléctrico, incendios, lesiones a personas o exposición al exceso de energía del microondas:1. LEA TODAS LAS INSTRUCCI...
Page 73 - Desembalaje y verificación de su horno microondas
5 S Para comenzar Desembalaje y verificación de su horno microondas Retire los materiales de empaque que están dentro de la cavidad del horno microondas; sin embargo, NO RETIRE LA CUBIERTA DE LA GUÍA DE ONDA que se encuentra en la pared derecha de la cavidad. Lea los anexos y GUARDE el Manual de ins...
Page 74 - Escoger una ubicación
6 S Para comenzar Escoger una ubicación Elección de una ubicación para su horno microondas en el mostrador Ya que usted usará el horno microondas con frecuencia debe elegir su ubicación para un fácil uso. Es prudente contar con un espacio en el mostrador al menos a uno de los lados del horno microon...
Page 75 - REQUISITOS ELÉCTRICOS; Instrucciones para conexión a tierra; CABLE DE EXTENSIÓN
7 S Para comenzar Este electrodoméstico debe ser conectado a tierra. Este horno microondas está equipado con un cable que tiene un alambre de tierra y un enchufe con toma a tierra. Éste se debe conectar en un tomacorriente de pared instalado y conectado a tierra apropiadamente de acuerdo con el Códi...
Page 76 - SOBRE SU HORNO MICROONDAS; Información que debe conocer
8 S Para comenzar SOBRE SU HORNO MICROONDAS Este Manual de instalación / uso y cuidado es valioso: léalo detalladamente y guárdelo para futura referencia.Un buen libro de cocina para microondas es muy útil. Consúltelo sobre principios, técnicas, sugerencias y recetas de cocina en microondas.NUNCA us...
Page 77 - ACERCA DE LA SEGURIDAD
9 S Para comenzar Información que debe conocer la película plástica toque los alimentos. Haga agujeros para que el vapor pueda salir. • Las tapas que pueden usarse en el microondas son una buena opción ya que mantienen el calor de los alimentos para acelerar la cocción. • Las bolsas para cocción en ...
Page 78 - SOBRE LOS ALIMENTOS
10 S Para comenzar SOBRE LOS ALIMENTOS ALIMENTO LO QUE DEBE HACER LO QUE NO DEBE HACER Huevos, salchichas, frutos secos, semillas, frutas y vegetales • Perfore las yemas del huevo antes de cocinarlo para evitar una “explosión”. • Haga pequeños agujeros en la piel de las papas, manzanas, zapallos, ho...
Page 79 - PARTES DEL HORNO MICROONDAS; Nombre de las partes
11 S Contr oles del pr oducto PARTES DEL HORNO MICROONDAS Nombre de las partes 1 Botón de un solo toque para abrir la puerta Presione para abrir la puerta 2 Puerta del horno microondas con ventana transparente 3 Pestillos de seguridad de la puerta El horno microondas no funcionará si la puerta no es...
Page 80 - PANEL DE CONTROL
12 S Contr oles del pr oducto El número cerca de la ilustración del panel de control indica las páginas donde puede encontrar descripciones de las características e información 15-17 27-28 18-26 2729 28 14 13 28 13 Indicadores La Pantalla interactiva de dos líneas especifica los pasos de operación y...
Page 81 - PARA FIJAR LA HORA; SELECCIÓN DEL IDIOMA/PESO; Antes de operar
13 S Operación • Antes de poner en funcionamiento su nuevo horno microondas, asegúrese de haber leído y entendido completamente este Manual de Instalación/uso y cuidado. • Antes de que se pueda usar el horno microondas, siga estos procedimientos: 1. Conecte el horno microondas. Cierre la puerta. La ...
Page 82 - Operación manual; DESCONGELAMIENTO MANUAL
14 S Operación Operación manual • Suponga que desea descongelar durante 5 minutos al 30%. PROCEDIMIENTO PANTALLA 1. Ingrese el tiempo de descongelamiento. 5:00 2. Presione el botón Power Level ocho veces o mantenga presionado hasta que aparezca la potencia deseada. 30 PERCENT 3. Presione el botón St...
Page 83 - USO DE LOS AJUSTES DEL SENSOR:; ENVOLTURA DE ALIMENTOS:
15 S Operación Sensor Options (Opciones del sensor) El sensor es un dispositivo semiconductor que detecta el vapor (humedad) emitido por los alimentos mientras se calientan. El sensor ajusta los tiempos de cocción y el nivel de potencia para diversos alimentos y cantidades. USO DE LOS AJUSTES DEL SE...
Page 84 - TABLA DE OPCIONES DEL SENSOR
16 S Operación Sensor Options (Opciones del sensor) TABLA DE OPCIONES DEL SENSOR ALIMENTO CANTIDAD PROCEDIMIENTO Popcorn(Palomitas de maíz) 1 paquete Use únicamente palomitas de maíz para cocción en horno microondas. Pruebe con varias marcas para elegir la que prefiera. No intente cocinar los granos...
Page 85 - TABLA DE FROZEN FOODS
17 S Operación Sensor Options (Opciones del sensor) TABLA DE FROZEN FOODS ALIMENTO CANTIDAD PROCEDIMIENTO Entradas 6 - 17 onzas Use este botón para comida de preparación rápida. Usted obtendrá resultados satisfactorios para la mayoría de marcas. Si desea puede probar diversas marcas y elegir la que ...
Page 86 - TABLA BREAKFAST
18 S Operación Your microwave oven has 6 convenience pads to assist with meal preparation. There are some foods in the Breakfast, Lunch, 15 Minute Dinners and Preset Recipes that use the sensor. See the sensor cooking information on page 15. For foods not using the sensor, follow the directions in t...
Page 88 - RECETAS PARA 6 PERSONAS
20 S Operación 15 MINUTE DINNERS (COMIDAS EN 15 MINUTOS) Y PRESET RECIPES (RECETAS PREESTABLECIDAS) Las comidas en 15 minutos y las recetas preestablecidas ofrecen cada una cinco platos fáciles de preparar y con un excelente sabor. Siga las instrucciones específicas ubicadas en el recetario y en la ...
Page 90 - RECETAS PREESTABLECIDAS (
22 S Operación 1. ENVUELTOS DE CARNE 1 Coloque en una cacerola de tres cuartos: 1 libra de carne molida Desmenuzar y cubrir. Presione el botón número 1 de Preset Recipes para seleccionar BEEF WRAPS (ENVUELTOS DE CARNE) y luego presione Start/Touch On . 2 Cuando se detenga, escurra la grasa y divida ...
Page 92 - TABLA SUPER DEFROST
24 S Operación TABLA SUPER DEFROST ALIMENTOS CANTIDAD PROCEDIMIENTO 1. Carne molida* 1.0 libra Cuando se detenga, dé vuelta, retire las piezas descongeladas y separe las piezas restantes. Cuando finalice, cubra y deje reposar de 3 a 5 minutos. 2. Pollo deshuesado* 1.0 libra Cuando se detenga, dé vue...
Page 93 - TABLA AUTO DEFROST
25 S Operación AUTO DEFROST (DESCONGELAMIENTO AUTOMÁTICO) • Suponga que quiere descongelar un bistec de 2.0 libras, usando Auto Defrost (Descongelamiento Automático). PROCEDIMIENTO PANTALLA 1. Presione el botón Defrost. SEE LABEL SELECT FOOD NUMBER 2. Seleccione el ajuste de Defrost que desee presio...
Page 94 - TABLA BEVERAGES
26 S Operación BEVERAGES (BEBIDAS) Beverages (Bebidas) le permite recalentar el café o té a una temperatura más adecuada para su bebida, o hacer café o té instantáneo.• Suponga que quiere recalentar 2 tazas de café. PROCEDIMIENTO PANTALLA 1. Presione el botón Beverages. SEE LABEL SELECT FOOD NUMBER ...
Page 95 - Otras Características Convenientes
27 S Operación WARM / HOLD (CALENTAR/MANTENER) Warm/Hold (Calentar/Mantener) le permite conservar caliente los alimentos hasta 30 minutos. Para usarlo, simplemente presione el botón Warm/Hold e ingrese el tiempo adecuado (hasta 30 minutos). Usted también puede programar Warm/Hold con cocción man- ua...
Page 97 - MODO DE DEMOSTRACIÓN
29 S Operación HELP (AYUDA - INDICADOR DE PANTALLA) Cada ajuste de SENSOR OPTIONS le brinda una sugerencia de cocción. Si desea verificarlo, presione el botón HELP cuando éste se encienda en la pantalla interactiva para acceder a estas sugerencias. MODO DE DEMOSTRACIÓN Para realizar una demostración...
Page 98 - Limpieza y cuidado
30 S Cuidado del pr oducto CUBIERTA DE LA GUÍA DE ONDA La cubierta de la guía de onda está hecha de mica de modo que requiere cuidado especial. Conserve limpia la cubierta de la guía de onda para asegurar un buen rendimiento del horno microondas. Limpie cuidadosamente con un paño humedecido cualquie...
Page 99 - Especificaciones
31 S Cuidado del pr oducto Especificaciones Voltaje en línea de CA: 120V monofásico, 60Hz, sólo CA Energía de CA requerida: 1,500 vatios, 13.0 amperios. Potencia de salida:* 1,100 vatios Frecuencia: 2,450 MHz Dimensiones externas: 24"(ancho) x 13 3 / 8 "(alto) x 19 1 / 4 "(profundidad) D...
Page 100 - Revisión para solicitud de servicio
32 S Cuidado del pr oducto Revise lo siguiente antes de llamar para solicitar servicio: Coloque en el horno microondas una taza de agua en una taza medidora de vidrio y cierre la puerta firmemente. Opere el horno microondas por un minuto en HIGH 100%. A ¿Se enciende la luz del horno microondas? SÍ _...
Page 101 - Garantía del Horno Microondas
33 S Garantía del Horno Microondas DOS AÑOS DE GARANTÍA COMPLETA El horno microondas y todas las partes y accesorios del componente, excepto como se detalla a continuación*, están garantizadas de no presentar materiales o mano de obra defectuosa en uso doméstico normal por un periodo de dos (2) años...