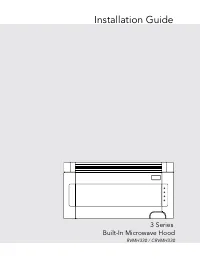
Page 2 - Installation Guide; IMPORTANT– Please Read and Follow!; Unpacking and Examining
1 Installation Guide IMPORTANT– Please Read and Follow! • Please read all instructions thoroughly before installing the Built-In Microwave Hood. Two people are recommended to install this product. • If a new electrical outlet is required, its installation should be completed by a qualified electrici...
Page 3 - Wall Construc tion; ELECTRICAL; ElEctrical rEquirEmEnts; figur; radiO Or tV intErfErEncE
2 2 Wall Construc tion 3 ELECTRICAL GROUNDING INSTRUCTIONS This Built-in Microwave Hood should be mounted against and supported by a flat vertical wall. The wall must be flat for proper installation. If the wall is not flat, use spacers to fill in the gaps. Wall construction should be a minimum of 2...
Page 4 - Installation Hardware; Hood Exhaust Duc t; Parts Included
3 When the hood is vented to the outside, a hood exhaust duct is required. All ductwork must be metal; absolutely do not use plastic duct. Check that all connections are made securely. Please read the following carefully: Exhaust cOnnEctiOn: The hood exhaust has been designed to connect to a standar...
Page 5 - Preparation of the Oven; Ventilation System; Operation; Outside
4 7 Preparation of the Oven Separate mounting plate from oven by removing two screws. See illustration below. Save these screws for use in section Mounting Oven to Wall , figure / . Mounting Plate Back of Microwave figur e figur e 4 8 Ventilation System (Preparing Oven for Installation) This Built-i...
Page 6 - Oven for Installation)
5 figur e figur e 8 Save fan cover bracket for future instructions. 4) HORIZONTAL EXHAUST: Put the wire back into the c avit y. T he Fan C over Br ac ket and E x haus t Damp er Assembly are mounted to the wall. Follow instructions on WALL TEMPLATE provided. (C) Ver tical Exhaust: Outside Ventilation...
Page 7 - Oven Installation; Mounting Scale Plate; Mounting Plate
6 figur e figur e # 4) VERTICAL EXHAUST: Attach the Fan Cover Bracket to unit with the 2 screws from back edge and 3 screws from the top center of the Fan Cover Bracket, which were removed in Step 1. The Hood Fan Unit is now rotated for vertical exhaust operation. figur e figur e $ 7 Exhaust Damper ...
Page 8 - 0 Mounting Oven to the Wall
7 10 Mounting Oven to the Wall Utilization of the carton may make installation easier. figur e figur e ~ Top Side Cutting Line 1) MOUNTING OVEN TO THE WALL : Place carton upside down. figur e figur e + (A) (B) 2) MOUNTING OVEN TO THE WALL : Using cutting line around the carton, cut into two pieces (...
Page 9 - Checklist for Installation
8 Two people are recommended to attach the Built-in Microwave Hood to the Mounting Plate. - figur e 4) MOUNTING OVEN TO THE WALL : Thread the Power Supply Cord through the hole made in the bottom of the top cabinet. Lift and tilt the oven forward. Hook the back bottom of the oven to the bottom of th...
Page 11 - Instruc tions d’installation; Série; IMPORTANT–S’il vous plaît lisez et suivez!; Déballage et Examen de; schéma
F1 Instruc tions d’installation 3 Série CRVMH330 IMPORTANT–S’il vous plaît lisez et suivez! • Veuillez lire attentivement toutes les instructions avant d’installer le système de Micro-onde intégrée. Nous recommandons que deux personnes collaborent à l’installation de cet appareil. • Faites appel à u...
Page 12 - Construc tion du Mur; INSTRUCTIONS DE; installatiOn ÉlEctriquE; intErfÉrEncE tV Ou radiO
F2 2 Construc tion du Mur 3 INSTRUCTIONS DE MISE À LA TERRE Le Micro-onde intégrée doit être monté sur et supporté par un mur vertical plat. Pour une installation correcte, le mur doit être plat. Si ce n’est pas le cas, employez des entretoises pour remplir les espaces. La construction du mur doit a...
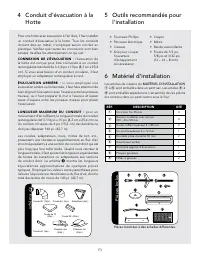
Page 13 - Matériel d’installation; Pièces Inclus; Conduit d’évacuation à la
F3 Pour une hotte avec évacuation à l’air libre, il faut installer un conduit d’évacuation à la hotte. Tous les conduits doivent être en métal; n’employez aucun conduit en plastique. Vérifiez que toutes les connexions sont bien serrées. Veuillez lire attentivement ce qui suit : cOnnExiOn dE l’ÉVacua...
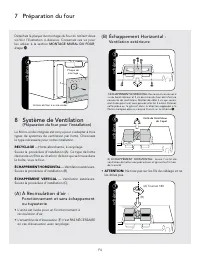
Page 14 - Préparation du four; Système de Ventilation; (Préparation du four pour l’installation); Fonc tionnement et sans échappement
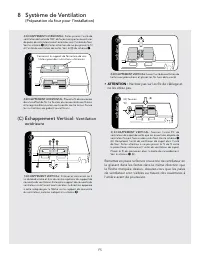
F4 7 Préparation du four Détachez la plaque de montage du four en retirant deux vis.Voir l’illustration ci-dessous. Conservez ces vis pour les utiliser à la section MONTAGE MURAL DU FOUR , étape / . Plaque de montage Arrière du four à micro-ondes 4 8 Système de Ventilation (Préparation du four pour ...
Page 15 - Ventilation
F5 3) éCHAPPEMENT HORIZONTAL : Faites pivoter l’unité de ventilation de hotte de 180° de façon à ce que les ouvertures de pales de ventilateur soient orientées vers l’arrière du four. Voir le schéma 7 (A).Faites attention de ne pas pincer le fil et l’unité de ventilation de hotte. Voir le (B) du sch...
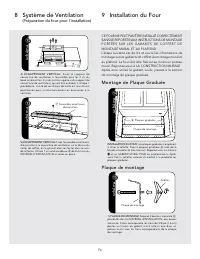
Page 16 - Montage de Plaque Graduée; Plaque de montage; Installation du Four
F6 # schéma 4) éC H A P P E M E N T V E R T I C A L : F i xe z l e s u p p o r t d e couverture de ventilateur à l’ensemble avec les 2 vis du bord arrière et les 3 vis du centre supérieur du support de couverture de ventilateur, qui ont été enlevées à l’étape 1 précédente. L’unité de ventilateur de ...
Page 17 - 0 Montage Mural du Four
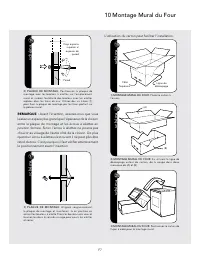
F7 L’utilisation du carton peut faciliter l’installation. ~ Côté Supérieur Ligne de découpage 1) MONTAGE MURAL DU FOUR : Placez le carton à l’envers. + (A) (B) 2) MONTAGE MURAL DU FOUR: En utilisant la ligne de découpage autour du car ton, de la coupe dans deux morceaux de (A) et (B). , schéma 3) MO...
Page 18 - Pense-bête pour l’installation
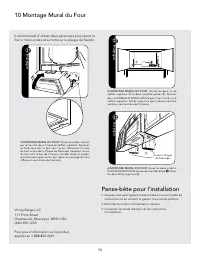
F8 Il recommandé d’utiliser deux personnes pour placer le four à micro-ondes et sa hotte sur la plaque de fixation. - schéma 4) MONTAGE MURAL DU FOUR: Passez le cordon secteur par le trou fait dans le fond du coffret supérieur. Soulevez et faites basculer le four vers l’avant. Accrochez l’arrière du...
Page 19 - Designer Built-in Microwave Hood; Instrucciones de Instalación; Serie; Desempaque y Revisión de; figura
S1 Designer Built-in Microwave Hood 111 Front Street Greenwood, Mississippi 38930 USA IMPORTANT– Please Read and Follow! • Please read all instructions thoroughly before installing the Built-in Microwave Hood. Two people are recommended to install this product. • If a new electrical outlet is requir...
Page 20 - Construcción de la Pared; rEquErimiEntOs ElÉctricOs; intErfErEncia cOn El radiO O tV
S2 2 Construcción de la Pared Este Diseñador Microondas para Emmpotrado debe contar y soportarse en una pared vertical plana. La pared debe ser plana para instalación apropiada. Si la pared no es plana, utilice espaciadores para llenar los vacíos. La construcción de la pared debe estar compuesta por...
Page 21 - Herrajes de Instalación; Ducto de Escape de; Partes Incluidas
S3 Cuando la campana extractora tiene escape hacia el exterior, se requiere un ducto de escape de campana. Todo el ducto debe ser metálico, categóricamente no utilice ducto plástico. Verifique que todas las conexiones están sujetadas firmemente. Por favor lea cuidadosamente lo siguiente: cOnExión dE...
Page 22 - Sistema de Escape; Extracción hacia; Preparación del horno
S4 Separe la placa de montaje del horno retirando dos tornillos. Véase la figura a continuación. Guarde estos tornillos para usarlos en la sección MONTAJE DEL HORNO EN LA PARED , paso / . Placa de Montaje Parte Posterior del Microondas 4 8 Sistema de Escape (Preparación del horno para Instalación) E...
Page 24 - Instalación del Horno; Montaje de las Placa de Escala
S6 Coloque nuevamente la Cubierta del Ventilador deslizándola dentro de las ranuras en la misma dirección de la flecha indicada sobre la Cubierta del Ventilador. Asegúrese que las aspas del ventilador son visibles a través de las aberturas superiores del horno antes de proceder. # figura 4) ESCAPE V...
Page 26 - Lista de verificación para; 0 Montaje del Horno en la
S8 S8 Se recomiendan dos personas para sujetar el Diseñador Microondas para Emmpotrado a la Placa de Montaje. - figura 4) MONTAJE DEL HORNO EN LA PARED : Passez le cordon secteur par le trou fait dans le fond du coffret supérieur. Levante e incline el horno hacia adelante. Enganche la parte inferior...