Page 2 - Contents
Contents About This Guide .............................................................................................................. 1 Get Started ......................................................................................................................... 2 1. 1 Connect the Hardware...
Page 5 - About This Guide
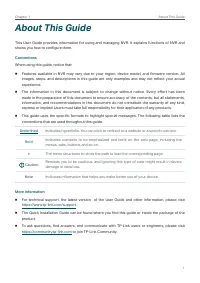
1 Chapter 1 About This Guide About This Guide This User Guide provides information for using and managing NVR. It explains functions of NVR and shows you how to configure them. Conventions When using this guide, notice that: ■ Features available in NVR may vary due to your region, device model, and ...
Page 6 - Get Started
1 Get Started This chapter guides you on how to set up your NVR for the first time. The quick setup wizard brings you convenience and flexibility to configure VIGI NVR. This chapter includes the following sections: • Connect the Hardware • Log In to Your NVR • Set Up NVR via Quick Setup Wizard
Page 7 - Connect the Hardware; Log In to Your NVR
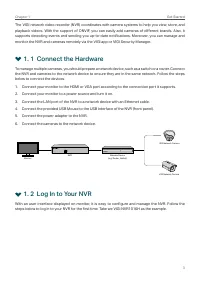
3 Chapter 1 Get Started The VIGI network video recorder (NVR) coordinates with camera systems to help you view, store, and playback videos. With the support of ONVIF, you can easily add cameras of different brands. Also, it supports detecting events and sending you up-to-date notifications. Moreover...
Page 10 - Set Up NVR via Quick Setup Wizard
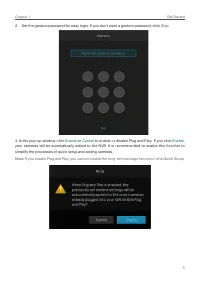
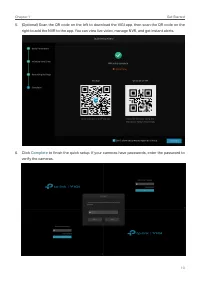
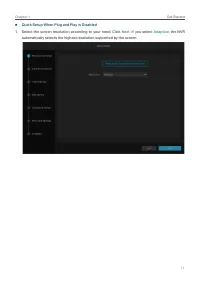
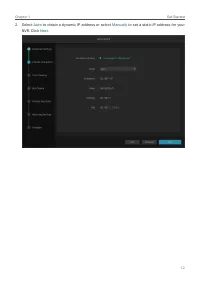
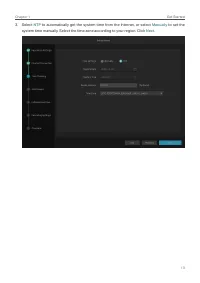
6 Chapter 1 Get Started 1. 3 Set Up NVR via Quick Setup Wizard The Quick Setup Wizard guides you through the process to set up your NVR. If you have enabled Plug and Play, refer to Quick Setup When Plug and Play is Enabled ; if not, refer to Quick Setup When Plug and Play is Disabled . ■ Quick Setup...
Page 24 - Configure Your Network Camera
2 Configure Your Network Camera This chapter introduces how to add your cameras to NVR and configure them. You can customize image effects and configure OSD (On Screen Display), Privacy Mask, Stream, and Pan&Tilt. This chapter contains the following sections: • Add Cameras to the NVR • Plug and ...
Page 25 - Add Cameras to the NVR; Add Cameras Singly or in Batches
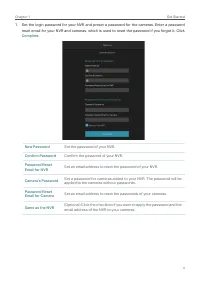
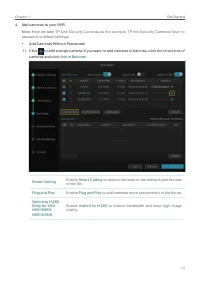
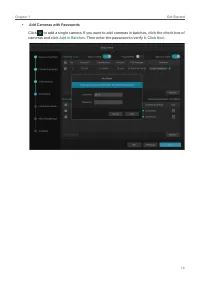
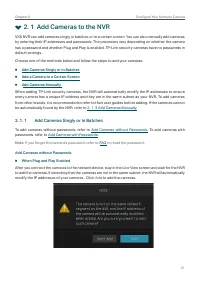
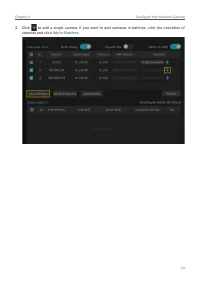
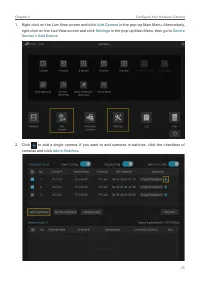
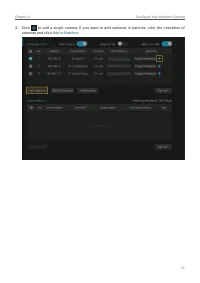
21 Chapter 2 Configure Your Network Camera 2. 1 Add Cameras to the NVR VIGI NVR can add cameras singly, in batches or to a certain screen. You can also manually add cameras by entering their IP addresses and passwords. The processes vary depending on whether the camera has a password and whether Plu...
Page 32 - Add a Camera to a Certain Screen
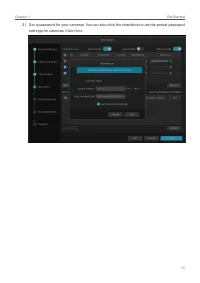
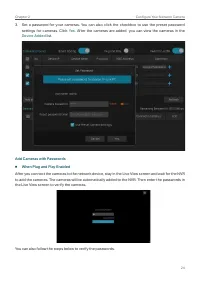
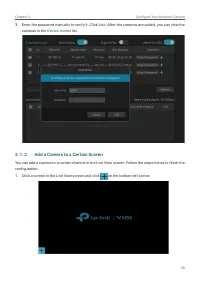
28 Chapter 2 Configure Your Network Camera 3. Enter the password manually to verify it. Click Add . After the cameras are added, you can view the cameras in the Device Added list. 2. 1. 2 Add a Camera to a Certain Screen You can add a camera to a certain channel in the Live View screen. Follow the s...
Page 35 - Add Cameras Manually
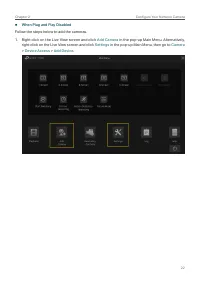
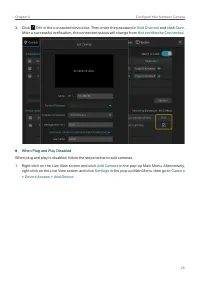
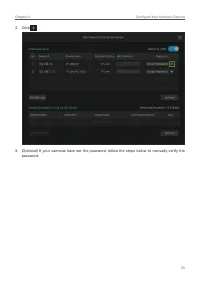
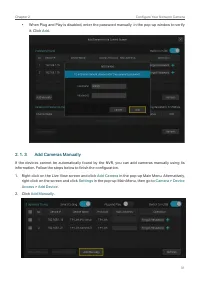
31 Chapter 2 Configure Your Network Camera • When Plug and Play is disabled, enter the password manually in the pop-up window to verify it. Click Add . 2. 1. 3 Add Cameras Manually If the devices cannot be automatically found by the NVR, you can add cameras manually using its information. Follow the...
Page 36 - Modify IP Addresses of Cameras
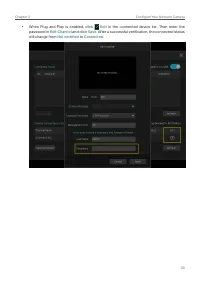
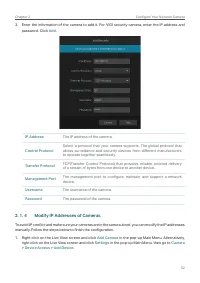
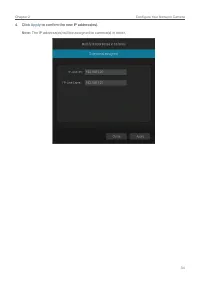
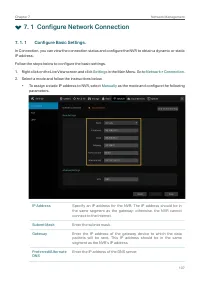
32 Chapter 2 Configure Your Network Camera 3. Enter the information of the camera to add it. For VIGI security camera, enter the IP address and password. Click Add . IP Address The IP address of the camera. Control Protocol Select a protocol that your camera supports. The global protocol that allows...
Page 39 - Plug and Play Settings
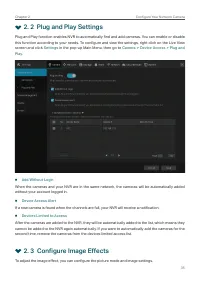
35 Chapter 2 Configure Your Network Camera 2. 2 Plug and Play Settings Plug and Play function enables NVR to automatically find and add cameras. You can enable or disable this function according to your needs. To configure and view the settings, right click on the Live View screen and click Settings...
Page 40 - Change Picture Mode; Configure Image Settings
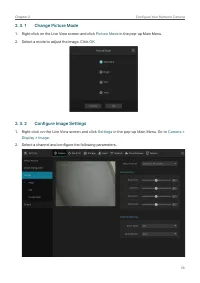
36 Chapter 2 Configure Your Network Camera 2. 3. 1 Change Picture Mode 1. Right click on the Live View screen and click Picture Mode in the pop-up Main Menu. 2. Select a mode to adjust the image. Click OK . 2. 3. 2 Configure Image Settings 1. Right click on the Live View screen and click Settings in...
Page 41 - Configure OSD Settings
37 Chapter 2 Configure Your Network Camera Brightness Adjust the brightness of image. The image gets brighter when the value increases. Contrast Adjust the contrast of image. The image contrast gets stronger when the value increases. Saturation Adjust the saturation of image. The color of image gets...
Page 43 - Configure Privacy Mask
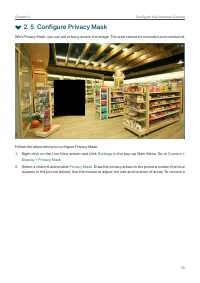
39 Chapter 2 Configure Your Network Camera 2. 5 Configure Privacy Mask With Privacy Mask, you can set privacy area in the image. The area cannot be recorded and monitored. Follow the steps below to configure Privacy Mask.1. Right click on the Live View screen and click Settings in the pop-up Main Me...
Page 44 - Configure Stream Settings; Configure Main Stream and Substream
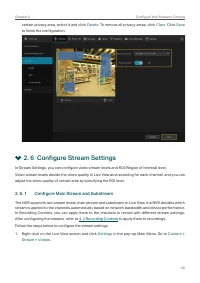
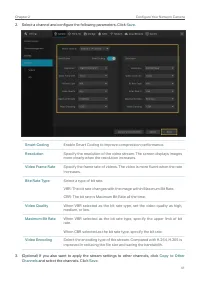
40 Chapter 2 Configure Your Network Camera certain privacy area, select it and click Delete . To remove all privacy areas, click Clear . Click Save to finish the configuration. 2. 6 Configure Stream Settings In Stream Settings, you can configure video stream levels and ROI (Region of interest) level...
Page 46 - Configure ROI; Preset and Call Positions
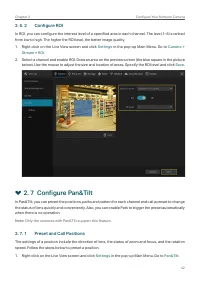
42 Chapter 2 Configure Your Network Camera 2. 6. 2 Configure ROI In ROI, you can configure the interest level of a specified area in each channel. The level 1–6 is ranked from low to high. The higher the ROI level, the better image quality.1. Right click on the Live View screen and click Settings in...
Page 48 - Preset and Call Paths in Cruise Scan
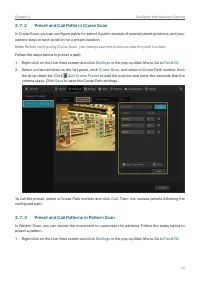
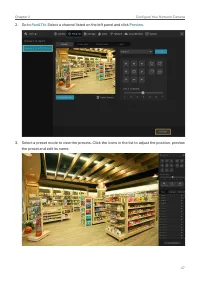
44 Chapter 2 Configure Your Network Camera 2. 7. 2 Preset and Call Paths in Cruise Scan In Cruise Scan, you can configure paths for patrol. A path consists of several preset positions, and your camera stays in each position for a preset duration. Note: Before configuring Cruise Scan, you need preset...
Page 49 - Enable Park
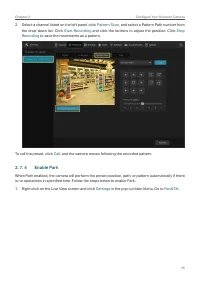
45 Chapter 2 Configure Your Network Camera 2. Select a channel listed on the left panel, click Pattern Scan , and select a Pattern Path number from the drop-down list. Click Start Recording and click the buttons to adjust the position. Click Stop Recording to save the movements as a pattern. To call...
Page 50 - Preview Preset Settings
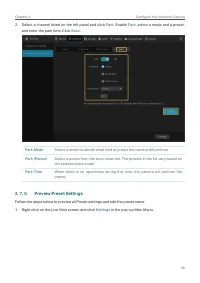
46 Chapter 2 Configure Your Network Camera 2. Select a channel listed on the left panel and click Park . Enable Park , select a mode and a preset, and enter the park time. Click Save . Park Mode Select a mode to decide what kind of preset the camera will perform. Park (Preset) Select a preset from t...
Page 52 - Manage Your Cameras; Modify the Name and Network Configurations
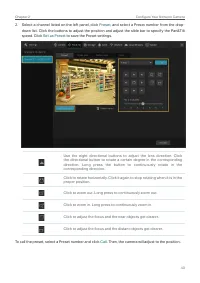
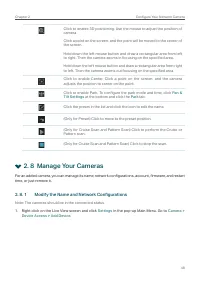
48 Chapter 2 Configure Your Network Camera Click to enable 3D positioning. Use the mouse to adjust the position of camera. Click a point on the screen, and the point will be moved to the center of the screen. Hold down the left mouse button and draw a rectangular area from left to right. Then the ca...
Page 53 - Change the Password and Reset Email
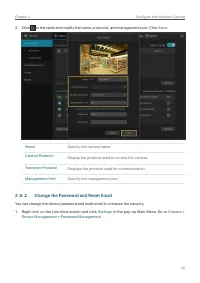
49 Chapter 2 Configure Your Network Camera 2. Click in the table and modify the name, protocols, and management port. Click Save . Name Specify the camera name. Control Protocol Display the protocol used to control the camera. Transport Protocol Displays the protocol used for communication. Manageme...
Page 54 - Upgrade the Firmware
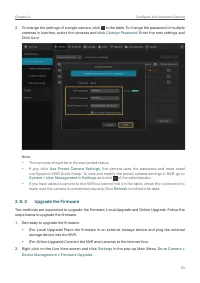
50 Chapter 2 Configure Your Network Camera 2. To change the settings of a single camera, click in the table. To change the password of multiple cameras in batches, select the cameras and click Change Password . Enter the new settings and Click Save . Note : • The cameras should be in the connected s...
Page 55 - Configure Scheduled Reboot
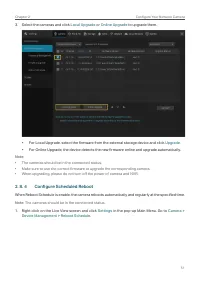
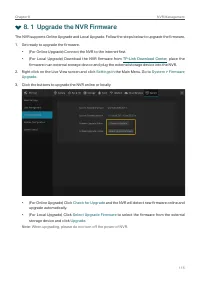
51 Chapter 2 Configure Your Network Camera 3. Select the cameras and click Local Upgrade or Online Upgrade to upgrade them. • For Local Upgrade, select the firmware from the external storage device and click Upgrade . • For Online Upgrade, the device detects the new firmware online and upgrade autom...
Page 56 - Remove Cameras from the NVR
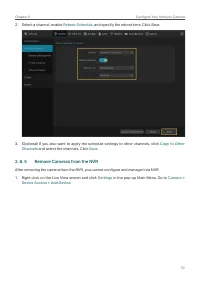
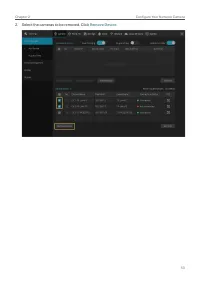
52 Chapter 2 Configure Your Network Camera 2. Select a channel, enable Reboot Schedule , and specify the reboot time. Click Save. 3. (Optional) If you also want to apply the schedule settings to other channels, click Copy to Other Channels and select the channels. Click Save . 2. 8. 5 Remove Cameras...
Page 58 - Live View
3 Live View In Live View, you can monitor the channels in real time and respond to abnormal conditions with quick operations, such as viewing instant playback, zooming in the image, and enabling real-time talk. This chapter contains the following sections: • Configure the Screen Layout • Configure L...
Page 59 - Configure the Screen Layout; Change the Screen Layout Quickly
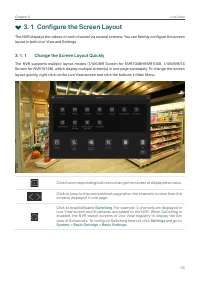
55 Chapter 3 Live View 3. 1 Configure the Screen Layout The NVR displays the videos of each channel via several screens. You can flexibly configure the screen layout in both Live View and Settings. 3. 1. 1 Change the Screen Layout Quickly The NVR supports multiple layout modes (1/4/6/8/9 Screen for ...
Page 60 - Rearrange Channels in Settings
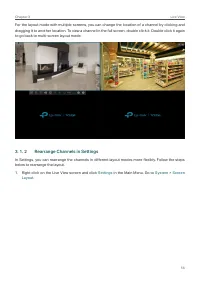
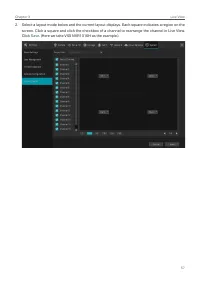
56 Chapter 3 Live View For the layout mode with multiple screens, you can change the location of a channel by clicking and dragging it to another location. To view a channel in the full screen, double click it. Double click it again to go back to multi-screen layout mode. 3. 1. 2 Rearrange Channels ...
Page 62 - Configure Live View Settings via Toolbar
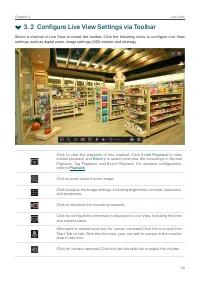
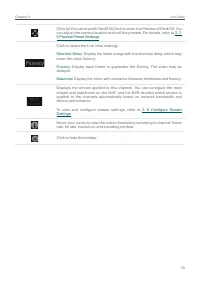
58 Chapter 3 Live View 3. 2 Configure Live View Settings via Toolbar Select a channel in Live View to reveal the toolbar. Click the following icons to configure Live View settings, such as digital zoom, image settings, OSD, stream, and strategy. Click to view the playback of this channel. Click 5-mi...
Page 64 - Recording and Storage
4 Recording and Storage This chapter guides you on how to view and configure recording and storage settings on your NVR. VIGI NVR allows you to set your own recording schedules and parameters, assign disk quota to connected cameras, manage and detect the installed hard drive, as well as export and b...
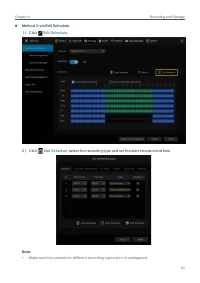
Page 65 - Configure Recording Schedules; Configure Recording Schedule for all Channels; Customize Recording Schedule
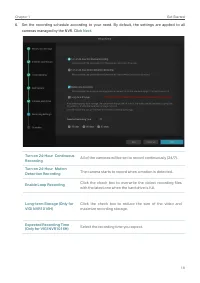
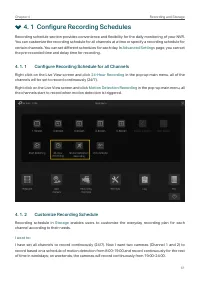
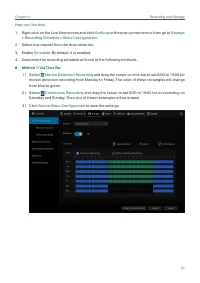
61 Chapter 4 Recording and Storage 4. 1 Configure Recording Schedules Recording schedule section provides convenience and flexibility for the daily monitoring of your NVR. You can customize the recording schedule for all channels at a time or specify a recording schedule for certain channels. You ca...
Page 69 - Configure Advanced Recording Settings; Recording Controls; Configure Storage Disk Group
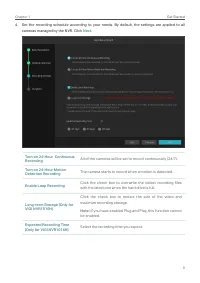
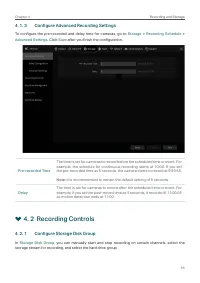
65 Chapter 4 Recording and Storage 4. 1. 3 Configure Advanced Recording Settings To configure the pre-recorded and delay time for cameras, go to Storage > Recording Schedule > Advanced Settings . Click Save after you finish the configuration. Pre-recorded Time The time is set for cameras to re...
Page 70 - Configure Disk Quota
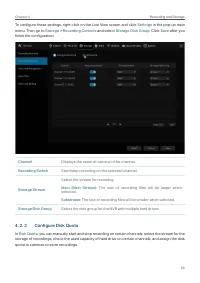
66 Chapter 4 Recording and Storage To configure these settings, right click on the Live View screen and click Settings in the pop-up main menu. Then go to Storage > Recording Controls and select Storage Disk Group . Click Save after you finish the configuration. Channel Displays the name of camer...
Page 71 - Record Manually
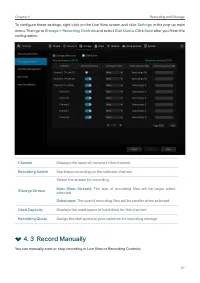
67 Chapter 4 Recording and Storage To configure these settings, right click on the Live View screen and click Settings in the pop-up main menu. Then go to Storage > Recording Controls and select Disk Quota . Click Save after you finish the configuration. Channel Displays the name of camera in thi...
Page 72 - Manage Hard Drive
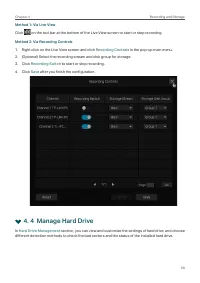
68 Chapter 4 Recording and Storage Method 1: Via Live View Click on the tool bar at the bottom of the Live View screen to start or stop recording. Method 2: Via Recording Controls 1. Right click on the Live View screen and click Recording Controls in the pop-up main menu. 2. (Optional) Select the re...
Page 73 - View and Configure Settings of Hard Drive
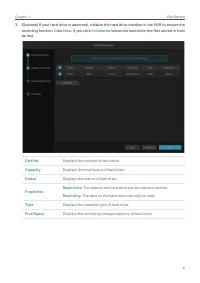
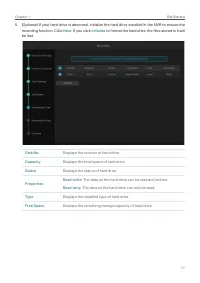
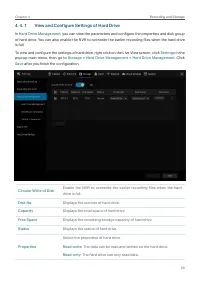
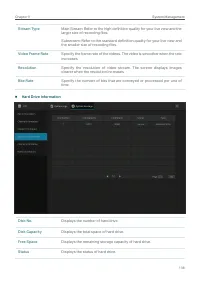
69 Chapter 4 Recording and Storage 4. 4. 1 View and Configure Settings of Hard Drive In Hard Drive Management , you can view the parameters and configure the properties and disk group of hard drive. You can also enable the NVR to overwrite the earlier recording files when the hard drive is full. To ...
Page 74 - Add External Hard Drive to NVR; Bad Sector Detection
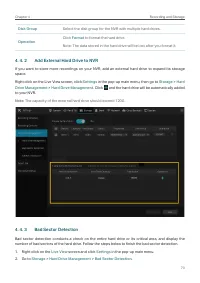
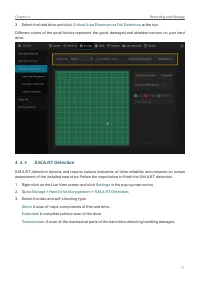
70 Chapter 4 Recording and Storage Disk Group Select the disk group for the NVR with multiple hard drives. Operation Click Format to format the hard drive. Note: The data stored in the hard drive will be lost after you format it. 4. 4. 2 Add External Hard Drive to NVR If you want to store more recor...
Page 77 - Export Recordings
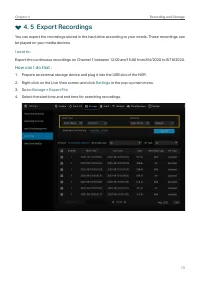
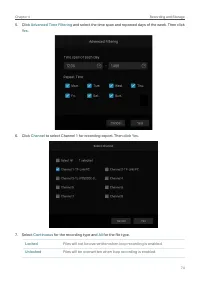
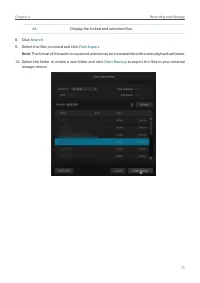
73 Chapter 4 Recording and Storage 4. 5 Export Recordings You can export the recordings stored in the hard drive according to your needs. These recordings can be played on your media devices. I want to : Export the continuous recordings on Channel 1 between 12:00 and15:00 from 8/4/2020 to 8/18/2020....
Page 81 - Backup Recordings
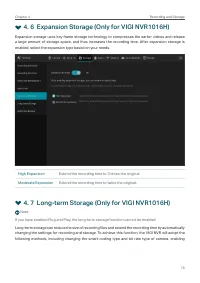
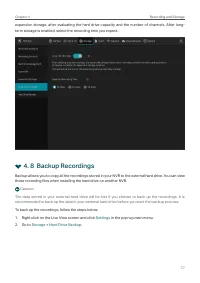
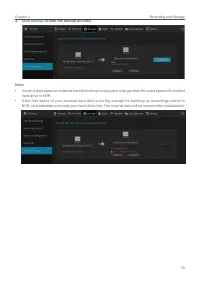
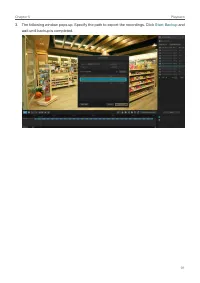
77 Chapter 4 Recording and Storage expansion storage, after evaluating the hard drive capacity and the number of channels. After long-term storage is enabled, select the recording time you expect. 4. 8 Backup Recordings Backup allows you to copy all the recordings stored in your NVR to the external ...
Page 83 - Playback
5 Playback This function allows you to play the history recordings and edit them, such as adding tags and exporting clips. You can easily search the recordings based on the channel, date, tag, and event. This chapter contains the following sections: • Instant Playback • Play Normal Recordings • Play...
Page 84 - Instant Playback; Play Normal Recordings
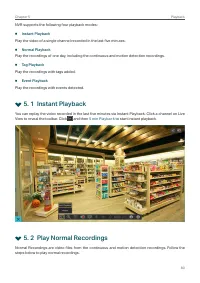
80 Chapter 5 Playback NVR supports the following four playback modes: ■ Instant Playback Play the video of a single channel recorded in the last five minutes. ■ Normal Playback Play the recordings of one day, including the continuous and motion detection recordings. ■ Tag Playback Play the recording...
Page 87 - Play Recordings with Tags
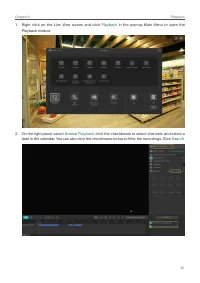
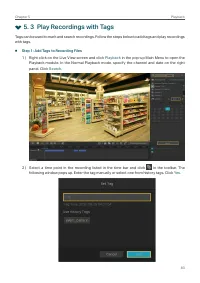
83 Chapter 5 Playback 5. 3 Play Recordings with Tags Tags can be used to mark and search recordings. Follow the steps below to add tags and play recordings with tags. ■ Step 1: Add Tags to Recording Files 1 ) Right click on the Live View screen and click Playback in the pop-up Main Menu to open the ...
Page 89 - Playback Recordings of Events
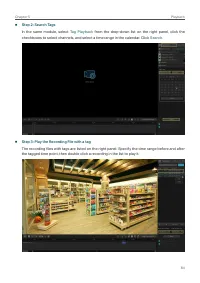
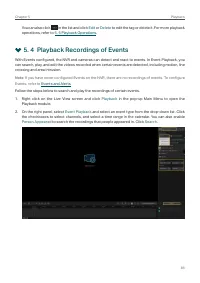
85 Chapter 5 Playback You can also click in the list and click Edit or Delete to edit the tag or delete it. For more playback operations, refer to 5. 5 Playback Operations . 5. 4 Playback Recordings of Events With Events configured, the NVR and cameras can detect and react to events. In Event Playba...
Page 90 - Playback Operations; Basic Playback Operations
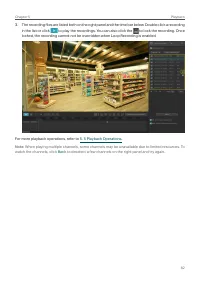
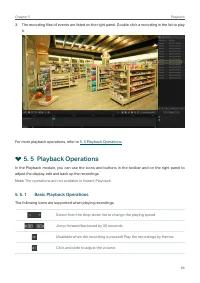
86 Chapter 5 Playback 3. The recording files of events are listed on the right panel. Double click a recording in the list to play it. For more playback operations, refer to 5. 5 Playback Operations . 5. 5 Playback Operations In the Playback module, you can use the icons and buttons in the toolbar a...
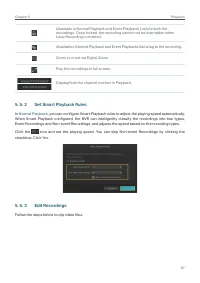
Page 91 - Set Smart Playback Rules; Edit Recordings
87 Chapter 5 Playback (Available in Normal Playback and Event Playback) Lock/unlock the recordings. Once locked, the recording cannot not be overridden when Loop Recording is enabled. (Available in Normal Playback and Event Playback) Add a tag to the recording. Zoom in or out via Digital Zoom. Play ...
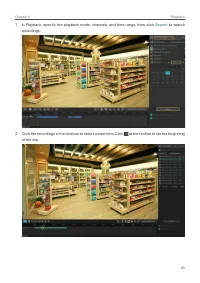
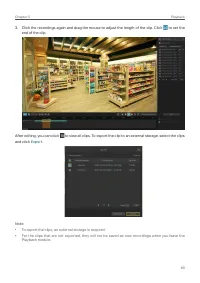
Page 94 - Export Recordings
90 Chapter 5 Playback 5. 5. 4 Export Recordings In Playback, you can easily search the desired recordings based on channel, time, recording types, tags, and events, and back up them in batches. Follow the steps below to search and back up recordings. Note : To back up the recordings, an external sto...
Page 96 - Events and Alerts
6 Events and Alerts This chapter guides you on how to configure the event settings and alarm actions when your cameras detect different types of events. VIGI NVR monitors the user-defined areas and you’ll be automatically alerted to any suspicious activity in your home and office. This chapter inclu...
Page 97 - Motion Detection
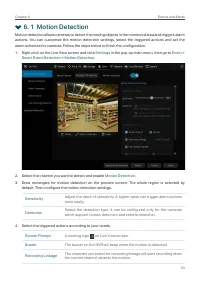
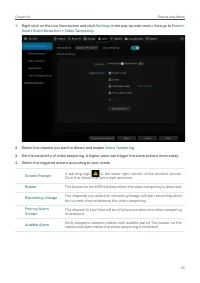
93 Chapter 6 Events and Alerts 6. 1 Motion Detection Motion detection allows cameras to detect the moving objects in the monitored area and triggers alarm actions. You can customize the motion detection settings, select the triggered actions and set the alarm schedule for cameras. Follow the steps b...
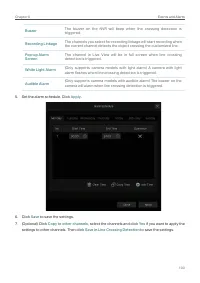
Page 98 - Video Tampering
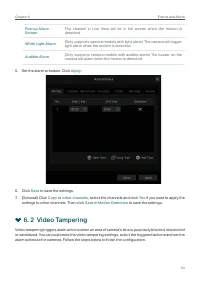
94 Chapter 6 Events and Alerts Pop-up Alarm Screen The channel in Live View will be in full screen when the motion is detected. White Light Alarm (Only supports camera models with light alarm) The camera will trigger light alarm when the motion is detected. Audible Alarm (Only supports camera models...
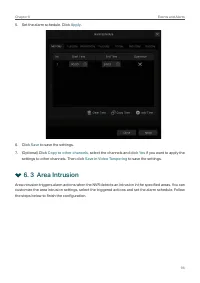
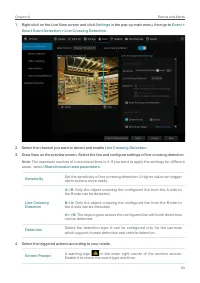
Page 102 - Line Crossing Detection
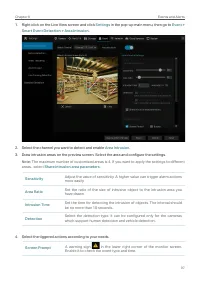
98 Chapter 6 Events and Alerts Buzzer The buzzer on the NVR will beep when the area intrusion is detected. Recording Linkage The channels you select for recording linkage will start recording when the current channel detects an intrusion in the area. Pop-up Alarm Screen The channel in Live View will...
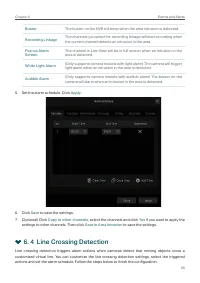
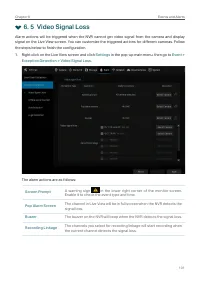
Page 105 - Video Signal Loss
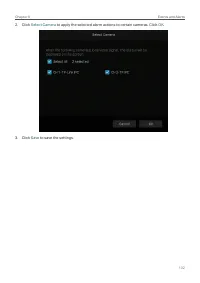
101 Chapter 6 Events and Alerts 6. 5 Video Signal Loss Alarm actions will be triggered when the NVR cannot get video signal from the camera and display signal on the Live View screen. You can customize the triggered actions for different cameras. Follow the steps below to finish the configuration.1....
Page 107 - Offline and IP Conflict
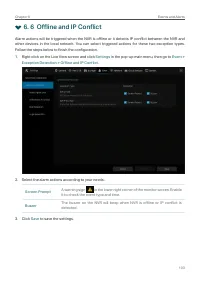
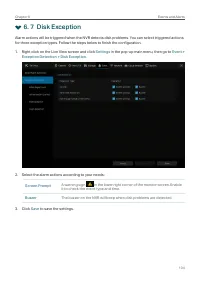
103 Chapter 6 Events and Alerts 6. 6 Offline and IP Conflict Alarm actions will be triggered when the NVR is offline or it detects IP conflict between the NVR and other devices in the local network. You can select triggered actions for these two exception types. Follow the steps below to finish the ...
Page 109 - Login Exception
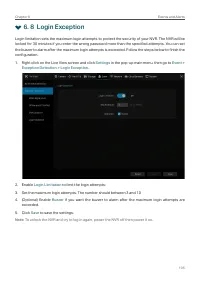
105 Chapter 6 Events and Alerts 6. 8 Login Exception Login limitation sets the maximum login attempts to protect the security of your NVR. The NVR will be locked for 30 minutes if you enter the wrong password more than the specified attempts. You can set the buzzer to alarm after the maximum login a...
Page 110 - Network Management
7 Network Management With proper network configurations, you can connect your NVR to the internet, build up mapping between internal and external ports, and manage it remotely via Cloud Services. This chapter contains the following sections: • Configure Network Connection • Configure Ports • Configu...
Page 111 - Configure Network Connection; Configure Basic Settings.
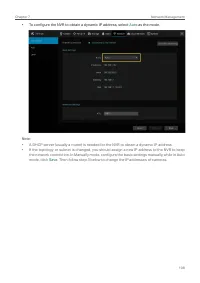
107 Chapter 7 Network Management 7. 1 Configure Network Connection 7. 1. 1 Configure Basic Settings. In Connection, you can view the connection status and configure the NVR to obtain a dynamic or static IP address. Follow the steps below to configure the basic settings.1. Right click on the Live Vie...
Page 113 - Configure Advanced Settings
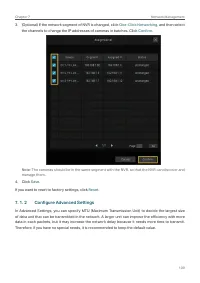
109 Chapter 7 Network Management 3. (Optional) If the network segment of NVR is changed, click One-Click Networking , and then select the channels to change the IP addresses of cameras in batches. Click Confirm . Note : The cameras should be in the same segment with the NVR, so that the NVR can disc...
Page 114 - Configure Ports
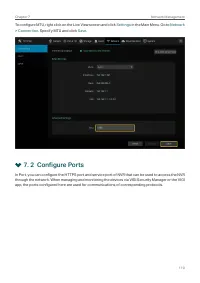
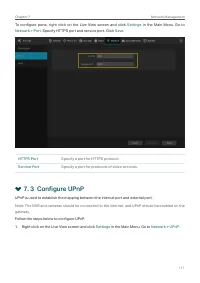
110 Chapter 7 Network Management To configure MTU, right click on the Live View screen and click Settings in the Main Menu. Go to Network > Connection . Specify MTU and click Save . 7. 2 Configure Ports In Port, you can configure the HTTPS port and service port of NVR that can be used to access t...
Page 116 - Enable Remote Management via Cloud Services
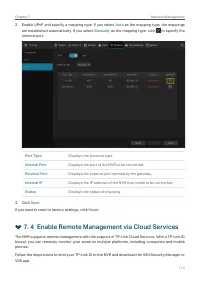
112 Chapter 7 Network Management 2. Enable UPnP and specify a mapping type. If you select Auto as the mapping type, the mappings are established automatically. If you select Manually as the mapping type, click to specify the external port. Port Type Displays the protocol type. Internal Port Displays...
Page 118 - NVR Management
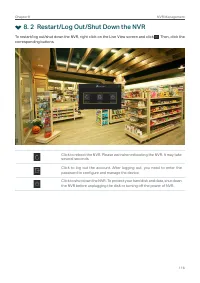
8 NVR Management This chapter contains the following sections to introduce how to manage NVR: • Upgrade the NVR Firmware • Restart/Log Out/Shut Down the NVR • Reset the NVR • Configure Reboot Schedule for NVR • Diagnose the NVR
Page 119 - Upgrade the NVR Firmware
115 Chapter 8 NVR Management 8. 1 Upgrade the NVR Firmware The NVR supports Online Upgrade and Local Upgrade. Follow the steps below to upgrade the firmware.1. Get ready to upgrade the firmware. • (For Online Upgrade) Connect the NVR to the internet first.• (For Local Upgrade) Download the NVR firmw...
Page 121 - Configure Reboot Schedule for NVR
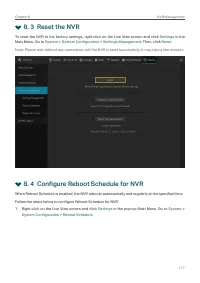
117 Chapter 8 NVR Management 8. 3 Reset the NVR To reset the NVR to the factory settings, right click on the Live View screen and click Settings in the Main Menu. Go to System > System Configuration > Settings Management . Then, click Reset . Note: Please wait without any operations until the ...
Page 122 - Diagnose the NVR
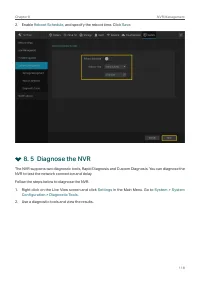
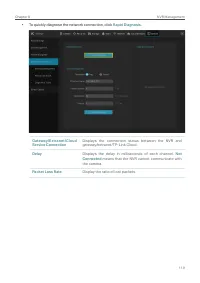
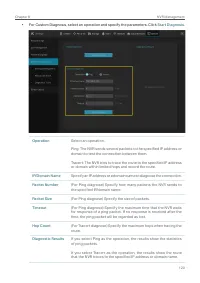
118 Chapter 8 NVR Management 2. Enable Reboot Schedule , and specify the reboot time. Click Save . 8. 5 Diagnose the NVR The NVR supports two diagnostic tools, Rapid Diagnosis and Custom Diagnosis. You can diagnose the NVR to test the network connection and delay. Follow the steps below to diagnose ...
Page 125 - System Management
9 System Management This chapter guides you to configure the basic and advanced settings of your NVR, export and import settings, and view system logs and messages on NVR. VIGI NVR allows users to create and modify administrator accounts based on their needs. This chapter includes the following sect...
Page 126 - Configure Basic Settings
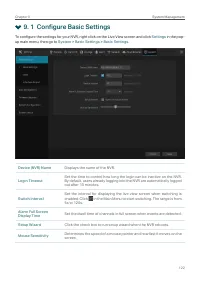
122 Chapter 9 System Management 9. 1 Configure Basic Settings To configure the settings for your NVR, right click on the Live View screen and click Settings in the pop- up main menu, then go to System > Basic Settings > Basic Settings. Device (NVR) Name Displays the name of the NVR. Login Time...
Page 127 - Modify System Time
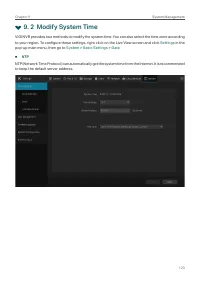
123 Chapter 9 System Management 9. 2 Modify System Time VIGI NVR provides two methods to modify the system time. You can also select the time zone according to your region. To configure these settings, right click on the Live View screen and click Settings in the pop-up main menu, then go to System ...
Page 128 - Configure Interface Output
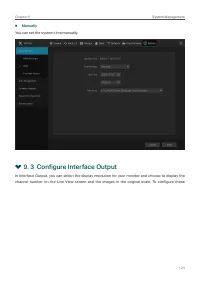
124 Chapter 9 System Management ■ Manually You can set the system time manually. 9. 3 Configure Interface Output In Interface Output, you can select the display resolution for your monitor and choose to display the channel number on the Live View screen and the images in the original scale. To confi...
Page 129 - Manage User Accounts
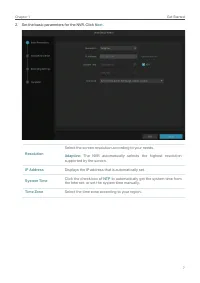
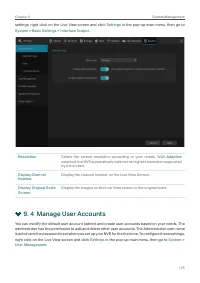
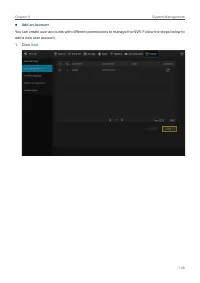
125 Chapter 9 System Management settings, right click on the Live View screen and click Settings in the pop-up main menu, then go to System > Basic Settings > Interface Output. Resolution Select the screen resolution according to your needs. With Adaptive selected, the NVR automatically select...
Page 133 - Import and Export Settings
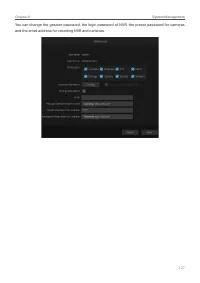
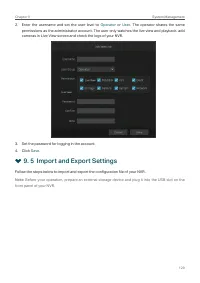
129 Chapter 9 System Management 2. Enter the username and set the user level to Operator or User . The operator shares the same permissions as the administrator account. The user only watches the live view and playback, add cameras in Live View screen and check the logs of your NVR. 3. Set the passw...
Page 135 - View System Logs
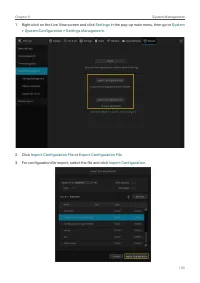
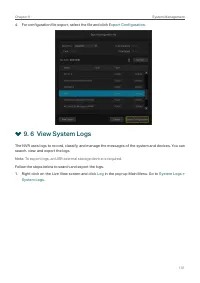
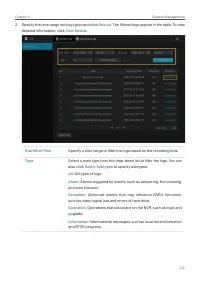
131 Chapter 9 System Management 4. For configuration file export, select the file and click Export Configuration . 9. 6 View System Logs The NVR uses logs to record, classify, and manage the messages of the system and devices. You can search, view, and export the logs. Note : To export logs, an USB ...
Page 138 - View System Messages
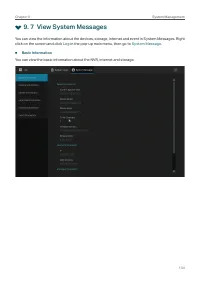
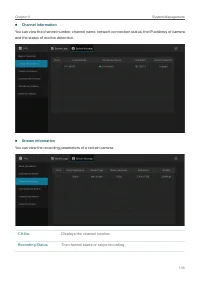
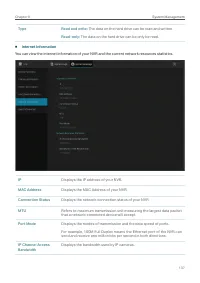
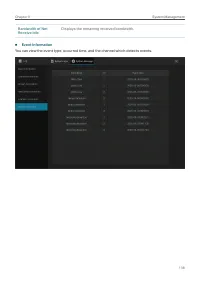
134 Chapter 9 System Management 9. 7 View System Messages You can view the information about the devices, storage, internet and event in System Messages. Right click on the screen and click Log in the pop-up main menu, then go to System Message. ■ Basic Information You can view the basic information...
Page 143 - FAQ
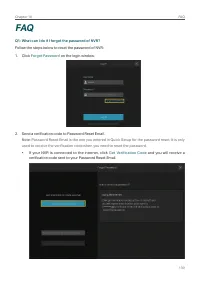
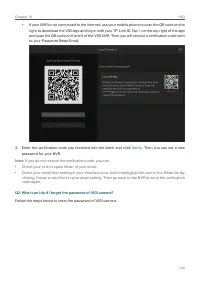
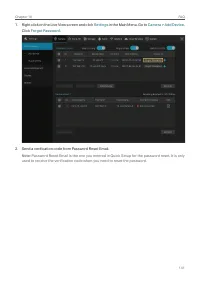
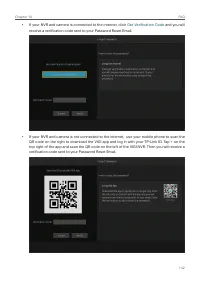
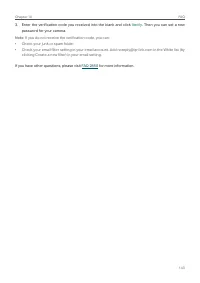
139 Chapter 10 FAQ FAQ Q1: What can I do if I forgot the password of NVR? Follow the steps below to reset the password of NVR:1. Click Forgot Password on the login window. 2. Send a verification code to Password Reset Email. Note : Password Reset Email is the one you entered in Quick Setup for the p...
Page 148 - FCC Compliance Information Statement
FCC Compliance Information Statement Product Name: Network Video RecorderModel Number: VIGI NVR1008H/VIGI NVR1008/VIGI NVR1016H Component Name Model Power Adapter T120150-2B1 Responsible party:TP-Link USA Corporation, d/b/a TP-Link North America, Inc.Address: 145 South State College Blvd. Suite 400,...
Page 149 - CE Mark Warning
Model Number: T120150-2B1Responsible party: TP-Link USA Corporation, d/b/a TP-Link North America, Inc.Address: 145 South State College Blvd. Suite 400, Brea, CA 92821Website: https://www.tp-link.com/us/Tel: +1 626 333 0234Fax: +1 909 527 6803E-mail: [email protected]This equipment has been tested an...
Page 151 - Safety Information
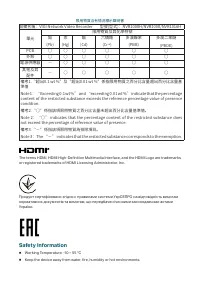
限用物質含有情況標示聲明書 設備名稱:VIGI Network Video Recorder 型號(型式):NVR1008H/NVR1008/NVR1016H 單元 限用物質及其化學符號 鉛 (Pb) 汞 (Hg) 鎘 (Cd) 六價鉻 (Cr +6 ) 多溴聯苯 (PBB) 多溴二苯醚 (PBDE) PCB ○ ○ ○ ○ ○ ○ 外殼 ○ ○ ○ ○ ○ ○ 電源供應器 - ○ ○ ○ ○ ○ 其他及其 配件 - ○ ○ ○ ○ ○ 備考1.〝超出0.1 wt %〞及〝超出0.01 wt %〞係指限用物質之百分比含量超出百分比含量基 準值Note 1:“Exceeding 0.1 wt %...
Page 152 - Explanation of the symbols on the product label
■ Do not attempt to disassemble, repair, or modify the device. If you need service, please contact us. ■ Do not use damaged charger or USB cable to charge the device. ■ Do not use any other chargers than those recommended. ■ Adapter shall be installed near the equipment and shall be easily accessibl...


 TP-Link VIGI C230I Mini
User Manual
TP-Link VIGI C230I Mini
User Manual
 TP-Link VIGI C300HP-4
User Manual
TP-Link VIGI C300HP-4
User Manual
 TP-Link VIGI C300HP-6
User Manual
TP-Link VIGI C300HP-6
User Manual
 TP-Link VIGI C300P-6
User Manual
TP-Link VIGI C300P-6
User Manual
 TP-Link VIGI C330I
User Manual
TP-Link VIGI C330I
User Manual
 TP-Link VIGI C340I
User Manual
TP-Link VIGI C340I
User Manual
 TP-Link VIGI C400HP
User Manual
TP-Link VIGI C400HP
User Manual
 TP-Link VIGI C440-2.8
User Manual
TP-Link VIGI C440-2.8
User Manual
 TP-Link VIGI C440-W
User Manual
TP-Link VIGI C440-W
User Manual
 TP-Link VIGI C540
User Manual
TP-Link VIGI C540
User Manual