Page 2 - WARNING; • Dangerously high voltages are present inside the TV.
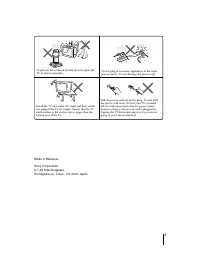
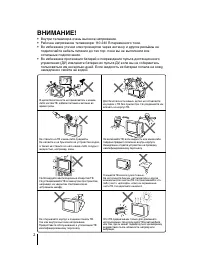
2 Do not place any objects on the TV. The apparatusshall not be exposed to dripping or splashing andthat no objects filled with liquids, such as vases,shall be placed on the apparatus. WARNING • Dangerously high voltages are present inside the TV. • TV operating voltage: 110 – 240 V AC. • Do not plu...
Page 4 - Securing the TV; screws; (1) Attach each end of a cord or chain to; or
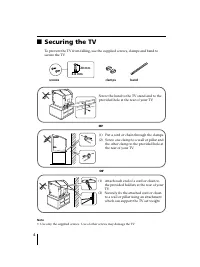
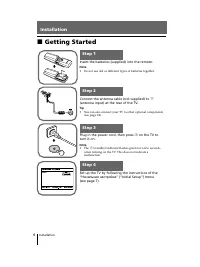
4 x Securing the TV To prevent the TV from falling, use the supplied screws, clamps and band tosecure the TV. 20 mm 3.8 mm screws clamps band or Screw the band to the TV stand and to theprovided hole at the rear of your TV. (1) Put a cord or chain through the clamps.(2) Screw one clamp to a wall or ...
Page 5 - Table of Contents; Installation
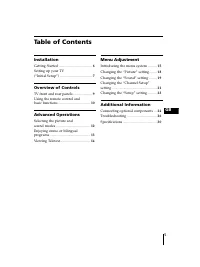
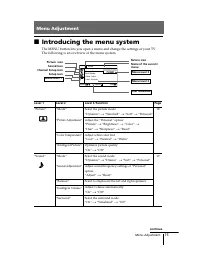
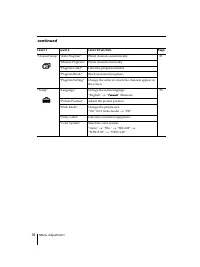
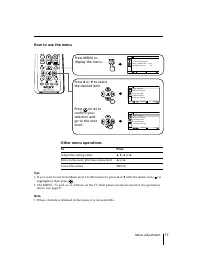
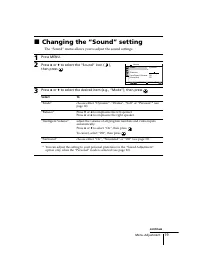
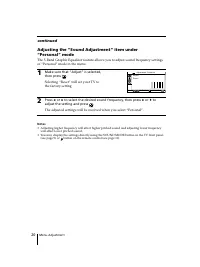
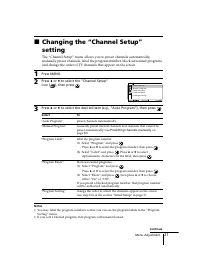
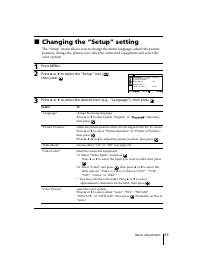
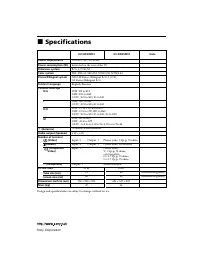
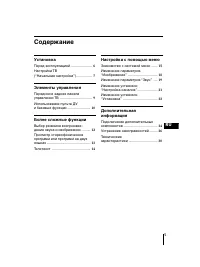
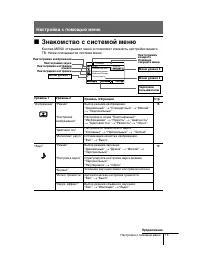
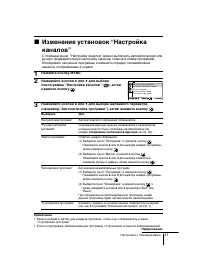
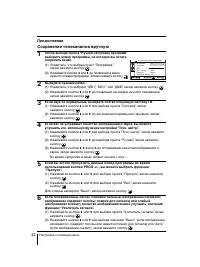
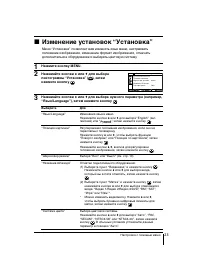
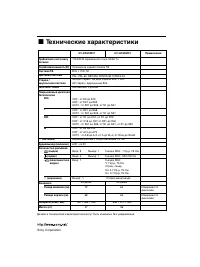
5 Menu Adjustment Introducing the menu system .......... 15 Changing the “Picture” setting ........ 18 Changing the “Sound” setting ......... 19 Changing the “Channel Setup”setting .................................................. 21 Changing the “Setup” setting .......... 23 Additional Information...
Page 6 - Getting Started; Начальная настройкa; Connect the antenna cable (not supplied) to
6 Installation Installation x Getting Started b b 1 Step 1 Insert the batteries (supplied) into the remote. Note • Do not use old or different types of batteries together. Step 2 Step 3 Step 4 Set up the TV by following the instructions of the“ Начальная настройкa ” (“Initial Setup”) menu (see page ...
Page 7 - Setting up your TV; Press
7 Installation Installation x Setting up your TV (“Initial Setup”) When you turn on your TV for the first time, the “ Начальная настройкa “ (“Initial Setup”) menu will appear. You may change the menu language, preset the TVchannels automatically, change the order of TV channels that appear on the sc...
Page 8 - continued
8 Installation The selected channel will appear onthe screen. 2) Press 2 +/– to select the new program number position for yourselected channel, then press t . 3) Repeat steps b) 1) and 2) if you wish to change the order of the otherchannels. c) Press MENU to go to the next menu. 4 Press 2 +/– to ad...
Page 9 - Overview of Controls; qa; TV front panel; TV front and rear panels; qa
9 Overview of Contr ols Overview of Controls Overview of Controls qa 1 2 R L Y C B C R qd qs 3 2 0 9 3 L(MONO) R PROG MENU (AUTO PROG) SOUND MODE 4 5 8 7 6 AUTO PROG:Press [MENU] for 5sec 1 3 L(MONO) R PROG MENU (AUTO PROG) SOUND MODE AUTO PROG:Pr AUTO PROG:Press [MENU] for 5sec ess [MENU] for 5sec ...
Page 10 - Using the remote control and basic
10 Overview of Controls x Using the remote control and basic functions TV 1 2 3 4 6 7 8 9 0 5 MENU PROG A / B RESET 1 2 3 6 8 7 45 9 qk qf qg qh ql qj qs ws qd wa w; 0qa Button Description Page 1 ? / 1 Turn off temporarily or turn on the TV. – 2 a Display the TV program. – 3 Jump to last program num...
Page 12 - Advanced Operations; Selecting the sound mode; -Band Graphic Equalizer display will appear.
12 Advanced Operations Advanced Operations Selecting the sound mode Press (or SOUND MODE on the front panel) to select the desired sound mode. 5-Band Graphic Equalizer display will appear. Select To listen to “Dynamic” dynamic and clear sound that emphasizes both the lowand high tones. “Drama” sound...
Page 13 - When receiving a NICAM program; When receiving an A2 program; Enjoying stereo or bilingual programs
13 Advanced Operations When receiving a NICAM program Broadcasting On-screen display (Selected sound) NICAMstereo NICAMbilingual NICAMmonaural When receiving an A2 program Broadcasting On-screen display (Selected sound) A2stereo A2bilingual NICAM (Stereo sound) Mono (Regular sound) t t NICAM Main (M...
Page 14 - Viewing Teletext; You can use the buttons on the remote to view Teletext.
14 Advanced Operations x Viewing Teletext Some TV stations broadcast an information service called Teletext which allowsyou to receive various information, such as stock market reports and news. You can use the buttons on the remote to view Teletext. To Do this display a Teletext Press . Each time y...
Page 15 - Menu Adjustment; Introducing the menu system
15 Menu Adjustment Menu Adjustment x Introducing the menu system The MENU button lets you open a menu and change the settings of your TV.The following is an overview of the menu system. Return icon Setup icon Channel Setup icon Name of the currentmenu Picture icon Menu level 3 Menu level 2 User Guid...
Page 17 - How to use the menu
17 Menu Adjustment How to use the menu Other menu operations Tips • If you want to exit from Menu level 2 to Menu level 1, press V or v until the return icon ( ) is highlighted, then press . • The MENU, t and 2 +/– buttons on the TV front panel can also be used for the operations above (see page 9)....
Page 18 - Changing the “Picture” setting; The “Picture” menu allows you to adjust the picture settings.; Selecting “Reset” will set your TV to the factory setting.
18 Menu Adjustment x Changing the “Picture” setting The “Picture” menu allows you to adjust the picture settings. 1 Press MENU. 2 Make sure the “Picture” icon ( ) is selected, then press . 3 Press V or v to select the desired item (e.g., “Mode”), then press . Select To “Mode” choose either “Dynamic”...
Page 19 - Changing the “Sound” setting; The “Sound” menu allows you to adjust the sound settings.
19 Menu Adjustment x Changing the “Sound” setting The “Sound” menu allows you to adjust the sound settings. 1 Press MENU. 2 Press V or v to select the “Sound” icon ( ), then press . 3 Press V or v to select the desired item (e.g., “Mode”), then press . Select To “Mode” choose either “Dynamic”, “Dram...
Page 20 - The adjusted settings will be received when you select “Personal”.
20 Menu Adjustment R e s e t 1 0 0 3 0 0 1 k 3 k 8 k A d j u s t Adjustment: Personal Confirm End Select Adjusting the “Sound Adjustment” item under“Personal” mode The 5-Band Graphic Equalizer feature allows you to adjust sound frequency settingsof “Personal” mode in the menu. 1 Make sure that “Adju...
Page 22 - Select the desired channel.
22 Menu Adjustment Presetting channels manually 1 After selecting “Manual Program”, select the programnumber to which you want to preset a channel. (1) Make sure “Program” is selected, then press . (2) Press V or v until the program number you want to preset appears on the menu, then press . 2 Selec...
Page 23 - Changing the “Setup” setting
23 Menu Adjustment x Changing the “Setup” setting The “Setup” menu allows you to change the menu language, adjust the pictureposition, change the picture size, label the connected equipment and select thecolor system. 1 Press MENU. 2 Press V or v to select the “Setup” icon ( ), then press . 3 Press ...
Page 24 - Connecting optional components; Connecting to the video input terminal (; Additional Information; Connecting to the monitor output terminal (
24 Additional Information x Connecting optional components Connecting to the video input terminal ( t ) Additional Information TV front panel Video game equipment TV rear panel Audio system 1 2 R L Y C B C R 3 L(MONO) R Audio/Video cable (not supplied) 1 2 R L Y C B C R Antenna cable (not supplied) ...
Page 25 - Connecting to the component video input terminal (
25 Additional Information DVD player TV rear panel Component video cable (not supplied) Audio cable (not supplied) 1 2 R L Y C B C R Connect To (on the DVD player) Y (green) Y C B (blue) C B , P B , C b or B-Y C R (red) C R , P R , C r or R-Y Connecting to the component video input terminal ( ) Note...
Page 26 - Troubleshooting guide; Troubleshooting; Reset function
26 Additional Information Snowy picture Noisy sound Distorted picture Noisy sound Good picture Noisy sound Possible cause Symptom Solutions Page 24 – 22 22 – – 22 22 • Check the antenna cable and connection on the TV, VCR and at the wall. • Check the antenna setup. Contact a Sony dealer for advice. ...
Page 30 - Specifications
30 Additional Information Power requirements Power consumption (W) Television system Color system Stereo/Bilingual system Teletext Language Channel coverage B/G I D/K M 8 (Antenna) Audio output (Speaker) Number of terminal (Video) (Audio) (Component Video) i (Headphone) Picture tube Tube size (cm) S...
Page 33 - Безопасная установка телевизора; Винты; или
4 x Безопасная установка телевизора Во избежание падения ТВ используйте прилагаемые винты, зажимы икрепежную ленту. 20 мм 3,8 мм Винты Зажимы Крепежная лента С помощью винтов прикрепите одинконец ленты к подставке для ТВ, адругой конец к специальному отверстиюв задней стенке ТВ. (1) Протяните шнур и...
Page 34 - Содержание; Установка; Пере; Элементы управления
5 RU Содержание Установка Пере д эксплуатацией ...................... 6 Настройка ТВ (“Начальная настройкa”) ................ 7 Элементы управления Передняя и задняя панелиуправления ТВ ................................. 9 Использование пульта ДУи базовые функции ....................... 10 Более слож...
Page 35 - Перед эксплуатацией; на ТВ для включения телевизора.; Подключите антенный кабель (не прилагается) к
Установка 6 Установка x Перед эксплуатацией b b 1 Шаг 1 Установите батареи (прилагаются) в пульт ДУ. Примечание • Не используйте одновременно старые и новые батареи или батареи различных типов. Шаг 2 Шаг 3 Шаг 4 Отрегулируйте ТВ, следуя инструкциям меню“Начальная настройкa” (см. стр. 7). Подключите ...
Page 36 - Настройка ТВ
Установка Установка 7 x Настройка ТВ (“Начальная настройкa”) При первом включении ТВ на экране отображается меню “Начальнаянастройкa”. Вы можете изменить язык меню, автоматически сохранить впамяти ТВ телеканалы, изменить порядок каналов ТВ появляющихся наэкране, и отрегулировать положение изображени...
Page 38 - Передняя панель управления ТВ; Передняя и задняя панели
Элементы управления Элементы управления 9 Элементы управления qa 1 2 R L Y C B C R qd qs 3 2 0 9 3 L(MONO) R PROG MENU (AUTO PROG) SOUND MODE 4 5 8 7 6 AUTO PROG:Press [MENU] for 5sec 1 3 L(MONO) R PROG MENU (AUTO PROG) SOUND MODE AUTO PROG:Pr AUTO PROG:Press [MENU] for 5sec ess [MENU] for 5sec qf П...
Page 41 - Более сложные функции; Bыбор режима звучания; Bыбор режима изображения; Hажмите
12 Более сложные функции Более сложные функции Bыбор режима звучания Нажмите (или кнопку SOUND MODE на передней панели) для выборанужного режима звучания. Отображается дисплей 5-полосного графическогоэквалайзера. Bыберите Чтобы получить “Динамичный” Динамическое и чистое звучание, при котором одина–...
Page 42 - При приеме программы NICAM; При приеме программы A2
13 Более сложные функции A/B x Просмотр стереофонических программили программ на двух языках С помощью кнопки А/В можно переключать ТВ в режим стереозвучанияили режим программы на двух языках в системе NICAM и A2 стерео. TV 1 2 3 4 6 7 8 9 0 5 MENU RESET PROG A/B При приеме программы NICAM Передача ...
Page 43 - eлeтeкст
14 Более сложные функции x T eлeтeкст Некоторые телевизионные каналы предоставляют информационную услугу“телетекст”. Teлeтeкст дает вам возможность получать различного родаинформацию, такую, как сводки фондовой биржи и лоследние известия.Для вывода на экран страниц телетекста вы можете пользоваться ...
Page 44 - Настройка с помощью меню; Знакомство с системой меню
15 Настройка с помощью меню E n g l i s h Установка Широкоэкр.режим: Нaзвание AV-входa Система цвета: Позиция картинки Настройка с помощью меню x Знакомство с системой меню Кнопка MENU открывает меню и позволяет изменить настройки вашегоТВ. Ниже описывается система меню. Пиктограмма возврата Пиктогр...
Page 46 - Нажимайте кнопки
17 Настройка с помощью меню Н а с т р о й к а к а н а л о в А в т о н a с т р о й к a п р о г р а м м Р у ч н а я н а с т р о й к а п р о г р а м мМ е т к и п р о г р а м м Б л о к и р о в к а п р о г р а м м С о р т и р о в к a п р о г р а м м Н а с т р о й к а к а н а л о в А в т о н a с т р о й к...
Page 47 - Изменение параметров “Изображение”; Выбор “Сброс” вернёт ТВ к заводским настройкам.
18 Настройка с помощью меню x Изменение параметров “Изображение” И з о б р а же н и е Ре ж и м : Д и н а м и ч н ы й Н a с т р о й к а и з о б р а же н и я Ц в е т о в о й т о н : Х ол од н ы й И н т е л л е к т. р е г у л . : В к л . Настройка параметров в опции “Нaстройка изображения” врежиме “Пер...
Page 48 - Изменение параметров “Звук”; Меню “Звук” позволяет вам настроить параметры звучания.
19 Настройка с помощью меню x Изменение параметров “Звук” Меню “Звук” позволяет вам настроить параметры звучания. 1 Нажмите кнопку MENU. 2 Нажимайте кнопки V или v для выбора пиктограммы “Звук” ( ), затем нажмитекнопку . 3 Нажимайте кнопки V или v для выбора нужного параметра (например, “Режим”), за...
Page 51 - Сохранение телеканалов вручную; Выберите нужный канал.
Настройка с помощью меню 22 Сохранение телеканалов вручную 1 После выбора пункта “Ручная настройка программ”выберите номер программы, на которую вы хотитесохранить канал. (1) Убедитесь, что выбран пункт “Программa”, затем нажмите кнопку . (2) Нажимайте кнопки V или v до появления в меню нужного номе...
Page 52 - Изменение установок “Установка”
23 Настройка с помощью меню x Изменение установок “Установка” Меню “Установка” позволяет вам изменять язык меню, настраиватьположение изображения, изменение формат изображения, отмечатьдополнительное оборудование и выбирать цветовую систему. 1 Нажмите кнопку MENU. 2 Нажимайте кнопки V или v для выбо...
Page 53 - Подключение к разъему выхода сигнала монитора (; Дополнительная информация
24 Дополнительная информация Задняя панель ТВ Аудиосистема 1 2 R L Y C B C R Видеомагнитофон Аудио/ видеокабель (не прилагается) Подключение к разъему выхода сигнала монитора ( T ) x Подключение дополнительныхкомпонентов Подключение к разъему входа видеосигнала ( t ) Дополнительная информация Передн...
Page 55 - Устранение неисправностей; Рекомендации по устранению неисправностей
26 Дополнительная информация Рябь на экране Помехи в звучании Помехи наизображении Помехи в звучании Качественноеизображение Помехи в звучании Возможная причина Симптом Решение x Устранение неисправностей Если в работеТB появились сбои, вы можете воспользоваться функцией перезагрузки(Reset) или прив...
Page 59 - Технические характеристики
30 Дополнительная информация Sony Corporation Требования к источникупитания Потребляемая мощность (Вт) Система ТВ Цветовая система Стерео /двуязычная система Teлeтeкст язык Покрываемый диапазонТелеканалов B/G I D/K M 8 (Антенна) Аудиовыход (колонки) Количество разъёмов (видео) (аудио) (компонентное ...