Page 2 - Important Safety Instructions; Important Note to the Customer; WARNING
Important Safety Instructions 4 Important Note to the Customer • Check for proper installation and use of the anti-tip bracket. Carefully tip the range forward by pulling it from the back to ensure that the anti-tip bracket engages the range leg and prevents tip-over. The range should not move more ...
Page 3 - Safety Definition
Important Safety Instructions 5 EN • Do not attempt to install or operate your appliance until you have read the safety precautions in this manual. Safety items throughout this manual are labeled with a WARNING or CAUTION statement based on the risk type. • Warnings and important instructions appear...
Page 4 - Grounding instructions
Important Safety Instructions 6 • Never modify or alter the appliance. For example, do not remove leveling legs, panels, wire covers or anti-tip brackets/screws. • Be sure to have an appropriate foam-type fire extinguisher available, clearly visible and easily accessible located near the appliance. ...
Page 5 - Instructions for using the appliance; • NEVER cover any slots, holes or
Important Safety Instructions 7 EN Instructions for using the appliance • Flammable materials should not be stored in the oven, near surface burners or elements, or in the storage or warmer drawer (if provided). This includes paper, plastic, and cloth items, such as cookbooks, plasticware and towels...
Page 10 - • Increase distance between unit; How to read the user manual; SAVE THESE INSTRUCTIONS; Instructions
Important Safety Instructions 12 This appliance has been tested and found to comply with the limits for a class B digital device, pursuant to Part 18 of the FCC rules (United States) and ICES-001 (Canada). These limits are designed to provide reasonable protection against harmful interference in a r...
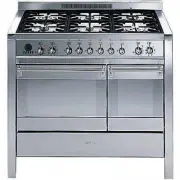
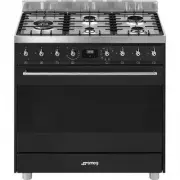
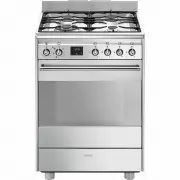
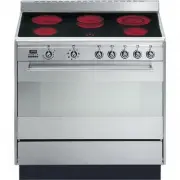
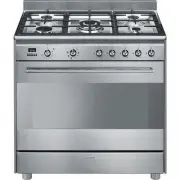
Page 11 - Description; General Description
Description 13 EN 1 Description 1.1 General Description 1 Cooktop 2 Control panel 3 Seal 4 Oven light 5 Door 6 Broiler 7 Fan 8 Oven 9 Storage compartment Rack/tray support frame shelf
Page 12 - RR; Function knob; to
Description 14 1.2 Cooktop RR = Reduced-rapid R = Rapid DUAL = Ultra-rapid 1.3 Control panel 1 Function knob The oven's various functions are suitable for different cooking modes. After selecting the required function, set the cooking temperature using the temperature knob. 2 Hot oven indicator ligh...
Page 13 - Temperature knob; NOTE
Description 15 EN 3 Temperature knob This knob allows you to select the cooking temperature. Turn the knob clockwise to the required value, between the minimum and maximum settings. 4 Hob burner knobs Useful for lighting and adjust the hob burners. Press and turn the knobs anti-clockwise to the valu...
Page 14 - Available accessories; Rack
Description 16 1.5 Available accessories Rack Used to hold containers containing food to be cooked. WOK ring (not included) Useful when using a wok. NOTE : Some models are not provided with all accessories. NOTE : The accessories intended to come into contact with food are made of materials that com...
Page 15 - Use; Improper use
Use 17 EN 2 Use 2.1 Instructions WARNING Danger of burns High temperature inside the oven during use • Keep the oven door closed during cooking. • Protect your hands by wearing oven gloves when moving food inside the oven. • Do not touch the heating elements inside the oven. • Do not pour water dire...
Page 16 - A gas leak can cause an explosion.
Use 18 A gas leak can cause an explosion. If you smell gas or there are faults in the gas system:• Immediately turn off the gas supply or close the valve on the gas cylinder. • Extinguish all naked flames and cigarettes. • Do not turn on power switches or appliances and do not remove plugs from powe...
Page 17 - Using the accessories
Use 19 EN 2.2 Using the accessories Racks and trays Racks and trays have to be inserted into the side guides until they come to a complete stop.The mechanical safety locks that prevent the rack from being taken out accidentally have to face downwards and towards the oven back. WOK ring (not included...
Page 18 - Using the cooktop; OFF; Simmer function
Use 20 2.3 Using the cooktop All the appliance's control and monitoring devices are located together on the front panel. The burner controlled by each knob is shown next to the knob. The appliance is equipped with an electronic ignition device. Simply press the knob and turn it counter-clockwise to ...
Page 19 - Practical tips for using the hob; • Heats very quickly and evenly.
Use 21 EN Practical tips for using the hob For better burner efficiency and to minimise gas consumption, use pans with lids and of suitable size for the burner, so that the flames do not reach up the sides of the pan. Once the contents come to the boil, turn down the flame far enough to ensure that ...
Page 20 - Using the storage compartment; LIGHT; Using the gas oven
Use 22 2.4 Using the storage compartment There is a storage compartment located at the bottom of the cooker; this can be used to store pans or metal objects required for its use.Gently release the storage compartment door. To close the storage compartment again, lift the door. 2.5 Using the oven Che...
Page 21 - Using the broiler; BROIL; Functions list
Use 23 EN Using the broiler Electronic spark ignition:• Push in zero position up to the mechanical stop for at least 2 seconds (the sparking will be heard) and rotate the temperature knob clockwise to BROIL . This automatically activates the electric spark igniter. Functions list WARNING Danger of f...
Page 22 - General advice
Use 24 2.6 Cooking advice General advice • Use pans/trays with a maximum width of 33-35 cm. • It is not possible to shorten cooking times by increasing the temperature (the food could be overcooked on the outside and undercooked on the inside). • It is advisable to preheat the oven cavity before bak...
Page 23 - Advice for defrosting and proving
Use 25 EN • To facilitate the flow of air, place the molds/pans in the center of the racks and make sure that their width/diameter does not exceed 30 cm. • Position the racks keeping an empty level between them. • Depending on the food and the increased load inside the cavity, cooking on two levels ...
Page 24 - Cooking information table
Use 26 Cooking information table Preh = preheatingRunner = position from the bottom Food Weight (Kg) Runner Function Preh Temperature (°F) Time (minutes) MEAT Roast chicken 1.2 2 - 3 FAN-ASSISTED Yes 450 65 - 70 Roast loin* 1.5 2 - 3 FAN-ASSISTED Yes 430 65 - 75 * in a pan on a rack. DESSERTS White ...
Page 25 - Cleaning and Maintenance; Cleaning and maintenance; Recommendations
Cleaning and Maintenance 27 EN 3 Cleaning and maintenance 3.1 Instructions Recommendations To keep the surfaces in good condition, they should be cleaned regularly after use. Let them cool first. Ordinary daily cleaning Always use only specific products that do not contain abrasives or chlorine-base...
Page 26 - Cleaning the door
Cleaning and Maintenance 28 3.2 Cleaning the hob 1. Pour some non-abrasive detergent on a damp cloth and wipe the surfaces. 2. Rinse thoroughly.3. Dry with a soft cloth or a microfibre cloth. Cleaning cooktop grates, flame-spreader crowns and burner caps 1. Remove the components from the hob.2. Clea...
Page 27 - Grasp the door on both sides with both; Cleaning the door glazing; Removing the inner glass
Cleaning and Maintenance 29 EN 2. Grasp the door on both sides with both hands, lift it forming an angle of around 30° and remove it. 3. To reassemble the door, put the hinges in the relevant slots in the oven, making sure that grooved sections A are resting completely in the slots. Lower the door a...
Page 28 - Clean the external glass panel and the; Cleaning the oven cavity
Cleaning and Maintenance 30 4. Clean the external glass panel and the one you just removed. Use paper towels. If there are tough to clean spots, use a damp sponge and mild detergent. 5. Reinsert the glass panels in the reverse order of removal. 6. Reposition the inner glass panel. Make sure you cent...
Page 29 - Extraordinary maintenance
Cleaning and Maintenance 31 EN Removal of the frame supports for racks/trays Removing the guide frames makes it easier to clean the sides of the oven. This must be done each time you use the automatic cleaning cycle (only on some models).To remove the guide frames:• Pull the frame towards the inside...