Page 2 - Contents
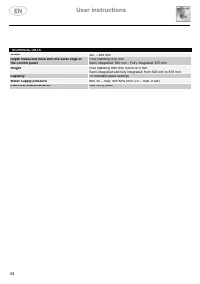
Contents 1. Description of the controls________________________________ 16 2. Troubleshooting _______________________________________ 25 Thank you for choosing one of our products.You are advised to read this manual carefully; it contains all theinformation you need about the right conditions for th...
Page 3 - User instructions; Description of the controls; Information display
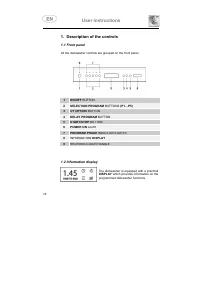
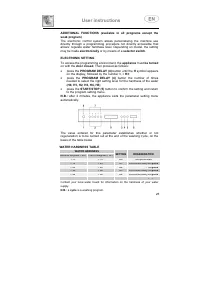
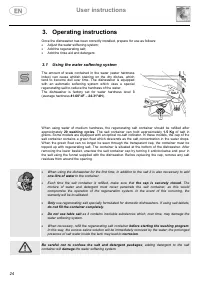
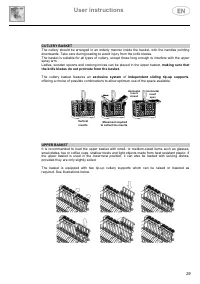
User instructions 1. Description of the controls 1.1 Front panel All the dishwasher controls are grouped on the front panel. 1 ON/OFF BUTTON 2 SELECTION PROGRAM BUTTONS (P1…P5) 3 3/1 OPTION BUTTON 4 DELAY PROGRAM BUTTON 5 START/STOP BUTTON 6 POWER ON LIGHT 7 PROGRAM PHASE INDICATOR LIGHTS 8 INFORMAT...
Page 4 - Only; level 2
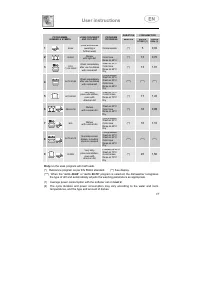
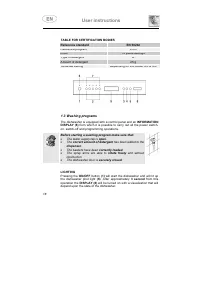
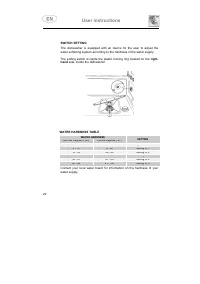
User instructions DURATION CONSUMPTION PROGRAMME, NUMBER & SYMBOL LOAD CROCKERY AND CUTLERY PROGRAM PROGRESS MINUTES WATER LITRES (1) POWERKWh (2) 1 SOAK Pans and dishes awaiting a further wash Cold prewash (**) 5 0,02 2 QUICK Dishes with light dirt Wash at 38°CCold rinseRinse at 68°C (**) 13 0,...
Page 5 - TABLE FOR CERTIFICATION BODIES; Before starting a washing program make sure that:; LIGHTING
User instructions TABLE FOR CERTIFICATION BODIES Reference standard EN 50242 Reference program ECO Load 10 place-settings Type of detergent B Amount of detergent 25 g Rinse aid setting Depending on the model 3/4 or 4/6 1.3 Washing programs The dishwasher is equipped with a control panel and an INFOR...
Page 7 - ”. The program will resume from the point in
User instructions INTERRUPTING A PROGRAM In order to interrupt a running program it is necessary: • to press the START/STOP (5) for some seconds until when the writting “ Time to end ” remains lit on the display (confirmation beep). At this point,it is possible to start the cycle again, otherwise: T...
Page 8 - PROGRAM DELAY
User instructions DELAYING THE PROGRAM (available in all programs except thesoak program) The PROGRAM DELAY button (4) can be pressed to delay the start of the program by up to 12 hours . This means that the dishwasher can be operated at the time of day of your choice.The first time the PROGRAM DELA...
Page 9 - REMOVING THE DISHES; At the end of the washing program, wait at least; advisable; to unload the lower basket first, and then the
User instructions TO SAVE ON ENERGY! … AND PROTECT THE ENVIRONMENT • Always try to run the dishwasher fully loaded . • Do not wash the dishes in running water. • Use the washing program that is most appropriate for each type of load. • Do not carry out any preliminary rinsing. • If available, connec...
Page 10 - cycle
User instructions ADDITIONAL FUNCTIONS (available in all programs except thesoak program) The electronic control system allows personalizing the machine usedirectly through a programming procedure not directly accessible thatallows: regulate water hardness level. Depending on model, the settingmay b...
Page 11 - SWITCH SETTING
User instructions SWITCH SETTING The dishwasher is equipped with an device for the user to adjust thewater softening system according to the hardness of the water supply. The setting switch is inside the plastic locking ring located on the right- hand side, inside the dishwasher. WATER HARDNESS TABL...
Page 13 - FAULT
User instructions FAULT DESCRIPTION E7 Turbine flow-regulator malfunction (for the relevant models only) The appliance is not able to "measure" the amount of water loadedaccurately. Interrupt the program and switch off the dishwasher. Switchthe dishwasher back on, program it again and start ...
Page 14 - INSTRUCTION MANUAL
INSTRUCTION MANUAL W W A A R R N N I I N N G G S S A A N N D D R R E E C C O O M M M M E E N N D D A A T T I I O O N N S S , , G G U U I I D D E E F F O O R R T T H H E E U U S S E E O O F F B B A A S S K K E E T T S S A A N N D D F F O O R R C C L L E E A A N N I I N N G G D D I I S S H H W W A A S...
Page 15 - INSTALLATION INSTRUCTIONS: these are intended for the
Contents 19 1. Safety and operating instructions ___________________________ 20 2. Installation and hook-up __________________________________ 22 2.1 Water supply connection _____________________________________________________ 222.2 Electrical connection ____________________________________________...
Page 16 - WASHING AND DRYING OF DISHES; THE NAME PLATE ON THE INNER EDGE OF THE DOOR MUST NEVER BE
Safety instructions 20 1. Safety and operating instructions THIS MANUAL FORMS AN INTEGRAL PART OF THE APPLIANCE: IT MUST ALWAYS BE KEPT INTACT TOGETHERWITH THE DISHWASHER. BEFORE USING THE APPLIANCE, CAREFULLY READ ALL THE INSTRUCTIONSCONTAINED IN THIS MANUAL. INSTALLATION MUST BE PERFORMED BY A QUA...
Page 17 - Safety instructions; THE APPLIANCE IS INTENDED FOR USE BY ADULTS.; AQUASTOP MODELS; DO NOT ATTEMPT TO REPAIR THE APPLIANCE.; The manufacturer declines all responsibility; for damage to persons or property resulting from failure to
Safety instructions 21 IN THE EVENT OF A FAULT, DISCONNECT THE DISHWASHER FROM THE ELECTRICAL POWER SUPPLY ANDSHUT OFF THE WATER TAP. THEN CALL IN A QUALIFIED TECHNICIAN. DO NOT USE APPLIANCES WHICH HAVE BEEN DAMAGED DURING TRANSIT! IF IN DOUBT, CONSULT YOURDEALER.THE APPLIANCE MUST BE INSTALLED AND...
Page 18 - Installation instructions; if the appliance is not built-in and is therefore accessible on one; Water supply connection; Preventing the risk of clogging or damage:; CONNECTING TO THE WATER SUPPLY; supplied
Installation instructions 22 2. Installation and hook-up Remove the polystyrene basket retainers.Position the appliance in the desired place of installation. The back or sides of the dishwasher maybe placed up against walls or other furniture units.If the dishwasher is installed near a heat source, ...
Page 19 - The dishwasher can also be connected to a hot water supply; not exceeding 60°C; , and should never be; connection
Installation instructions 23 The dishwasher can also be connected to a hot water supply not exceeding 60°C . Supplying the appliance with hot water cuts down the washing time by approximately 20 minutes, but slightlyreduces its effectiveness. Make the connection to the domestic hot water supply usin...
Page 20 - Adjust the water softening system; Using the water softening system; 0 washing cycles; . The salt container can hold approximately
User instructions 24 3. Operating instructions Once the dishwasher has been correctly installed, prepare for use as follows: • Adjust the water softening system; • Add the regenerating salt; • Add the rinse aid and detergent. 3.1 Using the water softening system The amount of scale contained in the ...
Page 21 - Using the rinse aid and detergent dispensers; detergent dispenser; and the; rinse aid dispenser; SOAK; ADDING THE RINSE AID; Rotate the container cap anticlockwise by 1⁄4 of a turn and remove it.; ADJUSTING THE RINSE AID DISPENSER SETTING; increased
User instructions 25 3.2 Using the rinse aid and detergent dispensers The detergent and rinse aid dispensers are situated on theinner part of the door: the detergent dispenser is on the left, and the rinse aid dispenser is on the right. With the exception of the SOAK program, before every washing cy...
Page 22 - ADDING THE DETERGENT; To open the detergent dispenser cap, lightly press the button
User instructions 26 ADDING THE DETERGENT To open the detergent dispenser cap, lightly press the button P . Add the detergent and close the cap carefully.During the washing cycle, the dispenser will be opened automatically. • When a SUPER program is selected, in addition to the normal dose of deterg...
Page 23 - General warnings and recommendations; MAKE SURE that the items being washed are dishwasher-safe.
User instructions 27 3.3 General warnings and recommendations Before using the dishwasher for the first time, it is advisable to read the followingrecommendations concerning dish types to be washed and their loading.There are generally no constraints on the washing of domestic dishes, but in certain...
Page 24 - Using the baskets; The dishwasher has a capacity of; EN 50242 STANDARD LOADS FOR CERTIFICATION BODIES; LOWER BASKET; With fixed supports; LOADING THE LOWER BASKET
User instructions 28 3.4 Using the baskets The dishwasher has a capacity of 10 place-settings , including serving dishes. EN 50242 STANDARD LOADS FOR CERTIFICATION BODIES LOWER BASKET UPPER BASKET LOWER BASKET The lower basket receives the full force of the lower spray arm, and should therefore be u...
Page 25 - The cutlery basket features an; Vertical
User instructions 29 CUTLERY BASKET The cutlery should be arranged in an orderly manner inside the basket, with the handles pointingdownwards. Take care during loading to avoid injury from the knife blades.The basket is suitable for all types of cutlery, except those long enough to interfere with th...
Page 26 - LOADING THE UPPER BASKET
User instructions 30 LOADING THE UPPER BASKET Load plates facing forward; cups, bowls etc. must always be facing downwards. The left side of thebasket can be loaded with cups and glasses on two levels. On the right plates and saucers can beslotted verticalli into the forks. Loading examples: ADJUSTI...
Page 27 - General warnings and recommendations
User instructions 31 4. Cleaning and maintenance Before carrying out any work, always disconnect the appliance from the electrical powersupply. 4.1 General warnings and recommendations Avoid the use of acidic or abrasive detergents. Clean the outer surfaces and door-lining of the dishwasher regularl...
Page 28 - CLEANING THE FILTER UNIT; The central filter
User instructions 32 CLEANING THE FILTER UNIT • The central filter H should be inspected regularly and cleaned if necessary. To remove it, take hold of the handle, turn anti-clockwise and lift. • Press the central filter H from below to extract it from the micro-filter. • Separate the two parts of t...
Page 30 - TECHNICAL DATA; 0 Standard place settings; Water supply pressure; See rating plate
User instructions 34 TECHNICAL DATA Width 447 ÷ 449 mm Depth measured flush with the outer edge ofthe control panel Free standing: 600 mmSemi-integrated: 590 mm - Fully integrated: 570 mm Height Free standing from 850 mm to 870 mmSemi-integrated and fully integrated: from 820 mm to 870 mm Capacity 1...