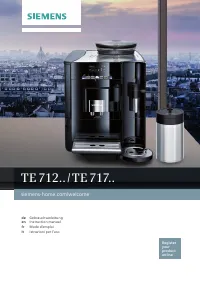
Page 3 - Ë Í; Â Ã À Á Å Æ
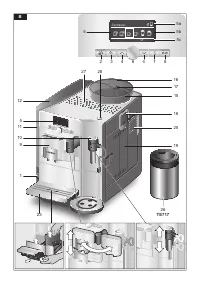
2 3 4 6 4 7 8 5a5b 5c 5 23 B 28 27 9 10 1 11 5 12 25 18 15 16 17 19 Ë Í Espresso  à À Á Å Æ TE717 26
Page 6 - Inhalt
2 de Inhalt Sehr geehrte Kaffeeliebhaberin, sehr geehrter Kaffeeliebhaber, herzlichen Glückwunsch zum Kauf dieses Kaffeevollautomaten aus dem Hause Siemens. Diese Gebrauchsanleitung beschreibt verschiedene Gerätevarianten, welche sich im Detail unterscheiden. Die Zuordnung erfolgt durch die E-Nr. z....
Page 7 - Sicherheitshinweise
3 de Sicherheitshinweise Die Gebrauchsanleitung bitte sorgfältig durchlesen, danach handeln und auf bewahren! Bei Weitergabe des Geräts diese Anleitung beilegen. Dieses Gerät ist für die Verarbeitung haushaltsüblicher Mengen im Haushalt oder in haushaltsähnlichen, nicht-gewerblichen Anwendungen best...
Page 9 - Auf einen Blick
5 de 1 Netzschalter O / I 2 Taste á (Personalisierung) 3 Taste à (Service-Programme) 4 Wähltasten < > 5 Display a) Statuszeile b) Auswahlzeile c) Navigationszeile 6 Drehknopf für Einstellungen Display 7 Taste j (Info-Menü) 8 Taste start (Getränke / Programme) 9 Kaffeeauslauf, höhenverstellbar ...
Page 10 - Vor dem ersten Gebrauch
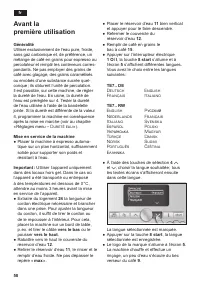
6 de Vor dem ersten Gebrauch Allgemeines Nur reines, kaltes Wasser ohne Kohlen- säure und vorzugsweise Espresso- oder Vollautomaten-Bohnenmischungen in die entsprechenden Behälter füllen. Keine glasierten, karamellisierten oder mit sons- tigen zuckerhaltigen Zusätzen behandelte Kaffeebohnen ver wend...
Page 11 - Ë Ë; Auto Off in; Bedienelemente
7 de ● Das Gerät ist betriebsbereit, wenn im Display 5 die Symbole für die Getränke- aus wahl und Taste 8 start leuchten. Espresso Ë Ë Í Â Ã À Á Å Æ Info: Der Kaffeevollautomat ist ab Werk mit den Standardeinstellungen für optimalen Betrieb programmiert. Das Gerät schaltet nach einer ausgewählten Ze...
Page 12 - Filterwechsel in
8 de Display Das Display 5 zeigt durch Symbole Auswahl- möglichkeiten, Kaffeestärke und Füllmenge sowie durch Texte Ein stel lungen, laufende Vorgänge und Meldungen an. Mit Drehknopf 6 und Wähl tasten 4 können hier Einstel- lungen vorgenommen werden. Die gewählte Einstellung wird durch einen Rahmen ...
Page 13 - Bit te Mahlgrad gröber stellen!; Displayanzeigen; Wassertank bald leer; Wassertank füllen
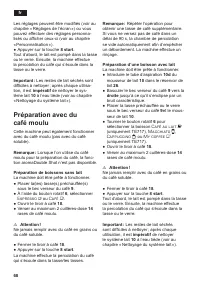
9 de Mahlgrad einstellen Mit dem Drehwähler 17 für Mahlgradein- stellung kann die gewünschte Feinheit des Kaffeepulvers eingestellt werden. ¡ Achtung! Den Mahlgrad nur bei laufendem Mahlwerk verstellen! Das Gerät kann sonst beschä- digt werden. Nicht in das Mahlwerk greifen. ● Bei laufendem Mahlwerk...
Page 14 - Displayeinstellungen; åå
10 de Displayeinstellungen Durch Drücken der Wähltasten 4 < und > können in den Menüebenen folgende Auswahlmenüs aufgerufen werden: Getränkeauswahl Espresso Ë Í Â Ã À Á Å Æ Kaffeestärke (nur für Kaffeegetränke) Espresso Ë Í 5 55 555 Füllmenge Espresso Ë Í Î Ð Ò Persönliche Füllmenge einstellen...
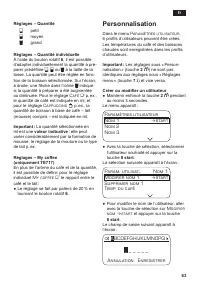
Page 15 - Personalisierung
11 de Einstellungen – Füllmenge � klein Ð mittel Ò groß Einstellungen – Persönliche Füllmenge Durch Drehen des Drehknopfs 6 kann die vorgegebene Füllmenge � , Ð oder Ò individuell an die vorhandene Tassengröße angepasst werden. Die Füllmenge ist passend zum ausgewählten Getränk einstellbar. Im Displ...
Page 16 - Benutzer auswählen; Macchiato; À Á Å Æ; Profil verl assen; Kindersicherung
12 de Zum Löschen des Benutzers mit der Wähl- taste Name löschen start auswählen und Taste 8 start drücken. Temperaturen speichern ● Mit der Wähltaste K affee Temp. oder Heissw. Temp. auswählen. ● Mit dem Drehknopf 6 die gewünschte Einstellung auswählen. ● Taste 2 á drücken. Die Einstellungen sind...
Page 17 - Menüeinstellungen; Sprache
13 de Menüeinstellungen ● Taste 7 j mindestens 3 Sekunden gedrückt halten. Es erscheinen nun die verschiedenen Einstellmöglichkeiten: Einstellungen Kaffee Temp. Heissw. Temp <85°C Profil verl assen Mit den Wähltasten 4 < und > können die verschiedenen Einstellmöglichkeiten aus gewählt werde...
Page 19 - Cappuccino; À Á Å Æ È É
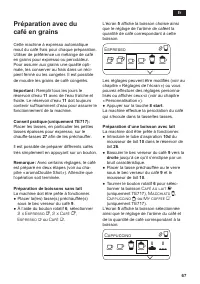
15 de Zubereitung mit Kaffeebohnen Dieser Kaffeevollautomat mahlt für jeden Brühvorgang frischen Kaffee. Vor zugsweise Espresso- oder Vollautomaten-Bohnen- mischungen verwenden. Für eine optimale Qualität die Bohnen kühl und verschlossen aufbewahren oder tiefgefrieren. Die Kaffee- bohnen können auch...
Page 21 - Milch schaum; Heißwasser beziehen; Heiss wasser
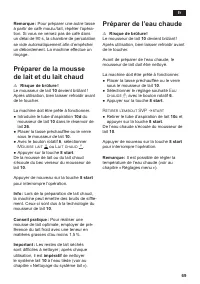
17 de Milchschaum und warme Milch zubereiten ¡ Verbrennungsgefahr! Der Milchschäumer 10 wird sehr heiß. Nach Benutzung zuerst abkühlen lassen und erst dann berühren. Das Gerät muss betriebsbereit sein. ● Das Ansaugrohr 10d des Milchschäumers 10 in den Milchbehälter 26 einführen. ● Die vorgewärmte Ta...
Page 29 - Entsorgung
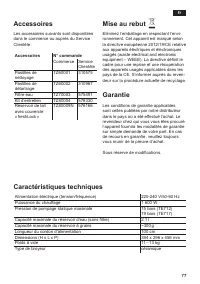
25 de Zubehör Folgendes Zubehör ist über den Handel und Kundendienst erhältlich: Zubehör Bestell nummer Handel Kunden- dienst Reinigungstabletten TZ60001 310575 Entkalkungstabletten TZ60002 310967 Wasserfilter TZ70003 575491 Pflegeset TZ80004 576330 Milchbehälter mit „freshLock“ Deckel TZ80009N 5761...
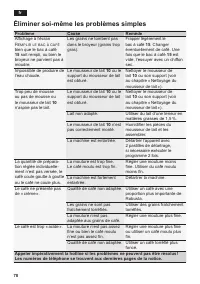
Page 30 - Einfache Probleme selbst beheben; Bohnenbehälter füllen
26 de Einfache Probleme selbst beheben Problem Ursache Abhilfe Displayanzeige Bohnenbehälter füllen trotz gefülltem Bohnen- behälter 15 oder Mahlwerk mahlt keine Kaffeebohnen. Bohnen fallen nicht ins Mahl werk (zu ölige Bohnen). Leicht an den Bohnen behälter 15 klopfen. Eventuell Kaffee- sorte wechs...
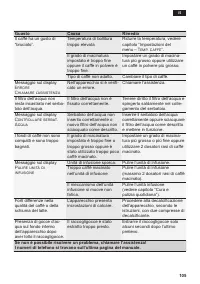
Page 31 - Störung
27 de Problem Ursache Abhilfe Der Kaffee ist zu „bitter“. Der Mahlgrad ist zu fein eingestellt oder das Kaffee- pulver ist zu fein. Mahlgrad gröber stellen oder gröberes Kaffeepulver verwenden. Ungeeignete Kaffeesorte. Kaffeesorte wechseln. Der Kaffee schmeckt „verbrannt“. Zu hohe Brühtemperatur Tem...
Page 32 - Contents
28 en Contents Dear Coffee Connoisseur, Congratulations on purchasing this fully automatic espresso machine from Siemens. These operating instructions describe vari- ous appliance designs, which differ in detail. Each appliance is assigned an E-number, e.g. TE712. The E-No. of the respective applian...
Page 33 - Safety instructions; offices,agriculturalandothersmallbusinessesorforuseby
29 en Safety instructions Please read and follow the operating instructions carefully and keep them for later reference. Enclose these instructions when you give this appliance to someone else. This appliance is designed for the preparation of normal household quantities in the home, or in household...
Page 35 - Included in delivery
31 en 1 Power on/off switch O / I 2 Customising button á 3 Service programmes button à 4 Selection buttons < > 5 Display a) Status line b) Selection line c) Navigation line 6 Rotary knob for display settings 7 Info menu button j 8 start button (drinks / programmes) 9 Coffee outlet, height-adju...
Page 37 - Auto Off after; Controls
33 en ● The appliance is ready for use when the symbols for the drink selection and the start button 8 light up in the display 5 . Espresso Ë Ë Í Â Ã À Á Å Æ Info: The factory settings of the fully auto- matic espresso machine are programmed for optimal performance. The appliance switches off automa...
Page 38 - Clean after
34 en Display The display 5 uses symbols to indicate the selection options, coffee strength and per- cup quantity, and uses text to indicate set- tings, ongoing processes and messages. The rotary knob 6 and selection buttons 4 can be used to change settings. The selected setting is highlighted by a ...
Page 39 - Please adjust; Displays; Water tank; Refill water tank
35 en Adjusting the grinding unit The rotary selector 17 adjusts the grind settings from coarse to fine. ¡ Warning! Adjust the grinding unit only while it is run- ning! Otherwise the appliance may be dam- aged. Do not reach into the grinding unit. ● While the grinding unit is running, adjust the rot...
Page 40 - Display settings; ml
36 en Display settings Press the selection buttons < and > 4 to select the following selection menus in the menu levels: Drink selection Espresso Ë Í Â Ã À Á Å Æ Coffee strength (only for coffee drinks) Espresso Ë Í 5 55 555 Per-cup quantity Espresso Ë Í Î Ð Ò Select your personal per-cup quan...
Page 41 - Customising
37 en Settings – Per-cup quantity � small Ð medium Ò large Settings – Personal per-cup quantity The preset per-cup quantity � , Ð or Ò can be individually adjusted to the size of the cup in use by turning the rotary knob 6 . The per-cup quantity can be adjusted according to the drink selected. An ar...
Page 42 - Coffee; Select a profile; Exit
38 en To delete the user, use the selection button Delete name start and press the start button 8 . Saving temperatures ● Use the selection button to select Coffee temp. or Hot water temp. . ● Turn the rotary knob 6 to select the required setting. ● Press the á button 2 . The settings are saved. C...
Page 43 - Menu settings; Exit profile
39 en Menu settings ● Hold down the j button 7 for at least 3 seconds. The different setting options are now displayed. Set tings Coffee temp. Hot water temp. <85°C Exit profile The different setting options can be selected with the selection buttons < and > 4 . Note: The changes you have m...
Page 50 - Service Programmes; Short rinse milk system
46 en ● Thoroughly clean the brewing unit sieve under the running water. Important: Clean the brewing unit with- out detergent and do not put it in the dishwasher. ● Wipe out the inside of the appliance thoroughly with a damp cloth and remove any coffee residues. ● Allow the brewing unit 20 and the ...
Page 55 - Disposal
51 en Storing accessories The espresso machine has special com- partments for storing the accessories and quick reference guide inside the appliance. ● To store the measuring spoon 14 , remove the water tank 11 and insert the spoon in the shaped recess 13 . ● To store the quick reference guide, open...
Page 56 - Simple troubleshooting; Refill bean container
52 en Simple troubleshooting Problem Cause Solution Display shows Refill bean container although the bean container 15 is full, or the grinding unit does not grind the beans. Beans are not falling into the grinding unit (beans too oily). Gently tap the bean container 15 . Change the type of coffee i...
Page 57 - Error
53 en Problem Cause Solution The coffee tastes “burnt”. Brewing temperature too high Reduce the temperature, see “Menu settings – Coffee temp. ” The grinding setting is too fine or the preground coffee is too fine. Adjust the grinding unit to a coarser setting or use coarser pre-ground coffee. Unsu...
Page 58 - Table des matières
54 fr Table des matières Chère amatrice de café, cher amateur de café, Nous vous félicitons pour l’achat de cette machine à expresso automatique Siemens. Ce mode d’emploi décrit les différents modèles d’appareils qui se distinguent par des détails. Le classement s’effectue par le n° E, p. ex. TE712....
Page 59 - Consignes de sécurité
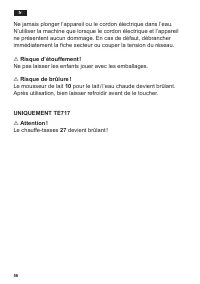
55 fr Consignes de sécurité Lire attentivement ce mode d’emploi, s’y conformer lors de l’utilisation et le conserver ! Veuillez joindre ce mode d’emploi si vous passez l’appareil à quelqu’un d’autre. Cet appareil est conçu pour la préparation de quantités usuelles, dans le cadre d’un foyer ou d’un u...
Page 60 - Risque d’étouffement !
56 fr Ne jamais plonger l’appareil ou le cordon électrique dans l’eau. N’utiliser la machine que lorsque le cordon électrique et l’appareil ne présentent aucun dommage. En cas de défaut, débrancher immédiatement la fi che secteur ou couper la tension du réseau. ¡ Risque d’étouffement ! Ne pas laisse...
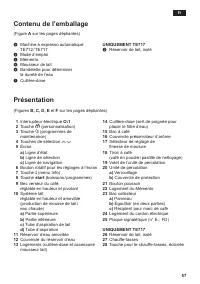
Page 61 - Présentation
57 fr 1 Interrupteur électrique O / I 2 Touche á (personnalisation) 3 Touche à (programmes de maintenance) 4 Touches de sélection < > 5 Écran a) Ligne d’état b) Ligne de sélection c) Ligne de navigation 6 Bouton rotatif pour les réglages à l’écran 7 Touche j (menu Info) 8 Touche start (boisson...
Page 63 - AR auto dans; Éléments de commande
59 fr ● La machine est prête à fonctionner lorsque les symboles de sélection de boisson et la touche 8 start sont allumés à l’écran 5 . Espresso Ë Ë Í Â Ã À Á Å Æ Info : La machine à expresso automatique est programmée en usine de façon à fonc- tionner de manière optimale. La machine s’arrête automa...
Page 64 - Net toyer
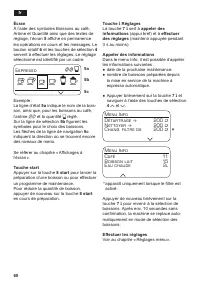
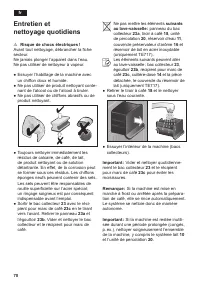
60 fr Écran À l’aide des symboles Boissons au café, Arôme et Quantité ainsi que des textes de réglage, l’écran 5 affiche en permanence les opérations en cours et les messages. Le bouton rotatif 6 et les touches de sélection 4 servent à effectuer les réglages. Le réglage sélectionné est identifié par...
Page 65 - Moudre moins; Affichagesàl’écran; Rés. eau presque vide; Remplir le
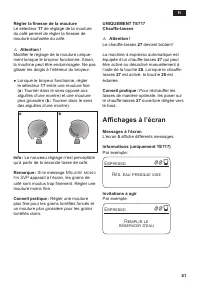
61 fr Réglerlafinessedelamouture Le sélecteur 17 de réglage de la mouture du café permet de régler la finesse de mouture souhaitée du café. ¡ Attention ! Modifier le réglage de la mouture unique- ment lorsque le broyeur fonctionne. Sinon, la machine peut être endommagée. Ne pas glisser les doig...
Page 66 - Réglages de l’écran
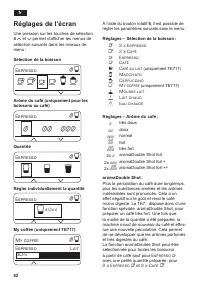
62 fr Réglages de l’écran Une pression sur les touches de sélection 4 < et > permet d’afficher les menus de sélection suivants dans les niveaux de menu : Sélection de la boisson Espresso Ë Í Â Ã À Á Å Æ Arôme du café (uniquement pour les boissons au café) Espresso Ë Í 5 55 555 Quantité Espress...
Page 67 - Personnalisation
63 fr Réglages – Quantité � petit Ð moyen Ò grand Réglages – Quantité individuelle À l’aide du bouton rotatif 6 , il est possible d’adapter individuellement la quantité à pré- parer prédéfinie � , Ð ou Ò à la taille de la tasse. La quantité peut être réglée en fonc- tion de la boisson sélectionnée. ...
Page 68 - Supprimer nom; chaude; Sélectionner un profil; Quitter profil; Sécurité enfants
64 fr ● Tourner le bouton rotatif 6 pour sélectionner une lettre ou un chiffre. ● Confirmer avec la touche 8 start . 6 champs sont disponibles pour le nom de l’utilisateur. Sélectionner le symbole â et appuyer sur la touche 8 start pour supprimer les entrées. Remarque : Appuyer sur la touche de séle...
Page 69 - Réglages menu; Quit ter profil
65 fr Réglages menu ● Maintenir appuyée la touche 7 j pendant au moins 3 secondes. Les différentes possibilités de réglage s’affichent. Régl ages Temp. du café Temp. eau chaude <85°C Quit ter profil Les touches de sélection 4 < et > permettent de sélectionner les différentes possibilités de...
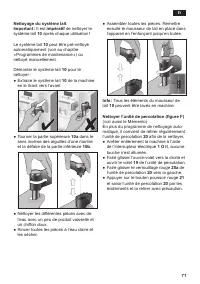
Page 80 - Rangement des
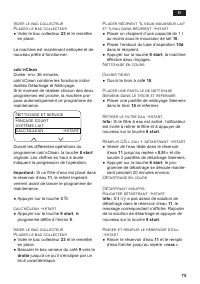
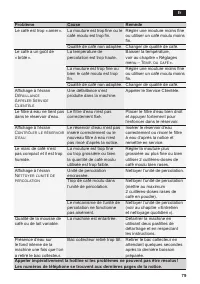
76 fr ● Appuyer sur la touche 8 start , le programme de détartrage se déroule pendant 1 minute environ, puis le programme de nettoyage rince la machine pendant 7 minutes environ. Détartrage en cours Net toyage en cours Vider le bac collecteur Pl acer le bac collecteur ● Vider le bac collecteur 23 et...
Page 81 - Mise au rebut
77 fr Accessoires Les accessoires suivants sont disponibles dans le commerce ou auprès du Service Clientèle : Accessoires N° commande Commerce Service Clientèle Pastilles de nettoyage TZ60001 310575 Pastilles de détartrage TZ60002 310967 Filtre eau TZ70003 575491 Kit d’entretien TZ80004 576330 Réser...
Page 82 - Éliminer soi-même les problèmes simples; Remplir le bac à café
78 fr Éliminer soi-même les problèmes simples Problème Cause Remède Affichage à l’écran Remplir le bac à café bien que le bac à café 15 soit rempli, ou bien le broyeur ne parvient pas à moudre. Les grains ne tombent pas dans le broyeur (grains trop gras). Frapper légèrement le bac à café 15 . Change...
Page 84 - Indice
80 it Indice A tutti gli intenditori e amanti del caffè, congratulazioni per avere acquistato questa macchina automatica per espresso della società Siemens. Le presenti istruzioni per l’uso descrivono diversi modelli di apparecchio, che sono diversi nelle caratterisitiche. Ad ogni apparecchio è asse...
Page 85 - Avvertenze di sicurezza; personaledinegozi,uffici,aziendeagricoleoartigianali,
81 it Avvertenze di sicurezza Leggere, osservare e conservare le istruzioni con cura! Se l’apparecchio viene ceduto, allegare anche le presenti istruzioni. Questo apparecchio e destinato alla lavorazione di quantità adeguate all’utilizzo domestico, e in generale per usi domestici e non professionali...
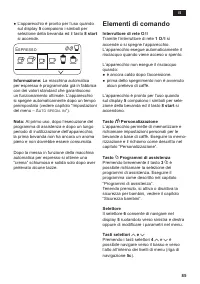
Page 87 - Panoramica
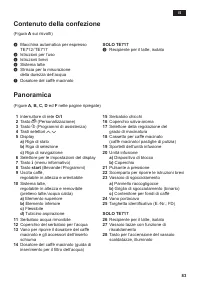
83 it 1 Interruttore di rete O / I 2 Tasto á (Personalizzazione) 3 Tasto à (Programmi di assistenza) 4 Tasti selettori < > 5 Display a) Riga di stato b) Riga di selezione c) Riga di navigazione 6 Selettore per le impostazioni del display 7 Tasto j (menu informativo) 8 Tasto start (Bevande / Pr...
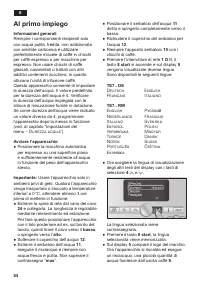
Page 88 - Al primo impiego
84 it Al primo impiego Informazioni generali Riempire i corrispondenti recipienti solo con acqua pulita, fredda, non addizionata con anidride carbonica e utilizzare preferibilmente miscele di caffè in chicchi per caffè espresso o per macchine per espresso. Non usare chicchi di caffè glassati, carame...
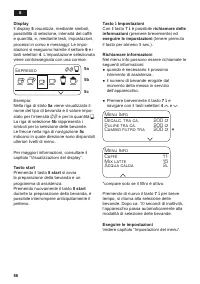
Page 89 - Elementi di comando
85 it ● L’apparecchio è pronto per l’uso quando sul display 5 compaiono i simboli per selezione della bevanda ed il tasto 8 start si accende. Espresso Ë Ë Í Â Ã À Á Å Æ Informazione: La macchina automatica per espresso è programmata già in fabbrica con dei valori standard che garantiscono un funzion...
Page 90 - Cambio filtro tra
86 it Display Il display 5 visualizza, mediante simboli, possibilità di selezione, intensità del caffè e quantità, e, mediante testi, impostazioni, processi in corso e messaggi. Le impo- stazioni si eseguono tramite il settore 6 e i tasti selettori 4 . Lʼimpostazione selezionata viene contrassegnata...
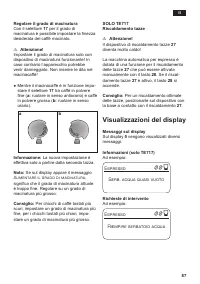
Page 91 - Aumentare il grado di macinatura; Visualizzazioni del display; Serb. acqua quasi vuoto; Riempire serbatoio acqua
87 it Regolare il grado di macinatura Con il selettore 17 per il grado di macinatura è possibile impostare la finezza desiderata del caffè macinato. ¡ Attenzione! Impostare il grado di macinatura solo con dispositivo di macinatura funzionante! In caso contrario lʼapparecchio potrebbe venir danneggia...
Page 92 - Impostazioni del display
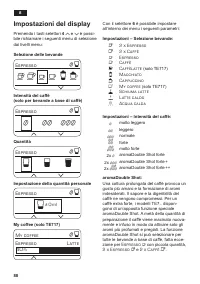
88 it Impostazioni del display Premendo i tasti selettori 4 < e > è possi- bile richiamare i seguenti menu di selezione dai livelli menu: Selezione delle bevande Espresso Ë Í Â Ã À Á Å Æ Intensità del caffè (solo per bevande a base di caffè) Espresso Ë Í 5 55 555 Quantità Espresso Ë Í Î Ð Ò Im...
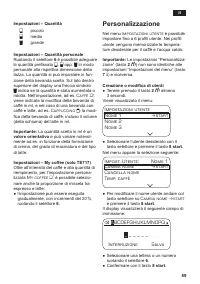
Page 93 - Personalizzazione; Impostazioni utente; Cambia nome; BCDEFGHIJKLMNOPQ
89 it Impostazioni – Quantità � piccolo Ð medio Ò grande Impostazioni – Quantità personale Ruotando il selettore 6 è possibile adeguare la quantità prefissata � , Ð opp. Ò in modo personale alla rispettiva dimensione della tazza. La quantità si può impostare in fun- zione della bevanda scelta. Sul l...
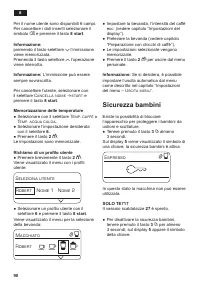
Page 94 - Cancell a nome; Seleziona utente; Uscita menu; Sicurezza bambini
90 it Per il nome utente sono disponibili 6 campi. Per cancellare i dati inseriti selezionare il simbolo â e premere il tasto 8 start . Informazione: premendo il tasto selettore > lʼimmissione viene memorizzata. Premendo il tasto selettore < lʼoperazione viene interrotta. Informazione: Lʼimmis...
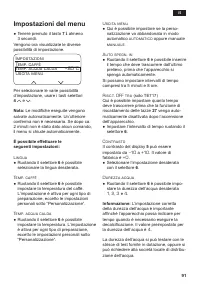
Page 95 - Impostazioni del menu
91 it Impostazioni del menu ● Tenere premuto il tasto 7 j almeno 3 secondi. Vengono ora visualizzate le diverse possibilità di impostazione. Impostazioni Temp. caffè Temp. acqua calda <85°C Uscita menu Per selezionare le varie possibilità dʼimpostazione, usare i tasti selettori 4 < e > . No...
Page 96 - Filtro acqua; Cambiare filtro
92 it ● Immergere per breve tempo la striscia di test in acqua, scuotere leggermente e dopo un minuto leggere il risultato. Livello Grado di durezza dellʼacquaTedesco (°dH) Francese (°fH) 1 2 3 4 1-7 8-14 15-21 22-30 1-13 14-25 26-38 39-54 Filtro acqua Prima di usare un nuovo filtro dellʼacqua 29 , ...
Page 98 - Preparazione con
94 it Sul display 5 viene visualizzata la bevanda scelta e le impostazioni di intensità e di quantità per questa bevanda: Cappuccino Ë Í À Á Å Æ È É È possibile modificare le impostazioni (vedere capitolo “Impostazioni del display”) o richiamare le impostazioni personalizzate (vedere capitolo “Perso...
Page 99 - Schiuma l at te; Prelievo di acqua calda; Acqua calda
95 it Nota: Per un’altra tazza di caffè / mix latte, ripetere l’operazione. Se entro 90 secondi il caffè non fuoriesce, la camera di infusione si svuota automaticamente, al fine di evitare un sovrappieno. L’apparecchio esegue un risciacquo. Preparare la schiuma latte e il latte caldo ¡ Pericolo di u...
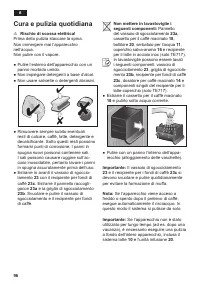
Page 100 - Cura e pulizia quotidiana
96 it Cura e pulizia quotidiana ¡ Rischio di scossa elettrica! Prima della pulizia staccare la spina. Non immergere mai l’apparecchio nell’acqua. Non pulire con il vapore. ● Pulire l’esterno dell’apparecchio con un panno morbido umido. ● Non impiegare detergenti a base d’alcol. ● Non usare salviette...
Page 102 - Programmi di assistenza
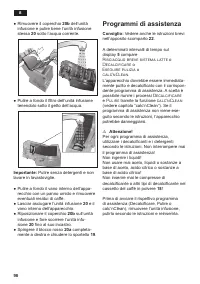
98 it ● Rimuovere il coperchio 20b dell’unità infusione e pulire bene l’unità infusione stessa 20 sotto l’acqua corrente. ● Pulire a fondo il filtro dell’unità infusione tenendolo sotto il getto dell’acqua. Importante: Pulire senza detergenti e non lavare in lavastoviglie. ● Pulire a fondo il vano i...
Page 103 - sistema l at te
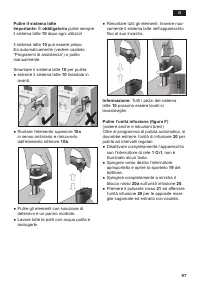
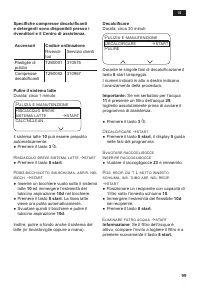
99 it Specifichecompressedecalcificanti e detergenti sono disponibili presso i rivenditori e il Centro di assistenza. Accessori Codice ordinazione Rivendi- tori Servizio clienti Pastiglie di pulizia TZ60001 310575 Compresse decalcificanti TZ60002 310967 Pulire il sistema latte Durata: circa 1 min...
Page 106 - Consigli per
102 it ● Premere il tasto 8 start ; il programma di decalcificazione si avvia per circa 1 minuto a cui fa seguito il programma di pulizia per ca. 7 minuti per risciacquare l’apparecchio. Decalcificazione in corso Pulizia in corso Svuotare raccogligocce Inserire raccogligocce ● Vuotare il raccogligoc...
Page 107 - Protezione dal gelo; Smaltimento
103 it Protezione dal gelo ¡ Per evitare danni provocati dall’azione del gelo durante il trasporto o il depo- sito, è necessario svuotare completa- mente l’apparecchio. Vedere capitolo “Impostazioni del menu – Blocco trasp. ” Accessori I seguenti accessori sono disponibili presso i rivenditori e il ...
Page 108 - Soluzione di piccoli guasti; Riempire serbatoio
104 it Soluzione di piccoli guasti Guasto Causa Rimedio Messaggio sul display Riempire serbatoio chicchi anche se il serbatoio chicchi 15 è pieno o se il macinacaffè non macina chicchi. I chicchi non cadono nel macinacaffè (chicchi troppo oleosi). Battere leggermente il serbatoio chicchi 15 . Eventu...
Page 114 - Garantiebedingungen; Siemens Info Line
Garantiebedingungen DEUTSCHLAND (DE) Die nachstehenden Bedingungen, die Voraussetzungen und Umfang unserer Garantieleistung beschreiben, lassen die Gewährleistungsverpflichtungen des Verkäufers aus dem Kaufvertrag mit dem Endabnehmer unberührt. Für dieses Gerät leisten wir Garantie gemäß nachstehen...


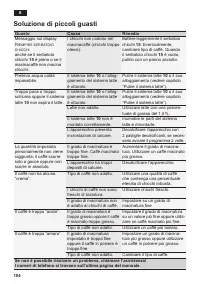


 Siemens HF35M630/01
User Manual
Siemens HF35M630/01
User Manual
 Siemens 1015N-2MFM-1A
Manual
Siemens 1015N-2MFM-1A
Manual
 Siemens 108
User Manual
Siemens 108
User Manual
 Siemens 11
User Manual
Siemens 11
User Manual
 Siemens 1168
User Manual
Siemens 1168
User Manual
 Siemens 120 Series
User Manual
Siemens 120 Series
User Manual
 Siemens 125-1957
User Manual
Siemens 125-1957
User Manual
 Siemens 125-3584T
User Manual
Siemens 125-3584T
User Manual
 Siemens 125-5033
User Manual
Siemens 125-5033
User Manual
 Siemens 140
User Manual
Siemens 140
User Manual
 Siemens 175V
User Manual
Siemens 175V
User Manual
 Siemens 18inc Freezer Tower with Dispenser
User Manual
Siemens 18inc Freezer Tower with Dispenser
User Manual
 Siemens 18inc Wine Tower
User Manual
Siemens 18inc Wine Tower
User Manual
 Siemens 1G03QB 630G
User Manual
Siemens 1G03QB 630G
User Manual
 Siemens 2 D SP
User Manual
Siemens 2 D SP
User Manual
 Siemens 2000
User Manual
Siemens 2000
User Manual
 Siemens 2010 Tango
User Manual
Siemens 2010 Tango
User Manual