Samsung UE32D5700RS - Manuals
Samsung UE32D5700RS TV – User Manual, Quick Guide in PDF format online.
Manuals:
User Manual Samsung UE32D5700RS
Summary
Contents Channel • Using the INFO button (Now & Next guide) 3 • Using the Channel Menu 4 • Using the Channel 12 • Using Favourite Channels 21 • Memorising Channels 23 • Using the Channel (for Satellite TV) 32 • Using Favourite Channels (for Satellite TV) 37 • Memorising Channels (for Satellite T...
▶ English ❑ Using the INFO button (Now & Next guide) The display identifies the current channel and the status of certain audio-video settings. The Now & Next guide shows daily TV programme information for each channel according to the broadcasting time. ● Scroll l , r to view information fo...
◀ ◀ ▶ English ❑ Using the Channel Menu Press the SMART HUB button to select the menu you want to use. Each screen will be displayed. ■ Guide The EPG (Electronic Programme Guide) information is provided by broadcasters. Using programme schedules provided by broadcasters, you can specify programmes yo...
◀ ◀ ▶ English ❑ Using the Channel N The option may differ depending on country. ■ Channel O SMART HUB → Channel → ENTER E Delete added channels or set favourites channels and use the programme guide for digital broadcasts. Change the antenna or channel settings using the menus in the top right corne...
◀ ◀ ▶ English Channel Status Display Icons Icon Operations a An analogue channel. c A channel selected. F A channel set as a Favourites 1 - 5 . \ A locked channel.
◀ ▶ English ❑ Using Favourite Channels ■ Favourites O SMART HUB → Favourites → ENTER E Shows all favourite channels. ● Edit Favourites t : You can set the selected channels to desired favourites channels. N The “ F ” symbol wil be displayed and the channel will be set as a favourite.
◀ ▶ English ❑ Memorising Channels O MENU m → Channel → ENTER E ■ Antenna t N The option may differ depending on country. Before your television can begin memorising the available channels, you must specify the type of signal source that is connected to the TV
◀ ▶ English – Automatic Ordering for Italy : Channels found will be automatically ordered following a criterion established by all the main national and local televisions. – Others Ordering for Italy : If you select this menu you will find others channels ordering directly organized from private nat...
◀ ◀ ▶ English ■ Cable Search Option (depending on the country) Sets additional search options such as the frequency and symbol rate for a cable network search. – Freq.Start / Freq.Stop : Set the start or stop frequency (differs in each country) – Symbol Rate : Displays available symbol rates. – Modu...
◀ ◀ ▶ English ❑ Using the Channel (for Satellite TV) for LED 5700 and above, for PDP TV N The option may differ depending on country. ■ Channel O SMART HUB → Channel → ENTER E Delete added channels or set favourites channels and use the programme guide for digital broadcasts. Select a channel in the...
◀ ▶ English ❑ Using Favourite Channels (for Satellite TV) for LED 5700 and above, for PDP TV ■ Favourites Shows all favourite channels. ● Edit Favourites t : You can set the selected channels to desired favourites channels. N The “ F ” symbol wil be displayed and the channel will be set as a favouri...
◀ ◀ ▶ English ● LNB Settings : Configures the outdoor equipment. – Satellite : Selects the satellite for receiving digital broadcasts. – Transponder : Selects a transponder from the list or adds a new transponder. – DiSEqC Mode : Selects DiSEqC mode for the selected LNB. – Lower LNB Oscillators : Se...
◀ ▶ English ❑ Other Features O MENU m → Channel → ENTER E ■ Edit Channel Number Use this to change channel number. When channel number is changed, channel information is not updated automatically. Enables or disables Edit Channel Number . N This function may not be supported depending on the region....
◀ ▶ English ❑ Changing the Preset Picture Mode O MENU m → Picture → Picture Mode → ENTER E ■ Picture Mode t Select your preferred picture type. ● Dynamic : Suitable for a bright room. ● Standard : Suitable for a normal environment. ● Natural for LED TV / Relax for PDP TV : Suitable for reducing eye ...
◀ ◀ ▶ English ❑ Adjusting Picture Settings O MENU m → Picture → ENTER E ■ Backlight for LED TV / Cell Light for PDP TV / Contrast / Brightness / Sharpness / Colour / Tint (G/R) Your television has several setting options for picture quality control. N In analogue TV , Ext. , AV modes of the PAL syst...
◀ ▶ English ❑ Changing the Picture Size O MENU m → Picture → Screen Adjustment → ENTER E ■ Screen Adjustment ● Picture Size : Your cable box/satellite receiver may have its own set of screen sizes as well. However, we highly recommend you use 16:9 mode most of the time. – Auto Wide : Automatically a...
◀ ▶ English – Smart View 1 : Reduces the 16:9 picture by 50%. for LED TV – Smart View 2 : Reduces the 16:9 picture by 25%. for LED TV N Smart View 1 is enabled only in HDMI mode. N Smart View 2 is enabled only in HDMI or DTV mode. N The picture size can vary depending on the input resolution when co...
◀ ◀ ▶ English N NOTE ● Depending on the input source, the picture size options may vary. ● The available items may differ depending on the selected mode. ● When connecting a PC , only 16:9 and 4:3 modes can be adjusted. ● Settings can be adjusted and stored for each external device connected to an i...
◀ ◀ ▶ English ● HD (High Definition): 16:9 - 1080i / 1080p (1920x1080), 720p (1280x720) ● Settings can be adjusted and stored for each external device you have connected to an input on the TV. Input Source Picture Size ATV, EXT, DTV (480i, 480p, 576i, 576p, 720p) Auto Wide , 16:9 , Wide Zoom , Zoom ...
◀ ◀ ▶ English ❑ Changing the Picture Options ■ Advanced Settings O MENU m → Picture → Advanced Settings → ENTER E ( Advanced Settings are available in Standard / Movie mode) You can adjust the detailed setting for the screen including colour and contrast. N When connecting a PC , you can only make c...
◀ ▶ English ● Black Tone ( Off / Dark / Darker / Darkest ): Select the black level to adjust the screen depth. ● Dynamic Contrast ( Off / Low / Medium / High ): Adjust the screen contrast. ● Shadow Detail ( -2~+2 ) for LED TV : Increase the brightness of dark images. ● Gamma : Adjust the primary col...
◀ ▶ English ❑ Setting up the TV with Your PC Set the input source to PC. ■ Auto Adjustment t O MENU m → Picture → Auto Adjustment → ENTER E Adjust frequency values/positions and fine tune the settings automatically. N Not available when connecting with an HDMI to DVI cable.
◀ ▶ English ❑ Changing the Preset Sound Mode O MENU m → Sound → Sound Mode → ENTER E ■ Sound Mode t ● Standard : Selects the normal sound mode. ● Music : Emphasizes music over voices. ● Movie : Provides the best sound for movies. ● Clear Voice : Emphasizes voices over other sounds. ● Amplify : Incre...
◀ ◀ ▶ English ❑ Adjusting Sound Settings O MENU m → Sound → Sound Effect → ENTER E ■ Sound Effect ● SRS TruSurround HD ( Off / On ) t (standard sound mode only) This function provides a virtual 5.1 channel surround sound experience through a pair of speakers using HRTF (Head Related Transfer Functio...
◀ ▶ English ■ Speaker Settings ● Speaker Select ( External Speaker / TV Speaker ) A sound echo may occur due to a difference in decoding speed between the main speaker and the audio receiver. In this case, set the TV to External Speaker . N When Speaker Select is set to External Speaker , the volume...
◀ ▶ English ❑ Selecting the Sound Mode t When you set to Dual f - g , the current sound mode is displayed on the screen. Audio Type Dual 1 / 2 Dual 1 / 2 A2 Stereo Mono MONO Automatic change Stereo STEREO ↔ MONO Dual DUAL f ↔ DUAL g DUAL f NICAM Stereo Mono MONO Automatic change Stereo MONO ↔ STEREO...
◀ ◀ ▶ English ❑ Connecting to a Wired Network You can attach your TV to your LAN using cable in three ways: ● You can attach your TV to your LAN by connecting the LAN port on the back of your TV to an external modem using a LAN cable. See the diagram below. The Modem Port on the Wall TV Rear Panel L...
◀ ◀ ▶ English ● Depending on how your network is configured, you may be able to attach your TV to your LAN by connecting the LAN port on the back of your TV directly to a network wall outlet using a LAN cable. See the diagram below. Note that the wall outlet is attached to a modem or router elsewher...
◀ ◀ ▶ English ❑ Connecting to a Wireless Network for LED TV To connect your TV to your network wireless, you need a wireless router or modem and a Samsung Wireless LAN adapter (WIS09ABGN, WIS09ABGN2, WIS10ABGN), which you connect to your TV’s back or side panel USB port. See the illustration below. ...
◀ ◀ ▶ English ● Method 2 : Connect via an extension cable To reconnect the Samsung Wireless LAN adapter using the extension cable, follow these steps: 1. Connect the extension cable to the USB port. 2. Connect the extension cable and Samsung Wireless LAN adapter. 3. Attach the Samsung Wireless LAN a...
◀ ▶ English ❑ Setting the network ■ Network Setup ( Auto ) Most wireless networks have an optional security system that requires devices that access the network to transmit an encrypted security code called an Access or Security Key. The Security Key is based on a Pass Phrase, typically a word or a ...
◀ ▶ English How to set up using Plug & Access function Turn on the power of wireless router and TV. 1. Insert USB memory stick into our Samsung wireless router and checking wireless router LED status (Blinking → On). 2. Then take USB memory out and insert it into Samsung TV. 3. Wait until the co...
◀ ▶ English ❑ Setting the Time O MENU m → System → Time → ENTER E ■ Time ● Clock : Setting the clock is for using various timer features of the TV. O The current time will appear every time you press the INFO button. N If you disconnect the power cord, you have to set the clock again. – Clock Mode (...
◀ ◀ ▶ English ❑ Locking Programme O MENU m → System → Security → ENTER E ■ Security N The PIN input screen appears before the setup screen. N Enter your 4-digit PIN. Change the PIN using the Change PIN option. ● Channel Lock ( Off / On ): Lock channels in channel list, to prevent unauthorized users,...
◀ ▶ English ❑ Economical Solutions ■ Eco Solution O MENU m → System → Eco Solution → ENTER E ● Energy Saving ( Off / Low / Medium / High / Picture Off ): This adjusts the brightness of the TV in order to reduce power consumption. If you select Picture Off , the screen is turned off, but the sound re...
◀ ◀ ▶ English ■ Screen Burn Protection for PDP TV To reduce the possibility of screen burn, this unit is equipped with screen burn prevention technology. The Time setting allows you to programme the time between movement of the picture in minutes. ● Pixel Shift ( Off / On ): Using this function, you...
◀ ◀ ▶ English ● You may notice that the picture in the PIP window becomes slightly unnatural when you use the main screen to view a game or karaoke. ● While Channel Lock and SMART HUB is in operation, the PIP function cannot be used. N PIP settings Main picture Sub picture Component, HDMI, PC TV
Support Menu ◀ ◀ ▶ English ❑ Support ■ e-Manual O MENU m → Support → ENTER E You can read the introduction and instructions about the TV features stored in your TV. N For the detailed information about e-Manual Screen, refer to “How to view the e-Manual”.
◀ ◀ ▶ English Installing the Latest Version ● By USB : Insert a USB drive containing the firmware upgrade file, downloaded from “www.samsung.com”, into the TV. Please be careful not to disconnect the power or remove the USB drive until upgrades are complete. The TV will be turned off and on automati...
◀ ▶ English ❑ Using the 3D function for PDP TV ■ 3D This exciting new feature enables you to view 3D content. In order to fully enjoy this feature, you must purchase a pair of Samsung 3D Active Glasses to view 3D video. Samsung 3D Active Glasses are sold separately. For more detailed purchasing info...
◀ ◀ ▶ English ● 3D Mode : Select the 3D input format. N If you want to feel the 3D effect fully, please wear the 3D Active Glasses first, and then select 3D Mode from the list below that provides the best 3d viewing experience. N When watching 3D images, turn on 3D Active Glasses. 3D Mode Operation ...
◀ ▶ English Supported formats and operating specifications for Standard HDMI 3D N The 3D formats indicated below are recommended by the HDMI association and must be supported. Source signal format Standard HDMI 1.4 3D 1920x1080p@24Hz x 2 1920x2205p@24Hz 1280x720p@50/60Hz x 2 1280x1470p@50/60Hz The m...
◀ ▶ Smart Hub English ❑ Getting Started with Smart Hub for PDP TV Features Search All Easily search and access content from diverse sources (e.g. applications, Your Video, AllShare). Social TV Share your TV viewing experience with your friends via social networking service (SNS). Your Video Enjoy yo...
◀ ▶ English ❑ Setting up Smart Hub ■ Settings Configure Smart Hub settings from this screen. Highlight Settings using the u and d buttons and press the ENTER E button. ● Account Management Register Service Account : Register login information for service sites. Change Password : Change account passw...
◀ ◀ ▶ English ❑ Using the Smart Hub service ■ Samsung Apps Samsung Apps is a store for downloading applications to be used on Samsung TV/AV equipment. Users can enjoy a variety of contents such as videos, music, photos, games, useful information etc. using the downloaded applications. Additional app...
◀ ▶ English ❑ Troubleshooting for SMART HUB Problem Possible Solution Some application contents only appear in English. How can I change the language? The Application content language may be different from the application user interface language.The ability to change the language depends on the serv...
◀ ◀ ▶ All Share English ❑ About AllShare™ AllShare™ connects your TV and compatible Samsung mobile phones/ devices through a network. You can play media contents including videos, photos and music saved on your mobile phones or the other devices (such as your PC) by controlling them on the TV via th...
◀ ▶ English ❑ Setting Up AllShare™ ■ AllShare Settings ● Media ( On / Off ): Enables or disables the media function. When the media function is on, Media contents play can be controlled by a mobile phone or other devices that support DLNA DMC. AllShare Settings Media
◀ ◀ ▶ English Anynet+ Menu The Anynet+ menu changes depending on the type and status of the Anynet+ devices connected to the TV. Anynet+ Menu Description View TV Changes Anynet+ mode to TV broadcast mode. Device List Shows the Anynet+ device list. Recording : (*recorder) Starts recording immediately...
◀ ◀ ▶ English ❑ Switching between Anynet+ Devices 1. Press the TOOLS button to select Anynet+ (HDMI-CEC). And then press the ENTER E button to select Device List . N If you cannot find a device you want, select Refresh to refresh the list. 2. Select a device and press the ENTER E button. You can swi...
◀ ◀ ▶ English ❑ Listening through a Receiver You can listen to sound through a receiver (i.e Home Theatre) instead of the TV Speaker . 1. Select Receiver and set to On . 2. Press the EXIT button to exit. N If your receiver supports audio only, it may not appear in the device list. N The receiver wil...
◀ ◀ ▶ English ❑ Troubleshooting for Anynet+ Problem Possible Solution Anynet+ does not work. • Check if the device is an Anynet+ device. The Anynet+ system supports Anynet+ devices only. • Only one receiver (home theatre) can be connected. • Check if the Anynet+ device power cord is properly connect...
◀ ▶ English I want to start Anynet+. • Check if the Anynet+ device is properly connected to the TV and check if the Anynet+ (HDMI-CEC) is set to On in the Anynet+ Setup menu. • Press the TOOLS button to display the Anynet+ menu and select a menu you want. I want to exit Anynet+. • Select View TV in ...
◀ ◀ ▶ English The connected device is not displayed. • Check whether or not the device supports Anynet+ functions. • Check whether or not the HDMI cable is properly connected. • Check whether Anynet+ (HDMI-CEC) is set to On in the Anynet+ setup menu. • Search Anynet+ devices again. • You can connect...
◀ ▶ My Contents English ❑ Using the Media Contents Enjoy photos, music and/or movie files saved on a USB Mass Storage Class (MSC) device. 1. Press the SMART HUB button. 2. Press the d or u button to select desired menu ( Videos , Photos , Music ), then press the ENTER E button. ● The displayed menu ...
◀ ◀ ▶ English ❑ Connecting a USB Device 1. Turn on your TV. 2. Connect a USB device containing recorded tv, photo, music and/or movie files to the USB port on the back or side panel of the TV. 3. When USB is connected to the TV, popup window appears. Then you can select New device connected. TV Rear...
◀ ▶ English ❑ Connecting to the PC through network You can play pictures, music and videos saved on your PC through a network connection in the SMART HUB mode. 1. For more information on how to configure your network, refer to “Setting the Network”. ● You are recommended to locate both TV and PC in ...
◀ ▶ English Screen Display Move to the file you desired using the up / down / right / left buttons and then press the ENTER E or � (Play) button. The file is played. Device name: Displays a connected device name. Change Content/Device: Changes the content type or connected device.Sorting: Displays s...
◀ ◀ ▶ English ❑ Recorded TV for PDP TV To use the recording or Timeshift function, the connected USB device must be available for recording. Device format is recommended to use USB HDD. N During the Device formatting, do not disconnect the device while formatting is in progress. If you format the de...
◀ ▶ English N In this mode, you can enjoy movie clips contained on a Game, but you cannot play the Game itself. ● Supported Subtitle Formats Name File extension Format MPEG-4 time-based text .ttxt XML SAMI .smi HTML SubRip .srt string-based SubViewer .sub string-based Micro DVD .sub or .txt string-b...
◀ ◀ ▶ English Video Decoder Audio Decoder • Supports up to H.264, Level 4.1 • GMC / H.264 FMO / ASO / RS, VC1 SP / MP / AP L4 and AVCHD are not supported. • XVID, MPEG4 SP, ASP: − Below 1280 x 720: 60 frame max − Above 1280 x 720: 30 frame max • Supports up to WMA 7, 8, 9, STD • WMA 9 PRO does not s...
◀ ▶ English ❑ Media Contents - Additional Function Sorting the file list To sort files in the file list, select the Sorting by using the l / r / u / d button. And then press the ENTER E button. Category Operations Recorded TV for PDP TV Videos Music Photos Folder View Displays the whole folder. You ...
◀ ▶ English Videos / Music / Photos Play Option menu The following functions are enabled during playback. Category Operations Videos Music Photos List Return to the file list. > > > Previous / Next Go to previous / next photo file. > Start Slide Show /Stop Slide Show You can start or sto...
◀ ▶ English ■ Data Service for Italy Allows the user to use information (text, still images, graphics, documents, software, etc.) transmitted via broadcast media. Auto Run Data Service (On / Off) Sets whether or not to automatically run data service. Auto Run Data Service automatically runs data ser...
◀ ▶ English Using Data Service If the channel you are currently watching provides data service, you can enjoy a variety of data services by pressing the , for Italy or red button. N Provided Data Service information may vary depending on broadcast. N While using data service, changing the channel us...
◀ ◀ ▶ English TEXT Switches to teletext mode or Returns to the previous screen. N Operations may differ depending on the service provider. u / d / l / r Moves the Data Service menu up, down, left and right. OK E Runs a selected item. EXIT e Stops a running Data Service .
◀ ▶ English ❑ Troubleshooting If you have any questions about the TV, first refer to this list. If none of these troubleshooting tips apply, please visit “www.samsung.com” then click on Support, or contact the call centre listed on the back-cover of this manual. Issues Solutions and Explanations Pic...
◀ ◀ ▶ English Issues Solutions and Explanations The speakers are making an inappropriate noise. • Check the cable connections. Make sure a video cable is not connected to an audio input. • For antenna or cable connections, check the signal strength. Low signal level may cause sound distortion. No Pi...
◀ ◀ ▶ English Issues Solutions and Explanations A “Mode Not Supported” message appears. • Check the supported resolution of the TV, and adjust the external device’s output resolution accordingly. There is a plastic smell from the TV. • This smell is normal and will dissipate over time. The TV Signal...
◀ ▶ English Issues Solutions and Explanations You have intermittent loss of audio or video. • Check the cable connections and reconnect them. • Loss of audio or video can be caused by using overly rigid or thick cables. Make sure the cables are flexible enough for long term use. If mounting the TV t...
◀ ▶ English ❑ Connecting to a COMMON INTERFACE slot ■ Attaching the CI Card Adaptor Attach the adapter as shown below. To connect the CI CARD Adapter, follow these steps. N We recommend attaching the adapter before installing 1. Insert the CI CARD Adapter into the two holes on the product 1 . N Plea...
◀ ◀ ▶ English N NOTE ● You must obtain a “CI or CI+ CARD” from a local cable service provider. ● When removing the “CI or CI+ CARD”, carefully pull it out with your hands since dropping the “CI or CI+ CARD” may cause damage to it. ● Insert the “CI or CI+ CARD” in the direction marked on the card. ● ...
◀ ◀ ▶ English ❑ Teletext Feature (depending on the country) The index page of the Teletext service gives you information on how to use the service. For Teletext information to be displayed correctly, channel reception must be stable. Otherwise, information may be missing or some pages may not be dis...
◀ ▶ English / (Teletext on / mix / off) Activates the Teletext mode for the current channel. Press the button twice to overlap the Teletext mode with the current broadcasting screen. Press it one more time to exit teletext. 8 (store) Stores the Teletext pages. 4 (size) Displays the teletext on the u...
◀ ◀ ▶ English Colour buttons(red, green, yellow, blue) If the FASTEXT system is used by the broadcasting company, the different topics on a Teletext page are colour-coded and can be selected by pressing the coloured buttons. Press the colour corresponding to the topic of your choice. A new colourcod...
◀ ▶ English 3 (page down) Displays the previous Teletext page. 6 (index) Displays the index (contents) page at any time while you are viewing Teletext. 5 (reveal) Displays the hidden text (answers to quiz games, for example). To display the normal screen, press it again. 7 (cancel) Shrinks the Telet...
◀ ◀ ▶ English Typical Teletext page Part Contents A Selected page number. B Broadcasting channel identity. C Current page number or search indications. D Date and time. E Text. F Status information. FASTEXT information.
◀ ▶ English ❑ Anti-theft Kensington Lock The Kensington Lock is not supplied by Samsung. It is a device used to physically fix the system when using it in a public place. The appearance and locking method may differ from the illustration depending on the manufacturer. Refer to the manual provided wi...
◀ ▶ English ❑ Licence TheaterSound, SRS and symbol are trademarks of SRS Labs, Inc. TheaterSound technology is incorporated under licence from SRS Labs, Inc. Manufactured under licence from Dolby Laboratories. Dolby and the double-D symbol are trademarks of Dolby Laboratories. Manufactured under lic...
◀ English DivX Certified® to play DivX® video up to HD 1080p, including premium content.DivX®, DivX Certified® and associated logos are trademarks of DivX, Inc. and are used under licence. ABOUT DIVX VIDEO: DivX® is a digital video format created by DivX, Inc. This is an official DivX Certified® dev...
▶ English ❑ How to view the e-Manual You can read the introduction and instructions about the TV features stored in your TV. O MENU m → Support → e-Manual → ENTER E Basic Features Changing the Preset Picture Mode Adjusting Picture Settings Changing the Picture Size Changing the Picture Options Setti...
◀ ▶ English Using the Help Display the e-Manual Guide & the Product Guide by pressing Help . <e-Manual Guide> The e-Manual guide appears as above. <Product Guide> The product guide appe ars as above. Return Sync media from multiple devices with AllShare AllShareTM syncs your digital ...
Quick Guide Samsung UE32D5700RS
Summary
English - 2 For more information on how to use e-Manual (p. 14) Figures and illustrations in this User Manual are provided for reference only and may differ from actual product appearance. Product design and specifications may be changed without notice. Digital TV notice 1. Functionalities related t...
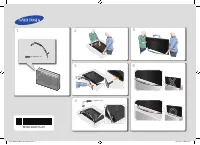
English - 3 Accessories ✎ Please make sure the following items are included with your TV. If any items are missing, contact your dealer. ✎ The items’ colours and shapes may vary depending on the models. ✎ Cables not included in the package contents can be purchased separately. ✎ Check that there is ...
English - 4 Viewing the Control Panel ✎ The product colour and shape may vary depending on the model. Remote control sensor Aim the remote control towards this spot on the TV. Power Indicator Blinks and turns off when the power is on and lights up in standby mode. SOURCE E Toggles between all the av...
English - 5 Viewing the Remote Control ✎ This is a special remote control for the visually impaired persons and has Braille points on the Power, Channel and Volume buttons. Installing batteries (Battery size: AAA) CH LIST MUTE POWER SOURCE HDMI PRE-CH MENU TOOLS RETURN E-MANUAL P.SIZE AD/SUBT. EXIT ...
English - 6 ✎ For best cable connection to this product, be sure to use cables with a maximum thickness as below: • Maximum thickness - 0.55 inches (14mm) Connecting to an Antenna When the TV is initially powered on, basic settings proceed automatically. ✎ Preset: Connecting the mains and antenna. V...
English - 7 Plug & Play (Initial Setup) When the TV is initially powered on, a sequence of on-screen prompts will assist in configuring basic settings. Press the POWER P button. Plug & Play is available only when the Source is set to TV. ✎ Before turning on the TV, make sure the antenna cabl...
English - 8 Connecting to an AV devices ¦ Available devices: DVD, Blu-ray player, HD cable box, HD STB (Set-Top-Box) satellite receiver, VCR Using an HDMI or an HDMI to DVI cable (up to 1080p) ✎ HDMI IN 1(DVI), 2, 3, 4 / PC/DVI AUDIO IN x When using an HDMI/DVI cable connection, you must use the HDM...
English - 9 Using a Component (up to 1080p) or an Audio/Video (480i only) and a Scart Cable ✎ In Ext. mode, DTV Out supports MPEG SD Video and Audio only. ✎ When connecting to AV IN , the colour of the AV IN [VIDEO] jack (green) will not match the video cable (yellow). ✎ To obtain the best picture q...
English - 10 Connecting to a Audio device and PC ¦ Available devices: digital audio system, amplifier, DVD home theatre Using an Optical (Digital) or a Headphone Connection ✎ DIGITAL AUDIO OUT (OPTICAL) x When a digital audio system is connected to the DIGITAL AUDIO OUT (OPTICAL) jack, decrease the ...
English - 11 ¦ Using an HDMI cable or an HDMI to DVI cable or a D-sub cable ✎ Connecting through the HDMI cable may not be supported depending on the PC. Display Modes (D-Sub and an HDMI to DVI Input) Optimal resolution is 1920 X 1080 @ 60 Hz. Mode Resolution Horizontal Frequency (KHz) Vertical Freq...
English - 12 Connecting to a COMMON INTERFACE slot Attaching the CI Card Adapter Attach the adapter as shown below.To connect the CI CARD Adapter, follow these steps. ✎ We recommend attaching the adapter before installing the wall mount, or inserting the “CI or CI+ CARD”. 1. Insert the CI CARD Adapt...
English - 13 Network Connection You can set up your TV so that it can access the Internet through your local area network (LAN) using a wired or wireless connection. Network Connection - Wireless You can connect your TV to your LAN through a standard wireless router or modem. To connect wirelessly, ...
English - 14 How to view the e-Manual Screen Display Using the Help Display the Product Guide by pressing Help . <E-manual Guide> The e-Manual guide appears as above. <Product Guide> The product guide appears as above. How to toggle between the e-Manual and the corresponding menu(s). ✎ T...
English - 16 Installing the Wall Mount Installing the Wall Mount Kit The wall mount kit (sold separately) allows you to mount the TV on the wall.For detailed information on installing the wall mount, see the instructions provided with the wall mount. Contact a technician for assistance when installi...
English - 17 Wall Mount Kit Specifications (VESA) ✎ The wall mount kit is not supplied, but sold separately. Install your wall mount on a solid wall perpendicular to the floor. When attaching to other building materials, please contact your nearest dealer. If installed on a ceiling or slanted wall, ...
English - 18 Troubleshooting If you have any questions about the TV, first refer to this list. If none of these troubleshooting tips apply, please visit “www. samsung.com,” then click on Support, or contact the call centre listed on the back-cover of this manual. Issues Solutions and Explanations Th...
English - 19 Securing the TV to the wall Caution : Pulling, pushing, or climbing onto the TV may cause the TV to fall. In particular, ensure that your children do not hang over or destabilize the TV; doing so may cause the TV to tip over, resulting in serious injuries or death. Follow all safety pre...
English - 20 Specifications Display Resolution 1920 x 1080 Environmental Considerations Operating Temperature Operating HumidityStorage Temperature Storage Humidity 10°C to 40°C (50°F to 104°F) 10% to 80%, non-condensing -20°C to 45°C (-4°F to 113°F) 5% to 95%, non-condensing TV System Analogue: B/G...
This page is intentionally left blank. [UD5700-ZG]BN68-03506C-L04.indb 21 2011-04-11 오전 10:53:32
Deutsch - 2 Weitere Informationen zur Verwendung des e-Manuals (Seite 14) Die Abbildungen und Illustrationen in diesem Handbuch dienen nur zur Information und können vom tatsächlichen Aussehen des Geräts abweichen. Änderungen an Ausführung und technischen Daten vorbehalten. Hinweis zu Digitalfernseh...
Deutsch - 3 Zubehör ✎ Vergewissern Sie sich, dass im Lieferumfang des Fernsehgeräts folgende Komponenten enthalten sind. Falls irgendwelche Teile fehlen sollten, setzen Sie sich bitte mit Ihrem Händler in Verbindung. ✎ Farbe und Form der Teile können sich je nach Modell unterscheiden. ✎ Kabel, die n...
Deutsch - 4 Bedienfeld ✎ Form und Farbe des Geräts können sich je nach Modell unterscheiden. Fernbedienungssensor Richten Sie die Fernbedienung auf diesen Sensor am Fernsehgerät. Netzanzeige Beim Einschalten des Fernsehgeräts blinkt die Netzleuchte kurz und erlischt anschließend. Im Standby-Modus le...
Deutsch - 5 Fernbedienung ✎ Dies ist eine spezielle Fernbedienung für Personen mit eingeschränktem Sehvermögen. Die Netztaste sowie die Tasten zum Einstellen des Senders und der Lautstärke sind in Braille beschriftet. Einlegen von Batterien (Batteriegröße: AAA) CH LIST MUTE POWER SOURCE HDMI PRE-CH ...
Deutsch - 6 ✎ Die optimale Kabelverbindung ist bei diesem Gerät gewährleistet, wenn Sie Kabel mit den nachfolgend angegebenen Maßen verwenden. • Maximaler Durchmesser - 14 mm Anschließen an eine Antenne Wenn das Fernsehgerät zum ersten Mal eingeschaltet wird, werden automatisch die Grundeinstellunge...
Deutsch - 7 Plug & Play (Anfangseinstellung) Wenn das Fernsehgerät erstmals eingeschaltet wird, helfen eine Reihe aufeinanderfolgender Abfragen beim Durchführen der Grundeinstellungen. Drücken Sie die Taste POWER P . Plug & Play ist nur verfügbar, wenn die Quelle auf TV eingestellt ist. ✎ St...
Deutsch - 8 Anschließen an ein AV-Gerät ¦ Verfügbare Geräte: DVD, Blu-ray-Player, HD-Kabelreceiver, HD-Satellitenreceiver, Videorekorder Mit Hilfe eines HDMI- oder HDMI/DVI-Kabels (bis zu 1080p) ✎ HDMI IN 1(DVI), 2, 3, 4 / PC/DVI AUDIO IN x Eine Verbindung über HDMI/DVI-Kabel kann nur über den Video...
Deutsch - 10 Anschließen an ein Audiogerät und einen PC ¦ Verfügbare Geräte: Digital-Audiosystem, Verstärker, DVD-Heimkinosystem Mit Hilfe des optischen Anschlusses (digital) oder des Anschlusses für die Kopfhörer ✎ DIGITAL AUDIO OUT (OPTICAL) x Wenn ein Digital-Audiosystem mit dem DIGITAL AUDIO OUT...
Deutsch - 12 Anschließen an den COMMON INTERFACE-Steckplatz Befestigen des CI-Kartenadapters Befestigen Sie den Adapter wie unten gezeigt.Gehen Sie folgendermaßen vor, um den CI-Kartenadapter anzuschließen. ✎ Wir empfehlen, den Adapter anzuschließen, bevor Sie die Wandhalterung befestigen oder die „...
Deutsch - 13 Netzwerkverbindung Sie können Ihr Fernsehgerät so einrichten, dass es über Ihr lokales Netzwerk (LAN) und eine Kabel- oder WLAN-Verbindung auf das Internet zugreifen kann. Netzwerkverbindung - Drahtlos Sie können können Ihr Fernsehgerät über einen standardmäßigen WLAN-Router oder ein Mo...
Deutsch - 14 So zeigen Sie das e-Manual an Bildschirmanzeige Verwenden der Hilfe Sie können die Produktdemo anzeigen, indem Sie auf Hilfe drücken. <e-Manual-Anleitung> Die e-Manual-Anleitung wird wie oben abgebildet angezeigt. <Produktdemo> Die Produktdemo wird wie oben abgebildet angeze...
Deutsch - 16 Anbringen der Wandhalterung Anbringen der Wandhalterung Mit der (separat erhältlichen) Wandhalterung können Sie das Fernsehgerät an einer Wand befestigen.Detaillierte Informationen zum Montieren der Wandhalterung finden Sie in den Anweisungen, die im Lieferumfang der Wandhalterung entha...
Deutsch - 17 Spezifikation (VESA) der Wandhalterung ✎ Die Wandhalterung wird nicht mitgeliefert, ist aber gesondert erhältlich. Montieren Sie die Wandhalterung an einer soliden Wand, die senkrecht zum Boden steht. Bei Installation auf anderen Trägermaterialien wenden Sie sich bitte an Ihren Fachhänd...
Deutsch - 18 Fehlerbehebung Bei Fragen zum Fernsehgerät schauen Sie zuerst in dieser Liste nach. Wenn keiner dieser Tipps zur Fehlerbehebung weiterhilft, wechseln Sie zur Website „www.samsung.com“ und klicken Sie dort auf „Unterstützung“ oder wenden Sie sich an das in der Liste auf der letzten Seite...
Deutsch - 19 Befestigen des Fernsehgeräts an der Wand Achtung : Das Fernsehgerät kann hinfallen, wenn Sie daran ziehen, es schieben oder darauf klettern. Stellen Sie insbesondere sicher, dass sich keine Kinder an das Gerät hängen oder es aus dem Gleichgewicht bringen. Anderenfalls könnte das Gerät u...
Deutsch - 20 Technische Daten Anzeigeauflösung 1920 x 1080 UmgebungsbedingungenBetriebstemperaturLuftfeuchtigkeit (bei Betrieb)TLagerungstemperaturLuftfeuchtigkeit (Lagerung) 10° C bis 40° C (50°F bis 104°F) 10% bis 80%, nicht kondensierend -20° C bis 45° C (-4°F bis 113°F) 5 % bis 95 %, nicht konde...
Français - 3 Accessoires ✎ Vérifiez que les éléments suivants sont inclus avec votre téléviseur. S’il manque des éléments, contactez votre revendeur. ✎ Les couleurs et les formes des éléments peuvent varier en fonction des modèles. ✎ Les câbles qui ne se trouvent pas dans le contenu de l’emballage p...
Français - 4 Présentation du panneau de configuration ✎ La couleur et la forme du produit peuvent varier en fonction du modèle. Capteur de la télécommande Dirigez la télécommande vers ce point du téléviseur. Témoin d’alimentation Clignote, puis s’arrête lorsque le téléviseur est allumé. S’allume en ...
Français - 5 Présentation de la télécommande ✎ Ceci est une télécommande spéciale destinée aux malvoyants. Elle dispose de points Braille sur les boutons Power, Channel et Volume. Installation des piles (type de pile : AAA) CH LIST MUTE POWER SOURCE HDMI PRE-CH MENU TOOLS RETURN E-MANUAL P.SIZE AD/S...
Français - 6 ✎ Pour obtenir la meilleure connexion câblée possible vers cet appareil, utilisez des câbles de l’épaisseur maximale indiquée ci-dessous. • Epaisseur maximale – 0,55 pouce (14 mm) Raccordement à une antenne Lorsque vous allumez le téléviseur pour la première fois, des réglages de base s...
Français - 8 Connexion à un périphérique AV ¦ Available devices : DVD, Lecteur Blu-ray, décodeur câble HD, récepteur satellite HD (boîtier décodeur), décodeur câble, récepteur satellite (boîtier externe), magnétoscope Utilisation d’un câble HDMI ou HDMI vers DVI (jusqu’à 1080p) ✎ HDMI IN 1(DVI), 2, ...
Français - 9 Utilisation d’un câble Composant (jusqu’à 1080p) ou Audio/Vidéo (480i uniquement) et d’un câble Scart ✎ En mode Ext. , la sortie DTV prend uniquement en charge les signaux vidéo et audio MPEG SD. ✎ Lors de la connexion à AV IN , la couleur de la prise AV IN [VIDEO] (verte) ne correspond...
Français - 10 Connexion entre un PC et un périphérique audio ¦ Available devices : système audio numérique, amplificateur, système home cinéma DVD Utilisation d’une connexion Optique (Numérique) ou d’une sortie casque ✎ DIGITAL AUDIO OUT (OPTICAL) x Lorsqu’un système audio numérique est connecté à l...
Français - 11 ¦ Utilisation d’un câble HDMI, d’un câble HDMI vers DVI ou d’un câble D-sub ✎ En fonction du PC, la connexion à l’aide du câble HDMI peut ne pas être prise en charge. Modes d’affichage (Entrées D-Sub et HDMI vers DVI) La résolution optimale est de 1920 X 1080 à 60 Hz. Mode Résolution F...
Français - 12 Connexion à un port INTERFACE COMMUNE Connexion de l’adaptateur de carte CI Connectez l’adaptateur comme illustré ci-dessous.Pour connecter l’adaptateur de carte CI, procédez comme suit : ✎ Il est conseillé de connecter l’adaptateur avant l’installation du montage mural ou d’insérer la...
Français - 13 Connexion réseau Vous pouvez configurer votre téléviseur de telle sorte qu’il puisse accéder à Internet par le biais de votre réseau local (LAN) à l’aide d’une connexion câblée ou sans fil. Connexion réseau - Sans fil Vous pouvez connecter votre téléviseur au réseau local par le biais ...
Français - 16 Installation du support mural Installation du kit de montage mural Le kit de montage mural (vendu séparément) permet de fixer le téléviseur au mur.Pour plus d’informations sur l’installation du support mural, reportez-vous aux instructions fournies avec le support mural. Faites appel à...
Français - 18 Résolution des problèmes Si vous avez des questions sur le téléviseur, commencez par consulter la liste ci-dessous. Si aucune de ces solutions de dépannage ne s’applique à votre problème, rendez-vous sur le site “www.samsung.com”, puis cliquez sur Assistance ou contactez le centre d’ap...
Français - 19 Fixation du téléviseur au mur Attention : si vous tirez ou poussez le téléviseur ou si vous grimpez dessus, il risque de tomber. Veillez notamment à ce que vos enfants ne se suspendent pas au téléviseur, ni ne le déséquilibrent, car cela pourrait le faire basculer et occasionner des b...
Français - 20 Caractéristiques techniques Résolution de l’affichage 1920 x 1080 Considérations environnementalesTempérature en service Humidité en fonctionnementTempérature de stockage Humidité sur le lieu de stockage De 10°C à 40°C (De 50°F a 104°F) 10% à 80%, sans condensation De -20°C à 45°C (De ...
Italiano - 2 Ulteriori informazioni sull’uso del Manuale elettronico (p. 14) Le figure e le illustrazioni presenti in questo Manuale dell’utente sono fornite unicamente a titolo di riferimento e possono differire da quelle del prodotto attuale. Le specifiche e il design del prodotto possono variare ...
Italiano - 3 Accessori ✎ Controllare che nell’imballaggio siano contenuti i seguenti componenti. Se eventuali componenti risultassero mancanti, contattare il rivenditore. ✎ La forma e il colore dei componenti possono variare in base al modello. ✎ Eventuali cavi non forniti in dotazione possono esser...
Italiano - 4 Vista del Pannello di controllo ✎ La forma e il colore del prodotto possono variare in base al modello. Sensore del telecomando Puntare il telecomando in direzione di questo punto sul televisore. Indicatore di alimentazione Lampeggia e si spegne quando l’alimentazione è attiva, si accen...
Italiano - 5 Vista del telecomando ✎ Questo speciale telecomando, progettato per aiutare chi ha problemi di vista, presenta punti in braille sui tasti Power, Channel e Volume. Inserimento delle batterie (tipo: AAA) CH LIST MUTE POWER SOURCE HDMI PRE-CH MENU TOOLS RETURN E-MANUAL P.SIZE AD/SUBT. EXIT...
Italiano - 6 ✎ Per la migliore connessione via cavo a questo prodotto, utilizzare cavi del diametro massimo indicato di seguito: • Diametro massimo - 0,55 pollici (14 mm) Collegamento all’antenna Quando il televisore viene acceso per la prima volta, le impostazioni di base vengono visualizzate autom...
Italiano - 8 Collegamento a un dispositivo AV ¦ Dispositivi disponibili: DVD, Blu-ray player, HD cable box, ricevitore satellitare HD STB (Set-Top-Box), VCR Uso di un cavo HDMI o HDMI-DVI (fino a 1080p) ✎ HDMI IN 1(DVI), 2, 3, 4 / PC/DVI AUDIO IN x Quando si effettua una connessione mediante cavo HD...
Italiano - 9 Uso di un cavo Component (fino a 1080p) o Audio/Video (solo 480i) e un cavo Scart ✎ In modalità Est. , l’uscita DTV supporta solo video e audio SD MPEG. ✎ Durante il collegamento a AV IN , il colore del jack AV IN [VIDEO] (verde) non corrisponderà a quello del cavo video (giallo). ✎ Per...
Italiano - 10 Connessione a un PC e a un dispositivo audio ¦ Dispositivi disponibili: digital audio system, amplifier, DVD home theatre Uso di un collegamento ottico (digitale) o cuffie ✎ DIGITAL AUDIO OUT (OPTICAL) x Quando un sistema audio digitale è collegato alla porta DIGITAL AUDIO OUT (OPTICAL...
Italiano - 11 ¦ Uso di un cavo HDMI, HDMI-DVI o D-sub ✎ La connessione mediante cavo HDMI potrebbe non essere supportata a seconda del modello di PC in uso. Modalità di visualizzazione (ingresso D-Sub e HDMI/DVI) La risoluzione ottimale è 1920 X 1080 a 60 Hz. Modalità Risoluzione Frequenza orizzonta...
Italiano - 12 Connessione a un alloggiamento COMMON INTERFACE Collegamento dell’adattatore di schede CI Collegare l’adattatore come mostrato sotto.Per collegare l’adattatore di schede CI, seguire questi passaggi. ✎ Si consiglia di collegare l’adattatore prima di eseguire l’installazione del sistema ...
Italiano - 13 Connessione di rete E’ possibile impostare il televisore in modo da poter accedere a Internet attraverso una LAN con un collegamento via cavo o wireless. Connessione di rete - Wireless E’ possibile collegare il televisore alla LAN utilizzando un modem o un router wireless standard. Per...
Italiano - 14 Come visualizzare il manuale elettronico Visualizzazione a schermo Uso della Guida Visualizzare la Guida del manuale elettronico e la Guida del prodotto premendo Guida . <Guida e-Manual> Viene visualizzata la Guida del manuale elettronico come mostrato sopra. <Guida Prodotto&g...
Italiano - 16 Installazione del supporto a parete Installazione del kit di supporto a parete Il kit di supporto a parete (venduto separatamente) consente di montare il televisore direttamente a una parete.Per informazioni dettagliate sull’installazione a parete, consultare le istruzioni fornite insi...
Italiano - 18 Risoluzione dei problemi In caso di domande sul funzionamento del televisore, consultare per prima cosa l’elenco sottostante. Se nessuno dei consigli sottoriportati si dimostra utile per risolvere il problema, visitare il sito www.samsung.com, quindi fare clic sulla voce Supporto, oppu...
Italiano - 19 Fissaggio del televisore alla parete Attenzione : Tirare, spingere o arrampicarsi sul televisore sono azioni che possono provocarne la caduta. Si raccomanda di non far giocare i bambini con il televisore poiché potrebbero appendersi ad esso destabilizzandolo; se ciò dovesse verificarsi...
Italiano - 20 Specifiche Risoluzione del display 1920 x 1080 Caratteristiche ambientaliTemperatura di esercizioUmidità di esercizioTemperatura di stoccaggioUmidità di stoccaggio Da 10° C 40° C (50°F C 104°F) Dal 10% al 80%, senza condensa Da -20° C 45° C (-4°F C 113°F) Dal 5% al 95%, senza condensa ...
Samsung TVs Manuals
-
Samsung 105S9W (UE105S9WATXUA)
User Manual
-
Samsung 19F4000 (UE19F4000)
User Manual
-
Samsung 19F4000 (UE19F4000AWXUA)
User Manual
-
Samsung 19H4000 (UE19H4000AKXUA)
User Manual
-
Samsung 19K4000 (UE19K4000)
User Manual
-
Samsung 22F5000 (UE22F5000)
User Manual
-
Samsung 22F5000 (UE22F5000AKXUA)
User Manual
-
Samsung 22F5400 (UE22F5400AKXUA)
User Manual
-
Samsung 22F5410 (UE22F5410AKXUA)
User Manual
-
Samsung 22H5000 (UE22H5000AKXUA)
User Manual
-
Samsung 22H5600 (UE22H5600AKXUA)
User Manual
-
Samsung 22H5610 (UE22H5610AKXUA)
User Manual
-
Samsung 22K5000 (UE22K5000)
User Manual
-
Samsung 24H4070 (UE24H4070AUXUA)
User Manual
-
Samsung 24H4080 (UE24H4080AUXUA)
User Manual
-
Samsung 24K4070 (UE24K4070)
User Manual
-
Samsung 24N4500 (UE24N4500AUXUA)
User Manual
-
Samsung 28F4000 (UE28F4000)
User Manual
-
Samsung 28F4000 (UE28F4000AWXUA)
User Manual
-
Samsung 28H4000 (UE28H4000AKXUA)
User Manual