Page 2 - What the icons and signs in this user; safety information; SAVE THESE INSTRUCTIONS
English - 2 IMPORTANT SAFETY SYMBOLS AND PRECAUTIONS What the icons and signs in this user manual mean: WARNING Hazards or unsafe practices that may result in severe personal injury or death. CAUTION Hazards or unsafe practices that may result in minor personal injury or property damage. CAUTION To ...
Page 3 - WARNING
English - 3 IMPORTANT SAFETY INSTRUCTIONS To reduce risk of burns, electric shock, fire, personal injury or exposure to excessive microwave energy, abide by all the warnings and cautions listed below. WARNING WARNING To reduce risk of burns, electric shock, fire, personal injury or exposure to exces...
Page 4 - GROUNDING INSTRUCTIONS; Use of Extension Cords; CRITICAL
English - 4 GROUNDING INSTRUCTIONS T his appliance must be grounded. In the event of an electrical short circuit, grounding reduces the risk of electric shock by providing an escape wire for the electrical current. This appliance is equipped with a cord that includes a grounding wire and a grounding...
Page 5 - INSTALLATION; CRITICAL USAGE
English - 5 If the power plug or power cord is damaged, contact your nearest service center for a replacement or repair. CAUTION INSTALLATION CAUTIONS Position the oven so that the plug is easily accessible. • Failing to do so may result in electric shock or fire due to electric leakage. Unplug the ...
Page 6 - USAGE CAUTIONS; CRITICAL CLEANING
English - 6 CAUTION USAGE CAUTIONS If the surface of the microwave is cracked, turn it off. • Failing to do so may result in electric shock. Dishes and containers can become hot. Handle with care.Hot foods and steam can cause burns. Carefully remove container coverings, directing steam away from you...
Page 7 - contents
English - 7 contents SETTING UP YOUR MICROWAVE OVEN 8 8 Checking the parts 8 Warranty and service information 8 Setting up your microwave oven 9 Features 9 Checking the control panel 10 Turning on the power for the first time 10 Setting the time 10 Child lock 10 My settings USING YOUR MICROWAVE OVEN...
Page 8 - CHECKING THE PARTS
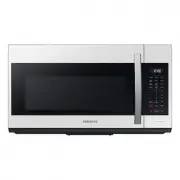
English - 8 setting up your microwave oven Be sure to follow these instructions closely so that your new microwave oven works properly. CHECKING THE PARTS Carefully unpack your microwave oven, and make sure you’ve received all the parts shown below. If your microwave oven was damaged during shipping...
Page 9 - CHECKING THE CONTROL PANEL
English - 9 01 SETTING UP Y OUR MICROW A VE O VEN CHECKING THE CONTROL PANEL FEATURES See page 12 See page 14 See page 13 See page 15 See page 10-11 See page 16 See page 14 See page 10 See page 10 See page 10 See page 16 See page 15 See page 10-11 See page 10-11 Display Cooking Guide Glass Turntable...
Page 10 - Activating/Deactivating; using your
English - 10 TURNING ON THE POWER FOR THE FIRST TIME The first time you plug the power cord into an outlet, the display turns on after four seconds with: PLEASE PRESS CLOCK AND SET TIME OF DAY . This will also occur after a power interruption. SETTING THE TIME Your microwave oven is equipped with a ...
Page 11 - SET TIMER BUTTON; METAL SHELF; Reheating food; ECO MODE
English - 11 02 USING Y OUR MICROW A VE O VEN SET TIMER BUTTON You can set the microwave so the LED Light turns on and off automatically at a preset time. The LED Light comes on at the same time every day until reset. 1. Press the Set Timer button. 2. Use the Number button to set the LED Light on ti...
Page 12 - SENSOR COOKING BUTTONS; Sensor cooking utensils & covers; SENSOR REHEAT BUTTON
English - 12 SENSOR COOKING BUTTONS The Sensor Cooking buttons let you cook favorite foods using preset power levels and times at the touch of a button. If the food is not thoroughly cooked or reheated when you use the auto cook feature, complete the cooking process by selecting a power level and co...
Page 13 - AUTO DEFROST BUTTON; POUND DEFROST BUTTON
English - 13 02 USING Y OUR MICROW A VE O VEN Sensor reheating table Follow the instructions below when reheating different types of food. Food Amount Procedure Dinner plate 1 serving (1 plate) Use only precooked, refrigerated foods. Cover the plate with vented plastic wrap or waxed paper tucked und...
Page 14 - KIDS MEALS BUTTON
English - 14 SOFTEN/MELT BUTTON 1. Press the Soften/Melt button. The display will show: SELECT 1 TO 4 . (Refer to the Soften/Melt table below.) Press the number button from 1 to 4 buttons to select the menu. 2. Press the number 1 or 2 buttons to select the amount. Only number 1 (serving) is availabl...
Page 15 - SNACKS BUTTON; MICROWAVE COOKING TIMES & POWER LEVELS
English - 15 02 USING Y OUR MICROW A VE O VEN SNACKS BUTTON 1. Press the Snacks button. The display will show SELECT 1 TO 4 . (Refer to the snack bar table below.) Press the number button from 1 to 4 buttons to select the menu. 2. Press the number 1 or 2 buttons to select the serving size. Only numb...
Page 16 - Power Levels; CUSTOM COOK BUTTON; cookware guide; MICROWAVE-SAFE UTENSILS
English - 16 Power Levels The 10 power levels allow you to choose the optimal power level for your cooking needs. 1 Warm 6 Simmer 2 Low 7 Medium high 3 Defrost 8 Reheat 4 Medium low 9 Sauté 5 Medium 10 High CUSTOM COOK BUTTON The Custom Cook button lets you store a customized set of cooking instruct...
Page 17 - cooking guide; GENERAL MICROWAVE TIPS; Cooking techniques
English - 17 03 COOKW ARE GUIDE & COOKING GUIDE Cookware Comments Glassware Oven-to-table ware Can be used, unless decorated with a metal trim. Fine glassware Can be used to warm foods or liquids. Delicate glass may break or crack if heated suddenly. Glass jars Regular glass is too thin to be us...
Page 18 - COOKING POULTRY; COOKING MEAT
English - 18 Food Remove from oven After standing (10 MIN.) Beef Rare 135 °F 145 °F Medium 150 °F 160 °F Well Done 160 °F 170 °F Pork Medium 150 °F 160 °F Well Done 160 °F 170 °F Poultry Dark meat 170 °F 180 °F Light meat 160 °F 170 °F COOKING POULTRY Place the poultry on a microwave-safe roasting r...
Page 19 - COOKING SEAFOOD; COOKING EGGS; COOKING VEGETABLES; Beef and barley stew
English - 19 03 COOKW ARE GUIDE & COOKING GUIDE COOKING SEAFOOD Place the fish on a microwave-safe roasting rack in a microwave-safe dish. Use a tight cover to steam the fish. A lighter cover of wax paper or paper towel will decrease steaming. Cook the fish until it flakes easily with a fork. Do...
Page 20 - cleaning and; CLEANING THE EXTERIOR; Cleaning under your microwave oven; CLEANING THE INTERIOR
English - 20 Warm potato salad 2 lbs. small red potatoes, cut into ½-inch pieces 4 slices bacon (uncooked), cut into ½-inch pieces ¼ cup chopped onion 2 tsp. sugar 1 tsp. salt 1 tsp. flour ½ tsp. celery seed ⅛ tsp. pepper 2½ Tbs. apple cider vinegar 1. In a 2-quart casserole, combine the potatoes an...
Page 23 - REPLACING THE CHARCOAL FILTER; troubleshooting
English - 23 05 TROUBLESHOO TING REPLACING THE CHARCOAL FILTER If your oven is vented to the inside, the charcoal filter should be replaced every 6 to 12 months and more often if necessary. The charcoal filter cannot be cleaned. To order a new charcoal filter, contact the Parts Department at 1-800-6...
Page 24 - appendix; warranty; MICROWAVE OVEN; Limited warranty to original purchaser
English - 24 Problem Solution Vent Motor suction force is too weak. Set the vent mode to high. The Vent Fan will only operate in low speed mode while the microwave is working. Operating noise is too loud. The MWO makes noise during operation. This is normal. If you hear an abnormal sound continuousl...
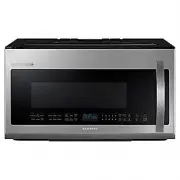
Page 27 - Horno de microondas; manual del usuario; imagine
Horno de microondas manual del usuario ME21H9900AS imagine las posibilidades Gracias por haber escogido este producto Samsung.
Page 28 - Significado de íconos y símbolos en este; información sobre; CONSERVE ESTAS INSTRUCCIONES
Español - 2 SÍMBOLOS Y PRECAUCIONES DE SEGURIDAD IMPORTANTES Significado de íconos y símbolos en este manual del usuario: ADVERTENCIA Peligros o procedimientos inseguros que pueden ocasionar graves lesiones en las personas e, incluso, provocar la muerte. PRECAUCIÓN Peligros o procedimientos inseguro...
Page 29 - ADVERTENCIA
Español - 3 INSTRUCCIONES DE SEGURIDAD IMPORTANTES Para reducir el riesgo de quemaduras, descargas eléctricas, incendio, lesiones o exposición a energía de microondas excesiva, respete las advertencias y precauciones que se indican a continuación. ADVERTENCIA ADVERTENCIA Para reducir el riesgo de qu...
Page 30 - Uso de los cables prolongadores; ADVERTENCIAS
Español - 4 INSTRUCCIONES DE CONEXIÓN A TIERRA Este electrodoméstico debe conectarse a tierra. En caso de cortocircuito, la conexión a tierra reduce el riesgo de descarga eléctrica ya que ofrece un cable de escape para la corriente eléctrica. Este electrodoméstico está equipado con un cable que incl...
Page 31 - PRECAUCIONES PARA LA
Español - 5 Si se daña el enchufe o el cable de alimentación, comuníquese con el centro de servicio técnico más cercano para solicitar un repuesto o una reparación. PRECAUCIÓN PRECAUCIONES PARA LA INSTALACIÓN Coloque el horno de manera tal que se pueda acceder al enchufe fácilmente. • No hacerlo pue...
Page 33 - contenido
Español - 7 contenido INSTALACIÓN DE SU HORNO DE MICROONDAS 8 8 Control de las piezas 8 Información sobre garantía y servicio técnico 8 Instalación de su horno de microondas 9 Características 9 Verificar el panel de control 10 Conectar el horno por primera vez 10 Configurar la hora 10 Seguro para ni...
Page 34 - CONTROL DE LAS PIEZAS
Español - 8 instalación de su horno de microondas Asegúrese de seguir estas instrucciones atentamente para que su nuevo horno de microondas funcione de manera adecuada. CONTROL DE LAS PIEZAS Desembale su horno de microondas con cuidado y asegúrese de haber recibido todas las piezas que se indican a ...
Page 35 - VERIFICAR EL PANEL DE CONTROL
Español - 9 01 INS TALACIÓN DE SU HORNO DE MICROOND AS Consulte la página 12 Consulte la página 14 Consulte la página 13 Consulte la página 15 Consulte la página 10-11 Consulte la página 16 Consulte la página 14 Pantalla Consulte la página 15 Consulte la página 10-11 Consulte la página 10 Consulte l...
Page 36 - Activación/Desactivación; uso del horno de
Español - 10 CONECTAR EL HORNO POR PRIMERA VEZ La primera vez que enchufe el cable de alimentación en un tomacorriente, la pantalla se encenderá después de cuatro segundos con el siguiente mensaje: PLEASE PRESS CLOCK AND SET TIME OF DAY (POR FAVOR OPRIMA CLOCK (RELOJ) Y CONFIGURE LA HORA DEL DÍA) . ...
Page 37 - BOTÓN DE AJUSTE DEL TEMPORIZADOR; DESACTIVAR PLATO GIRATORIO); ESTANTE METÁLICO; Recalentar alimentos; RECORDATORIO DE FILTRO
Español - 11 02 USO DEL HORNO DE MICROOND AS BOTÓN LED HI/LO/OFF (LED ALTA/BAJA/ APAGADA) El botón LED le permite seleccionar un ajuste de brillo para la luz de su horno de microondas. Presionar (veces) 1 2 3 LED Alto Bajo Desactivado BOTÓN DE AJUSTE DEL TEMPORIZADOR Puede programar el horno de micr...
Page 38 - BOTONES DE SENSOR COOKING (COCCIÓN CON SENSOR); Recipientes y tapas para la cocción con sensor; BOTÓN SENSOR REHEAT (RECALENTAMIENTO CON SENSOR)
Español - 12 BOTONES DE SENSOR COOKING (COCCIÓN CON SENSOR) Los botones Sensor Cooking (Cocción con sensor) comprenden configuraciones que se emplean frecuentemente, permitiéndole seleccionarlas rápida y cómodamente. Si los alimentos no se cocinan bien o se recalientan cuando usa la función de cocci...
Page 39 - BOTÓN AUTO DEFROST (DESCONGELAMIENTO AUTOMÁTICO); BOTÓN 1 POUND DEFROST (DESCONGELAMIENTO 1 LIBRA)
Español - 13 02 USO DEL HORNO DE MICROOND AS Tabla de recalentamiento con sensor Siga las instrucciones a continuación cuando recaliente distintos tipos de alimentos. Tipo de alimento Estándar Procedimiento Platos preparados 1 porción (1 plato) Utilice sólo alimentos precocidos, refrigerados. Cubra ...
Page 41 - TIEMPOS DE COCCIÓN Y NIVELES DE POTENCIA DEL MICROONDAS; Cocción en una sola etapa; Cocción multietapas
Español - 15 02 USO DEL HORNO DE MICROOND AS BOTÓN SNACKS (BOTANAS) 1. Presione el botón Snacks (Botanas). En la pantalla se verá SELECT 1 TO 4 (SELECCIONAR 1 A 4) . (Consulte la tabla de Botanas a continuación.) Presione los botones numéricos del 1 al 4 para seleccionar el menú. 2. Presione los bot...
Page 42 - RECIPIENTES Y UTENSILIOS APTOS PARA; Niveles de potencia; BOTÓN CUSTOM COOK
Español - 16 guía de recipientes y utensilios de cocina Al cocinar alimentos en el horno de microondas, las microondas deben ser capaces de penetrar en los alimentos sin que sean reflejadas o absorbidas por el recipiente.Es importante escoger los recipientes correctos, por lo tanto, busque recipient...
Page 43 - guía de cocción; SUGERENCIAS GENERALES PARA; Técnicas de cocción
Español - 17 03 GUÍA DE RECIPIENTES Y UTENSILIOS DE COCINA & GUÍA DE COCCIÓN Utensilio de cocina Comentarios Recipientes de vidrio Vajilla de mesa Puede utilizarse, a menos que esté decorada con un ribete de metal. Cristalería fina Puede utilizarse para calentar alimentos o líquidos. La cristale...
Page 44 - COCINAR CARNE DE AVE; COCINAR CARNE
Español - 18 Tipo de alimento Al sacarlo del horno Después del tiempo de reposo (10 MIN.) Carne de res Jugoso 135 °F 145 °F Media 150 °F 160 °F Cocida 160 °F 170 °F Carne de puerco Media 150 °F 160 °F Cocida 160 °F 170 °F Carne de ave Carne oscura 170 °F 180 °F Carne blanca 160 °F 170 °F COCINAR CAR...
Page 45 - COCINAR MARISCOS; COCINAR VERDURAS; Estofado de carne y cebada; Guisado de brócoli y queso
Español - 19 03 GUÍA DE RECIPIENTES Y UTENSILIOS DE COCINA & GUÍA DE COCCIÓN COCINAR MARISCOS Coloque el pescado sobre una asadera para microondas en una fuente para microondas. Utilice una cubierta ceñida para cocinar el pescado al vapor. Una cubierta más liviana de papel encerado o toalla de p...
Page 46 - Ensalada tibia de patatas; Sopa de frijoles negros; Limpieza y; LIMPIEZA DEL EXTERIOR; Limpieza debajo de su horno de microondas; LIMPIEZA DEL INTERIOR
Español - 20 Ensalada tibia de patatas 2 lb. de pequeñas patatas rojas, cortadas en trozos de ½ pulg. 4 rodajas de panceta (sin cocinar), cortadas en trozos de ½ pulg. ¼ taza de cebolla picada 2 cucharadas de azúcar 1 cucharada de sal 1 cucharada de harina ½ cucharada de semillas de apio ⅛ cucharada...
Page 49 - REEMPLAZO DEL FILTRO DE CARBÓN; guía de solución
Español - 23 05 GUÍA DE SOL UCIÓN DE PROBLEMAS REEMPLAZO DEL FILTRO DE CARBÓN Si su horno tiene ventilación hacia el interior, el filtro de carbón debe reemplazarse cada 6 a 12 meses, y más a menudo si es necesario. El filtro de carbónx 1-800-627-4368 o el distribuidor Samsung más cercano. También p...
Page 50 - apéndice; garantía; HORNO DE MICROONDAS SAMSUNG; Garantía limitada al comprador original
Español - 24 Problema Solución Provoca interferencias con la televisión o la radio. Esto es similar a la interferencia causada por otros artefactos pequeños, como, por ejemplo, los secadores de cabello. Aleje más su microondas (o electrodoméstico) de otros aparatos, como su TV o radio. La fuerza de ...


 Samsung CE1180GBR (UBR) (GWR)
User Manual
Samsung CE1180GBR (UBR) (GWR)
User Manual
 Samsung CE1185GBR (UBR) (GWR)
User Manual
Samsung CE1185GBR (UBR) (GWR)
User Manual
 Samsung CE745G
User Manual
Samsung CE745G
User Manual
 Samsung MC12J8035CT/AA
User Manual
Samsung MC12J8035CT/AA
User Manual
 Samsung MC17T8000CG/AA
User Manual
Samsung MC17T8000CG/AA
User Manual
 Samsung MC32K7058CT
User Manual
Samsung MC32K7058CT
User Manual
 Samsung MC455THRCBB
User Manual
Samsung MC455THRCBB
User Manual
 Samsung ME11A7510DG/AA
User Manual
Samsung ME11A7510DG/AA
User Manual
 Samsung ME11A7710DG/AA
User Manual
Samsung ME11A7710DG/AA
User Manual
 Samsung ME11CB751012
User Manual
Samsung ME11CB751012
User Manual
 Samsung ME16A4021AS/AA
User Manual
Samsung ME16A4021AS/AA
User Manual
 Samsung ME17R7021EG/AA
User Manual
Samsung ME17R7021EG/AA
User Manual
 Samsung ME19CB704112
User Manual
Samsung ME19CB704112
User Manual
 Samsung ME19R7041FG/AA
User Manual
Samsung ME19R7041FG/AA
User Manual
 Samsung ME21A706BQN/AA
User Manual
Samsung ME21A706BQN/AA
User Manual