Page 2 - GENERAL POWER TOOL SAFETY WARNINGS
2 - English WARNING R e a d a l l s a f e t y w a r n i n g s , i n s t r u c t i o n s , illustrations and specifications provided with this power tool. Failure to follow all instructions listed below may result in electric shock, fire and/ or serious injury. Save all warnings and instructions for ...
Page 4 - CIRCULAR SAW SAFETY WARNINGS
4 - English top surface of the wood causing the blade to climb out of the kerf and jump back toward the operator. Kickback is the result of saw misuse and/or incorrect operat- ing procedures or conditions and can be avoided by taking proper precautions as given below: Maintain a firm grip with bot...
Page 5 - SYMBOLS
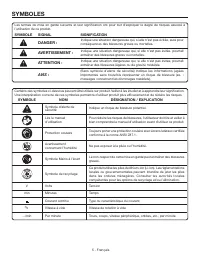
5 - English SYMBOLS Some of the following symbols may be used on this product. Please study them and learn their meaning. Proper interpretation of these symbols will allow you to operate the product better and safer. SYMBOL NAME DESIGNATION/EXPLANATION Safety Alert Indicates a potential personal inj...
Page 6 - FEATURES; SPECIFICATIONS; ASSEMBLY; INSTALLING/REMOVING THE BLADE; PRODUCT SPECIFICATIONS
6 - English FEATURES SPECIFICATIONS Blade Diameter ....................................... 7-1/4 in. (184 mm)Blade Arbor ...............................Diamond (Bolt-LH Combo)Cutting Depth at 0° ................................................. 2-1/2 in. Cutting Depth at 45° ...........................
Page 7 - APPLICATIONS
7 - English ASSEMBLY Retract the lower guard into the upper guard, making sure the lower guard spring works properly, allowing the guard to move freely. Check to see that the saw teeth and arrow on the saw blade and the arrow on the lower guard are pointing in the same direction. NOTE: The saw t...
Page 8 - OPERATION; INSTALLING/REMOVING THE BATTERY PACK
8 - English OPERATION INSTALLING/REMOVING THE BATTERY PACK See Figure 3, page 14. Insert the battery pack into the product as shown. Make sure the latches on each side of the battery pack snap into place and the battery pack is secured in the saw before beginning operation. Depress the latches...
Page 9 - SETTING BLADE DEPTH
9 - English OPERATION WARNING: When using the saw, always stay alert and exercise control. Do not remove the saw from the workpiece while the blade is moving. SETTING BLADE DEPTH See Figure 9, page 15. Always keep correct blade depth setting. The correct blade depth setting for all cuts should not e...
Page 10 - RIP CUTTING; BEVEL CUTTING; SETTING THE BEVEL ANGLE; POCKET CUTTING
10 - English OPERATION NOTE: The distance from the line of cut to the guideline is the amount you should offset the guide. RIP CUTTING See Figure 14, page 15. Use a guide when making long or wide rip cuts with the saw. To rip cut using optional edge guide (sold separately): Secure the workpiece. ...
Page 11 - ADJUSTING THE DEPTH LOCK LEVER; USING THE RAFTER HOOK
11 - English OPERATION ADJUSTMENTS ADJUSTING THE DEPTH LOCK LEVER See Figure 21, page 16. Over time, due to wear, the depth lock lever may move from its original setting. If the lever prematurely contacts any part of the saw during tightening and loosening, adjust the lever by following these steps:...
Page 12 - MAINTENANCE; GENERAL MAINTENANCE; ADJUSTING THE BASE; ADJUSTMENTS
12 - English MAINTENANCE WARNING: When servicing use only identical replacement parts. Use of any other parts may create a hazard or cause product damage. WARNING: Always wear eye protection with side shields marked to comply with ANSI Z87.1. Failure to do so could result in objects being thrown int...
Page 13 - ACCESSORIES; NOTE: ILLUSTRATIONS START ON PAGE 14 AFTER; This product has a 90-Day Satisfaction Guarantee Policy,; TROUBLESHOOTING; LED LIGHT FUNCTIONS
13 - English Look for these accessories where you purchased this product: Edge Guide ...................................................................................................................................................... 690119004 Edge Guide Knob .................................
Page 15 - UTILISATION ET ENTRETIEN DE LA PILE; AVERTISSEMENTS DE SÉCURITÉ RELATIFS SCIE CIRCULAIRE; MÉTHODE DE COUPE
3 - Français AVERTISSEMENTS DE SÉCURITÉ GÉNÉRALES RELATIVES AUX OUTILS ÉLECTRIQUES Garder les outils bien affûtés et propres. Des outils correctement entretenus et dont les tranchants sont bien affûtés risquent moins de se bloquer et sont plus faciles à contrôler. Utiliser l’outil, les accessoir...
Page 16 - RÈGLES SUPPLÉMENTAIRES DE SÉCUIRITÉ
4 - Français AVERTISSEMENTS DE SÉCURITÉ RELATIFS SCIE CIRCULAIRE Tenir fermement la scie avec les deux mains et positionner les bras de manière à pouvoir résister aux rebonds. Se tenir d’un côté de lame, et non dans la trajectoire de celle-ci. Le rebond peut causer un recul brutal de la scie, mais...
Page 17 - SYMBOLES
5 - Français SYMBOLES Certains des symboles ci-dessous peuvent être utilisés sur produit. Veiller à les étudier et à apprendre leur signification. Une interprétation correcte de ces symboles permettra d’utiliser produit plus efficacement et de réduire les risques. SYMBOLE NOM DÉSIGNATION / EXPLICATI...
Page 18 - CARACTÉRISTIQUES; FICHE TECHNIQUE; ASSEMBLAGE; INSTALLATION/RETRAIT DE LA LAME
6 - Français CARACTÉRISTIQUES FICHE TECHNIQUE Diamètre de la lame................................184 mm (7-1/4 po)Axe de lame ........ Losange (Boulon combiné pas à gauche)Profondeur de coupe à 0° .....................63,5 mm (2-1/2 po) Profondeur de coupe à 45° .............46,03 mm (1-13/16 po)Pro...
Page 19 - UTILISATION
7 - Français ASSEMBLAGE Serrer fermement le boulon de lame en le tournant vers la droite, à l’aide de la clé. Ne pas trop serrer. NOTE : Ne jamais utiliser une lame trop épaisse pour permettre à la rondelle à collerette inférieure de s’engager sur les méplats de la broche. Pour retirer la lame : ...
Page 20 - LAMES DE SCIE; SYSTÈME DE GARDE DE LAME
8 - Français UTILISATION Relâcher les loquets pour retirer le bloc-pile. Pour prendre connaissance des consignes de chargement, consulter le manuel d’utilisation des piles et des chargeurs. AVERTISSEMENT : L e s o u t i l s à p i l e s s o n t t o u j o u r s e n é t a t d e fonctionnement. Il est...
Page 21 - RÉGLAGE DE LA PROFONDEUR DE COUPE; LAMPE DEL
9 - Français UTILISATION AVERTISSEMENT : Lors de l’utilisation, toujours être attentif et en contrôle de la scie. Ne pas retirer la scie de la pièce avant arrêt complet de la lame. RÉGLAGE DE LA PROFONDEUR DE COUPE Voir la figure 9, page 15. Toujours maintenir un réglage de profondeur de coupe corre...
Page 22 - D’ARRÊT DU BISEAU À 0°
10 - Français UTILISATION COUPE EN LONG Voir le figure 14, page 15. Utilisez le guide de chant pour effectuer des refentes très longues ou larges, avec votre scie. Pour effectuer une coupe rectiligne en utilisant un guide de chant en option : Fixez la pièce. Installer le guide de bordure dans la...
Page 23 - UTILISER LE CROCHET POUR CHEVRONS; RÉGLAGES
11 - Français Régler l’angle de biseau sur zéro. Régler la lame sur la profondeur de coupe correcte, en fonction du matériau à couper. Relever la garde de lame inférieure au moyen de la poignée de rétraction. NOTE : Toujours utiliser la poignée pour relever la garde de lame inférieure, pour év...
Page 24 - ENTRETIEN; RÉGLAGE LE LEVIER DE BLOCAGE DE BISEAU; RÉGLAGE DE LA BASE
12 - Français ENTRETIEN AVERTISSEMENT : Utiliser exclusivement des pièces d’origine pour les réparations. L’usage de toute autre pièce pourrait créer une situation dangereuse ou endommager l’outil. AVERTISSEMENT : Toujours porter une protection oculaire certifiée conforme à la norme ANSI Z87.1. Si c...
Page 25 - ACCESSOIRES; NOTE: ILLUSTRATIONS COMMENÇANT; DÉPANNAGE; FONCTIONS DES TÉMOINS DEL; GÉNÉRALITÉS
13 - Français ACCESSOIRES Pour obtenir ces accessoires, s’adresser au revendeur après duquel vous avez acheté ce produit. Guide de chant .................................................................................................................................................690119004 Bo...
Page 26 - ADVERTENCIAS DE SEGURIDAD GENERALES PARA DE
2 - Español ADVERTENCIA L e a t o d a s l a s a d v e r t e n c i a s , i n s t r u c c i o n e s , ilustraciones y especificaciones proporcionadas con esta herramienta eléctrica. No seguir las instrucciones indicadas a continuación puede provocar descargas eléctricas, incendios o lesiones graves. G...
Page 28 - ADVERTENCIAS DE SEGURIDAD PARA SIERRA CIRCULAR
4 - Español El mal uso de la sierra ocasionará un contragolpe y/o de procedimientos o condiciones de trabajo incorrectas, y puede evitarse tomando las medidas de precaución adecuadas, como las señalas abajo: Sujete firmemente la sierra con ambas manos y coloque sus brazos de manera tal que resista...
Page 29 - SÍMBOLOS; SÍMBOLO
5 - Español SÍMBOLOS Es posible que se empleen en este producto algunos de los siguientes símbolos. Le suplicamos estudiarlos y aprender su significado. Una correcta interpretación de estos símbolos le permitirá utilizar mejor y de manera más segura el producto. SÍMBOLO NOMBRE DENOMINACIÓN/EXPLICACI...
Page 30 - CARACTERÍSTICAS; ESPECIFICACIONES; DESEMPAQUETADO; ARMADO; MONTAJE/REMOCIÓN DE LA HOJA
6 - Español CARACTERÍSTICAS ESPECIFICACIONES Diámetro de la hoja ................................ 184 mm (7-1/4 pulg.) Árbol de la hoja de corte ............................................ Rómbico (comb. c/ perno de rosca izq.) Profundidad de corte a 0° .................... 63,5 mm (2-1/2 pulg.) Pr...
Page 31 - USOS
7 - Español Apriete firmemente el perno de la hoja; para ello, gírelo hacia la izquierda con la llave de tuercas. No aplique un apriete excesivo. NOTA: Nunca utilice una hoja tan gruesa que no permita acoplar la arandela de brida exterior en la parte plana del husillo. Para quitar la hoja: Reti...
Page 32 - FUNCIONAMIENTO; HOJAS DE LA SIERRA
8 - Español FUNCIONAMIENTO INSTALACIÓN/DESMONTAR DEL PAQUETE DE BATERÍAS Vea la figura 3, página 14. Coloque el paquete de baterías en el producto como se muestra. Asegúrese de que los pestillos situados en ambos lados del paquete de baterías entren completamente en su lugar con un chasquido y d...
Page 33 - AJUSTE DE LA PROFUNDIDAD DE LA HOJA; LUZ LED
9 - Español FUNCIONAMIENTO Inspeccione la pieza de trabajo para ver si contiene nudos o clavos antes de empezar a cortar. Nunca corte nudos ni clavos. Corte en línea recta. Siempre utilice una guía recta al efectuar cortes al hilo. Esto ayuda a evitar el torcimiento de la hoja. Use hojas limpi...
Page 35 - CORTE EN CAVIDAD; USO DEL GANCHO PARA VIGA; AJUSTES
11 - Español FUNCIONAMIENTO CORTE EN CAVIDAD Vea la figura 18, página 16. ADVERTENCIA: Siempre ajuste el ángulo de biselado a cero antes de efectuar un corte en cavidad. Si se intenta efectuar un corte en cavidad a cualquier otro ángulo puede producirse una pérdida de control de la sierra, y por con...
Page 36 - MANTENIMIENTO; CÓMO AJUSTAR LA BASE
12 - Español MANTENIMIENTO ADVERTENCIA: Para el servicio de la unidad sólo utilice piezas de repuesto idénticas. El empleo de piezas diferentes puede causar un peligro o dañar el producto. ADVERTENCIA: Siempre póngase protección ocular con la marca de cumplimiento de la norma ANSI Z87.1. Si no cumpl...
Page 37 - ACCESORIOS; FUNCIONES DE LAS LUCES LED; MANTENIMIENTO GENERAL
13 - Español Busque estos accesorios donde adquirió este producto. Guía para cantos ........................................................................................................................................................690119004 Perilla de la guía para cantos ..................
Page 44 - OPERATOR’S MANUAL; SCIE CIRCULAIRE À POIGNÉE ARRIÈRE DE 18 V DE 18,42 CM; Customer Service Information:; Información sobre servicio al consumidor:
999000016 6-20-22 (REV:02) OPERATOR’S MANUAL MANUEL D’UTILISATIONMANUAL DEL OPERADOR 7-1/4 in. 18 V REAR HANDLE CIRCULAR SAW 184 mm (7-1/4 po) 18 V SCIE CIRCULAIRE À POIGNÉE ARRIÈRE 184 mm (7-1/4 pulg.) SIERRA CIRCULAR CON MANGO TRASERO R8658 SCIE CIRCULAIRE À POIGNÉE ARRIÈRE DE 18 V DE 18,42 CM SIE...