Page 2 - Contents; Installation and Configuration
Contents 1. Product Overview About the TS-x62 and TS-x64.................................................................................................................................... 3 Hardware specifications.........................................................................................
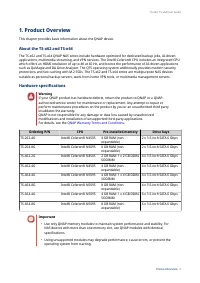
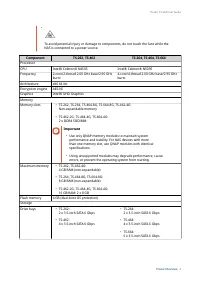
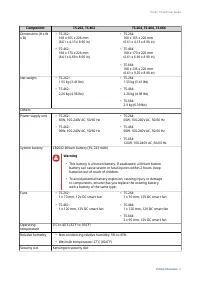
Page 4 - Hardware specifications; Warning; QNAP Warranty Terms and Conditions; CPU
1. Product Overview This chapter provides basic information about the QNAP device. About the TS-x62 and TS-x64 The TS-x62 and TS-x64 QNAP NAS series include hardware optimized for dedicated backup jobs, AI-driven applications, multimedia streaming, and VPN services. The Intel® Celeron® CPU includes ...
Page 8 - Tip; Package contents; Item; Components
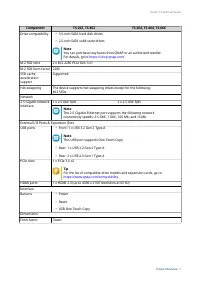
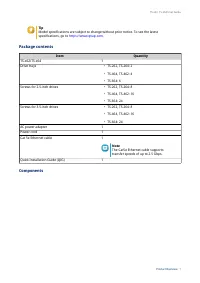
Tip Model specifications are subject to change without prior notice. To see the latest specifications, go to https://www.qnap.com . Package contents Item Quantity TS-x62/TS-x64 1 Drive trays • TS-262, TS-264: 2 • TS-464, TS-462: 4 • TS-664: 6 Screws for 2.5-inch drives • TS-262, TS-264: 8 • TS-464, ...
Page 9 - Front panel; Component
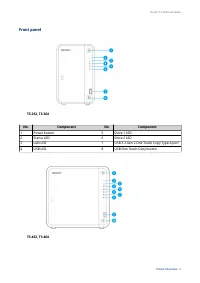
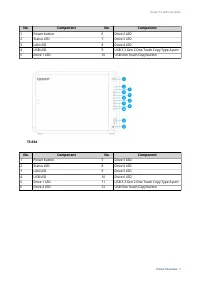
Front panel TS-262, TS-264 No. Component No. Component 1 Power button 5 Drive 1 LED 2 Status LED 6 Drive 2 LED 3 LAN LED 7 USB 3.2 Gen 2 One Touch Copy Type-A port 4 USB LED 8 USB One Touch Copy button TS-462, TS-464 TS-x62, TS-x64 User Guide Product Overview 8
Page 11 - Rear panel
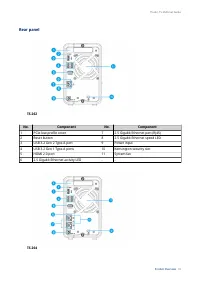
Rear panel TS-262 No. Component No. Component 1 PCIe low-profile cover 7 2.5 Gigabit Ethernet port (RJ45) 2 Reset button 8 2.5 Gigabit Ethernet speed LED 3 USB 3.2 Gen 2 Type-A port 9 Power input 4 USB 3.2 Gen 1 Type-A ports 10 Kensington security slot 5 HDMI 2.0 port 11 System fan 6 2.5 Gigabit Eth...
Page 14 - System board
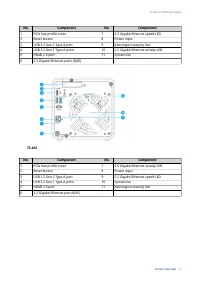
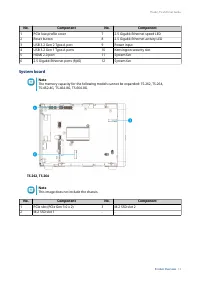
No. Component No. Component 1 PCIe low-profile cover 7 2.5 Gigabit Ethernet speed LED 2 Reset button 8 2.5 Gigabit Ethernet activity LED 3 USB 3.2 Gen 2 Type-A port 9 Power input 4 USB 3.2 Gen 1 Type-A ports 10 Kensington security slot 5 HDMI 2.0 port 11 System fan 6 2.5 Gigabit Ethernet ports (RJ45...
Page 15 - Note; This image does not include the chassis.; Memory slot 1; Front drive numbering
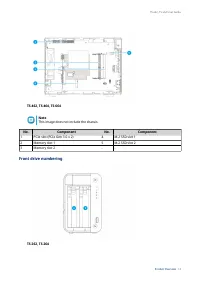
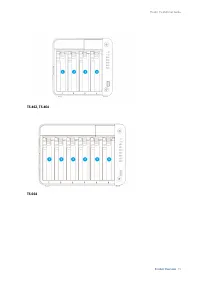
TS-462, TS-464, TS-664 Note This image does not include the chassis. No. Component No. Component 1 PCIe slot (PCIe Gen 3.0 x 2) 4 M.2 SSD slot 1 2 Memory slot 1 5 M.2 SSD slot 2 3 Memory slot 2 - - Front drive numbering TS-262, TS-264 TS-x62, TS-x64 User Guide Product Overview 14
Page 17 - Network port numbering
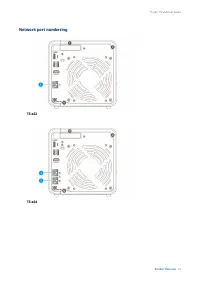
Network port numbering TS-x62 TS-x64 TS-x62, TS-x64 User Guide Product Overview 16
Page 18 - USB port numbering; Front USB Ports; Safety information; carefully before performing any operation.; General Instructions
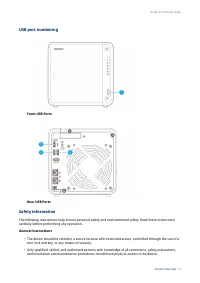
USB port numbering Front USB Ports Rear USB Ports Safety information The following instructions help ensure personal safety and environmental safety. Read these instructions carefully before performing any operation. General Instructions • The device should be stored in a secure location with restri...
Page 20 - Category; Setting up the NAS; Important; Installation requirements; Connect the power cord and all applicable cables.; QTS installation
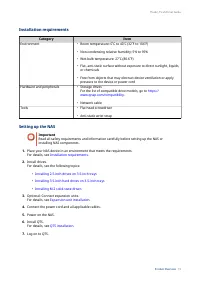
Installation requirements Category Item Environment • Room temperature: 0˚C to 40˚C (32˚F to 104˚F) • Non-condensing relative humidity: 5% to 95% • Wet-bulb temperature: 27˚C (80.6˚F) • Flat, anti-static surface without exposure to direct sunlight, liquids, or chemicals • Free from objects that may ...
Page 21 - Hardware installation; • Installing a drive deletes all data on the drive.; a. Locate the locking mechanism on the left side of the NAS.
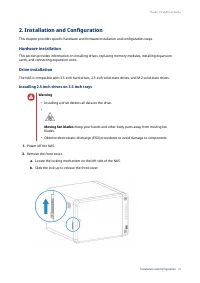
2. Installation and Configuration This chapter provides specific hardware and firmware installation and configuration steps. Hardware installation This section provides information on installing drives, replacing memory modules, installing expansion cards, and connecting expansion units. Drive insta...
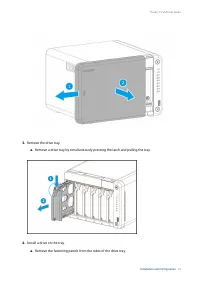
Page 22 - c. Slide the front cover to the left and then pull.
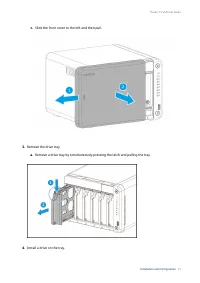
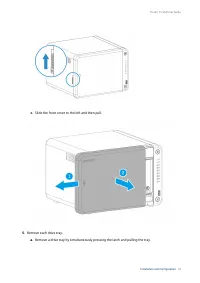
c. Slide the front cover to the left and then pull. 3. Remove the drive tray. a. Remove a drive tray by simultaneously pressing the latch and pulling the tray. 4. Install a drive on the tray. TS-x62, TS-x64 User Guide Installation and Configuration 21
Page 23 - on the bottom of the tray.
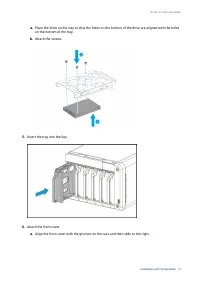
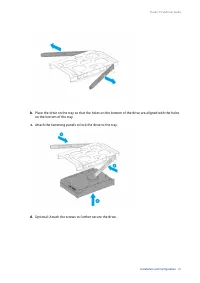
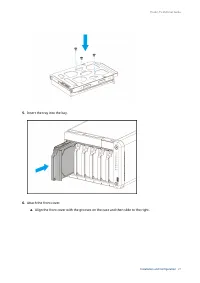
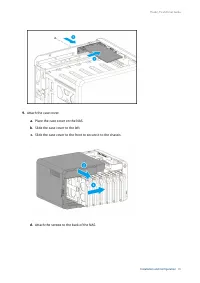
a. Place the drive on the tray so that the holes on the bottom of the drive are aligned with the holes on the bottom of the tray. b. Attach the screws. 5. Insert the tray into the bay. 6. Attach the front cover. a. Align the front cover with the grooves on the case and then slide to the right. TS-x6...
Page 26 - a. Remove the fastening panels from the sides of the drive tray.
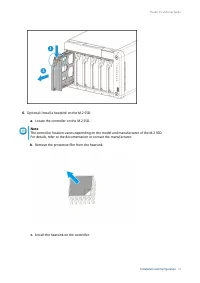
3. Remove the drive tray. a. Remove a drive tray by simultaneously pressing the latch and pulling the tray. 4. Install a drive on the tray. a. Remove the fastening panels from the sides of the drive tray. TS-x62, TS-x64 User Guide Installation and Configuration 25
Page 27 - c. Attach the fastening panels to lock the drive to the tray.
b. Place the drive on the tray so that the holes on the bottom of the drive are aligned with the holes on the bottom of the tray. c. Attach the fastening panels to lock the drive to the tray. d. Optional: Attach the screws to further secure the drive. TS-x62, TS-x64 User Guide Installation and Confi...
Page 29 - instructions can result in serious injury or death.
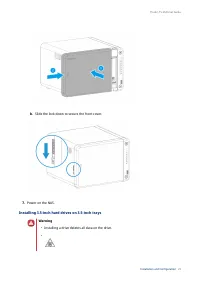
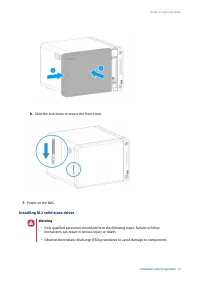
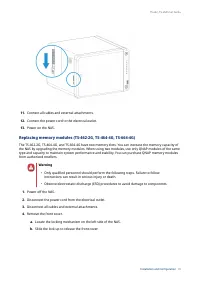
b. Slide the lock down to secure the front cover. 7. Power on the NAS. Installing M.2 solid-state drives Warning • Only qualified personnel should perform the following steps. Failure to follow instructions can result in serious injury or death. • Observe electrostatic discharge (ESD) procedures to ...
Page 30 - efficiency and to ensure consistent performance.; Disconnect the power cord from the electrical outlet.
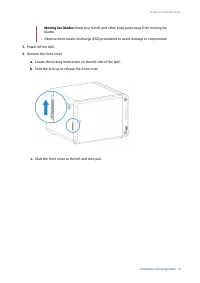
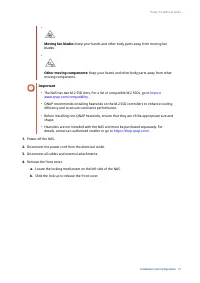
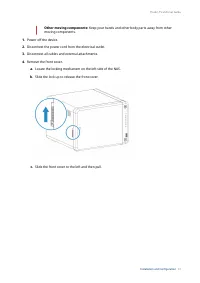
• Moving fan blades: Keep your hands and other body parts away from moving fan blades. • Other moving components: Keep your hands and other body parts away from other moving components. Important • The NAS has two M.2 SSD slots. For a list of compatible M.2 SSDs, go to https:// www.qnap.com/compatib...
Page 33 - The following installation images do not include the chassis.
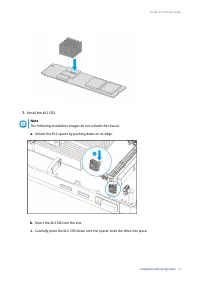
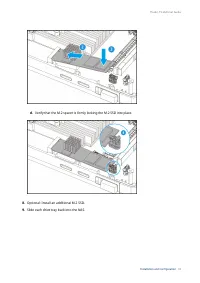
7. Install the M.2 SSD. Note The following installation images do not include the chassis. a. Unlock the M.2 spacer by pushing down on its edge. b. Insert the M.2 SSD into the slot. c. Carefully press the M.2 SSD down until the spacer locks the drive into place. TS-x62, TS-x64 User Guide Installatio...
Page 34 - Slide each drive tray back into the NAS.
d. Verify that the M.2 spacer is firmly locking the M.2 SSD into place. 8. Optional: Install an additional M.2 SSD. 9. Slide each drive tray back into the NAS. TS-x62, TS-x64 User Guide Installation and Configuration 33
Page 35 - b. Slide the lock down to secure the front cover.
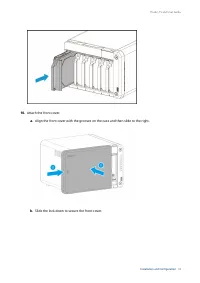
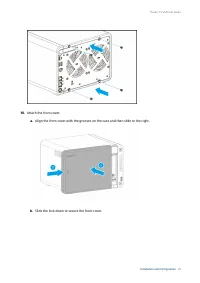
10. Attach the front cover. a. Align the front cover with the grooves on the case and then slide to the right. b. Slide the lock down to secure the front cover. TS-x62, TS-x64 User Guide Installation and Configuration 34
Page 39 - • Do not bend the module.; a. Align the notch with the ridge in the slot.
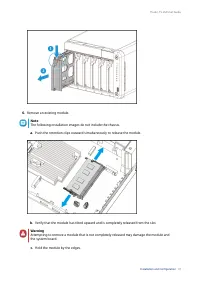
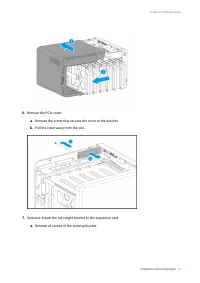
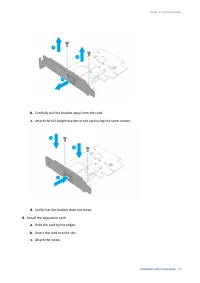
d. Carefully slide the module out of the slot. Warning • Do not touch the internal components, particularly the metal connectors. • Do not bend the module. 7. Install a new module. a. Align the notch with the ridge in the slot. b. Insert the module into the slot. c. Verify that the metal connectors ...
Page 41 - Installing expansion cards; website are shipped with the brackets necessary to fit this NAS.
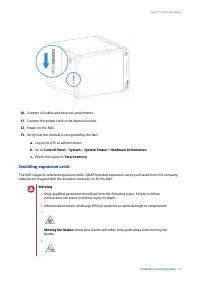
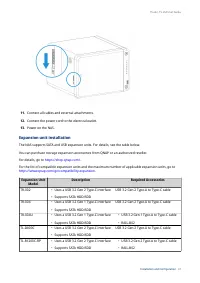
10. Connect all cables and external attachments. 11. Connect the power cord to the electrical outlet. 12. Power on the NAS. 13. Verify that the module is recognized by the NAS. a. Log on to QTS as administrator. b. Go to Control Panel > System > System Status > Hardware Information . c. Che...
Page 48 - Expansion unit installation; • Supports SATA HDD/SDD
11. Connect all cables and external attachments. 12. Connect the power cord to the electrical outlet. 13. Power on the NAS. Expansion unit installation The NAS supports SATA and USB expansion units. For details, see the table below. You can purchase storage expansion accessories from QNAP or an auth...
Page 49 - Connecting USB expansion units
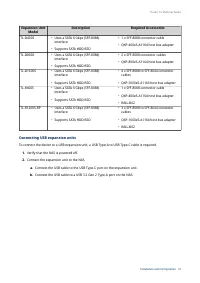
Expansion Unit Model Description Required Accessories TL-D400S • Uses a SATA 6 Gbps (SFF-8088) interface • Supports SATA HDD/SSD • 1 x SFF-8088 connector cable • QXP-400eS-A1164 host bus adapter TL-D800S • Uses a SATA 6 Gbps (SFF-8088) interface • Supports SATA HDD/SSD • 2 x SFF-8088 connector cable...
Page 50 - Connecting SATA expansion units; Expansion unit; Install a host bus adapter on the PCIe slot.
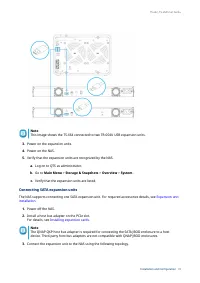
Note This image shows the TS-664 connected to two TR-004U USB expansion units. 3. Power on the expansion units. 4. Power on the NAS. 5. Verify that the expansion units are recognized by the NAS. a. Log on to QTS as administrator. b. Go to Main Menu > Storage & Snapshots > Overview > Sys...
Page 51 - Initializing QTS using
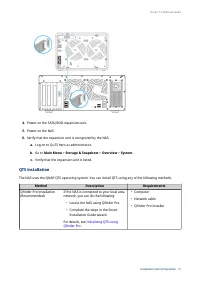
4. Power on the SATA JBOD expansion unit. 5. Power on the NAS. 6. Verify that the expansion unit is recognized by the NAS. a. Log on to QuTS hero as administrator. b. Go to Main Menu > Storage & Snapshots > Overview > System . c. Verify that the expansion unit is listed. QTS installatio...
Page 52 - Initializing QTS using Qfinder Pro
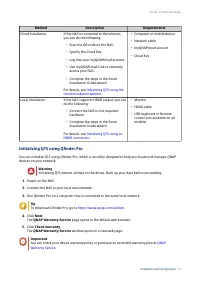
Method Description Requirements Cloud installation If the NAS is connected to the internet, you can do the following: • Scan the QR code on the NAS. • Specify the Cloud Key. • Log into your myQNAPcloud account. • Use myQNAPcloud Link to remotely access your NAS. • Complete the steps in the Smart Ins...
Page 55 - Initializing QTS using the cloud installation website
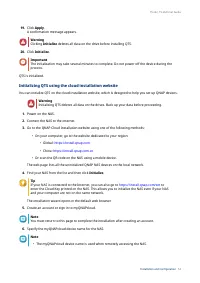
19. Click Apply. A confirmation message appears. Warning Clicking Initialize deletes all data on the drive before installing QTS. 20. Click Initialize. Important The initialization may take several minutes to complete. Do not power off the device during the process. QTS is initialized. Initializing ...
Page 58 - Initializing QTS using an HDMI connection
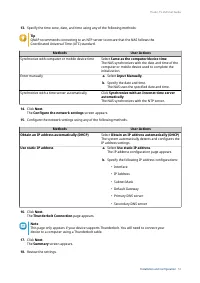
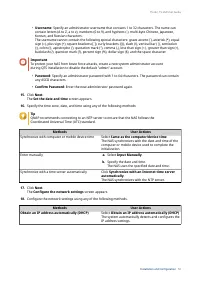
Methods User Actions Use static IP address a. Select Use static IP address. The IP address configuration page appears. b. Specify the following IP address configurations: • Interface • IP Address • Subnet Mask • Default Gateway • Primary DNS server • Secondary DNS server 19. Click Next. The Thunderb...
Page 61 - USB One Touch Copy button; Hybrid Backup Sync; LEDs; System Status LED
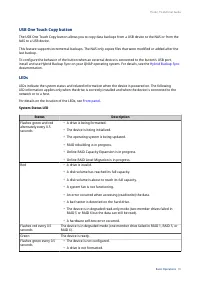
USB One Touch Copy button The USB One Touch Copy button allows you to copy data backups from a USB device to the NAS or from the NAS to a USB device. This feature supports incremental backups. The NAS only copies files that were modified or added after the last backup. To configure the behavior of t...
Page 63 - Audio alerts; Duration
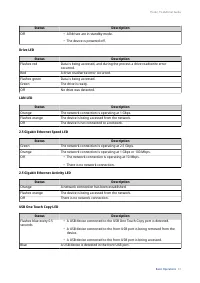
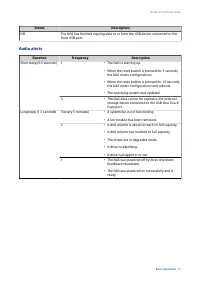
Status Description Off The NAS has finished copying data to or from the USB device connected to the front USB port. Audio alerts Duration Frequency Description Short beep (0.5 seconds) 1 • The NAS is starting up. • When the reset button is pressed for 3 seconds, the NAS resets configurations. • When...
Page 64 - NAS migration requirements; Migrating NAS data using HBS 3; Status and setting changes after NAS migration
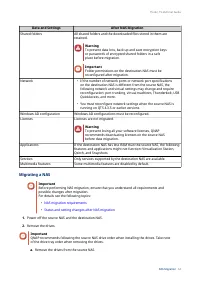
4. NAS Migration You can migrate data and settings from your current NAS to another NAS model with minimal disruptions by installing all the hard drives from the source NAS to the destination NAS. RAID configuration and other settings are retained on the destination NAS after migration. NAS migratio...
Page 65 - Migrating a NAS
Data and Settings After NAS Migration Shared folders All shared folders and the downloaded files stored in them are retained. Warning To prevent data loss, back up and save encryption keys or passwords of encrypted shared folders in a safe place before migration. Important Folder permissions on the ...
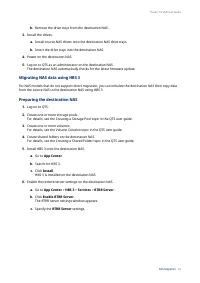
Page 66 - from the source NAS to the destination NAS using HBS 3.; Preparing the destination NAS; For details, see the Volume Creation topic in the QTS user guide.
b. Remove the drive trays from the destination NAS. 3. Install the drives. a. Install source NAS drives onto the destination NAS drive trays. b. Insert the drive trays into the destination NAS. 4. Power on the destination NAS. 5. Log on to QTS as an administrator on the destination NAS. The destinat...
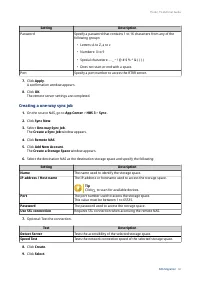
Page 67 - Creating a one-way sync job
Setting Description Password Specify a password that contains 1 to 16 characters from any of the following groups: • Letters: A to Z, a to z • Numbers: 0 to 9 • Special characters: . - _ ~ ! @ # $ % ^ & ( ) { } • Does not start or end with a space. Port Specify a port number to access the RTRR s...
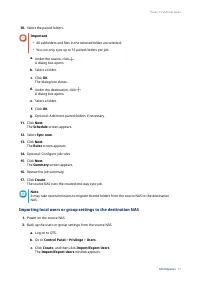
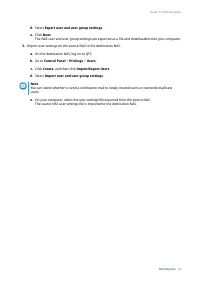
Page 68 - Importing local users or group settings to the destination NAS; Back up the users or group settings from the source NAS.
10. Select the paired folders. Important • All subfolders and files in the selected folder are selected. • You can only sync up to 16 paired folders per job. a. Under the source, click . A dialog box opens. b. Select a folder. c. Click OK. The dialog box closes. d. Under the destination, click . A d...
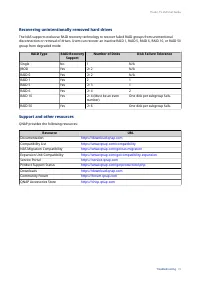
Page 70 - Rebuilding
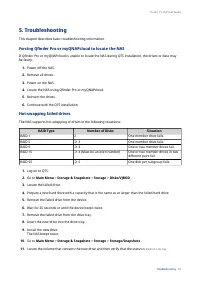
5. Troubleshooting This chapter describes basic troubleshooting information. Forcing Qfinder Pro or myQNAPcloud to locate the NAS If Qfinder Pro or myQNAPcloud is unable to locate the NAS during QTS installation, the drives or data may be faulty. 1. Power off the NAS. 2. Remove all drives. 3. Power ...
Page 74 - GNU General Public License; Preamble; modify it: responsibilities to respect the freedom of others.; Terms and Conditions; “This License” refers to version 3 of the GNU General Public License.
Other company names and products mentioned herein are trademarks or registered trademarks of their respective holders. GNU General Public License Version 3, 29 June 2007 Everyone is permitted to copy and distribute verbatim copies of this license document, but changing it is not allowed. Preamble Th...
Page 80 - Use with the GNU Affero General Public License.; differ in detail to address new problems or concerns.
have actual knowledge that, but for the patent license, your conveying the covered work in a country, or your recipient's use of the covered work in a country, would infringe one or more identifiable patents in that country that you have reason to believe are valid. If, pursuant to or in connection ...
Page 81 - Interpretation of Sections 16 and 17.; CE notice; FCC Class B Notice
PROVIDE THE PROGRAM “AS IS” WITHOUT WARRANTY OF ANY KIND, EITHER EXPRESSED OR IMPLIED, INCLUDING, BUT NOT LIMITED TO, THE IMPLIED WARRANTIES OF MERCHANTABILITY AND FITNESS FOR A PARTICULAR PURPOSE. THE ENTIRE RISK AS TO THE QUALITY AND PERFORMANCE OF THE PROGRAM IS WITH YOU. SHOULD THE PROGRAM PROVE...
Page 82 - • Reorient or relocate the receiving antenna.; VCCI notice; VCCI–B; BSMI notice
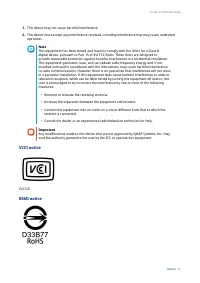
1. This device may not cause harmful interference. 2. This device must accept any interference received, including interference that may cause undesired operation. Note This equipment has been tested and found to comply with the limits for a Class B digital device, pursuant to Part 15 of the FCC Rul...
Page 83 - 部件名称
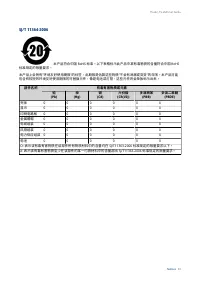
SJ/T 11364-2006 本产品符合中国 RoHS 标准。以下表格标示此产品中某有毒物质的含量符合中国 RoHS 标准规定的限量要求。 本产品上会附有 ” 环境友好使用期限 ” 的标签,此期限是估算这些物质 ” 不会有泄漏或突变 ” 的年限。本产品可能 包含有较短的环境友好使用期限的可替换元件,像是电池或灯管,这些元件将会单独标示出来。 部件名称 有毒有害物质或元素 铅 (Pb) 汞 (Hg) 镉 (Cd) 六价铬 (CR(VI)) 多溴联苯 (PBB) 多溴二苯醚 (PBDE) 壳体 0 0 0 0 0 0 显示 0 0 0 0 0 0 印刷电路板 0 0 0 0 0 0 金属螺帽 0...


 QNap HS-264-8G (2.5GbE, HDMI, Gen2)
User Manual
QNap HS-264-8G (2.5GbE, HDMI, Gen2)
User Manual
 QNap TS-231K
User Manual
QNap TS-231K
User Manual
 QNap TS-251D-2G
User Manual
QNap TS-251D-2G
User Manual
 QNap TS-253D-4G
User Manual
QNap TS-253D-4G
User Manual
 QNap TS-328
User Manual
QNap TS-328
User Manual
 QNap TS-364-4G (2.5GbE, HDMI)
User Manual
QNap TS-364-4G (2.5GbE, HDMI)
User Manual
 QNap TS-431K
User Manual
QNap TS-431K
User Manual
 QNap TS-873AeU-4G
User Manual
QNap TS-873AeU-4G
User Manual