Philips HS8420 - Manuals
Philips HS8420 Electric Shaver – Manual in PDF format online.
Manuals:
Manual Philips HS8420


Summary
4. Keep the razor and cord away from heated surfaces. 5 Never drop or insert any object into any opening. 6. Do not charge razor or plug in charging stand outdoors or operate where aerosol (spray) products are being used or where oxygen is being administered. 7. Do not use this razor with a damaged ...
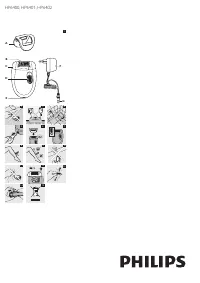
7 Table of Contents Features .........................................................8-9Important ....................................................... 10Introduction ................................................. 10Before First Use ..................................... 10-11Charging Indicatio...
8 9 features NIvEA FoR MEN Shaving Conditioner Dispensing System Shaving Unit Quick Clean System Individually Floating Heads Shaving Conditioner Release Button Electronic on/off Button LED Charge & Low Battery Indicator ENGLISH ENGLISH How the Unique Philips Norelco Lift and Cut Shaving System M...
Philips Electric Shavers Manuals
-
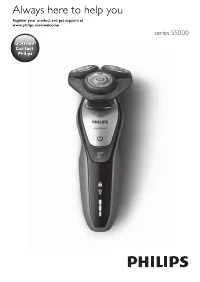 Philips 5000 S5630/12
User Manual
Philips 5000 S5630/12
User Manual
-
 Philips AT610
User Manual
Philips AT610
User Manual
-
Philips AT620
User Manual
-
 Philips BRE610/00
User Manual
Philips BRE610/00
User Manual
-
 Philips BRE650/00
User Manual
Philips BRE650/00
User Manual
-
 Philips BRI950
User Manual
Philips BRI950
User Manual
-
Philips BRI953
User Manual
-
Philips BRI954
User Manual
-
Philips BRI956
User Manual
-
Philips BRI959
User Manual
-
 Philips BT7201
User Manual
Philips BT7201
User Manual
-
 Philips HP2840/11
User Manual
Philips HP2840/11
User Manual
-
 Philips HP6401/01
User Manual
Philips HP6401/01
User Manual
-
 Philips HP6420/00
User Manual
Philips HP6420/00
User Manual
-
 Philips HP6427/12
User Manual
Philips HP6427/12
User Manual
-
 Philips HP6437
User Manual
Philips HP6437
User Manual
-
 Philips HP6455/00
User Manual
Philips HP6455/00
User Manual
-
Philips HP6459/00
User Manual
-
 Philips HP6461/00
User Manual
Philips HP6461/00
User Manual
-
 Philips HP6479/00
User Manual
Philips HP6479/00
User Manual