Page 2 - introduction; Extra Fresh Shaving Gel; important; EnglisH
4 introduction The shaver comes with two different kinds of NIVEA FOR MEN car tridges: Extra Fresh Shaving Gel for a fresh sensation during and after shaving and Moisturising Shaving Lotion for sensitive skin. This gives you the oppor tunity to tr y them out and discover which one suits your skin ty...
Page 4 - according to scientific evidence available today.; charging
Electromagnetic fields (EMF) This Philips appliance complies with all standards regarding electromagnetic fields (EMF). If handled properly and in accordance with the instructions in this user manual, the appliance is safe to use according to scientific evidence available today. charging Charging ta...
Page 5 - charged.You can then leave the appliance in the; Cordless shaving time; are available in boxes containing five car tridges and
charged.You can then leave the appliance in the charging stand. Cordless shaving time HQ6730 and HQ6710: A fully charged shaver has a cordless shaving time of up to 45 minutes. HQ6725 and HQ6707: A fully charged shaver has a cordless shaving time of up to 40 minutes. Cartridges Car tridges with NIVE...
Page 6 - Inserting cartridges; shaver. It only fits properly if the white side of; Replacing cartridges; Do not throw the pump away when you replace
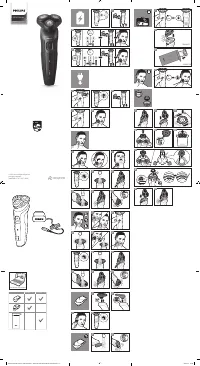
Inserting cartridges 1 When you start using a new set of cartridges, take the pump out of its bag and push it into a cartridge until it locks into position with a click. 2 Move the release slide downwards and open the cover of the cartridge compartment. 3 Slide the cartridge with the pump into the s...
Page 7 - Using the appliance
3 Push the pump into a new cartridge until it locks into position with a click. 4 Slide the cartridge with the pump into the shaver. It only fits properly if the white side of the pump is pointing upwards. Close the cover. Using the appliance Shaving 1 Switch the shaver on by pressing the on/off but...
Page 8 - cleaning and maintenance
5 Clean the shaver (see chapter ‘Cleaning and maintenance’). Rinse the shaver after each shave. Remove the car tridge if you are not going to use the appliance for more than one week. 6 Put the protection cap on the shaver every time you have used it, to prevent damage. Trimming (HQ6730 and HQ6725 o...
Page 10 - storage; you can store the shaver in the charging stand,; replacement; HQ167 Philips Cool Skin shaving heads only.
2 Open the trimmer to clean it on the inside. 3 Lubricate the trimmer teeth with a drop of sewing machine oil every six months. storage There are three ways to store the shaver : 1 you can store the shaver in the charging stand, even when it is wet. Always unplug the charging stand before storing th...
Page 11 - Accessories; The following accessories are available:
2 Press the release button (1) and open the shaving unit (2). 3 Turn the wheel anticlockwise (1) and remove the retaining frame (2). 4 Remove the shaving heads and place new ones in the shaving unit. 5 Put the retaining frame back into the shaving unit, press the wheel (1) and turn it clockwise (2)....
Page 12 - Environment; but hand it in at an official collection point for; Disposal of the batteries; handing it in at an official collection point. Dispose
Environment Do not throw the appliance away with the normal household waste at the end of its life, but hand it in at an official collection point for recycling. By doing this you will help to preserve the environment. Disposal of the batteries The built-in rechargeable batter y contains substances ...
Page 13 - Troubleshooting; until sufficient NIVEA FOR MEN shaving
to your local Philips dealer or contact the Ser vice Depar tment of Philips Domestic Appliances and Personal Care BV. Troubleshooting 1 The shaving heads do not move smoothly over the skin. Cause: not enough shaving gel/lotion has been applied. Solution: press the pump button a few times until suffi...
Page 16 - Einführung; Extra Frischegel; DEutscH
18 Einführung Der Rasierer wird mit zwei Sor ten NIVEA FOR MEN-Kar tuschen geliefer t: Extra Fresh-Frischegel für ein erfrischendes Gefühl während und nach der Rasur sowie eine Feuchtigkeit spendende Rasieremulsion für empfindliche Haut. Sie können beide Sor ten ausprobieren und ermitteln, welche si...
Page 17 - Wichtig; Lesen Sie diese Bedienungsanleitung vor dem ersten
Wichtig Lesen Sie diese Bedienungsanleitung vor dem ersten Gebrauch des Geräts sorgfältig durch, und bewahren Sie sie für eine spätere Verwendung auf. Verwenden Sie zum Aufladen des Geräts nur das mitgelieferte Netzteil und die mitgelieferte Ladestation. Das Netzteil wandelt Netzspannungen von 100 b...
Page 18 - sich nicht die Hände verbrühen.; laden
Der Rasierer ist wasserdicht und kann unter fließendem Wasser gereinigt werden. Gehen Sie vorsichtig mit heißem Wasser um. Achten Sie darauf, dass das Wasser nicht zu heiß ist und Sie sich nicht die Hände verbrühen. Das Gerät erfüllt die internationalen IEC- Sicherheitsvorschriften und kann ohne Bed...
Page 19 - Sobald Sie mit dem Aufladen der Akkus beginnen,; Das Gerät laden; Laden Sie das Gerät, wenn der Motor anhält oder; Kabellose Rasierzeit; Mit einem vollständig geladenen Rasierer können Sie
ladeanzeigen laden Sobald Sie mit dem Aufladen der Akkus beginnen, leuchtet die grüne Kontrollanzeige. Das Gerät laden Laden Sie das Gerät, wenn der Motor anhält oder langsamer als gewöhnlich läuft. 1 Stecken Sie den kleinen Stecker in die Ladestation und das Netzteil in die Steckdose. 2 Setzen Sie ...
Page 20 - Kartuschen; enthält genügend Gel bzw. Emulsion für ca. 10; Kartuschen einsetzen; Nach dem Öffnen einer neuen Packung
Kartuschen Die Kar tuschen mit NIVEA FOR MEN Frischegel bzw. Rasieremulsion werden in Packungen mit je 5 Kar tuschen und einer kleinen Kunststoffpumpe geliefer t. NIVEA FOR MEN Kar tuschen mit Frischegel bzw. Rasieremulsion sind 32 Monate haltbar, wenn sie bei Temperaturen zwischen 0 c C und +40 c C...
Page 21 - Kartuschen austauschen; Werfen Sie die Pumpe nicht weg, wenn Sie eine
2 Drücken Sie den Freigaberiegel nach unten und öffnen Sie den Deckel der Kartuschenkammer. 3 Schieben Sie die Kartusche mit der Pumpe in den Rasierer. Sie lässt sich nur richtig einsetzen, wenn die weiße Seite der Pumpe nach oben zeigt. 4 Schließen Sie die Abdeckung, bis sie hörbar einrastet. 5 Drü...
Page 22 - Das Gerät benutzen; Drücken Sie während des Rasierens regelmäßig
4 Schieben Sie die Kartusche mit der Pumpe in den Rasierer. Sie lässt sich nur dann richtig einsetzen, wenn die weiße Seite der Pumpe nach oben zeigt. Schließen Sie die Abdeckung. Das Gerät benutzen Rasieren 1 Schalten Sie das Gerät mit dem Ein-/ Ausschalter ein. 2 Drücken Sie die gelbe Taste der Pu...
Page 23 - Gebrauch auf den Rasierer, um Beschädigungen; Langhaarschneider (nur HQ6730 und; Langhaarschneider aufsetzen (siehe “Reinigung und; reinigung und Wartung; Spülen Sie Schereinheit und Haarauffangkammer
Spülen Sie den Rasierer nach jedem Gebrauch ab. Falls Sie das Gerät länger als eine Woche nicht verwenden, sollten Sie die Kar tusche herausnehmen. 6 Setzen Sie die Schutzkappe nach jedem Gebrauch auf den Rasierer, um Beschädigungen zu vermeiden. Langhaarschneider (nur HQ6730 und HQ6725) Zum Trimmen...
Page 25 - jedem Gebrauch von außen mit der; Aufbewahrung; Es gibt drei Möglichkeiten zum Aufbewahren des
2 Reinigen Sie die Ladestation mit einem feuchten Tuch. Langhaarschneider (nur HQ6730 und HQ6725) 1 Reinigen Sie den Langhaarschneider nach jedem Gebrauch von außen mit der mitgelieferten Bürste. 2 Öffnen Sie den Langhaarschneider, um ihn von innen zu reinigen. 3 Ölen Sie die Zähne des Langhaarschne...
Page 26 - Ersatz; Tauschen Sie die Scherköpfe alle zwei Jahre aus, um; Zubehör; Die folgenden Ersatz- und Zubehör teile sind
Ersatz Tauschen Sie die Scherköpfe alle zwei Jahre aus, um auch weiterhin optimale Rasierergebnisse zu erzielen. Ersetzen Sie beschädigte oder abgenutzte Scherköpfe ausschließlich durch HQ167 Philips Cool Skin Scherköpfe. 1 Schalten Sie den Rasierer aus. 2 Drücken Sie die Entriegelungstaste (1), und...
Page 27 - Umweltschutz; Werfen Sie das Gerät am Ende der Lebensdauer; Die Akkus entsorgen; die Umwelt gefährden können. Entfernen Sie die
HQ170 NIVEA FOR MEN Cool Skin Feuchtigkeit spendende Rasieremulsion. HQ171 NIVEA FOR MEN Cool Skin Extra Fresh Frischegel. Umweltschutz Werfen Sie das Gerät am Ende der Lebensdauer nicht in den normalen Hausmüll. Bringen Sie es zum Recycling zu einer offiziellen Sammelstelle. Auf diese Weise helfen ...
Page 28 - Garantie und Kundendienst; Benötigen Sie weitere Informationen oder treten; Fehlerbehebung; Die Leistung des Geräts lässt nach.
Garantie und Kundendienst Benötigen Sie weitere Informationen oder treten Probleme auf, wenden Sie sich bitte an Ihren Philips-Händler oder setzen Sie sich mit einem Philips Ser vice-Center in Ihrem Land in Verbindung (Telefonnummer siehe Garantieschrift). Besuchen Sie auch die Philips Website ( www...
Page 32 - introducción; Gel extra refrescante para el afeitado; Español
34 introducción La afeitadora se suministra con dos tipos diferentes de car tuchos NIVEA FOR MEN: un gel extra refrescante para el afeitado que da sensación de frescor durante y después del afeitado y una loción hidratante para el afeitado para pieles sensibles. De este modo podrá probar ambos y des...
Page 33 - importante
importante Antes de usar el aparato, lea atentamente estas instrucciones de uso y consér velas por si necesitara consultarlas en el futuro. Utilice sólo la clavija adaptadora y el soporte de carga suministrados. La clavija adaptadora transforma la corriente de 100 - 240 voltios a un bajo voltaje de ...
Page 34 - carga; La afeitadora tarda aproximadamente 8 horas en; Indicaciones de carga
El aparato cumple las normas de seguridad IEC aprobadas internacionalmente, y se puede utilizar de manera segura en el baño o en la ducha. Para obtener los mejores resultados de afeitado, bombee gel o loción frecuentemente. Antes de comenzar a utilizar el aparato, compruebe que ni el gel ni la loció...
Page 36 - Cómo insertar los cartuchos
Use sólo car tuchos Philips NIVEA FOR MEN Cool Skin (HQ170 y HQ171). Un car tucho Philips NIVEA FOR MEN Cool Skin contiene gel o loción suficiente para unos 10 afeitados. No tire la bomba cuando sustituya un car tucho vacío. La necesitará para los otros cinco car tuchos. Por razones higiénicas, le a...
Page 37 - Cómo sustituir los cartuchos; No tire la bomba cuando sustituya un car tucho
3 Deslice el cartucho con la bomba en la afeitadora. Sólo se acopla adecuadamente si el lado blanco de la bomba está hacia arriba. 4 Cierre la cubierta (oirá un clic). 5 Presione el botón amarillo de la bomba unas cuantas veces hasta que aparezca el gel o la loción para el afeitado NIVEA FOR MEN. Ya...
Page 38 - Enjuague la afeitadora después de cada uso. Quite el
Uso del aparato Afeitado 1 Encienda la afeitadora presionando una vez el botón de encendido/apagado. 2 Presione el botón amarillo de la bomba para aplicar gel o loción para el afeitado NIVEA FOR MEN sobre la piel. Desplace la afeitadora sobre la piel con movimientos rectos y circulares. 3 Mientras s...
Page 39 - Limpieza y mantenimiento
6 Después de usar la afeitadora, coloque siempre la tapa protectora para evitar que se deteriore. Recorte (sólo modelos HQ6730 y HQ6725) Para arreglar las patillas y el bigote. 1 Apague la afeitadora. Limpie la afeitadora antes de colocar el cor tapatillas (consulte el capítulo “Limpieza y mantenimi...
Page 41 - Hay tres modos de guardar la afeitadora:; Sustitución
Cortapatillas (sólo modelos HQ6730 y HQ6725) 1 Después de cada uso, limpie el exterior del cortapatillas con el cepillo que se suministra. 2 Abra el cortapatillas para limpiarlo por dentro. 3 Cada seis meses lubrique los dientes del cortapatillas con una gota de aceite de máquina de coser. almacenam...
Page 42 - Accesorios; Están disponibles los siguientes accesorios:
Sustituya los cabezales de afeitado gastados o deteriorados sólo por cabezales de afeitado Philips HQ167 Cool Skin. 1 Apague la afeitadora. 2 Pulse el botón de liberación (1) y abra la unidad de afeitado (2). 3 Gire la rueda en sentido contrario al de las agujas del reloj (1) y quite el marco de ret...
Page 43 - Medio ambiente; Al final de su vida útil, no tire el aparato junto; Cómo deshacerse de las baterías; recogida oficial. Deposite la batería en un lugar de; Garantía y servicio; al Cliente de Philips en su país (hallará el número
Medio ambiente Al final de su vida útil, no tire el aparato junto con la basura normal del hogar. Llévelo a un punto de recogida oficial para su reciclado. De esta manera ayudará a conservar el medio ambiente. Cómo deshacerse de las baterías La batería recargable incorporada contiene sustancias que ...
Page 44 - Guía de resolución de problemas; Causa: no se ha aplicado suficiente gel/loción
Ser vicio de Atención al Cliente de Philips en su país, diríjase a su distribuidor local Philips o póngase en contacto con el Ser vice Depar tment de Philips Domestic Appliances and Personal Care BV. Guía de resolución de problemas 1 Los cabezales de afeitado no se desplazan fácilmente por la piel. ...
Page 46 - suficiente en la afeitadora.
Causa 1: el cartucho no se ha insertado correctamente. Inserte correctamente el cartucho. Sólo se acopla adecuadamente en la afeitadora si el lado blanco de la bomba está hacia arriba. Causa 2: el cartucho no se ha introducido lo suficiente en la afeitadora. Solución 2: empuje el cartucho hasta que ...
Page 47 - Gel de rasage extra rafraîchissant; Avant d’utiliser l’appareil, lisez les instructions ci-; Français
49 introduction Votre rasoir est livré avec 2 types de car touches NIVEA FOR MEN différentes : un gel de rasage extra rafraîchissant pour une sensation de fraîcheur pendant et après le rasage et une lotion de rasage hydratante pour peau sensible. Vous pouvez ainsi essayer et choisir celui ou celle q...
Page 49 - Champs électromagnétiques; Cet appareil Philips est conforme à toutes les; charge; La charge dure environ 8 heures.; Informations relatives à la charge; Chargez l’appareil lorsque le moteur s’arrête ou
Champs électromagnétiques Cet appareil Philips est conforme à toutes les normes relatives aux champs électromagnétiques (CEM). Il répond aux règles de sécurité établies sur la base des connaissances scientifiques actuelles s’il est manipulé correctement et conformément aux instructions de ce mode d’...
Page 50 - Autonomie de rasage; car touches peuvent être conser vés pendant
3 Appuyez dessus jusqu’à ce que vous entendiez un clic. Le rasoir s’éteint automatiquement lorsqu’il est placé sur la base de recharge. 4 Retirez le cordon d’alimentation de la prise de courant et déconnectez la petite fiche de la base de recharge lorsque la batterie est complètement chargée. Vous p...
Page 51 - Insérer les cartouches
Ne jetez pas la pompe quand vous remplacez une car touche vide. Vous en aurez besoin pour les cinq car touches. Pour des raisons d’hygiène, il est conseillé de changer la pompe à chaque nouveau jeu de car touches. Retirez la car touche de l’appareil si vous ne vous en ser vez pas pendant au moins un...
Page 52 - Remplacer les cartouches; Ne jetez pas la pompe quand vous remplacez une; Utilisation de l’appareil
Remplacer les cartouches Ne jetez pas la pompe quand vous remplacez une car touche vide. Vous en aurez besoin pour les autres car touches. 1 Déplacez le bouton de déverrouillage vers bas et ouvrez le couvercle du compartiment à cartouche. 2 Retirez la cartouche vide et ôtez la pompe. 3 Insérez la po...
Page 53 - Tondre les favoris et la moustache (HQ6730; Pour tailler les favoris et la moustache.
fréquemment sur le bouton de la pompe ; le rasoir glissera plus facilement sur votre visage. Si vous n’avez plus de gel/lotion de rasage, vous pouvez également utiliser le rasoir sans gel/lotion sur un visage sec. Votre peau pourrait avoir besoin de 2 ou 3 semaines pour s’habituer au système de rasa...
Page 54 - Nettoyage et entretien; Nettoyez régulièrement l’appareil pour obtenir des; Unité de rasage et compartiment à poils
Nettoyage et entretien Nettoyez régulièrement l’appareil pour obtenir des résultats de rasage optimaux. Pour obtenir des résultats de rasage optimaux et un rasoir propre, rincez soigneusement l’unité de rasage et le compar timent à poils à l’eau très chaude après chaque utilisation. Veillez à ce que...
Page 55 - Vous pouvez ranger le rasoir de trois façons :
7 Ouvrez à nouveau l’unité de rasage et laissez-la ouverte pour que le rasoir sèche complètement. Base de recharge 1 Débranchez la base de recharge. 2 Nettoyez-la à l’aide d’un chiffon humide. Tondeuse (HQ6730 et HQ6725 uniquement) 1 Nettoyez l’extérieur de la tondeuse après chaque utilisation, à l’...
Page 56 - remplacement; Pour obtenir un résultat de rasage optimal,; Accessoires; Les accessoires suivants sont disponibles :
remplacement Pour obtenir un résultat de rasage optimal, remplacez les têtes de rasage tous les deux ans. Remplacez les têtes endommagées ou usées uniquement par des têtes de rasage Philips Cool Skin HQ167. 1 Arrêtez le rasoir. 2 Appuyez sur le bouton de déverrouillage (1) et ouvrez l’unité de rasag...
Page 58 - Dépannage; la pompe jusqu’à ce qu’une quantité suffisante de
visitez le site Web de Philips à l’adresse www.philips.com ou contactez le Ser vice Consommateurs Philips de votre pays (vous trouverez le numéro de téléphone correspondant sur le dépliant de garantie internationale). S’il n’existe pas de Ser vice Consommateurs Philips dans votre pays, renseignez-vo...
Page 60 - Cause 2 : la cartouche n’a pas suffisamment été
Solution 2 : nettoyez les têtes de rasage en profondeur. Reportez-vous au chapitre « Nettoyage et entretien ». Cause 3 : les têtes de rasage sont endommagées. Solution 3 : remplacez les têtes de rasage. Reportez-vous au chapitre « Remplacement ». 4 Le couvercle du compartiment à cartouche ne se refe...
Page 62 - introduzione; e l’emulsione idratante per le pelli delicate. In questo; italiano
64 introduzione Il rasoio viene fornito con due diversi tipi di car tuccia NIVEA FOR MEN: il gel di rasatura rinfrescante, per una piacevole sensazione durante e dopo la rasatura, e l’emulsione idratante per le pelli delicate. In questo modo potrete provarle entrambe e scoprire qual è la più adatta ...
Page 63 - Prima di utilizzare l’apparecchio, leggete
importante Prima di utilizzare l’apparecchio, leggete attentamente le istruzioni e conser vatele per eventuali riferimenti futuri. Per caricare il rasoio, usate esclusivamente la spina e il supporto di ricarica forniti con l’apparecchio. La spina consente di trasformare la tensione 100-240 volt in u...
Page 64 - come caricare l’apparecchio; Una normale ricarica richiede circa 8 ore.; Istruzioni di ricarica
L’apparecchio è conforme alle norme di sicurezza IEC approvate a livello internazionale e può essere usato con la massima tranquillità nel bagno o sotto la doccia. Per ottenere un risultato di rasatura ottimale, erogate spesso il gel o l’emulsione. Prima di usare l’apparecchio, controllate se il gel...
Page 65 - ricarica dell’apparecchio; Caricate l’apparecchio quando il motore si ferma o; Tempo di rasatura cordless; Un rasoio completamente carico ha un’autonomia di; cartucce; Le car tucce con il gel/l’emulsione NIVEA FOR MEN
ricarica dell’apparecchio Caricate l’apparecchio quando il motore si ferma o inizia a funzionare più lentamente. 1 Inserite lo spinotto nel supporto di ricarica e quindi la spina nella presa di corrente. 2 Mettete il rasoio nel supporto di ricarica. 3 Premete fino a farlo scattare il posizione. Il r...
Page 66 - Inserimento delle cartucce; inseritela in una cartuccia, fino a farla scattare
Utilizzate esclusivamente car tucce Philips NIVEA FOR MEN Cool Skin (HQ170 e HQ171). Una car tuccia NIVEA FOR MEN Cool Skin contiene gel/emulsione sufficiente per circa 10 rasature. Non gettate la pompa insieme alla car tuccia scarica: vi ser virà per le altre car tucce. Per motivi di igiene, vi con...
Page 67 - Premete alcune volte il pulsante giallo fino; Sostituzione delle cartucce; Non gettate la pompa insieme alla car tuccia scarica:; Modalità d’uso dell’apparecchio
5 Premete alcune volte il pulsante giallo fino a quando inizierà a uscire il gel/l’emulsione NIVEA FOR MEN. A questo punto il rasoio è pronto per l’uso. Sostituzione delle cartucce Non gettate la pompa insieme alla car tuccia scarica: vi ser virà per le altre car tucce. 1 Fate scorrere la guida vers...
Page 69 - pulizia e manutenzione; Una pulizia regolare assicura risultati di rasatura; Unità di rasatura e vano di raccolta peli
2 Premete il pulsante di sgancio (1) e togliete l’unità di rasatura dal rasoio (2). 3 Piegate leggermente il tagliabasette all’indietro e inseritelo sul rasoio. 4 Premete nuovamente il pulsante di sgancio per estrarre il tagliabasette dal rasoio. 5 Rimettete l’unità di rasatura sul rasoio. pulizia e...
Page 70 - supporto di ricarica
3 Sciacquate l’unità di rasatura e la vaschetta dei peli sotto l’acqua calda corrente. 4 Risciacquate la parte esterna dell’unità di rasatura. 5 Controllate che l’unità di rasatura e la vaschetta dei peli siano state pulite adeguatamente. 6 Chiudete l’unità di rasatura ed eliminate l’acqua in eccess...
Page 71 - come riporre l’apparecchio; È possibile riporre il rasoio in tre modi diversi:; Sostituzione; Sostituite le testine di rasatura ogni due anni per
2 Aprite il tagliabasette per pulirlo anche all’interno. 3 Lubrificate i dentini del tagliabasette ogni sei mesi, utilizzando una goccia di olio per macchina da cucire. come riporre l’apparecchio È possibile riporre il rasoio in tre modi diversi: 1 il rasoio può essere riposto nel suppor to di ricar...
Page 72 - Accessori; Accessori disponibili:
2 Premete il pulsante di sgancio (1) e aprite l’unità di rasatura (2). 3 Ruotate la rotella in senso antiorario (1) e togliete la struttura di supporto (2). 4 Togliete le testine e inserite quelle nuove nell’unità di rasatura. 5 Rimettete la struttura di supporto nell’unità di rasatura, premete la r...
Page 73 - Tutela dell’ambiente; smaltite l’apparecchio tra i rifiuti domestici ma; Smaltimento delle batterie; prima di rimuovere le batterie, verificare che siano; Garanzia e assistenza
Tutela dell’ambiente Per contribuire alla tutela dell’ambiente, non smaltite l’apparecchio tra i rifiuti domestici ma consegnatelo a un centro di raccolta ufficiale. Smaltimento delle batterie La batteria ricaricabile integrata contiene sostanze potenzialmente nocive per l’ambiente. Rimuovete sempre...
Page 74 - assistenza Philips Domestic Appliances & Personal; Risoluzione dei guasti; per far fuoriuscire una quantità sufficiente di
autorizzato Philips oppure contattate il Repar to assistenza Philips Domestic Appliances & Personal Care BV. Risoluzione dei guasti 1 Le testine di rasatura non scorrono bene sulla pelle. Causa: la quantità di gel/emulsione applicata non è sufficiente. Soluzione: premete alcune volte la pompa pe...
Page 76 - Soluzione 2: premete la cartuccia fino a farla
Soluzione 2: premete la cartuccia fino a farla scattare in posizione. 5 Il gel/l’emulsione NIVEA FOR MEN hanno cambiato colore o sono diventati acquosi. Causa: il gel/l’emulsione NIVEA FOR MEN non sono stati conservati a una temperatura adeguata. Soluzione: inserite una nuova cartuccia. 6 La pelle s...
Page 77 - inleiding; Het scheerapparaat wordt geleverd met twee; nEDErlanDs
79 inleiding Het scheerapparaat wordt geleverd met twee verschillende soor ten NIVEA FOR MEN-zakjes: Extra Fresh Shaving Gel voor een fris gevoel tijdens en na het scheren en Moisturising Shaving Lotion voor de gevoelige huid. Dit geeft u de gelegenheid beide soor ten uit te proberen en vast te stel...
Page 78 - Belangrijk; Lees deze gebruiksaanwijzing zorgvuldig door
Belangrijk Lees deze gebruiksaanwijzing zorgvuldig door voordat u het apparaat gaat gebruiken. Bewaar de gebruiksaanwijzing om deze indien nodig te kunnen raadplegen. Gebruik uitsluitend de bijgeleverde powerplug en oplader. De powerplug zet 100-240 volt om in een veilige laagspanning van minder dan...
Page 79 - opladen; Het opladen duur t ongeveer 8 uur.
Het apparaat voldoet aan de internationaal erkende IEC-veiligheidsvoorschriften en kan veilig onder de douche en in bad worden gebruikt. Voor het beste scheerresultaat moet u regelmatig scheergel/lotion aanbrengen. Controleer voordat u het apparaat gaat gebruiken of de scheergel en lotion die bij he...
Page 80 - Het scheerapparaat schakelt automatisch uit; Snoerloze scheertijd
Oplaadlampjes opladen Het groene indicatielampje gaat branden zodra u het lege scheerapparaat gaat opladen. Het apparaat opladen Laad het apparaat op wanneer de motor langzamer gaat draaien of ophoudt met draaien. 1 Steek het stekkertje in de oplader en steek de powerplug in het stopcontact. 2 Plaat...
Page 83 - Spoel het scheerapparaat na iedere scheerbeur t
Het apparaat gebruiken scheren 1 Schakel het scheerapparaat in door één keer op de aan/uitknop te drukken. 2 Druk op de gele pompknop om NIVEA FOR MEN-scheergel/-lotion op uw huid aan te brengen. Beweeg het scheerapparaat over uw huid, terwijl u zowel rechte als draaiende bewegingen maakt. 3 Druk ti...
Page 84 - tondeuse bevestigt (zie hoofdstuk ‘Schoonmaken en; schoonmaken en onderhoud
Tondeuse (alleen HQ6730 en HQ6725) Gebruik de tondeuse voor het bijknippen van bakkebaarden en snor. 1 Schakel het scheerapparaat uit. Maak het scheerapparaat schoon voordat u de tondeuse bevestigt (zie hoofdstuk ‘Schoonmaken en onderhoud’). 2 Druk op de ontgrendelknop (1) en trek de scheerunit van ...
Page 85 - oplader
2 Druk op de ontgrendelknop (1) en klap de scheerunit open (2). 3 Maak de scheerunit en de haarkamer schoon door ze enige tijd onder een warme kraan schoon te spoelen. 4 Spoel de buitenzijde van de scheerunit schoon. 5 Zorg ervoor dat u de binnenkant van de scheerunit en de haarkamer goed schoonspoe...
Page 86 - Opbergen; u kunt het scheerapparaat opbergen in de; Vervangen
Tondeuse (alleen HQ6730 en HQ6725) 1 Maak de buitenkant van de tondeuse na ieder gebruik schoon met het bijgeleverde borsteltje. 2 Klap de tondeuse open om deze aan de binnenkant schoon te maken. 3 Smeer elke zes maanden de tanden van de tondeuse met een druppeltje naaimachineolie. Opbergen U kunt h...
Page 87 - De volgende accessoires zijn verkrijgbaar :
Ver vang beschadigde of versleten scheerhoofden uitsluitend door HQ167 Philips Cool Skin- scheerhoofden. 1 Schakel het scheerapparaat uit. 2 Druk op de ontgrendelknop (1) en klap de scheerunit open (2). 3 Draai het wieltje linksom (1) en verwijder de opsluitplaat (2). 4 Verwijder de scheerhoofden en...
Page 88 - accu in op een officieel inzamelpunt voor batterijen.
Milieu Gooi het apparaat aan het einde van zijn levensduur niet weg met het normale huisvuil, maar lever het in op een door de overheid aangewezen inzamelpunt om het te laten recyclen. Op die manier levert u een bijdrage aan een schonere leefomgeving. Accu’s verwijderen De ingebouwde accu bevat stof...
Page 89 - vouwblad). Als er geen Customer Care Centre in; Problemen oplossen; Druk op de ontgrendelknop en klap de
vouwblad). Als er geen Customer Care Centre in uw land is, gaat u naar uw Philips-dealer of neemt u contact op met de afdeling Ser vice van Philips Domestic Appliances and Personal Care BV. Problemen oplossen 1 De scheerhoofden bewegen niet makkelijk over de huid. Oorzaak: er is onvoldoende scheerge...
Page 90 - Om te voorkomen dat lange haren de
verwisselt, kan het een aantal weken duren voordat het apparaat weer optimaal scheer t. 4 Verwijder de haren met het bijgeleverde borsteltje. 5 Plaats de scheerhoofden terug in de scheerunit. Plaats de opsluitplaat terug in de scheerunit, druk op het wieltje en draai het rechtsom. 6 Om te voorkomen ...
Page 92 - introdução; Gel de Barbear Extra Fresco; português
94 introdução A máquina é fornecida com duas recargas diferentes de NIVEA FOR MEN: Gel de Barbear Extra Fresco para uma sensação de frescura durante e depois do barbear e Loção Hidratante para a Barba especial para peles sensíveis. Terá, assim, a opor tunidade de experimentar e descobrir qual a que ...
Page 93 - Leia estas instruções com atenção antes de utilizar
importante Leia estas instruções com atenção antes de utilizar o aparelho e guarde-as para uma eventual consulta futura. Para carregar a máquina, use apenas a ficha e a base de carga fornecidos. A ficha transforma 100-240 volts numa tensão segura e baixa inferior a 24 volts. A ficha de alimentação i...
Page 95 - Autonomia sem fio; até 45 minutos de autonomia de barbear sem fio.; Recargas
1 Introduza a ficha pequena no suporte de carga e ligue a ficha de alimentação na tomada eléctrica. 2 Coloque a máquina sobre o suporte de carga. 3 Faça pressão até ouvir um clique. A máquina desliga-se automaticamente quando é colocada sobre o supor te de carga. 4 Retire a ficha da tomada eléctrica...
Page 96 - Colocar as recargas
Um car tucho Philips NIVEA FOR MEN Cool Skin contém gel/loção suficiente para cerca de 10 barbas. Não deite a pequena bomba de plástico fora quando for substituir uma recarga vazia. Irá precisar dela para as cinco recargas. Por razões de higiene, aconselha-se que introduza uma bomba nova quando come...
Page 97 - Substituição das recargas; Não deite a bomba fora quando for substituir; utilização do aparelho
Substituição das recargas Não deite a bomba fora quando for substituir uma recarga vazia. Irá precisar dela para as outras recargas. 1 Faça deslizar a tampa do compartimento das recargas para baixo e abra-a. 2 Retire a recarga vazia e puxe a bomba para fora. 3 Empurre a bomba para dentro da nova rec...
Page 99 - limpeza e manutenção; Uma limpeza regular garante melhores resultados; Unidade de corte e câmara de recolha dos
4 Retire o aparador premindo novamente o botão de libertação e puxando o aparador para fora da máquina. 5 Volte a colocar a unidade de corte na máquina de barbear. limpeza e manutenção Uma limpeza regular garante melhores resultados no cor te. Para manter sempre a máquina limpa e com um óptimo desem...
Page 100 - suporte de carga; A cada seis meses, lubrifique os dentes do
4 Enxagúe o exterior da unidade de corte. 5 Certifique-se de que o interior da unidade de corte e da câmara de recolha dos pêlos ficam bem limpos. 6 Feche a unidade de corte e sacuda o excesso de água. Nunca seque a unidade de corte com uma toalha ou tecido, pois pode danificar as cabeças de corte. ...
Page 101 - arrumação; Existem três maneiras de guardar a máquina de; Substituição; em dois anos para manter a eficácia da máquina de
arrumação Existem três maneiras de guardar a máquina de barbear : 1 pode guardar a máquina no supor te de carga, mesmo quando esta estiver molhada. Desligue sempre o suporte de carga da corrente antes de colocar a máquina molhada ou seca no mesmo. 2 O aparador pode ser guardado dentro da bolsa forne...
Page 102 - Acessórios; Estão disponíveis os seguintes acessórios:; Ambiente; Não deite fora o aparelho junto com o lixo; Eliminação das pilhas; A bateria incorporada recarregável contém
4 Retire as cabeças de corte e coloque as cabeças novas na unidade de corte. 5 Reponha a armação de fixação na unidade de corte, prima o anel (1) e rode-o para a direita (2). 6 Volte a colocar a unidade de corte na máquina de barbear. Acessórios Estão disponíveis os seguintes acessórios: Ficha de al...
Page 103 - Causa: não foi aplicada uma quantidade suficiente
de o entregar num ponto de recolha oficial. Elimine a bateria num ponto de recolha oficial para baterias. Se tiver problemas na remoção da bateria, pode também levar a máquina a um centro de assistência Philips, que poderá remover a bateria por si e eliminá-la de forma segura para o ambiente. Retire...
Page 107 - Giriş; Ekstra Ferahlatıcı Tıraş Jeli; Önemli; türkçE
109 Giriş Tıraş makinesi iki farklı NIVEA FOR MEN krem kar tuşu ile birlikte sunulmaktadır : Tıraş sırasında ve sonrasında ekstra ferahlık veren Tıraş jeli ve hassas ciltler için Nemlendirici Tıraş Losyonu. Böylece, kremleri deneyebilir ve cilt türünüze en uygun olanı seçebilirsiniz. Ekstra Ferahlat...
Page 111 - Boş bir kar tuşu değiştirdiğinizde, pompayı atmayın.
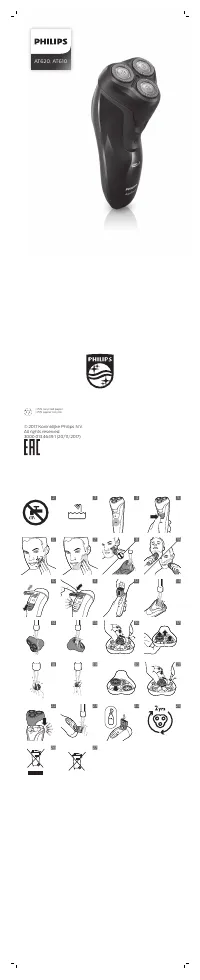
Kartuşların yerleştirilmesi 1 Yeni bir kartuş seti kullanmaya başladığınızda, pompayı kutudan çıkartın ve “klik” sesi çıkararak yerine sabitlenene kadar kartuşu itin. 2 Açma sürgüsünü aşağıya doğru hareket ettirin ve kartuş yuvasının kapağını açın. 3 Pompa takılı kartuşu kaydırarak tıraş makinesine ...
Page 112 - üzerinde düz ve dairesel hareketler yaparak
3 Bir “klik” sesi çıkararak yerine oturana kadar pompayı yeni kartuşa doğru itin. 4 Kartuşu pompayla beraber tıraş makinesine itin. Sadece pompanın beyaz tarafı yukarı bakacak şekilde doğru olarak yerleştirilebilir. Kapağı kapatın. Cihazın Kullanımı Tıraş olma 1 Açma/kapama düğmesine bir kez basarak...
Page 113 - Temizlik ve bakım
4 Açma/kapama düğmesine bir kez basarak cihazı kapatın. 5 Tıraş makinesini temizleyin (Bkz Temizlik ve bakım) Tıraş makinesini her tıraştan sonra yıkayın. Cihazı bir haftadan daha uzun bir zaman kullanmayacaksanız kar tuşu çıkarın. 6 Tıraş makinesinin başlıklarını, hasar görmemeleri için her kullanı...
Page 114 - Tıraş ünitesi ve kıl haznesi; olarak temizlenmesine özen gösterin.; Şarj standı
Sıcak suya dikkat edin. Ellerinizin yanmaması için daima suyun çok sıcak olmadığını kontrol edin. Tıraş ünitesi ve kıl haznesi 1 Tıraş makinesini kapatın. 2 Çıkarma düğmesine (1) basarak tıraş ünitesini (2) çıkarın. 3 Tıraş ünitesini ve kıl haznesini bir süre sıcak su musluğunun altına tutmak sureti...
Page 115 - Düzelticinin iç yüzeyini temizlemek için; saklama; asma kordonundan asarak da saklayabilirsiniz. Bu; Değiştirme
Düzeltici (sadece HQ6730 ve HQ6725 için) 1 Düzelticinin dış kısmını her kullanımdan sonra cihaz ile birlikte verilen fırça ile temizleyin. 2 Düzelticinin iç yüzeyini temizlemek için düzelticiyi açın. 3 Düzelticinin dişlerini her altı ayda bir, bir damla dikiş makinesi yağıyla yağlayın. saklama Tıraş...
Page 116 - Aksesuarlar; Belir tilen aksesuarlar bulunmaktadır :
2 Çıkarma düğmesine (1) basın ve tıraş ünitesini (2) çıkarın. 3 Çarkı saat yönünün tersine (1) döndürerek tutucu çerçeveyi (2) çıkartın. 4 Tıraş başlıklarını çıkartarak yeni tıraş başlıklarını tıraş ünitesine yerleştirin. 5 Tutucu çerçeveyi tekrar tıraş ünitesine geçirin, çarka bastırın (1) ve saat ...
Page 117 - bir Philips ser vis merkezine verebilirsiniz. Burada pil; Garanti ve Servis; adresinden ziyaret ediniz
Çevre Kullanım ömrü sonunda cihazı normal evsel atıklarınızla birlikte atmayın; bunun yerine, geri dönüşüm için resmi yetkililere verin. Bu sayede çevre korumasına yardımcı olursunuz. Pillerin atılması Dahili şarj edilebilir pil, çevreyi kirletebilecek maddeler içermektedir. Cihazı atmadan ya da res...
Page 118 - sorun giderme; tekrar kolayca hareket edebilmesi için, yeterli
Merkezi yoksa, yerel Philips yetkilinize başvurun veya Philips Ev Aletleri ve Kişisel Bakım BV Ser vis Depar tmanı ile iletişime geçin. sorun giderme 1 Tıraş başlıkları cilt üzerinde kolayca hareket etmiyor. Sebep: Yeterli miktarda tıraş jeli/losyonu kullanılmamış. Çözüm: tıraş başlıklarının cildini...
Page 120 - cildinizi nemlendirin.
6 Cilt tahriş oluyor Sebep 1: cildiniz henüz bu tıraş sistemine alışık olmayabilir. Çözüm 1: cildinizin bu tıraş sistemine alışması için 2-3 hafta bekleyin. Sebep 2: tıraş jeli/losyonu cildinizi tahriş ediyor. Çözüm 2A: Başka bir NIVEA FOR MEN kartuşu türünü deneyin. Çözüm 2B: Tıraştan önce tıraş je...


 Philips 5000 S5466/17
User Manual
Philips 5000 S5466/17
User Manual
 Philips 5000 S5630/12
User Manual
Philips 5000 S5630/12
User Manual
 Philips AT610
User Manual
Philips AT610
User Manual
 Philips BRE610/00
User Manual
Philips BRE610/00
User Manual
 Philips BRI862/00
User Manual
Philips BRI862/00
User Manual