Philips 29PT9417 - Manuals
Philips 29PT9417 TV – Manual in PDF format online.
Manuals:
Manual Philips 29PT9417


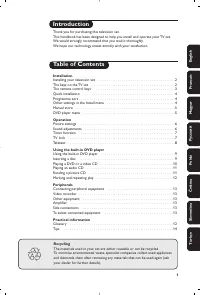
Summary
2 & Place the TV on a solid surface. ! 29PT9417: 47 kg ! For ventilation, leave at least 5 cm free allaround the TV. Do not place the TV on acarpet.To prevent any unsafe situations, do notplace any objects on top of the TV. Avoid heat,direct sunlight and exposure to rain or water. é Insert the a...
3 3 B b ¬ + - V + - P v b i 0 h q Select VCR DVD SAT AMP CD MENU OK 1 2 3 4 5 6 7 8 9 0 Ò ® ‡ π † Active Control S ® ® ® ® æ Use of the remote control B Standby Press to switch the TV on or off.When switched off, a redindicator on the TV lights up. ®Ò‡π† Audio- and Video equipment keys(p. 20) ® Inst...
4 B b ¬ + - V + - P v b i 0 h q Select VCR DVD SAT AMP CD MENU OK 1 2 3 4 5 6 7 8 9 0 Ò ® ‡ π † Active Control S ® ® ® ® æ i On Screen information Press to display information about the selected TV channel andprogramme. Menu/Remote control info When a menu is on screen, press i to display info on th...
Philips TVs Manuals
-
 Philips 14PT6107_58
User Manual
Philips 14PT6107_58
User Manual
-
 Philips 15PF5121
User Manual
Philips 15PF5121
User Manual
-
 Philips 15PT6807_01
User Manual
Philips 15PT6807_01
User Manual
-
 Philips 19PFL3403_10
User Manual
Philips 19PFL3403_10
User Manual
-
Philips 19PFL3403_10
Quick Guide
-
 Philips 19PFL5403S_60
User Manual
Philips 19PFL5403S_60
User Manual
-
 Philips 19PFL5522D
User Manual
Philips 19PFL5522D
User Manual
-
 Philips 19PFL5602D
User Manual
Philips 19PFL5602D
User Manual
-
 Philips 20PF4110
User Manual
Philips 20PF4110
User Manual
-
 Philips 20PF4110S
User Manual
Philips 20PF4110S
User Manual
-
 Philips 20PF5121
User Manual
Philips 20PF5121
User Manual
-
 Philips 20PFL5122
User Manual
Philips 20PFL5122
User Manual
-
 Philips 20PFL5522D
User Manual
Philips 20PFL5522D
User Manual
-
 Philips 22PFL5403(D)(S)
User Manual
Philips 22PFL5403(D)(S)
User Manual
-
 Philips 23PF5320
Manual
Philips 23PF5320
Manual
-
 Philips 23PF5321
User Manual
Philips 23PF5321
User Manual
-
 Philips 23PFL5322
User Manual
Philips 23PFL5322
User Manual
-
 Philips 24HFL2839T
User Manual
Philips 24HFL2839T
User Manual
-
 Philips 24HFL2849T
User Manual
Philips 24HFL2849T
User Manual
-
 Philips 26PFL3312S_60
User Manual
Philips 26PFL3312S_60
User Manual