Page 2 - IMPORTANT SAFETY NOTICE; Dear Panasonic Customer:
2-E NGLISH IMPORTANT SAFETY NOTICE WARNING: To prevent damage which may result in fire or shock hazard, do not expose this appliance to rain or moisture. Machine Noise Information Ordinance 3. GSGV, January 18, 1991: Thesound pressure level at the operator position is equal or less than 70 dB(A) acc...
Page 3 - Preparation
E NGLISH -3 Preparation WARNING: B For permanently connected equipment, a readily accessible disconnectdevice shall be incorporated in the building installation wiring; B For pluggable equipment, the socket-outlet shall be installed near theequipment and shall be easily accessible. CAUTION: To assur...
Page 5 - Contents
E NGLISH -5 Preparation Contents Preparation IMPORTANT SAFETY NOTICE ...2Precautions with regard to safety .........................................6 Accessories ...............................10Before use ..................................11Location and function of each part ..........................
Page 6 - Precautions with regard to safety; WARNING
6-E NGLISH Precautions with regard to safety WARNING If you notice smoke, strange smells or noise coming from theprojector, disconnect the mains plug from the mains socket. B Do not continue to use the projector in such cases, otherwise fire orelectric shocks could result. B Check that no more smoke...
Page 8 - Caution
8-E NGLISH During a thunderstorm, do not touch the projector or the cable. B Electric shocks can result. Do not use the projector in a bath or shower. B Fire or electric shocks can result. Do not look into the lens while the projector is being used. B Strong light is emitted from the projector’s len...
Page 10 - Accessories
10-E NGLISH Card remote control unit(N2QADC000008 x1) Mains lead(K2CM3DR00002 x 1) Carrying bag(TPEP013-1 x 1) Lithium battery forremote control unit(CR2025 x1) RGB signal cable [1.8 m (5´10˝),K1HA15DA0002 x1] Accessories Check that all of the accessories shown below have been included with yourproj...
Page 11 - Before use; Caution when moving the projector; Cautions regarding setting-up
E NGLISH -11 Preparation Before use Caution when moving the projector Be sure to attach the lens cover before moving the projector. The projection lens is extremely susceptible to vibration and shocks. Whenmoving the projector, use the accessory carrying bag. When placing theprojector inside the car...
Page 12 - Notes on use
12-E NGLISH Notes on use In order to get the best picture quality Draw curtains or blinds over any windows and turn off any lights near thescreen to prevent outside light or light from indoor lamps from shining ontothe screen. Do not touch the surfaces of the lens with your bare hands. If the surfac...
Page 13 - Location and function of each part; Projector
E NGLISH -13 Preparation Location and function of each part # Projector control panel (page 16) $ Zoom ring (page 25) % Focus ring (page 25) & Security lock This can be used to connect a commercially-available theft-preventioncable (manufactured by Kensington). This security lock is compatible w...
Page 16 - Remote control unit
16-E NGLISH Menuoperation <on connectorpanel:page 15> Remote control unit FREEZE SHUTTER INDEX WINDOW PROJECTOR STD AUTO SETUP INPUT POWER MENU ENTER VIDEO RGB VOLUME D.ZOOM ' ( + - . / 0 1 2 , ) * Projector control panel # RGB INPUT indicator This indicator illuminates when a signal is being ...
Page 18 - Projection methods
18-E NGLISH Setting-up Projection methods In way of installing projector, any one of the following four projection methodsare used. Select whichever projection method matches the setting-upmethod. (The projection method can be set from the “OPTION” menu. Referto pages 46 and 47 for details.) B Front...
Page 19 - Getting; Projector position; Projection distances
E NGLISH -19 Getting s tar ted H1 L SH L SW 81.2 mm (3-3/16 ˝) Projector position L: Projection distance SH: Image heightSW: Image widthH1: Distance from centre of lens to bottom edgeof projected image Top edge of screen Screen Bottom edge of screen Screen Projection distances Wide (LW) Telephoto (L...
Page 21 - Connections; Notes on connections; Connecting to computer
E NGLISH -21 Getting s tar ted Connections Notes on connections B Read the instruction manual for each peripheral device carefully before connecting it. B Turn off the power supply for all peripheral devices before making any connections. B If the cables necessary for connection are not included wit...
Page 22 - Connecting to video equipment
22-E NGLISH NOTE: B If the signal cables are disconnected or if the power supply for thecomputer or video deck is turned off while “D.ZOOM”(digital zoom) or“INDEX WINDOW” is being used, these functions will be cancelled. Connecting to video equipment D-sub15-pin (male) - BNCx5 (male) adapter cable D...
Page 23 - Preparation for the remote control unit
E NGLISH -23 Getting s tar ted Insert the accessory lithium battery while making sure that the polarities are correct. # While pushing the battery holder tab to the right, pull out the batteryholder. $ Insert the battery into the battery holder so that the + side is facingupward. % Insert the batter...
Page 24 - Turning on the power; Press the POWER button.
ENTER FREEZE SHUTTER INDEX WINDOW PROJECTOR VOLUME D.ZOOM STD VIDEO INPUT POWER RGB MENU AUTO SETUP ) * $ & ( ' # Turning on the power Before turning on the power 1. Ensure that all peripheral devices are connectedproperly. 2. Remove the lens cover. Lens cover Mains lead Connect the accessory ma...
Page 25 - Basic; Adjusting the size; Adjusting the angle; NETWORK
E NGLISH -25 Basic operation Press the input select button to select theinput signal. Follow the procedure below when you set the projector up first, and whenyou change the setup place. Press the AUTO SETUP button toinitiate automatic positioning. B The tilt of the projector and the inputsignal will...
Page 26 - Turning off the power; P O W E R O F F
FREEZE SHUTTER INDEX WINDOW PROJECTOR VOLUME D.ZOOM STD VIDEO INPUT POWER RGB MENU AUTO SETUP ENTER # $ % Turning off the power POWER button Press the POWER button. B “POWER OFF” is displayed on thescreen. Press the I I or H H button to select “OK”, and then press the ENTER button. B The lamp unit w...
Page 27 - Direct power off function; CAUTION
E NGLISH -27 Basic operation POWER button on the projector POWER button status Red Illuminated The projector is in standby mode and image projectionis possible by pressing the POWER button. A picture is being projected. The lamp is cooling down after the power has beenturned off or while direct powe...
Page 29 - Useful
E NGLISH -29 Useful functions Turning off the picture and soundmomentarily (SHUTTER) The “SHUTTER” function can be used to momentarily turn off the picture andsound from the projector when the projector is not being used for shortperiods of time, such as during breaks in meetings or when carrying ou...
Page 31 - Still; Still
E NGLISH -31 Useful functions ENTER PROJECTOR VOLUME D.ZOOM STD MENU AUTO SETUP SHUTTER FREEZE INDEX WINDOW The remote control unit functions during INDEX WINDOW Press the F or G button to select a screen size. It can switch to three stages. Still picture Moving picture Still picture Moving picture ...
Page 32 - Menu screens; K E Y S T O N E
32-E NGLISH On-screen menus Menu screens The various settings and adjustments forthis projector can be carried out byselecting the operations from on-screenmenus.The general arrangement of these menusis shown below. MAIN MENU M E N U K E Y S T O N E P I C T U R E P O S I T I O N I N D E X W I N D O ...
Page 33 - Adjustments
E NGLISH -33 Adjustments and settings POSITION menu (page 41) O P T I O N O S D O N A U T O S E A R C H O N A U T O S I G N A L O N A U T O K E Y S T N O N R G B 2 S E L E C T I N P U T R G B / Y P B P R A U T O V G A 6 0 / 4 8 0 p 4 8 0 p S X G A M O D E S X G A N R O F F B L A C K B O A R D O F F ...
Page 34 - Menu operation guide
34-E NGLISH # Press the MENU button. The “MAIN MENU”will be displayed. $ Press the F F or G G button to select an item. Selected item willbe displayed inblue. % Press the ENTER button to accept theselection. The selectedmenu screen oradjustmentscreen will thenbe displayed.(Example:“PICTURE”menu) ENT...
Page 35 - Returning a setting to the factory default; B R I G H T 3 2
E NGLISH -35 Adjustments and settings & Press the F F or G G button to select an item, and then press the I I or H H button to change or adjust the setting. An individual adjustment screensuch as the one shown below willbe displayed for bar scale items. The bar scale will turn green whenany adju...
Page 36 - Correcting keystone distortion
36-E NGLISH Correcting keystone distortion Keystone distortion is corrected automatically when the projector’s automaticsetup function is used, but this correction will not apply if the screen itself istilted. In such cases, you can correct the keystone distortion manually withthe following procedur...
Page 37 - Adjusting the picture; PICTURE MODE
E NGLISH -37 Adjustments and settings Press the F or G button on the projector or remote control unit toselect an item, and then press the I or H button to change the setting.For items with bar scales, press theENTER button or the I or H button to display the adjustment screen,and then press the I o...
Page 38 - CONTRAST
38-E NGLISH CONTRAST This adjusts the contrast of thepicture. (Adjust the “BRIGHT”setting first if required beforeadjusting the “CONTRAST” setting.)The picture is bright: I button The picture is dark: H button BRIGHT This adjusts the darker areas (blackareas) in the picture.Black areas are too light...
Page 39 - AI; DAYLIGHTVIEW; MODE
E NGLISH -39 Adjustments and settings NOTE: B “AI” is disabled when “LAMPPOWER” is set to “LOW”.(Refer to page 47.) NOTE: B “W-BAL” is disabled when“MODE” in “DAYLIGHTVIEW”is set to “OFF”. NOTE: B “AUTO” may not functioncorrectly if any objects areplaced on the projector. B “AUTO” will be disabled w...
Page 40 - SIGNAL MODE
40-E NGLISH SIGNAL MODE (RGB/YP B P R /NETWORK only) This displays the type of signalwhich is currently being projected.Refer to the list on page 62 fordetails on each type of signal. sRGB is an international colourreproduction standard (IEC61966-2-1) established by the InternationalElectrotechnical...
Page 41 - POSITION; Adjusting the position
E NGLISH -41 Adjustments and settings Press the F or G button on the projector or remote control unit toselect an item, and then press the I or H button to change the setting. For items with bar scales, press theENTER button or the I or H button to display the adjustment screen,and then press the I ...
Page 42 - ASPECT
42-E NGLISH S4:3 The size of the input signal iscompressed to 75% and projected.(This is useful for projecting apicture with a 4:3 aspect ratio onto a16:9 screen.) AUTO (S-VIDEO only)When an S1 video signal is beinginput, the aspect ratio is changedautomatically to project a 16:9picture. 4:3 The inp...
Page 43 - RESIZING; FRAME LOCK
RESIZING This should normally be set to “ON”.(This setting is only for signalswhich have lower resolutions thanthe LCD panels. Refer to page 62for details.) ON The pixel resolution of the inputsignal is converted to the sameresolution as the LCD panels beforebeing projected. This may sometimes cause...
Page 44 - Changing the display language
44-E NGLISH Changing the display language Press the F or G button on the projector or remote control unit to select a language, then press the ENTER button to accept the setting. Indicates the language which iscurrently set. L A N G U A G E E N G L I S H D E U T S C H F R A N Ç A I S E S P A Ñ O L I...
Page 45 - Option settings; OSD
E NGLISH -45 Adjustments and settings Option settings Press the F or G button on the projector or remote control unit toselect an item, then press the I or H button to change the setting. O P T I O N ▲ B A C K C O L O R B L U E F R O N T / R E A R F R O N T D E S K / C E I L I N ...
Page 46 - RGB2 SELECT; SXGA MODE; BLACKBOARD
46-E NGLISH RGB2 SELECT This setting is used to select thefunction of the RGB2 IN/1 OUTconnector. RGB/YP B P R This should normally be set to“AUTO”. RGB or YP B P R is selected automatically depending on thesynchronising signal status.When 480i, 576i, 480p, 576p, 1 080/60i, 1 080/50i, 720/60p andsom...
Page 47 - FAN CONTROL
E NGLISH -47 Adjustments and settings DESK/CEILING This setting should be changed inaccordance with the projector setting-up method. (Refer to page 18.) DESK When the projector is placed on adesk or similar. CEILING When the projector is suspendedfrom a ceiling using the ceilingbracket (sold separat...
Page 48 - CONTROL KEY; POWER MEMORY
48-E NGLISH CONTROL KEY To disable the buttons on theprojector, set “CONTROL KEY” to“OFF”. A confirmation screen willthen be displayed. Select “OK” byusing I or H button. To use the buttons on the projector, set to “ON”by using the remote control unit. AUTO POW.OFF If no signal is input to the proje...
Page 49 - Setting up the security function; S E C U R I T Y; INPUT PASSWD; AMEND PASSWD
E NGLISH -49 Adjustments and settings Setting up the security function This projector is equipped with a security function. A password input screencan be displayed, or a company URL can be set up and displayed at thebottom of the projected image. Press the F or G button on the projector or remote co...
Page 50 - TEXT DISPLAY; TEXT CHANGE
50-E NGLISH TEXT DISPLAY You can set text to be displayed atthe bottom of the projected image atall times. ON “TEXT DISPLAY” is enabled. OFF “TEXT DISPLAY” is disabled. TEXT CHANGE The text which is displayed when“TEXT DISPLAY” is set to “ON” canbe changed.Press the ENTER button to displaythe “TEXT ...
Page 51 - Network setup
E NGLISH -51 Network setup (PT-LB20NTE only) You need to make adjustments on some items when controlling the projectorwith a personal computer by means of the wireless network. Refer to theaccessory CD-ROM for details. INPUT PASSWD Set to “ON” if you want passwordconfirmation to be used whencontroll...
Page 53 - Care
E NGLISH -53 Care and m aintenance Remedy Problem Indicator display Flashing (red) It is nearly time toreplace the lampunit. Illuminated (red) An abnormality has been detected in the lampcircuit. B Does “REPLACELAMP” appear onthe screen afterthe projector isturned on? B This occurs whenthe operation...
Page 54 - Cleaning and replacing the air filter; Cleaning
54-E NGLISH Cleaning and replacing the air filter If the air filter becomes clogged with dust, the internal temperature of theprojector will rise, the TEMP indicator will illuminate and the projector’spower will turn off (the TEMP indicator will flash after the power is turned off). The air filter s...
Page 55 - Replacing the lamp unit; Warning
E NGLISH -55 Care and m aintenance Replacing the lamp unit Warning When replacing the lamp, allow itto cool for at least one hourbefore handling it. B The lamp cover gets very hot,and touching it can cause burns. Notes on replacing the lampunit B The light generating lamp ismade of glass, so droppin...
Page 56 - Lamp unit replacement procedure
B A 56-E NGLISH Lamp unit replacement procedure # Disconnect the mains leadfrom the projector by followingthe procedure on page 26, andcheck that the area around thelamp unit has cooled down. $ Use a Phillips screwdriver toturn the lamp unit cover fixingscrews at the bottom of theprojector, and then...
Page 57 - O P T I O N
' Install the lamp unit cover, andthen use a Phillips screwdriverto securely tighten the lampunit cover fixing screws. ( Connect the mains lead. ) Press the POWER button sothat a picture is projected ontothe screen. * Press the MENU button todisplay the “MAIN MENU”, andthen press the F or G button t...
Page 58 - Before calling for service
58-E NGLISH Before calling for service Before calling for service, check the following points. Problem Possible cause Page Power does notturn on. No pictureappears. The picture isfuzzy. The colour ispale or grayish. No sound canbe heard. The remotecontrol unitdoes notoperate. The buttons onthe proje...
Page 59 - Cleaning and maintenance
E NGLISH -59 Care and m aintenance The picture doesnot displaycorrectly. Picture fromcomputer doesnot appear. Problem Possible cause B The signal format (“TV-SYSTEM”) may not be setcorrectly. B There may be a problem with the video tape orother signal source. B A signal which is not compatible with ...
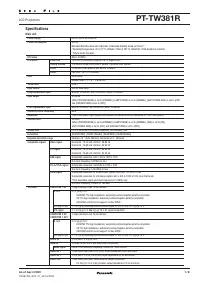
Page 60 - Specifications
60-E NGLISH Specifications Power supply: 100 V - 240 V ~, 50 Hz/60 Hz Power consumption: 220 W [During standby (when fan isstopped): Approx. 4 W] Amps: 2.5 A - 1.3 A LCD panel: Panel size (diagonal): PT-LB20NTE/PT-LB20E/PT-LB20SE: 0.7 type (17.78 mm)PT-LB20VE: 0.6 type (15.24 mm) Aspect ratio: 4:3 M...
Page 61 - Other
E NGLISH -61 Other s Connectors RGB IN/OUT: Dual line, D-sub HD 15-pin (female)(One line is available for input and output,selectable using an on-screen menu) During YP B P R input/output: Y: 1.0 V [p-p] (Including sync), 75 Ω P B , P R : 0.7 V [p-p], 75 Ω During RGB input/output: R.G.B.: 0.7 V [p-p...
Page 62 - Appendix; List of compatible signals
62-E NGLISH Appendix *1 The “i” appearing after the resolution indicates an interlaced signal.*2 The following symbols are used to indicate picture quality. AA Maximum picture quality can be obtained.A Signals are converted by the image processing circuit before picture is projected. B Some loss of ...
Page 63 - Projection dimensions calculation methods
Other s Projection dimensions calculation methods If the screen size (diagonal) is SD (m), then the following formula is used tocalculate the projection distance for the wide lens position (LW) and theprojection distance for the telephoto lens position (LT). *The values obtained from the formulas ab...
Page 64 - Using the SERIAL connector; Connection; Communications settings
64-E NGLISH Using the SERIAL connector The serial connector which is on the connector panel of the projectorconforms to the RS-232C interface specification, so that the projector can becontrolled by a personal computer which is connected to this connector. Connection Pin assignments and signalnames ...
Page 65 - Cable specifications
E NGLISH -65 Other s Control commands The commands which the personal computer can use to control the projectorare shown in the following table. Command Control Contents Remarks In standby mode, all commands other thanthe PON command are ignored. B The PON command is ignored duringlamp ON control. B...
Page 66 - Trademark acknowledgements; Dimensions
66-E NGLISH These Operating Instructions are printed on recycled paper. Trademark acknowledgements B VGA and XGA are trademarks of International Business MachinesCorporation. B Macintosh is a registered trademark of Apple Computer, Inc. B S-VGA is a registered trademark of the Video Electronics Stan...


 Panasonic PT-AE100E
User Manual
Panasonic PT-AE100E
User Manual
 Panasonic PT-AE2000E
User Manual
Panasonic PT-AE2000E
User Manual
 Panasonic PT-AX200E
User Manual
Panasonic PT-AX200E
User Manual
 Panasonic PT-TW381R
User Manual
Panasonic PT-TW381R
User Manual
 Panasonic PT-LC76E
Manual
Panasonic PT-LC76E
Manual
 Panasonic PT-LC56E
Manual
Panasonic PT-LC56E
Manual
 Panasonic PT-LM2E
Manual
Panasonic PT-LM2E
Manual
 Panasonic PT-L780NTE
Manual
Panasonic PT-L780NTE
Manual
 Panasonic PT-L735NTE
Manual
Panasonic PT-L735NTE
Manual