Page 2 - Introduction; Safety precautions; Convention used in this manual
2 EN C S D A DE ES F R NL P L RU S V • Thank you for purchasing an Olympus Digital Voice Recorder. Please read these instructions for information about using the product correctly and safely. Keep the instructions handy for future reference. To ensure successful recordings, we recommend that you tes...
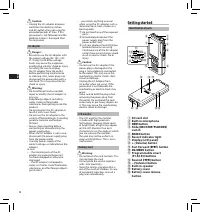
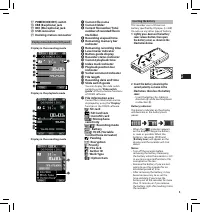
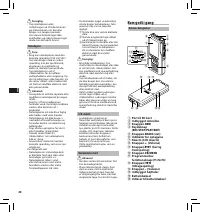
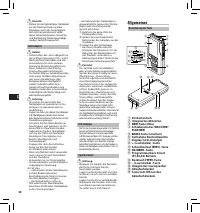
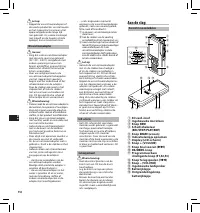
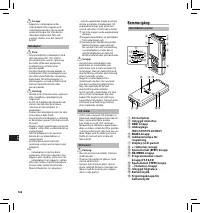
Page 4 - Getting started; Identification of parts
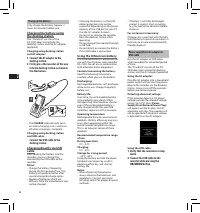
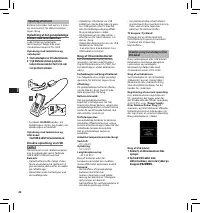
4 EN C S D A DE ES F R NL P L RU S V f Caution: • Unplug the AC adapter or power cord from the docking station and AC outlet when not using for extended periods of time. If this precaution is not followed and the docking station is damaged then fire may occur. AC adapter f Danger: • Be sure to use t...
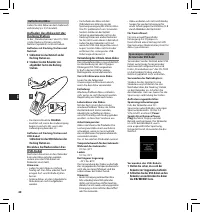
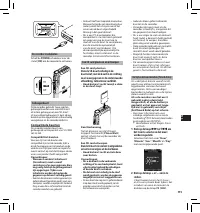
Page 7 - Compatible cards
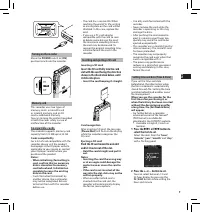
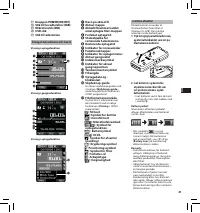
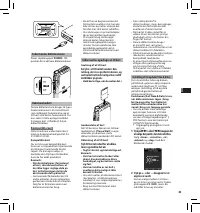
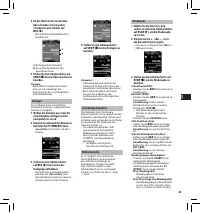
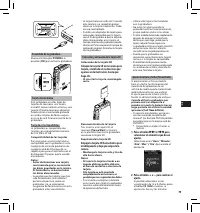
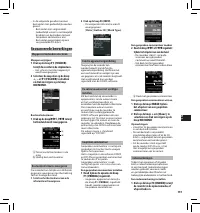
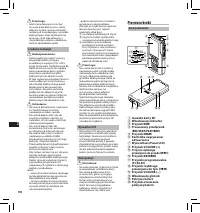
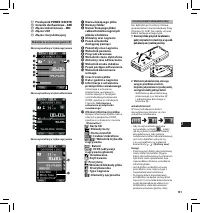
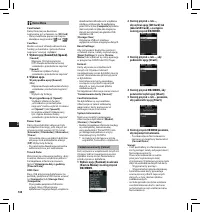
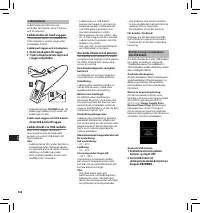
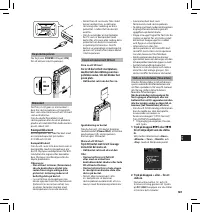
7 EN C S D A DE ES F R NL P L RU S V Turning on the recorder Move the POWER switch to [ ON] position to activate the recorder. Memory card This recorder uses two types of memory cards: a microSD card as internal memory, and an SD card as additional memory. You can remove the content recorded in both...
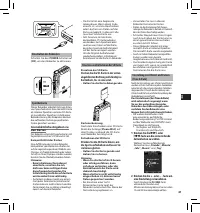
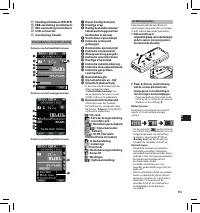
Page 8 - Basic operations; EXIT
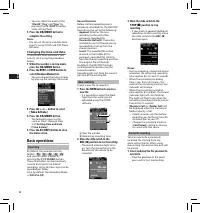
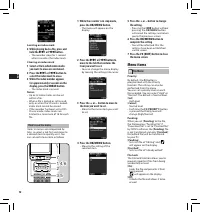
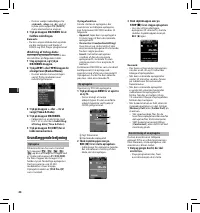
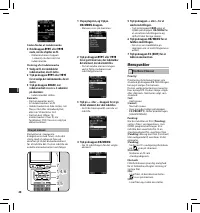
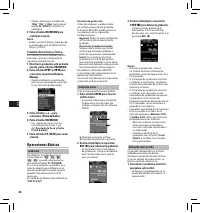
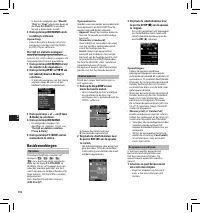
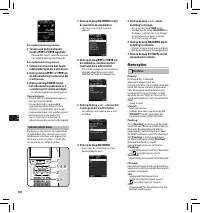
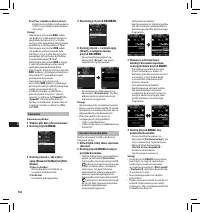
8 EN C S D A DE ES F R NL P L RU S V 3 Move the slide switch to the STOP ( 4 ) position to stop recording. • If you want to append additional recordings to the same file, move the slide switch to the REC ( s ) position again. a b Notes: • During recording, a beep will sound whenever the remaining re...
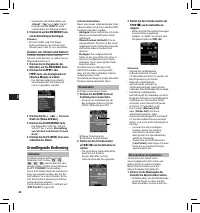
Page 11 - VERBAL; Advanced operations; FOLDER; ERASE
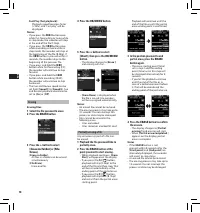
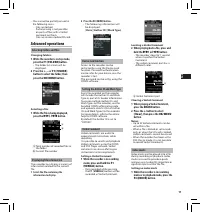
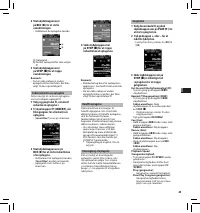
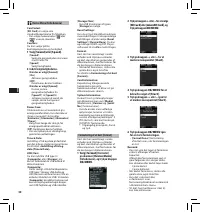
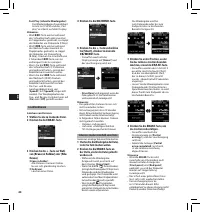
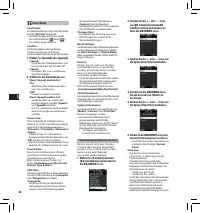
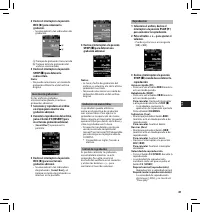
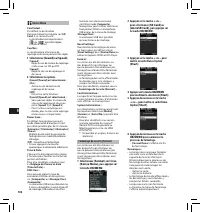
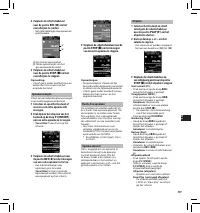
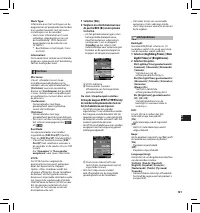
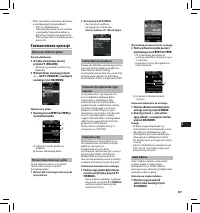
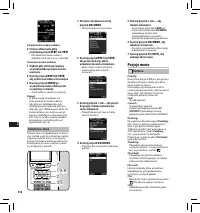
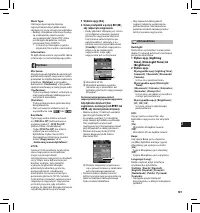
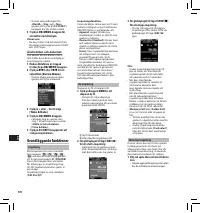
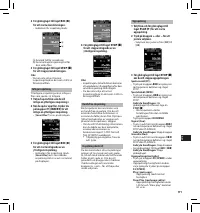
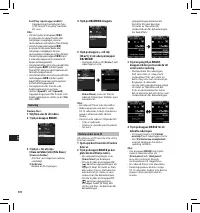
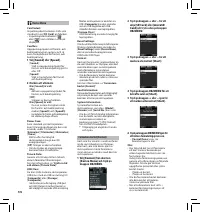
11 EN C S D A DE ES F R NL P L RU S V Setting the Author ID and Work Type Every file recorded on the recorder will include the Author ID and Work Type as part of its header information. To create multiple Author IDs and Work Types on the recorder, use the bundled ODMS software to create and upload a...
Page 12 - Menu items
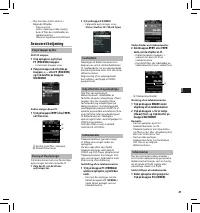
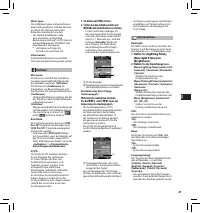
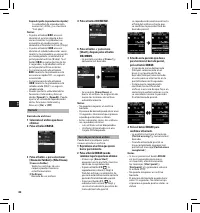
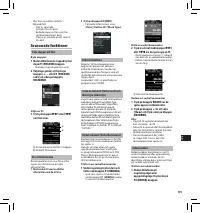
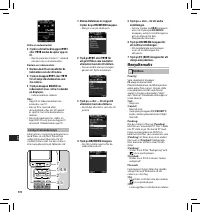
12 EN C S D A DE ES F R NL P L RU S V Menu items File Menu Priority: By default, the F2 button is programmed with the Priority function. The setting can also be performed from the menu. You can set a priority level on each file recorded. You can select “High” or “Normal”. The default is Normal level...
Page 15 - Customizing the recorder
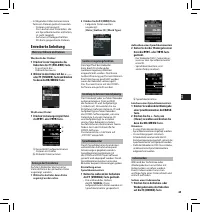
15 EN C S D A DE ES F R NL P L RU S V Customizing the recorder You can customize various settings of the recorder using the ODMS software. For more details, refer to the online help for ODMS software. Common settings: You can set the default values for each of the recorder’s Menu items. Administrati...
Page 16 - Managing files on your PC; ODMS and DSS Player software
16 EN C S D A DE ES F R NL P L RU S V Professional / Home Edition SP2 x64 Microsoft® Windows Vista®: Ultimate / Enterprise / Business / Home Premium / Home Basic SP2 (both x86/64) Microsoft® Windows 7®: Ultimate / Enterprise / Professional / Home Premium (both x86/64) For Workgroup: Microsoft® Windo...
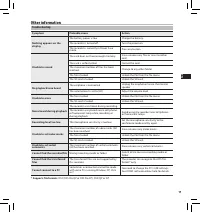
Page 17 - Other information; Troubleshooting
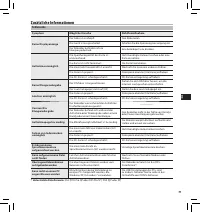
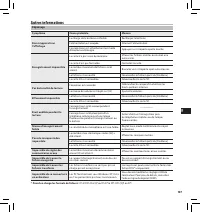
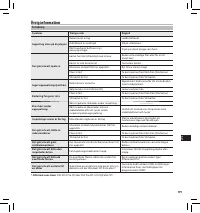
17 EN C S D A DE ES F R NL P L RU S V Other information Troubleshooting Symptom Probable cause Action Nothing appears on the display The batter y power is low. Charge the batter y. The recorder is turned of f. Turn the power on. The recorder is currently in Power Save mode. Press any button. Unable ...
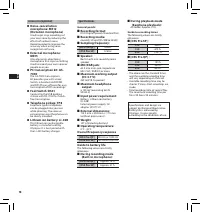
Page 18 - Specifications
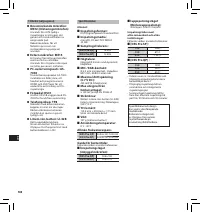
18 EN C S D A DE ES F R NL P L RU S V Accessories (optional) s Noise-cancellation microphone: ME12 (Dictation microphone) Used to get crisp recordings of your own voice by reducing the ef fects of ambient noise. Recommended to improve the accuracy when using voice -recognition sof tware. s External ...
Page 19 - Technical assistance and support; For customers in Europe:
19 EN C S D A DE ES F R NL P L RU S V Technical assistance and support The DS-7000 is part of the Olympus Professional Dictation System. Your certified professional dealer has been fully trained on the entire Olympus Professional Dictation range, including dictation, transcription devices and softwa...
Page 20 - Úvod; Bezpečnostní zásady
20 EN C S D A DE ES F R NL P L RU S V • Děkujeme, že jste zakoupili digitální diktafon Olympus. Informace o správném a bezpečném používání tohoto produktu naleznete v těchto pokynech k použití. Uschovejte si je pro budoucí použití. Aby bylo nahrávání úspěšné, doporučujeme před použitím diktafonu ote...
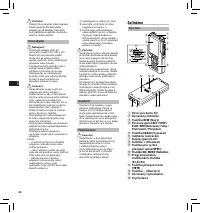
Page 22 - Začínáme; Popis částí
22 EN C S D A DE ES F R NL P L RU S V f Výstraha: • Pokud síťový adaptér nebo napájecí kabel nepoužíváte delší dobu, odpojte jej od kolébky. Pokud by byla poškozena kolébka, mohlo by dojít ke vzniku požáru. Síťový adaptér f Nebezpečí: • Používejte adaptér vždy při správném napětí (100–240 V stř.). P...
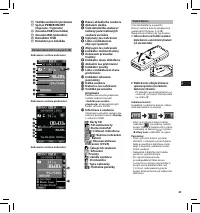
Page 23 - Konektor USB
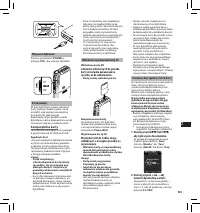
23 EN C S D A DE ES F R NL P L RU S V Zobrazení kontrolek stavu (panel LCD) Vložení baterie V tomto diktafonu je použita lithium-iontová baterie předepsaná společností Olympus (LI-42B). Nepoužívejte žádný jiný typ baterie. 1 Lehce zatlačte na tlačítko uvolnění krytu baterie a otevřete kryt baterií (...
Page 25 - Kompatibilní karty
25 EN C S D A DE ES F R NL P L RU S V Zapnutí diktafonu Posunutím přepínače POWER do polohy [ ON] aktivujte rekordér. Paměťová karta Tento diktafon používá dva typy paměťových karet: kartu microSD jako vnitřní paměť a kartu SD jako dodatečnou paměť. V případě poruchy diktafonu můžete bezpečně odebra...
Page 26 - Základní obsluha; Device Menu
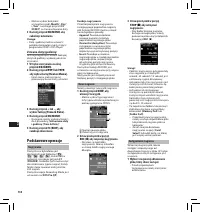
26 EN C S D A DE ES F R NL P L RU S V 3 Posunutím přepínače do polohy STOP ( 4 ) ukončíte nahrávání. • Pokud chcete do stejné složky přidat další nahrávky, posuňte přepínač opět do polohy REC ( s ) (Nahrávání). a b Poznámky: • V případě, že zbývající doba nahrávání dosáhne 60 sekund, 30 sekund a 10 ...
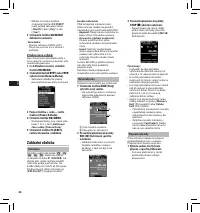
Page 28 - Stiskněte tlačítko
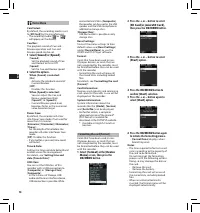
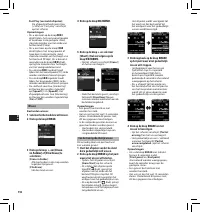
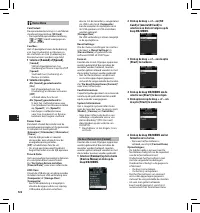
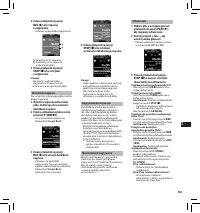
28 EN C S D A DE ES F R NL P L RU S V 3 V pozici, na které má částečné vymazání být ukončeno, stiskněte tlačítko ERASE znovu. • Na displeji se po dobu 8 sekund střídavě zobrazuje zpráva o místě (času) zahájení mazání zvoleném v bodě 2 a konečném bodě (času) mazání nastaveném v tomto bodě. • Necháte-...
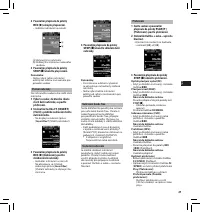
Page 29 - Pokročilá obsluha
29 EN C S D A DE ES F R NL P L RU S V Nastavení ID mluvčího a typu nahrávky Součástí hlavičky všech souborů nahraných do diktafonu je ID mluvčího a typ nahrávky. Seznam ID mluvčích a typů nahrávky v diktafonu vytvoříte pomocí dodaného softwaru ODMS. Nahrajte pomocí něj seznam dat (seznam ID mluvčích...
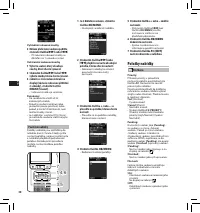
Page 30 - Položky nabídky
30 EN C S D A DE ES F R NL P L RU S V Položky nabídky File Menu Priority: Přiřazení priority v původním nastavení probíhá prostřednictvím tlačítka F2 . Nastavení lze rovněž provést přes nabídku.Prioritu můžete přiřadit ke každému nahranému souboru. Můžete vybrat »High« nebo »Normal«. Přednastavena j...
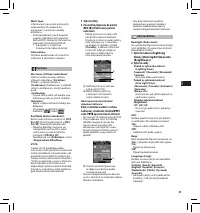
Page 33 - Přizpůsobení diktafonu
33 EN C S D A DE ES F R NL P L RU S V Přizpůsobení diktafonu Pomocí softwaru ODMS můžete přizpůsobovat různá nastavení diktafonu.Další podrobnosti viz nápověda online pro software ODMS. Nastavení společných: Pro každou z položek nabídky diktafonu můžete nastavit výchozí hodnoty. Nastavení administra...
Page 34 - Správa souborů v počítači; Software ODMS a DSS Player
34 EN C S D A DE ES F R NL P L RU S V Professional / Home Edition SP2 x64Microsoft® Windows Vista®:Ultimate / Enterprise / Business / Home Premium / Home Basic SP2 (oboje x86/64)Microsoft® Windows 7®:Ultimate / Enterprise / Professional / Home Premium (oboje x86/64) Pro pracovní skupinu: Microsoft® ...
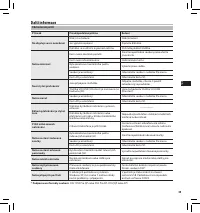
Page 35 - Další informace; Odstraňování potíží
35 EN C S D A DE ES F R NL P L RU S V Další informace Odstraňování potíží Příznak Pravděpodobná příčina Řešení Na displeji se nic nezobrazí Nízk ý stav baterie. Nabijte baterii. Je v ypnuto napájení. Zapněte diktafon. Diktafon se nachází v úsporném režimu. Stiskněte jakékoli tlačítko. Nelze nahrávat...
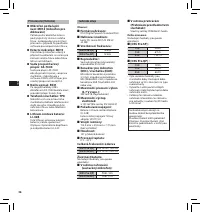
Page 36 - Technické údaje
36 EN C S D A DE ES F R NL P L RU S V Příslušenství (Volitelné) s Mikrofon potlačující šum: ME12 (mikrofon pro diktování ) Potlačuje vliv okolního šumu a posk y tuje čistý záznam vašeho hlasu. Je doporučen pro zv ýšení přesnosti v případě, že používáte sof tware pro rozpoznávání hlasu. s Externí mik...
Page 37 - Technická pomoc a podpora; Pro zákazníky v Evropě:
37 EN C S D A DE ES F R NL P L RU S V Technická pomoc a podpora Diktafon DS-7000 je součástí systému Olympus Professional Dictation System. Prodejce, u nějž jste produkt zakoupili, by měl být schopen vyřešit, případně opravit, mnoho obvyklých problému, se kterými se při používání tohoto systému může...
Page 38 - Introduktion; Sikkerhedsregler; Særligt for denne vejledning
38 EN C S D A DE ES F R NL P L RU S V • Tak, fordi du har købt en digital Olympus diktermaskine. Læs denne vejledning for at få yderligere oplysninger om, hvordan produktet bruges korrekt og sikkert. Gem betjeningsvejledningen til senere brug. Vi anbefaler, at du afprøver optagefunktionen og lydstyr...
Page 40 - Kom godt i gang; Delenes betegnelser
40 EN C S D A DE ES F R NL P L RU S V f Forsigtig: • Tag netadapteren eller netledningen ud af ladestationen og stikkontakten, når den ikke bruges i en længere periode. Hvis denne forholdsregel ikke overholdes, og ladestationen tager skade, kan der opstå brand. Netadapter f Fare: • Brug kun netadapt...
Page 41 - Isættelse af batteri; POWER
41 EN C S D A DE ES F R NL P L RU S V Visning af statusindikatorer (LCD-skærm) Isættelse af batteri Diktermaskinen anvender et litiumionbatteri fremstillet af Olympus (LI-42B). Der må ikke anvendes andre batterityper. 1 Tryk forsigtigt på batteriudløseren, og åbn batteridækslet som vist på illustrat...
Page 44 - Grundlæggende betjening
44 EN C S D A DE ES F R NL P L RU S V 3 Skub skydeknappen over på STOP ( 4 ) for at stoppe optagelsen. • Hvis du vil føje yderligere optagelser til samme fil, skal du skubbe skydeknappen over på REC ( s ) igen. a b Bemærk: • Der høres et bip under optagelsen, når der er 60, 30 og 10 sekunder tilbage...
Page 47 - Avanceret betjening
47 EN C S D A DE ES F R NL P L RU S V Valg af forfatter-id og arbejdstype Alle filer, der optages på diktermaskinen, indeholder et forfatter-id og en arbejdstype i filens header. Hvis du vil oprette flere forfatterid’er og arbejdstyper på diktermaskinen, skal du bruge det medfølgende program ODMS ti...
Page 48 - Menupunkter
48 EN C S D A DE ES F R NL P L RU S V Menupunkter File Menu (Filmenu) Priority: Prioriteringsfunktionen ligger som standard på knappen F2 . Indstillingen kan også vælges fra menuen.Du kan vælge prioriteringsniveau for hver optaget fil. Du kan vælge »High« eller »Normal«. Normal er valgt som standard...
Page 51 - Tilpasning af diktermaskinen
51 EN C S D A DE ES F R NL P L RU S V Tilpasning af diktermaskinen Du kan tilpasse diktermaskinens forskellige indstillinger efter behov ved hjælp af ODMS programmet.Yderligere oplysninger findes i onlinehjælpen til ODMS programmet. Fælles indstillinger: Du kan angive standardværdier for diktermaski...
Page 52 - Filhåndtering på din pc; ODMS- og DSS Player program
52 EN C S D A DE ES F R NL P L RU S V Professional / Home Edition SP2 x64Microsoft® Windows Vista®:Ultimate / Enterprise / Business / Home Premium / Home Basic SP2 (både x86 og x64)Microsoft® Windows 7®:Ultimate / Enterprise / Professional / Home Premium (både x86 og x64) Til arbejdsgrupper: Microso...
Page 53 - Øvrige oplysninger; Fejlfinding
53 EN C S D A DE ES F R NL P L RU S V Øvrige oplysninger Fejlfinding Symptom Mulig årsag Afhjælpning Skærmen er tom Batteriet er fladt. Oplad batteriet. Optageren er slukket. Tænd for strømmen. Diktermaskinen er i energisparefunktion. Tr yk på en vilkårlig knap. Kan ikke optage Kor tet mangler hukom...
Page 54 - Tekniske data
54 EN C S D A DE ES F R NL P L RU S V Tilbehør (ekstraudstyr) s Mikrofon med støjreduktion: ME12 (dikteringsmikrofon) Bruges til at få klare optagelser af din stemme gennem reduktion af støj fra omgivelserne.Anbefales for større nøjagtighed ved brug af talegenkendelsesprogrammer. s Ekstern mikrofon:...
Page 55 - Teknisk hjælp og support; Til brugere i Europa:
55 EN C S D A DE ES F R NL P L RU S V Teknisk hjælp og support DS-7000 er en del af Olympus Professional Dictation System. Din forhandler er uddannet til at fejlfinde og løse de mest almindelige problemer, der kan opstå på maskinen. Hvis du får brug for teknisk assistance eller hjælp i forbindelse m...
Page 56 - Einführung; Sicherheitshinweise; In dieser Anleitung verwendete Begriffe
56 EN C S D A DE ES F R NL P L RU S V • Vielen Dank für das Vertrauen in Olympus-Produkte, dass Sie uns mit dem Kauf des Digital Voice Rekorders erwiesen haben. Machen Sie sich bitte gründlich mit dem Inhalt dieser Bedienungsanleitung vertraut, damit stets ein einwandfreier und sicherer Betrieb des ...
Page 57 - Docking station
57 EN C S D A DE ES F R NL P L RU S V Sicherheitshinweise bei der Rekorderhandhabung f Achtung: • Halten Sie den Rekorder von Kindern und Kleinkindern fern, um folgende Gefahrensituation und die Gefahr schwerer Verletzungen zu vermeiden: 1 Versehentliches Verschlucken von Akkus, Speicherkarten oder ...
Page 58 - Allgemeines; Bezeichnung der Teile
58 EN C S D A DE ES F R NL P L RU S V f Vorsicht: • Ziehen Sie das Netzteil bzw. Netzkabel aus der Docking Station und der Steckdose, wenn das Gerät längere Zeit nicht verwendet wird. Sollte dieser Sicherheitshinweis missachtet und die Docking Station beschädigt werden, besteht Feuergefahr. Netzadap...
Page 62 - Grundlegende Bedienung
62 EN C S D A DE ES F R NL P L RU S V 3 Stellen Sie den Schiebeschalter auf STOP ( 4 ) um die Aufnahme zu stoppen. • Sollen zusätzliche Aufzeichnungen an eine Datei angehängt werden, so stellen Sie erneut den Schiebeschalter auf REC ( s ). a b Hinweise: • Sobald die verbleibende Aufnahmezeit 60, 30 ...
Page 65 - Erweiterte Anleitung
65 EN C S D A DE ES F R NL P L RU S V Einstellung der Autoren-ID und Aufgabentyp Der Dateikopf jeder auf dem Rekorder aufgenommenen Datei enthält die Autoren-ID und Aufgabentyp (=Arbeitsart). Verwenden Sie zur Erstellung mehrerer Autoren-ID und Aufgabentyp auf dem Rekorder das ODMS-Softwarepaket, um...
Page 66 - Menüpunkte
66 EN C S D A DE ES F R NL P L RU S V Menüpunkte File Menu Priority: Auf der F2 -Taste ist ab Werk die Prioritätsfunktion programmiert. Die Einstellung kann auch im Menü vorgenommen werden. Sie können für jede aufgenommene Datei eine Prioritätsstufe einstellen. Sie können „High“ oder „Normal“ wählen...
Page 70 - ODMS und DSS Player-Software
70 EN C S D A DE ES F R NL P L RU S V Professional / Home Edition SP2 x64Microsoft® Windows Vista®:Ultimate / Enterprise / Business / Home Premium / Home Basic SP2 (x86 und x64)Microsoft® Windows 7®:Ultimate / Enterprise / Professional / Home Premium (x86 und x64) Für Arbeitsgruppen: Microsoft® Wind...
Page 71 - Zusätzliche Informationen; Fehlersuche
71 EN C S D A DE ES F R NL P L RU S V Zusätzliche Informationen Fehlersuche Symptom Mögliche Ursache Abhilfemaßnahme Keine Displayanzeige Der Akku ist erschöpf t. Den Akku laden. Das Gerät ist ausgeschaltet. Schalten Sie die Spannungsversorgung ein. Der Rekorder befindet sich im Energiesparbetrieb. ...
Page 73 - Technische Hilfe und Support; Für Kunden in Europa:
73 EN C S D A DE ES F R NL P L RU S V Technische Hilfe und Support Der DS-7000 ist Teil der Professionellen Diktiersysteme von Olympus. Ihr zer tifizier ter Fachhändler ist bezüglich der gesamten Palette der Professionellen Olympus Diktiersysteme einschließlich aller Diktier- und Transkriptiongeräte...
Page 74 - Introducción; Precauciones de seguridad; Convenciones Utilizadas en este Manual
74 EN C S D A DE ES F R NL P L RU S V • Gracias por haber comprado esta grabadora de voz digital Olympus. Lea estas instrucciones para información sobre el uso correcto de este producto y para su seguridad. Guarde estas instrucciones en un lugar a mano para su referencia en el futuro. Para tener éxi...
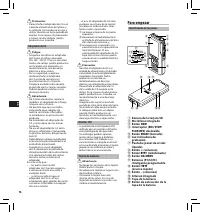
Page 76 - Para empezar; Identificación de las piezas
76 EN C S D A DE ES F R NL P L RU S V f Precaución: • Desenchufe el adaptador de CA o el cable de alimentación de la base y la salida de CA cuando no lo vaya a utilizar durante un largo periodo de tiempo. Si no sigue esta precaución y la base resulta dañada, podría producirse un incendio. Adaptador ...
Page 79 - Tarjetas Compatibles
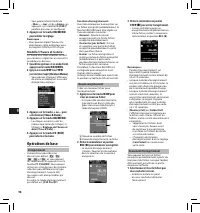
79 EN C S D A DE ES F R NL P L RU S V Encendido de la grabadora Mueva el interruptor POWER a la posición [ ON ] para activar la grabadora. Tarjeta de memoria Esta grabadora usa dos tipos de tarjetas de memoria: una tarjeta microSD como memoria interna y una tarjeta SD como memoria adicional. Puede r...
Page 80 - Operaciones Básicas; Cambio de la hora y fecha:
80 EN C S D A DE ES F R NL P L RU S V 3 Deslice el interruptor a la posición STOP ( 4 ) para detener la grabación. • Si desea añadir grabaciones adicionales al mismo archivo, deslice otra vez, el interruptor a la posición REC ( s ). a b Notas: • Durante la grabación, sonará un timbre cuando el tiemp...
Page 83 - Funciones avanzadas
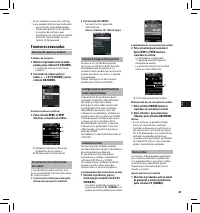
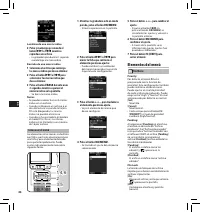
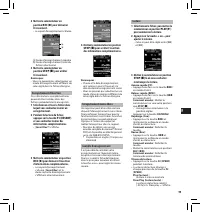
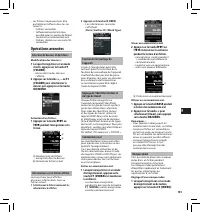
83 EN C S D A DE ES F R NL P L RU S V Configuración de identificación de autor y tipo de trabajo Cada archivo de grabación de la grabadora incluirá la identificación de autor y el tipo de trabajo como parte de la información del encabezado. Para crear múltiples identidades de autor y tipos de trabaj...
Page 84 - Elementos del menú
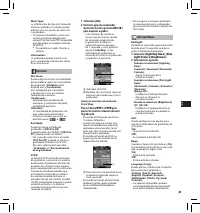
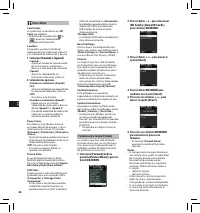
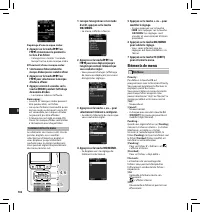
84 EN C S D A DE ES F R NL P L RU S V Elementos del menú File Menu Priority: Por defecto, el botón F2 está programado con la función de prioridad. Esta configuración también puede realizarse desde el menú.Puede ajustar el nivel de prioridad de cada archivo de grabación. Puede elegir entre “High” y “...
Page 87 - Personalización de la grabadora
87 EN C S D A DE ES F R NL P L RU S V Personalización de la grabadora Puede personalizar varios ajustes de la grabadora con el software ODMS.Para más información, consulte la Ayuda en línea del software ODMS. Ajustes comunes: Puede configurar los valores por defecto para cada elemento del menú de la...
Page 88 - Software DSS Player y ODMS
88 EN C S D A DE ES F R NL P L RU S V Professional / Home Edition SP2 x64Microsoft® Windows Vista®:Ultimate / Enterprise / Business / Home Premium / Home Basic SP2 (ambos x86/64)Microsoft® Windows 7®:Ultimate / Enterprise / Professional / Home Premium (ambos x86/64) Para grupo de trabajo: Microsoft®...
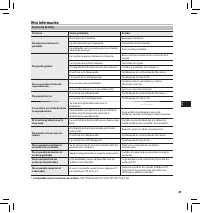
Page 89 - Otra información; Resolución de fallos
89 EN C S D A DE ES F R NL P L RU S V Otra información Resolución de fallos Síntoma Causa probable Acción No aparece nada en la pantalla Nivel bajo de la batería. Recargue la batería. La alimentación está apagada. Encienda la alimentación. La grabadora está actualmente en el modo ahorro de energía. ...
Page 91 - Asistencia y ayuda técnica; FInformación para clientes europeos:
91 EN C S D A DE ES F R NL P L RU S V Asistencia y ayuda técnica DS-7000 es un sistema profesional de dictado de Olympus. El representante profesional cer tificado de Olympus ha recibido una amplia formación acerca de la gama de sistemas profesionales de dictado de Olympus, incluyendo sof tware y di...
Page 92 - Précautions de sécurité; Précautions d’utilisation; Conventions utilisées dans ce manuel
92 EN C S D A DE ES F R NL P L RU S V • Merci d’avoir porté votre choix sur cet enregistreur vocal numérique. Lisez ce mode d’emploi pour les informations concernant l’utilisation de l’appareil. Conservez-le à portée de la main pour toute question ultérieure. Nous vous recommandons de tester la fonc...
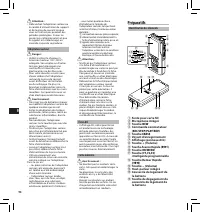
Page 94 - Préparatifs; Identification des éléments
94 EN C S D A DE ES F R NL P L RU S V f Attention : • Débranchez l’adaptateur secteur ou le cordon d’alimentation du support et de la prise de courant lorsque vous ne l’utilisez pas pendant des périodes prolongées. Si vous ne prenez pas cette précaution et que le support est endommagé, un incendie r...
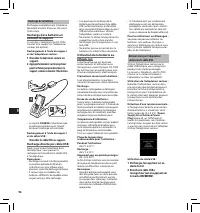
Page 97 - Description de la carte
97 EN C S D A DE ES F R NL P L RU S V Mise en marche de l’enregistreur Mettez le commutateur POWER en position [ ON ] pour mettre l’enregistreur en marche. Carte mémoire Cet enregistreur utilise deux types de carte mémoire : une carte microSD en tant que mémoire interne et une carte SD en tant que m...
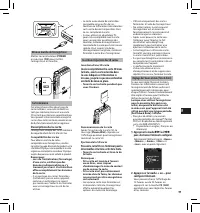
Page 98 - Opérations de base
98 EN C S D A DE ES F R NL P L RU S V 3 Mettez le commutateur en position STOP ( 4 ) pour arrêter l’enregistrement. • Si vous souhaitez ajouter un enregistrement complémentaire au même fichier, mettez à nouveau le commutateur en position REC ( s ). a b Remarques : • Pendant l’enregistrement, un bip ...
Page 101 - Opérations avancées
101 EN C S D A DE ES F R NL P L RU S V Réglage de l’Identifiant Auteur et du type de travail Chaque fichier enregistré sur l’appareil comprend l’Identifiant Auteur et le type de travail, qui font partie des informations d’en-tête. Pour créer des Identifiant Auteur et des types de travail, utilisez l...
Page 102 - Eléments de menu
102 EN C S D A DE ES F R NL P L RU S V Eléments de menu File Menu Priority : Par défaut, la touche F2 est programmée avec la fonction Priority. Vous pouvez également effectuer le réglage à partir du menu.Vous pouvez régler un niveau de priorité pour chaque fichier enregistré. Vous pouvez sélectionne...
Page 105 - Personnalisation de l’enregistreur
105 EN C S D A DE ES F R NL P L RU S V Personnalisation de l’enregistreur Vous pouvez personnaliser différents réglages de l’enregistreur à l’aide du logiciel ODMS.Pour plus de détails, veuillez consulter l’aide en ligne du logiciel ODMS. Paramètres communs : Vous pouvez régler les valeurs par défau...
Page 106 - Logiciels ODMS et DSS Player
106 EN C S D A DE ES F R NL P L RU S V Professional / Home Edition SP2 x64Microsoft® Windows Vista® :Ultimate / Enterprise / Business / Home Premium / Home Basic SP2 (tous deux x86/64)Microsoft® Windows 7® :Ultimate / Enterprise / Professional / Home Premium (tous deux x86/64) Pour groupe de travail...
Page 107 - Autres informations; Dépannage
107 EN C S D A DE ES F R NL P L RU S V Autres informations Dépannage Symptôme Cause probable Mesure Rien n’apparaît sur l’affichage La charge de la batterie est faible. Rechargez la batterie. L’alimentation est coupée. Allumez l’alimentation. L’enregistreur est actuellement en mode d’économie d’éner...
Page 109 - Assistance technique et soutien; Pour les clients résidant en Europe :
109 EN C S D A DE ES F R NL P L RU S V Assistance technique et soutien Le DS-7000 fait partie du système de dictée professionnel Olympus. Votre revendeur professionnel certifié a été entièrement formé à toute la gamme de systèmes de dictée professionnels Olympus, y compris les dispositifs et logicie...
Page 110 - Inleiding; Veiligheidsmaatregelen
110 EN C S D A DE ES F R NL P L RU S V • Hartelijk dank voor uw aankoop van een Olympus digitale voicerecorder. Lees deze instructies voor informatie over een correct en veilig gebruik van het product. Houd de instructies bij de hand zodat u deze later opnieuw kunt raadplegen. Voor geslaagde opnamen...
Page 112 - Aan de slag; Overzicht van onderdelen
112 EN C S D A DE ES F R NL P L RU S V f Let op: • Koppel de wisselstroomadapter of de voedingskabel los van de houder en het stopcontact wanneer u het apparaat gedurende lange tijd niet gebruikt. Als u deze maatregel niet naleeft en de houder schade oploopt, kan er brand ontstaan. Wisselstroomadapt...
Page 115 - Compatibele kaarten
115 EN C S D A DE ES F R NL P L RU S V De recorder inschakelen Schuif de POWER -schakelaar naar de stand [ ON ] om de recorder te activeren. Geheugenkaart Deze recorder gebruikt twee soorten geheugenkaarten: een microSD-kaart als intern geheugen en een SD-kaart als aanvullend geheugen. U kunt de op ...
Page 116 - Basisbewerkingen; De tijd en datum wijzigen:
116 EN C S D A DE ES F R NL P L RU S V 3 Verplaats de schuifschakelaar naar de positie STOP ( 4 ) om de opname te stoppen. • Als u extra opnamen wilt toevoegen aan hetzelfde bestand, moet u de schuifschakelaar opnieuw naar de positie REC ( s ) schuiven. a b Opmerkingen: • Tijdens de opname wordt een...
Page 119 - Geavanceerde bewerkingen
119 EN C S D A DE ES F R NL P L RU S V De auteursnaam en het werktype instellen Elk bestand dat op de recorder is opgenomen, zal de auteursnaam en het werktype bevatten als onderdeel van de koptekstinformatie. Om meerdere auteursnamen en werktypes op de recorder te maken, kunt u de bijgeleverde ODMS...
Page 120 - Menuopties
120 EN C S D A DE ES F R NL P L RU S V Menuopties File Menu Priority: De knop F2 is standaard geprogrammeerd met de prioriteitsfunctie. De instelling kan ook vanaf het menu worden uitgevoerd. Voor elk opgenomen bestand kunt u een prioriteitsniveau instellen. U hebt de keuze tussen “High” en “Normal”...
Page 123 - De recorder aanpassen
123 EN C S D A DE ES F R NL P L RU S V De recorder aanpassen U kunt de verschillende instellingen van de recorder aanpassen met de ODMS-software . Zie de online Help voor de ODMS-software voor meer informatie. Gemeenschappelijke instellingen: U kunt de standaardwaarden voor elk menu-item van de reco...
Page 124 - Bestanden beheren op uw PC; Minimumvereisten
124 EN C S D A DE ES F R NL P L RU S V Professional / Home Edition SP2 x64 Microsoft® Windows Vista®: Ultimate / Enterprise / Business / Home Premium / Home Basic SP2 (zowel x86 als 64) Microsoft® Windows 7®: Ultimate / Enterprise / Professional / Home Premium (zowel x86 als 64) Werkgroep-gebruik: M...
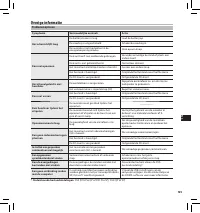
Page 125 - Overige informatie; Problemen oplossen
125 EN C S D A DE ES F R NL P L RU S V Overige informatie Problemen oplossen Symptoom Vermoedelijke oorzaak Actie Het scherm blijft leeg De batterijstroom is laag. Laad de batterij op . De voeding is uitgeschakeld. Schakel de voeding in. De recorder staat momenteel in de energiebesparingsmodus. Druk...
Page 126 - Specificaties; Tijdens de opnamemodus
126 EN C S D A DE ES F R NL P L RU S V Accessoires (optioneel) s Ruisonderdrukkende microfoon: ME12 (dictaatmicrofoon) Wordt gebruikt om zuivere opnamen van uw stem te maken door de effecten van omgevingsruis te beperken. Aanbevolen om de nauwkeurigheid te verbeteren bij het gebruik van spraakherken...
Page 127 - Technische bijstand en ondersteuning; Voor klanten in Europa:
127 EN C S D A DE ES F R NL P L RU S V Technische bijstand en ondersteuning De DS-7000 is een onderdeel van het professionele dictaatsysteem van Olympus. Uw dealer is opgeleid om vaak voorkomende problemen met alle dictaatsystemen van Olympus, zoals problemen met het opnemen, de transcriptieapparatu...
Page 128 - Wprowadzenie; Środki ostrożności; Konwencje stosowane w tym podręczniku
128 EN C S D A DE ES F R NL P L RU S V • Dziękujemy Państwu za zakup dyktafonu cyfrowego firmy Olympus. Prosimy o przeczytanie tej instrukcji obsługi w celu uzyskania informacji na temat prawidłowego i bezpiecznego korzystania z tego urządzenia. Instrukcję obsługi należy zachować do użytku w przyszł...
Page 130 - Pierwsze kroki; Nazwy elementów
130 EN C S D A DE ES F R NL P L RU S V f Przestroga: • Jeżeli stacja dokująca ma nie być używana przez dłuższy czas, należy odłączyć zasilacz sieciowy lub kabel sieciowy od stacji dokującej i gniazdka elektrycznego. Jeżeli użytkownik nie zastosuje się do tego zalecenia, a stacja dokująca ulegnie usz...
Page 133 - Kompatybilne karty
133 EN C S D A DE ES F R NL P L RU S V Włączanie dyktafonu Przesuń przełącznik POWER w pozycję [ ON ], aby włączyć dyktafon. Karta pamięci W tym dyktafonie można stosować karty pamięci dwóch typów: kartę microSD jako pamięć wewnętrzną oraz kartę SD jako pamięć dodatkową. W przypadku usterki dyktafon...
Page 134 - Podstawowe operacje
134 EN C S D A DE ES F R NL P L RU S V 3 Ustaw przełącznik w pozycji STOP ( 4 ) aby zatrzymać nagrywanie. • Aby dodać kolejne nagrania do tego samego pliku, należy ponownie przesunąć przełącznik do pozycji REC ( s ). a b Uwagi: • Podczas nagrywania, gdy pozostały czas nagrania jest równy 60 sekund, ...
Page 136 - Naciśnij przycisk
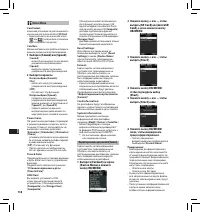
136 EN C S D A DE ES F R NL P L RU S V 3 W miejscu, w którym chcesz zakończyć kasowanie częściowe, naciśnij ponownie przycisk ERASE . • Początkowy punkt kasowania (czas) ustawiony w kroku 2 i końcowy punkt kasowania (czas) ustawiony w tym kroku będą wyświetlane naprzemiennie przez 8 sekund. • Jeśli ...
Page 137 - Zaawansowane operacje
137 EN C S D A DE ES F R NL P L RU S V Ustawianie ID użytkownika i typu nagrania ID użytkownika i typ nagrania to część nagłówka każdego pliku nagranego w dyktafonie. Aby utworzyć kilka ID użytkownika i typów nagrań w dyktafonie, należy użyć dostarczonego w zestawie programu ODMS Player w celu utwor...
Page 138 - Pozycje menu
138 EN C S D A DE ES F R NL P L RU S V Pozycje menu File Menu Priority: Domyślnie przycisk F2 jest przypisany do funkcji Priority. Opcję tę można także wybrać z menu.Dla każdego nagranego pliku można ustawić poziom priorytetu. Można wybrać opcję „High“ lub „Normal“. Domyślne ustawienie poziomu to No...
Page 141 - Dostosowywanie dyktafonu
141 EN C S D A DE ES F R NL P L RU S V Dostosowywanie dyktafonu Korzystając z oprogramowania ODMS, można dostosować dyktafon do własnych preferencji.Szczegółowe informacje zawiera pomoc online do programu ODMS. Ustawienia wspólne: Można ustawić wartości domyślne pozycji menu dyktafonu. Ustawienia ad...
Page 142 - Programy ODMS i DSS Player
142 EN C S D A DE ES F R NL P L RU S V Professional / Home Edition SP2 x64Microsoft® Windows Vista®:Ultimate / Enterprise / Business / Home Premium / Home Basic SP2 (systemy x86/64)Microsoft® Windows 7®:Ultimate / Enterprise / Professional / Home Premium (systemy x86/64) Instalacja w grupie roboczej...
Page 143 - Inne informacje; Rozwiązywanie problemów
143 EN C S D A DE ES F R NL P L RU S V Inne informacje Rozwiązywanie problemów Objaw Prawdopodobna przyczyna Działanie Brak obrazu na w yświetlaczu Poziom energii baterii akumulatorowej jest niski. Naładuj baterię akumulatorową. Wyłączone zasilanie. Włącz zasilanie. Dyktafon działa obecnie w tr ybie...
Page 144 - Specyfikacja techniczna
144 EN C S D A DE ES F R NL P L RU S V Akcesoria (opcjonalne) s Mikrofon wytłumiający zakłócenia: ME12 (mikrofon przeznaczony do dyktowania) Umożliwia uzyskanie w yższej jakości nagrania głosu przez zmniejszenie zakłóceń pł ynących z otoczenia. Zwiększa precyzję przetwarzania przy korzystaniu z prog...
Page 145 - Wsparcie techniczne; Informacja dla użytkowników w Europie:
145 EN C S D A DE ES F R NL P L RU S V Wsparcie techniczne Dyktafon DS-7000 należy do linii profesjonalnych rozwiązań do dyktowania firmy Olympus. Lokalni certyfikowani sprzedawcy zostali kompleksowo przeszkoleni z zakresu wszystkich rozwiązań do dyktowania firmy Olympus, w tym z urządzeń i programó...
Page 146 - Введение; Меры предосторожности
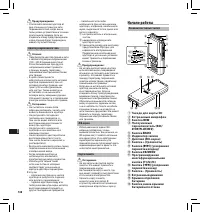
146 EN C S D A DE ES F R NL P L RU S V • Благодарим Вас за покупку ЦИФРОВОГО ДИКТОФОНА OLYMPUS. Внимательно прочтите эту инструкцию, содержащую информацию о правильном и безопасном использовании диктофона. Храните инструкцию в доступном месте, чтобы в будущем Вы могли легко ее найти. Для обеспечения...
Page 148 - Начало работы; Названия составных частей
148 EN C S D A DE ES F R NL P L RU S V f Предупреждение: • Отключайте сетевой адаптер от док-станции и от розетки сети переменного тока, когда вы не пользуетесь устройством в течение длительного периода. Если не следовать этому предупреждению и док-станция будет повреждена, может случиться пожар. Ад...
Page 150 - Зарядка батареи; Подключите к док-станции кабель
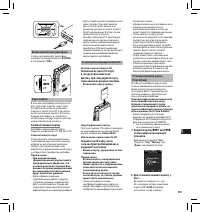
150 EN C S D A DE ES F R NL P L RU S V • В зависимости от допустимой мощности USB-разъема вашего ПК зарядка батареи с помощью USB-кабеля может оказаться недостаточной. В этом случае воспользуйтесь сетевым адаптером. • Не устанавливайте диктофон в док-станцию и не вынимайте его, пока он работает. • Н...
Page 151 - Совместимые карты
151 EN C S D A DE ES F R NL P L RU S V Включение питания диктофона Чтобы активировать диктофон, переместите выключатель POWER в положение [ ON ]. Карта памяти В данном диктофоне используется два типа карт памяти: карта типа microSD в качестве внутренней памяти и карта типа SD в качестве дополнительн...
Page 152 - Основные операции
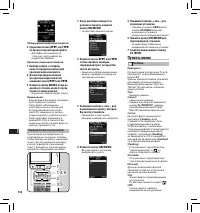
152 EN C S D A DE ES F R NL P L RU S V 3 Чтобы остановить запись, переведите ползунковый переключатель в положение STOP ( 4 ). • Если вы хотите добавить к этому же файлу дополнительные записи, снова переведите ползунковый переключатель в положение REC ( s ). a b Примечания: • В процессе записи кажды...
Page 155 - Расширенные операции
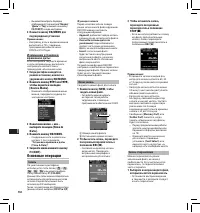
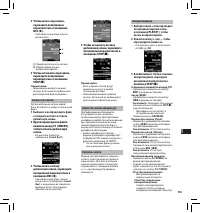
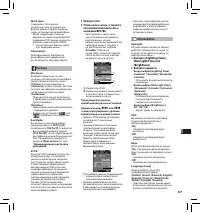
155 EN C S D A DE ES F R NL P L RU S V Имя автора и Тип задания В заголовок каждого файла, записанного на диктофоне, включены такие сведения как Имя автора и Тип задания. Чтобы задать в диктофоне несколько идентификаторов авторов и типов работы, используйте входящую в комплект поставки программу ODM...
Page 156 - Пункты меню
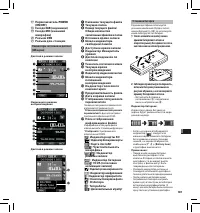
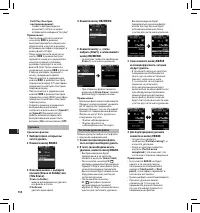
156 EN C S D A DE ES F R NL P L RU S V Пункты меню File Menu Приоритет: По умолчанию для функции Priority (приоритет) запрограммирована кнопка F2 . Уровень приоритета можно установить для каждого записанного файла. Можно выбрать вариант “High” или “Normal”. По умолчанию установлен уровень Normal.[ S...
Page 160 - Минимальные требования
160 EN C S D A DE ES F R NL P L RU S V Минимальные требования Программное обеспечение ODMS (Система Windows)Операционная система: Для одного пользователя: Microsoft® Windows® XP:Professional / Home Edition SP3 x86Professional / Home Edition SP2 x64Microsof t® Windows Vista®:Ultimate / Enterprise / B...
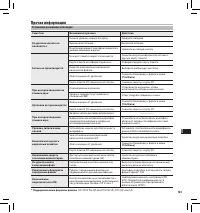
Page 161 - Прочая информация; Устранение возможных неполадок
161 EN C S D A DE ES F R NL P L RU S V Прочая информация Устранение возможных неполадок Симптом Возможная причина Действие На дисплее ничего не появляется Низкий уровень заряда батареи. Зарядите батарею. Вык лючено питание. Вк лючите питание. В настоящий момент диктофон находится в режиме экономии э...
Page 162 - Спецификации
162 EN C S D A DE ES F R NL P L RU S V Аксессуары (опциональные) s Монофонический микрофон с подавлением шумов: ME12 (микрофон для дик товки) Используется для получения чистой записи Вашего голоса благодаря снижению влияния окру жающих шумов.Рекомендуется для повышения точности работы ПО для распозн...
Page 163 - Техническая помощь и обслуживание; Для покупателей в Европе:
163 EN C S D A DE ES F R NL P L RU S V Техническая помощь и обслуживание DS-7000 является частью профессиональной системы дик товки Olympus Professional Dictation System. Ваш уполномоченный профессиональный дилер прошел полный к урс обучения по всему ассортимент у профессиональной системы дик товки ...
Page 164 - Säkerhetsföreskrifter
164 EN C S D A DE ES F R NL P L RU S V • Tack för att du köpte en digital diktafon från Olympus. Läs dessa instruktioner för information om hur produkten används på ett korrekt och säkert sätt. Ha instruktionerna till hands för framtida användning. För att säkerställa lyckade inspelningar, rekommend...
Page 166 - Komma igång; Identifikation av delar
166 EN C S D A DE ES F R NL P L RU S V f Se upp: • Koppla ur nätadaptern eller strömkabeln från vaggan och nätuttaget om den inte används under en längre tid. Om denna säkerhetsåtgärd inte följs och vaggan skadas, kan det leda till brand. Nätadapter f Fara: • Använd alltid en nätadapter med rätt spä...
Page 170 - Grundläggande funktioner
170 EN C S D A DE ES F R NL P L RU S V 3 För glidreglaget till läget STOP ( 4 ) för att stoppa inspelning. • Om du vill lägga till ytterligare inspelningar till samma fil för du glidreglaget till läget REC ( s ) igen. a b Obs: • Under inspelningen kommer ett pip att höras när återstående inspelnings...
Page 173 - Avancerade funktioner
173 EN C S D A DE ES F R NL P L RU S V Ställa in Author ID (Författar-ID) och Work Type (Arbetstyp) Varje fil som spelas in med röstinspelaren inkluderar Author ID och Work Type som en del av filhuvudet. Skapa flera olika Author ID och Work Type på röstinspelaren genom att använda paketet med ODMS p...
Page 174 - Menyalternativ
174 EN C S D A DE ES F R NL P L RU S V Menyalternativ File Menu Priority: Som standard är knappen F2 programmerad med Prioritetsfunktionen. Inställningen kan också göras från menyn. Du kan ställa in en prioritetsnivå för varje fil som spelas in. Du kan välja mellan ”High” och ”Normal”. Standardinstä...
Page 177 - Anpassa röstinspelaren
177 EN C S D A DE ES F R NL P L RU S V Anpassa röstinspelaren Du kan anpassa ett flertal av röstinspelarens inställningar med hjälp av programvaran ODMS.Mer information finns i onlinehjälpen till programvaran ODMS. Gemensamma inställningar: Du kan ställa in standardvärden för var och en av röstinspe...
Page 178 - Hantera filer på din PC; Programvaran ODMS och DSS Player
178 EN C S D A DE ES F R NL P L RU S V Professional / Home Edition SP2 x64Microsoft® Windows Vista®:Ultimate / Enterprise / Business / Home Premium / Home Basic SP2 (både x86/64)Microsoft® Windows 7®:Ultimate / Enterprise / Professional / Home Premium (både x86/64) För arbetsgrupper: Microsoft® Wind...
Page 179 - Övrig information; Felsökning
179 EN C S D A DE ES F R NL P L RU S V Övrig information Felsökning Symtom Trolig orsak Åtgärd Ingenting visas på displayen Batterinivån är låg. Ladda batteriet. Diktafonen är avstängd. Slå på strömmen. Röstinspelaren befinner sig i energisparläget. Tr yck på vilken knapp som helst. Det går inte att...
Page 180 - Specifikationer
180 EN C S D A DE ES F R NL P L RU S V Tillbehör (säljs separat) s Brusminskande mikrofon: ME12 (Dikteringsmikrofon) Används för att få tydliga inspelningar av din egen röst genom att minska ef fekten av omgivande ljud.Rekommenderas för att förbättra precision när röstigenkänningsprogram används. s ...
Page 181 - Teknisk hjälp och support
181 EN C S D A DE ES F R NL P L RU S V Teknisk hjälp och support DS-7000 är den del av Olympus Professional Dictation System. Din återförsäljare har genomgått en fullständig utbildning för att kunna göra felsökningar på alla produkter i Olympus Professional Dictation-sortimentet, inklusive diktering...
Page 182 - MEMO
Page 183 - Olympus Service Department
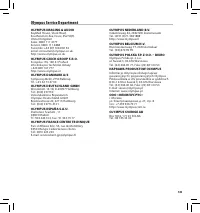
183 Olympus Service Department OLYMPUS IMAGING & AUDIO KeyMed House, Stock Road, Southend-on-Sea, Essex, SS2 5QH, United KingdomSales: 0800 111 4777Service: 0800 111 4888Facsimile: +44 (0)1702445134email: [email protected]http://www.olympus.co.uk OLYMPUS CZECH GROUP S.R.O. Evropska 176, 160 41 P...
Page 184 - 2 Waterloo Rd, North Ryde NSW 2113, Australia
E1-BS0821- 01 AP1202 OLYMPUS IMAGING CORP. Shinjuku Monolith, 3-1 Nishi-Shinjuku 2-chome, Shinjuku-ku, Tokyo 163- 0914, Japan. Tel. +81 (0)3-3340 -2111 http://www.olympus.com OLYMPUS EUROPA HOLDING GMBH (Premises/Goods deliver y) Wendenstrasse 14-18, 20097 Hamburg, Germany. Tel. +49 (0)40 -237730 (L...


 Olympus DM-10
Manual
Olympus DM-10
Manual
 Olympus DM-20
Manual
Olympus DM-20
Manual
 Olympus DM-3
Manual
Olympus DM-3
Manual
 Olympus DM-420
Manual
Olympus DM-420
Manual
 Olympus DM-450
Manual
Olympus DM-450
Manual
 Olympus DM-5
Manual
Olympus DM-5
Manual
 Olympus DM-550
Manual
Olympus DM-550
Manual
 Olympus DM-901
Manual
Olympus DM-901
Manual
 Olympus DR-1200
User Manual
Olympus DR-1200
User Manual
 Olympus DR-2100
User Manual
Olympus DR-2100
User Manual
 Olympus DR-2200
User Manual
Olympus DR-2200
User Manual
 Olympus DR-2300
User Manual
Olympus DR-2300
User Manual
 Olympus DS-10
User Manual
Olympus DS-10
User Manual
 Olympus DS-20
Manual
Olympus DS-20
Manual
 Olympus DS-2300
Manual
Olympus DS-2300
Manual
 Olympus DS-2400
Manual
Olympus DS-2400
Manual
 Olympus DS-30
Manual
Olympus DS-30
Manual
 Olympus DS-3400
Manual
Olympus DS-3400
Manual