Page 2 - CONTENU; IMPORTANT SAFEGUARDS; SAVE THESE; WARNING
EN 3 EN FR 2 CONTENT/ CONTENU These instructions are part of the appliance. Read all instructions and safety instructions before operating the appliance. Ces directives font partie de l’appareil. Lire toutes les directives et consignes de sécurité avant d’utiliser l’appareil. ASSISTANCE VIDEOS ARE A...
Page 3 - CONSIGNES DE SÉCURITÉ; CONSERVER; AVERTISSEMENT; OTHER SAFEGUARDS
EN FR 5 FR 4 CONSIGNES DE SÉCURITÉ Lorsque vous utilisez un appareil électrique, il est important de toujours respecter les consignes de sécurité de base, notamment: • Lire toutes les directives. • Ne pas utiliser à l’extérieur. • Ne pas laisser le câble d’alimentation pendre au bout de la table ou ...
Page 4 - AUTRES CONSIGNES DE SÉCURITÉ
FR 7 EN 6 OTHER SAFEGUARDS • Do not put fingers into the capsule compartment or capsule shaft; risk of injury! • Water could flow around a capsule when not perforated by the blades and damage the appliance. • Be careful not to injure yourself on sharp points or trap your fingers when reaching inside...
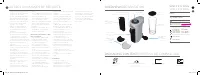
Page 5 - CONTENU DE L’EMBALLAGE; SPÉCIFICATIONS
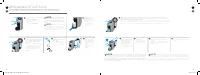
2nd is wrong My Machine ENV155 120 Volts, 60 Hertz, 1350 Watts (USA/CA) ~ 10�1 lb (~ 4�6 kg) 37�1 fl oz�* (1�1 l*) 33�8 fl oz�* (1�7 l*) If water tank on the side / Si le réservoir d'eau est sur le coté 8�7 in / 220 mm* 9�1 in / 232 mm* If water tank at the back / Si le réservoir d'eau est à l'arriè...
Page 6 - MANIPULATION DE L'APPAREIL; SUPPORT DE TASSE
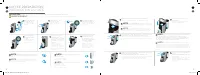
2 1 2 1 EN FR EN FR 11 10 AVERTISSEMENT: Soyez prudent en enlevant le support de tasse car il peut contenir du liquide chaud. Assurez-vous de bien mettre le support en place avant d'y placer une tasse. CAUTION: Be careful when removing the cup support since it may contain warm liquid. Make sure the ...
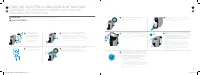
Page 8 - PRÉPARATION DU CAFÉ
2 1 25 sec. EN FR EN FR 15 14 1 Fill the water tank with fresh potable water. Remplir le réservoir avec de l’eau potable fraîche. 6 Open the machine head by pushing the lever up. The machine head will open automatically, with an electrical mechanism. Pour ouvrir la tête de la machine, appuyer sous l...
Page 10 - NETTOYAGE
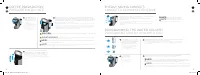
3 sec. 3 x 3 x / 3 sec. 2 1 2 1 3 x / 2 sec. 3 sec. EN FR EN FR 19 18 NOTE: Choose function within 2 minutes or else the machine will go back to Ready mode. ORANGE light will blink 3 times every 2 seconds, indicating the “Factory reset” function. NOTE: Si la fonction n'est pas choisie en moins de 2 ...
Page 11 - EMPTYING THE SYSTEM; VIDER LA MACHINE; DÉTARTRAGE
2 X 3 sec. 3 sec. 3 sec. 10 0 m l ℮ 3 sec. 2 1 2 1 EN FR EN FR 21 20 1 Empty the water tank and put it in place. Vider le réservoir d’eau et le remettre en place. 2 Open the machine head and let the used capsule be ejected. Close the machine. Empty the capsule container. Ouvrir la partie supérieure ...
Page 13 - RÉSUMÉ DES LUMIÈRES ET CLIGNOTEMENTS
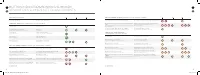
EN FR EN FR 25 24 BUTTON INDICATORS/BLINKING SUMMARY/ RÉSUMÉ DES LUMIÈRES ET CLIGNOTEMENTS NO LIGHT / PAS DE LUMIÈRE: No light on the button/ La Lumière est éteinte Machine OFF ➔ see point 1* Machine éteinte ➔ voir point 1* GREEN LIGHT - NORMAL USE / LUMIERE VERTE - UTILISATION NORMALE: Steady light...
Page 14 - TROUBLESHOOTING
EN EN 27 26 1� No light on the button. ➔ The machine has turned “OFF” automatically; push the button to turn the machine “ON”. ➔ Check the plug, voltage, and fuse. 2� No coffee. ➔ Check that the light on the button is GREEN. ➔ Check that the water tank is filled and is well positioned. ➔ Check that ...
Page 15 - GUIDE DE DÉPANNAGE
FR FR 29 28 1� Bouton éteint. ➔ La machine s'est éteinte automatiquement. Appuyer sur le bouton pour la mettre sous tension. ➔ Vérifier le connecteur, le voltage et les fusibles. 2� Pas de café. ➔ Vérifier que la lumière VERTE est allumée. ➔ Vérifier que le réservoir d'eau est rempli et bien install...
Page 16 - CONTACT THE; DISPOSAL AND ENVIRONMENTAL PROTECTION/
EN FR EN FR 31 30 Should you need any additional information, in case of problems or simply to seek advice, call the Nespresso Club. Contact details for your nearest Nespresso Club can be found in the welcome material in your machine box or at nespresso.com Pour obtenir des renseignements supplément...
Page 17 - CONTENIDO; MEDIDAS IMPORTANTES DE SEGURIDAD; PRECAUCIÓN
ES ES 33 32 CONTENIDO Estas instrucciones son parte del aparato. Lea todas las instrucciones de uso y de seguridad antes de poner el aparato en funcionamiento. EN WWW.NESPRESSO.COM PODRÁ ENCONTRAR VIDEOS DE AYUDA - VISITE LA SECCIÓN “MÁQUINAS” Nespresso Vertuo es un sistema exclusivo para crear un A...
Page 18 - OTRAS MEDIDAS DE SEGURIDAD
ES ES 35 34 Al usar aparatos eléctricos, siempre se deben seguir ciertas medidas importantes de seguridad, entre las que se incluyen las siguientes: • Las medidas importantes de seguridad son parte del aparato. Lea atentamente las medidas importantes de seguridad que se suministran con el aparato an...
Page 19 - CONTENIDO DEL ENVOLTORIO; ESPECIFICACIONES; VISIÓN GENERAL DE LA MÁQUINA
My Machine ENV155 120 Volts, 60 Hertz, 1350 Watts (USA/CA) ~ 10�1 lb (~ 4�6 kg) 37�1 oz�* (1�1 l*) 33�8 oz�* (1�7 l*) Si el tanque de agua está al costado 8�7 in / 220 mm* 9�1 in / 232 mm* si el tanque de agua está en la parte trasera 5�6 in / 142mm 12�7 in / 323 mm* 13�2 in / 335 mm* 16�2 in / 412 ...
Page 20 - MANIPULACIÓN DE LA MÁQUINA; SOPORTE DEL TANQUE; SOPORTE DE TAZA
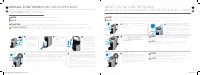
2 1 2 1 ES ES 39 38 1 El soporte del tanque de agua se puede rotar y colocar en la parte trasera, hacia el lado izquierdo o hacia el lado derecho de la máquina. 2 Retire el tanque de agua inclinándolo ligeramente hacia atrás y luego tirando suavemente de él. Coloque el tanque de agua en la posición ...
Page 22 - PREPARACIÓN DEL CAFÉ
2 1 25 sec. ES ES 43 42 1 Llene el tanque de agua con agua potable. 6 Abra el cabezal de la máquina empujando la palanca hacia arriba. El cabezal de la máquina se abrirá automáticamente con un mecanismo eléctrico. 5 Coloque una taza de suficiente capacidad debajo de la boca de salida del café. Para ...
Page 23 - CONCEPTO DE AHORRO DE ENERGÍA
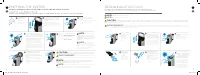
2 1 3 sec. ES ES 45 44 14 Para expulsar la cápsula, abra el cabezal de la máquina empujando la palanca hacia arriba. El cabezal de la máquina se abrirá automáticamente con un mecanismo eléctrico. 12 Para determinar la altura del café en forma manual, presione el botón y vuelva a presionarlo para det...
Page 25 - VACIADO DEL SISTEMA; DESCALCIFICACIÓN
2 X 3 sec. 3 sec. 2 1 3 sec. 3 sec. 10 0 m l ℮ 2 1 ES ES 49 48 1 Vacíe el tanque de agua y colóquelo en su lugar. 2 Abra el cabezal de la máquina y permita que la máquina expulse la cápsula utilizada. Cierre la máquina. Vacíe el contenedor de la cápsula. 3 Para apagar el aparato (modo "APAGADO&#...
Page 27 - RESUMEN DE INDICADORES/PARPADEO DE BOTONES
ES ES 53 52 RESUMEN DE INDICADORES/PARPADEO DE BOTONES SIN LUZ Sin luz en el botón Máquina APAGADA ➔ consulte el punto 1* LUZ VERDE - USO NORMAL / Luz permanente Modo Listo Parpadeo regular: Una vez/segundo Calentando Giro lento Lectura de código de barras de la cápsula Giro rápido Preparación del c...
Page 28 - RESOLUCIÓN DE PROBLEMAS
ES ES 55 54 1� Sin luz en el botón. ➔ La máquina se “APAGÓ” en forma automática; presione el botón para “ENCENDER” la máquina. ➔ Revise el enchufe, la tensión y el fusible. 2� Sin café. ➔ Controle que la luz del botón sea VERDE. ➔ Controle que el tanque de agua esté lleno y bien colocado. ➔ Controle...
Page 29 - DESECHO Y PROTECCIÓN AMBIENTAL
ES ES 57 56 Si necesita cualquier información adicional, si tiene algún problema o si desea recibir consejos, llame a Nespresso Club. Puede encontrar los detalles de contacto del Nespresso Club más cercano a usted en el material de bienvenida que se incluye en la caja de su máquina o en nespresso.co...


 Nespresso BNV250CRO1BUC1
User Manual
Nespresso BNV250CRO1BUC1
User Manual
 Nespresso EN167B
User Manual
Nespresso EN167B
User Manual
 Nespresso Essenza Mini C30 Silver
User Manual
Nespresso Essenza Mini C30 Silver
User Manual
 Nespresso Pixie C60
User Manual
Nespresso Pixie C60
User Manual
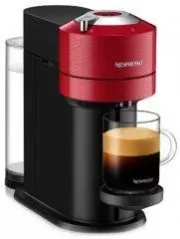 Nespresso Vertuo Next GCV1 Cherry Red
User Manual
Nespresso Vertuo Next GCV1 Cherry Red
User Manual
 Nespresso Vertuo Next GCV1 Chrome
User Manual
Nespresso Vertuo Next GCV1 Chrome
User Manual
 Nespresso Vertuo Next GCV1 Light Grey
User Manual
Nespresso Vertuo Next GCV1 Light Grey
User Manual