Napoleon LEX485RSBIPSS-AU - Manuals
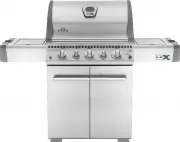
User Manual Napoleon LEX485RSBIPSS-AU


Summary
2 www.napoleongrills.com N415-0275-AU JUN 12.18 Aluminum castings / stainless steel base ........................................... 15 years Stainless steel lid ................................................................................ 15 years Porcelain enamel lid ..............................
3 www.napoleongrills.com N415-0275-AU JUN 12.18 WARNING! Failure to follow these instructions could result in property damage, personal injury or death. Read and follow all warnings and instructions in this manual prior to operating grill. Safe Operating Practices • This gas grill must be assembled ...
4 www.napoleongrills.com N415-0275-AU JUN 12.18 Locating Your Outdoor Gas Grill It is important when selecting a location for your gas grill to ensure clearances to adjacent combustibles are met. This appliance is intended for installation on an outdoor patio or in your yard. ‘This appliance shall o...
Napoleon BBQs Manuals
-
 Napoleon AS300K
User Manual
Napoleon AS300K
User Manual
-
 Napoleon AS300K-2
User Manual
Napoleon AS300K-2
User Manual
-
 Napoleon BI32NSS-AU
User Manual
Napoleon BI32NSS-AU
User Manual
-
 Napoleon BILEX485RBINK
User Manual
Napoleon BILEX485RBINK
User Manual
-
 Napoleon BILEX485RBINSS
User Manual
Napoleon BILEX485RBINSS
User Manual
-
 Napoleon BILEX605RBINK
User Manual
Napoleon BILEX605RBINK
User Manual
-
 Napoleon BILEX605RBINSS
User Manual
Napoleon BILEX605RBINSS
User Manual
-
 Napoleon BILEX730RBINK
User Manual
Napoleon BILEX730RBINK
User Manual
-
 Napoleon BILEX730RBINSS
User Manual
Napoleon BILEX730RBINSS
User Manual
-
 Napoleon F365DPGT-AU
User Manual
Napoleon F365DPGT-AU
User Manual
-
 Napoleon F425DPGT-AU
User Manual
Napoleon F425DPGT-AU
User Manual
-
 Napoleon LEX485RSBI
User Manual
Napoleon LEX485RSBI
User Manual
-
 Napoleon LEX485RSBIPK
User Manual
Napoleon LEX485RSBIPK
User Manual
-
 Napoleon LEX605RSBIPK
User Manual
Napoleon LEX605RSBIPK
User Manual
-
 Napoleon LEX605RSBIPSS
User Manual
Napoleon LEX605RSBIPSS
User Manual
-
 Napoleon LEX730RSBIP
User Manual
Napoleon LEX730RSBIP
User Manual
-
 Napoleon LEX730RSBIPK
User Manual
Napoleon LEX730RSBIPK
User Manual
-
 Napoleon NK22K-LEG-2
User Manual
Napoleon NK22K-LEG-2
User Manual
-
 Napoleon PRO22K-CART-2
User Manual
Napoleon PRO22K-CART-2
User Manual
-
 Napoleon PRO22K-LEG-2
User Manual
Napoleon PRO22K-LEG-2
User Manual