Page 2 - Copyrght Notce
Preface MS-7697 Preface Preface MS-7697 Preface Copyrght Notce The materal n ths document s the ntellectual property of MICRO-STAR INTERNA- TIONAL. We take every care n the preparaton of ths document, but no guarantee s gven as to the correctness of ts contents. Our products are under contnual mprov...
Page 3 - Techncal Support
Preface MS-7697 Preface Preface MS-7697 Preface Techncal Support If a problem arses wth your system and no soluton can be obtaned from the user’s manual, please contact your place of purchase or local dstrbutor. Alternatvely, please try the followng help resources for further gudance. Vst the MSI we...
Page 4 - FCC-B Rado Frequency Interference Statement
v Preface MS-7697 Preface Preface MS-7697 Preface FCC-B Rado Frequency Interference Statement Ths equpment has been tested and found to comply wth the lmts for a Class B dgtal devce, pursuant to Part 15 of the FCC Rules. These lmts are desgned to provde reasonable protecton aganst harmful nterferenc...
Page 5 - Battery Informaton
Preface MS-7697 Preface v Preface MS-7697 Preface Calforna, USA: The button cell battery may contan perchlorate materal and requres specal handlng when recycled or dsposed of n Calforna. For further nformaton please vst:http://www.dtsc.ca.gov/hazardouswaste/perchlorate/ CAUTION: There s a rsk of exp...
Page 6 - Preface; Preface; WEEE (Waste Electrcal and Electronc Equpment) Statement; ENGLISH; FRANÇAIS
v Preface MS-7697 Preface Preface MS-7697 Preface WEEE (Waste Electrcal and Electronc Equpment) Statement ENGLISH To protect the global envronment and as an envronmentalst, MSI must re- mnd you that...Under the European Unon (“EU”) Drectve on Waste Electrcal and Electron- c Equpment, Drectve 2002/96...
Page 7 - ESPAÑOL; NEDERLANDS; SRPSKI; POLSKI
Preface MS-7697 Preface v Preface MS-7697 Preface ESPAÑOL MSI como empresa comprometda con la proteccón del medo ambente, recomenda:Bajo la drectva 2002/96/EC de la Unón Europea en matera de desechos y/o equ- pos electróncos, con fecha de rgor desde el 13 de agosto de 2005, los productos clasficados...
Page 8 - TÜRKÇE; ČESKY
v Preface MS-7697 Preface Preface MS-7697 Preface TÜRKÇE Çevrec özellğyle blnen MSI dünyada çevrey korumak çn hatırlatır:Avrupa Brlğ (AB) Kararnames Elektrk ve Elektronk Malzeme Atığı, 2002/96/EC Kararnames altında 13 Ağustos 2005 tarhnden tbaren geçerl olmak üzere, elektrkl ve elektronk malzemeler ...
Page 11 - Englsh; Seres; Europe verson
Page 12 - Manboard Specficatons
En-2 MS-7697 Manboard Manboard Specficatons Processor Support AMD ® A8/A6/A4/E2-seres processors for the FM1 package (For the latest nformaton about CPU, please vst http://www.ms.com/servce/cpu-support) Chpset AMD ® A75/ A55 chpset Memory Support 2x DDR3 DIMMs support DDR3 1600/ 1333/ 1066 DRAM (16G...
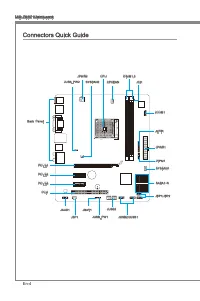
Page 14 - Connectors Quck Gude
En-4 MS-7697 Manboard Connectors Quck Gude Back Panel CPU CPUFAN DIMM1,3 JPWR2 JPWR1 SYSFAN1 SATA1~6 JFP1/JFP2 JUSB3 JSP1 JAUD1 JCI1 JTPM1 PCI_E1 SYSFAN2 JBAT1 PCI_E2 PCI_E3 PCI1 JCOM1 JLPT1 JUSB_PW1 JUSB2/JUSB1 JUSB_PW2
Page 15 - Connectors Reference Gude
En-5 Englsh Connectors Reference Gude Port Type Port Name Page FM1 APU Socket CPU En-8 ATX 24-pn Power Connector JPWR1 En-12 ATX 4-pn Power Connector JPWR2 En-12 DDR3 Memory Slots DIMM1,3 En-13 PCIe x16 Expanson Slot PCI_E1 En-15 PCIe x1 Expanson Slots PCI_E2.3 En-15 PCI Expanson Slot PCI1 En-15 SAT...
Page 16 - Back Panel Quck Gude; Important
En-6 MS-7697 Manboard Back Panel Quck Gude Mouse/Keyboard A PS/2 ® mouse/keyboard DIN connector for a PS/2 ® mouse/keyboard. USB 2.0 Port The USB 2.0 port s for attachng USB 2.0 devces such as keyboard, mouse, or other USB 2.0-compatble devces. USB 3.0 Port (optonal) USB 3.0 port s backward-compatbl...
Page 18 - Introducton to FM1 APU
En-8 MS-7697 Manboard CPU (Central Processng Unt) Important Overheatng Overheatng can serously damage the CPU and manboard. Always make sure the coolng fans work properly to protect the CPU from overheatng. Be sure to apply an even layer of thermal paste (or thermal tape) between the CPU and the hea...
Page 19 - CPU & Cooler Installaton
En-9 Englsh CPU & Cooler Installaton When you are nstallng the CPU, make sure the CPU has a cooler attached on the top to prevent overheatng. Meanwhle, do not forget to apply some thermal paste on CPU before nstallng the heat snk/cooler fan for better heat dsperson. Follow the steps below to nst...
Page 21 - Mountng Screw Holes
En-11 Englsh Mountng Screw Holes When nstallng the manboard, first nstall the necessary mountng stands requred for an manboard on the mountng plate n your computer case. If there s an I/O back plate that came wth the computer case, please replace t wth the I/O backplate that came wth the manboard pa...
Page 22 - Power Supply
En-12 MS-7697 Manboard Power Supply ATX 24-pn Power Connector: JPWR1 Ths connector allows you to connect an ATX 24-pn power supply. To connect the ATX 24-pn power supply, algn the power supply cable wth the connector and firmly press the cable nto the connector. If done correctly, the clp on the pow...
Page 23 - Memory; Dual-Channel mode Populaton Rule
En-13 Englsh Memory These DIMM slots are used for nstallng memory modules. For more nformaton on compatble components, please vst http://www.ms.com/servce/test-report DDR3 240-pn, 1.5V 48x2=96 pn 72x2=144 pn Dual-Channel mode Populaton Rule In Dual-Channel mode, the memory modules can transmt and re...
Page 24 - Installng Memory Modules
En-14 MS-7697 Manboard Installng Memory Modules Unlock the DIMM slot by pushng the mountng clps to the sde. Vertcally nsert the memory module nto the DIMM slot. The memory module has an off-center notch on the bottom that wll only allow t to fit one way nto the DIMM slot.Push the memory module deep ...
Page 25 - Expanson Slots; PCIe (Perpheral Component Interconnect Express) Slot; PCI (Perpheral Component Interconnect) Slot; PCI Interrupt Request Routng
En-15 Englsh Expanson Slots Ths manboard contans numerous ports for expanson cards, such as dscrete graphcs or audo cards. PCIe (Perpheral Component Interconnect Express) Slot The PCIe slot supports the PCIe nterface expanson card. PCIe 2.0 x16 Slot PCIe x1 Slot PCI (Perpheral Component Interconnect...
Page 26 - Sngle Vdeo Card Installaton
En-16 MS-7697 Manboard Vdeo/ Graphcs Cards If avalable, ths manboard takes advantage of the CPU’s ntegrate graphcs processor, but dscrete vdeo cards can be nstalled by way of the manboard’s expanson slots. Addng on one or more dscrete vdeo cards wll sgnficantly boost the system’s graphcs performance...
Page 27 - Internal Connectors
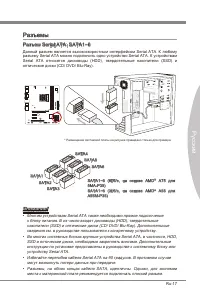
En-17 Englsh Internal Connectors Seral ATA Connector: SATA1~6 Ths connector s a hgh-speed Seral ATA nterface port. Each connector can connect to one Seral ATA devce. Seral ATA devces nclude dsk drves (HDD), sold state drves (SSD), and optcal drves (CD/ DVD/ Blu-Ray). * The MB layout n ths figure s f...
Page 31 - TPM Module Connector: JTPM1; Parallel Port Header: JLPT1
En-21 Englsh TPM Module Connector: JTPM1 Ths connector connects to a TPM (Trusted Platform Module). Please refer to the TPM securty platform manual for more detals and usages. * The MB layout n ths figure s for reference only. 11 5 V 10.N o Pin 14.G roun d 8.5V Pow er 12.G roun d 6.Se rial IR Q 4.3....
Page 32 - Seral Port Connector: JCOM1
En-22 MS-7697 Manboard Seral Port Connector: JCOM1 Ths connector s a 16550A hgh speed communcaton port that sends/receves 16 bytes FIFOs. You can attach a seral devce. 1.DC D 3.SO UT 10.N o Pin 5.Gro und 7.RT S 9.RI 8.CT S 6.DS R 4.DT R 2.SIN USB 3.0 Expanson Connector: JUSB3 (optonal) The USB 3.0 p...
Page 33 - Jumper; Clear CMOS Jumper: JBAT1
En-23 Englsh Jumper Clear CMOS Jumper: JBAT1 There s CMOS RAM onboard that s external powered from a battery located on the manboard to save system configuraton data. Wth the CMOS RAM, the system can automatcally boot nto the operatng system (OS) every tme t s turned on. If you want to clear the sys...
Page 34 - BIOS Setup
En-24 MS-7697 Manboard BIOS Setup Ths chapter provdes basc nformaton on the BIOS Setup program and allows you to configure the system for optmum use. You may need to run the Setup program when: An error message appears on the screen durng the system bootng up, and requests you to run BIOS SETUP. You...
Page 35 - Control
En-25 Englsh Control Keyboard Mouse Descrpton <↑><↓> Move the cursor Select Item <←><→> Select Screen <Enter> Clck/ Double- clck the left button Select Icon/ Feld <Esc> Clck the rght button Jumps to the Ext menu or returns to the prevous from a submenu <+> I...
Page 36 - The Man Menu
En-26 MS-7697 Manboard The Man Menu Once you enter BIOS CMOS Setup Utlty, the Man Menu wll appear on the screen. The Man Menu allows you to select from the setup functons. Man Menu Use ths menu for basc system configuratons, such as tme, date etc. Advanced Use ths menu to setup the tems of the BIOS ...
Page 38 - Overclockng
En-28 MS-7697 Manboard Overclockng Ths menu s for advanced users who want to overclock the manboard. Current CPU / NB / DRAM Frequency These tems show the current clocks of CPU, NB and Memory speed. Read-only. Adjust Internal Core Clock Ths tem s used to adjust the nternal core clock. Adjust CPU Rat...
Page 42 - Software Informaton
En-32 MS-7697 Manboard Software Informaton Take out the Drver/Utlty DVD that s ncluded n the manboard package, and place t nto the DVD-ROM drve. The nstallaton wll auto-run, smply clck the drver or utlty and follow the pop-up screen to complete the nstallaton. The Drver/Utlty DVD contans the: Drver ...
Page 43 - Deutsch; Sere; Europa Verson
Page 44 - Spezfikatonen
De-2 MS-7697 Manboard Spezfikatonen Prozessoren AMD ® A8/A6/A4/E2-Sere Prozessoren für Sockel FM1 (Wetere CPU Informatonen finden Se unter http://www.ms.com/servce/cpu-support) Chpsatz AMD ® A75/ A55 Chpsatz Specher 2x DDR3 DIMMs unterstützen DDR3 1600/ 1333/ 1066 DRAM (max. 16GB) Unterstützt den Du...
Page 45 - Steckplätze
De-3 Deutsch Anschlüsse & Tasten Hntere En-/ und Ausgänge 1x PS/2 Tastaturanschluss 1x PS/2 Mausanschluss 4x USB 2.0 Anschlüsse 2x USB 3.0 Anschlüsse (A75MA-P35) 1x LAN Anschluss 1x VGA Anschluss 1x DVI-D Anschluss 6x Audobuchsen On-Board 2x USB 2.0 Stftlesten 1x USB 3.0 Stftleste (A75MA-P35) 1x...
Page 46 - Anschlussüberscht
De-4 MS-7697 Manboard Anschlussüberscht Rücktafel CPU CPUFAN DIMM1,3 JPWR2 JPWR1 SYSFAN1 SATA1~6 JFP1/JFP2 JUSB3 JSP1 JAUD1 JCI1 JTPM1 PCI_E1 SYSFAN2 JBAT1 PCI_E2 PCI_E3 PCI1 JCOM1 JLPT1 JUSB_PW1 JUSB2/JUSB1 JUSB_PW2
Page 48 - Wchtg
De-6 MS-7697 Manboard Rücktafel-Überscht Maus/Tastatur De PS/2 ® Maus/Tastatur Stecker DIN st für ene PS/2 ® Maus/Tastatur. USB 2.0 Anschluss Der USB 2.0 Anschluss dent zum drekten Anschluss von USB-Geräten, we etwa Ta- statur, Maus oder weterer USB-kompatbler Geräte. USB 3.0 Anschluss (optonal) Der...
Page 50 - Erklärung zur FM1 APU
De-8 MS-7697 Manboard CPU (Prozessor) Wchtg Überhtzung Überhtzung beschädgt de CPU und das System nachhaltg. Stellen Se stets ene korrekte Funktonswese des CPU Kühlers scher, um de CPU vor Überhtzung zu schützen. Überprüfen Se ene glechmäßge Schcht der thermschen Paste (oder ther- mschen Klebeandes)...
Page 54 - Stromversorgung
De-12 MS-7697 Manboard Stromversorgung ATX 24-polger Stromanschluss: JPWR1 Mt desem Anschluss verbnden Se den ATX 24-polgen Anschluss des Netztels. Achten Se be dem Verbnden des ATX 24-polgen Stromanschlusses darauf, dass der Anschluss des Netztels rchtg auf den Anschluss an der Hauptplatne ausgerch...
Page 56 - Vorgehenswese bem Enbau von Specher Modulen
De-14 MS-7697 Manboard Vorgehenswese bem Enbau von Specher Modulen Öffnen Se den DIMM-Steckplatz, ndem Se de Befestgungsclps zur Sete klap- pen. Stecken Se das Spechermodul senkrecht n den DIMM-Steckplatz en. Das Spechermodul hat ene Kerbe an der Untersete, so dass es nur n ener Rchtung engesetzt we...
Page 57 - PCIe (Perpheral Component Interconnect Express) Steckplatz; PCI (Perpheral Component Interconnect) Steckplatz
De-15 Deutsch Erweterungssteckplätze Deses Motherboard enthält zahlreche Schnttstellen für Erweterungskarten, we ds- krete Grafik-oder Soundkarten. PCIe (Perpheral Component Interconnect Express) Steckplatz Der PCIe Steckplatz unterstützt PCIe-Erweterungskarten. PCIe 2.0 x16-Steckplatz PCIe x1-Steck...
Page 58 - Installaton ener Grafikkarte
De-16 MS-7697 Manboard Vdeo/Grafikkarten Fall m Prozessor ntegrert, nutzt deses Manboard den m Prozessor befindlchen Grafikprozessor. Zusätzlche Grafikkarten können aber über de auf dem Manboard verfügbaren Erweterungssteckplätze engesetzt werden um de Systemlestung zu er- höhen. Installaton ener Gr...
Page 63 - Parallele Schnttstelle: JLPT1
De-21 Deutsch TPM Anschluss: JTPM1 Deser Anschluss wrd für das optonale TPM Modul (Trusted Platform Module) ver- wendet. Wetere Informatonen über den Ensatz des optonalen TPM Modules ent- nehmen Se btte dem TPM Plattform Handbuch. * Das MB-Layout deser Abbldung dent ledglch Illustratonszwecken. 11 5...
Page 64 - Sereller Anschluss: JCOM1
De-22 MS-7697 Manboard Sereller Anschluss: JCOM1 Es handelt sch um ene 16550A Kommunkatonsschnttstelle, de 16 Bytes FIFOs sendet/empfängt. Her lässt sch ene serelle Maus oder andere serelle Geräte drekt anschleßen. 1.DC D 3.SO UT 10.N o Pin 5.Gro und 7.RT S 9.RI 8.CT S 6.DS R 4.DT R 2.SIN USB 3.0 Er...
Page 66 - Aufruf des BIOS Setups
De-24 MS-7697 Manboard BIOS Setup Deses Kaptel enthält Informatonen über das BIOS Setup und ermöglcht es Ihnen, Ihr System optmal auf Ihre Anforderungen enzustellen. Notwendgket zum Aufruf des BIOS besteht, wenn: Während des Bootvorgangs des Systems ene Fehlermeldung erschent und Se zum Aufruf des B...
Page 67 - Steuertasten
De-25 Deutsch Steuertasten Tastatur Maus Beschrebung <↑><↓> Bewegen Se den Cursor Auswahl enes Entrages <←><→> Auswahl enes Screen <Enter> Klcken/ dop- pelt-klcken Se mt der lnken Maustaste Auswahl enes Symbols/ Feldes <Esc> Klcken Se mt der rechten Maustaste Aufr...
Page 68 - Das Hauptmenü
De-26 MS-7697 Manboard Das Hauptmenü Nachdem Se das BIOS CMOS Setup Utlty, aufgerufen haben, erschent das Hauptmenü. Das Hauptmenü können Se von der Setup-Funktonen auswählen. Man Menu In desem Menü können Se de Basskonfiguraton Ihres Systems anpassen, so z.B. Uhrzet, Datum usw. Advanced Verwenden S...
Page 75 - Franças; Séres
Page 76 - Spécficatons
Fr-2 Carte mère MS-7697 Spécficatons Processeurs Supportés AMD ® A8/A6/A4/E2-séres processeurs pour le paquet FM1 (Pour plus d'nformaton sur le CPU, veullez vster http://www.ms.com/servce/cpu-support) Jeux de puces Puces AMD ® A75/ A55 Mémore supportée 2x DDR3 DIMMs supportent DDR3 1600/ 1333/ 1066 ...
Page 77 - França; Connecteurs & Boutons
Fr-3 França s Connecteurs & Boutons Panneau arrère 1x port claver PS/2 1x port sours PS/2 4x ports USB 2.0 2x ports USB 3.0 (A75MA-P35) 1x port LAN 1x port VGA 1x port DVI-D 6x ports audo Connecteurs ntégrés 2x connecteurs USB 2.0 1x connecteur USB 3.0 (A75MA-P35) 1x connecteur S/PDIF-Out 1x con...
Page 78 - Gude Rapde Des Composants
Fr-4 Carte mère MS-7697 Gude Rapde Des Composants Panneau arrère CPU CPUFAN DIMM1,3 JPWR2 JPWR1 SYSFAN1 SATA1~6 JFP1/JFP2 JUSB3 JSP1 JAUD1 JCI1 JTPM1 PCI_E1 SYSFAN2 JBAT1 PCI_E2 PCI_E3 PCI1 JCOM1 JLPT1 JUSB_PW1 JUSB2/JUSB1 JUSB_PW2
Page 80 - Gude rapde du panneau arrère
Fr-6 Carte mère MS-7697 Gude rapde du panneau arrère Sours/Claver Le standard connecteur de sours/claver DIN de PS/2 ® est pour une sours ou un claver de PS/2 ® . Port USB 2.0 Le port USB 2.0 sert à brancher des pérphérques USB 2.0 tels que le claver, la sours, ou d’autres pérphérques compatbles USB...
Page 82 - Introducton du FM1 APU
Fr-8 Carte mère MS-7697 Processeur : CPU Important Surchauffe La surchauffe endommage séreusement l’unté centrale et le système. Assurez-vous toujours que le ventlateur de refrodssement fonctonne correctement pour protéger l’unté centrale contre la surchauffe. Assurez-vous d’applquer une couche d’en...
Page 83 - Installaton du CPU et son ventlateur
Fr-9 França s Installaton du CPU et son ventlateur Quand vous nstallez le CPU, assurez-vous que le CPU sot équpé d’un ventlateur de refrodssement attaché sur le dessus pour évter la surchauffe. Néanmons, n’oublez pas d’applquer une couche d’endut thermque sur le CPU avant d’nstaller le ventla- teur ...
Page 86 - Connecteurs d’almentaton; Connecteur d’almentaton ATX 24-pn : JPWR1; Connecteur d’almentaton du ATX 4-pn : JPWR2
Fr-12 Carte mère MS-7697 Connecteurs d’almentaton Connecteur d’almentaton ATX 24-pn : JPWR1 Ce connecteur vous permet de reler une almentaton ATX 24-pn. Pour cela, algnez le câble d’almentaton avec le connecteur et appuyez fermement le câble dans le con- necteur. S cec est ben fat, la pnce sur le câ...
Page 87 - Règle de populaton en mode double-canal
Fr-13 França s Mémore Ces emplacements DIMM sont destnés à nstaller les modules de mémore. Pour plus d’nformatons sur les composants compatbles, veullez vster http://www.ms.com/ser- vce/test-report DDR3 240-pn, 1.5V 48x2=96 pn 72x2=144 pn Règle de populaton en mode double-canal En mode de double-can...
Page 88 - Installaton des modules de mémore
Fr-14 Carte mère MS-7697 Installaton des modules de mémore Déveroullez l’emplacement DIMM en repoussant les pnces de montage sur le côté. Insérez vertcalement le module de mémore dans l’emplacement DIMM. Le module de mémore possède une seule encoche en son centre sur le bas et ne s’adaptera que s’l ...
Page 89 - Emplacement PCIe (Perpheral Component Interconnect Express)
Fr-15 França s Emplacements d’extenson Cette carte mère content de nombreux ports pour les cartes d’extenson, tels que les cartes graphques ou les cartes audo. Emplacement PCIe (Perpheral Component Interconnect Express) L’emplacement PCIe supporte la carte d’extenson d’Interface PCIe. Emplacement PC...
Page 90 - Installaton de smple carte vdéo
Fr-16 Carte mère MS-7697 Cartes Vdéo/ Graphcs La carte mère peut utlser le graphque ntégré au processeur, mas peut également utlser une carte vdéo dstncte nstallée sur un port d’extenson de la carte mère. Une carte vdéo addtonnelle peut amélorer fortement la performance graphque du sys- tème. Pour u...
Page 93 - Connecteur audo panneau avant : JAUD1
Fr-19 França s Connecteur panneau avant : JFP1, JFP2 Ces connecteurs se connectent aux nterrupteurs et LEDs du panneau avant. Le JFP1 est conforme au gude de concepton de la connectvté Entrée/sorte du panneau avant Intel ® . Lors d’nstallaton des connecteurs du panneau avant, veullez utlser les mCon...
Page 95 - Connecteur de Module TPM : JTPM1; Connecteur de port Parallèle : JLPT1
Fr-21 França s Connecteur de Module TPM : JTPM1 Ce connecteur permet de reler un module TPM (Trusted Platform Module) en opton. Veullez vous référer au manuel du module TPM pour plus de détals. * Le schéma de carte mère dans la figure n’est qu’à ttre de référence 11 5 V 10.N o Pin 14.G roun d 8.5V P...
Page 96 - Connecteur de port séral : JCOM1
Fr-22 Carte mère MS-7697 Connecteur de port séral : JCOM1 Le port seral est un port de communcatons de haute vtesse de 16550A, qu envoe/ reçot 16 bytes FIFOs. Vous pouvez attacher un pérphérque séral. 1.DC D 3.SO UT 10.N o Pin 5.Gro und 7.RT S 9.RI 8.CT S 6.DS R 4.DT R 2.SIN Connecteurs d’extenson U...
Page 97 - Cavaler d’effacement CMOS : JBAT1
Fr-23 França s Cavaler Cavaler d’effacement CMOS : JBAT1 Il y a un CMOS RAM ntégré, qu possède un bloc d’almentaton almenté par une bat- tere externe, destné à conserver les données de configuraton du système. Avec le CMOS RAM, le système peut lancer automatquement le système d’explotaton chaque fos...
Page 98 - Réglage BIOS; Entrée dans le paramétrage
Fr-24 Carte mère MS-7697 Réglage BIOS Ce chaptre donne des nformatons concernant le programme de réglage du BIOS et vous permet de configurer le système pour obtenr des performances d’utlsaton opt- mum. Vous aurez peut-être beson de lancer le programme de réglage lorsque : Un message d’erreur appara...
Page 99 - Contrôle
Fr-25 França s Contrôle Claver Sours Descrpton <↑><↓> Bouger le curseur Chosr un artcle <←><→> Chosr un écran <Entrer> Clquer/ Double- clquer le bouton gauche Chosr une cône/ un domane <Esc> Clquer le bouton drote Retourner au menu Ext ou revenr à la page précé- d...
Page 100 - Menu prncpal
Fr-26 Carte mère MS-7697 Menu prncpal Une fos entré dans l’unté de réglages BIOS CMOS, le menu prncpal apparaît sur l’écran. Le Menu Prncpal vous permet de sélectonner parm les fonctons de réglages. Man Menu Utlsez ce menu pour les configuratons du système de base, tel que l’heure, la date. Advanced...
Page 106 - Informaton Logcel
Fr-32 Carte mère MS-7697 Informaton Logcel Sortez le DVD ‘Plote/Servce’, qu est nclus dans la boîte de la carte mère et placez- le dans le DVD-ROM. L’nstallaton va automatquement se déclencher, clquez sur le plote ou sur l’utltare et suvez les nstructons à l’écran pour l’nstallaton. Le DVD ‘Plote/Se...
Page 107 - Русский; Серия
Page 108 - Характеристики системной платы
Ru-2 MS-7697 Системная плата Характеристики системной платы Поддержка процессоров Процессоры серии AMD ® A8/A6/A4/E2 для разьема FM1 (Список поддерживаемых моделей см. http://www.ms.com/servce/cpu-support) Чипсет AMD ® A75/ A55 Память 2x слота DDR3 DIMM с поддержкой модулей DDR3 1600/ 1333/ 1066 DRA...
Page 109 - Слоты
Ru-3 Русский Разъемы & Кнопки Разъемы на задней панели 1x PS/2 порт клавиатуры 1x PS/2 порт мыши 4x порта USB 2.0 2x порта USB 3.0 (A75MA-P35) 1x порт LAN 1x порт VGA 1x порт DVI-D 6x аудиоразъемов Разъемы на плате 2x разъема USB 2.0 1x разъем USB 3.0 (A75MA-P35) 1x разъем S/PDIF-Out 1x аудиораз...
Page 110 - Краткое руководство по разъемам
Ru-4 MS-7697 Системная плата Краткое руководство по разъемам Задняя панель CPU CPUFAN DIMM1,3 JPWR2 JPWR1 SYSFAN1 SATA1~6 JFP1/JFP2 JUSB3 JSP1 JAUD1 JCI1 JTPM1 PCI_E1 SYSFAN2 JBAT1 PCI_E2 PCI_E3 PCI1 JCOM1 JLPT1 JUSB_PW1 JUSB2/JUSB1 JUSB_PW2
Page 112 - Разъемы на задней панели
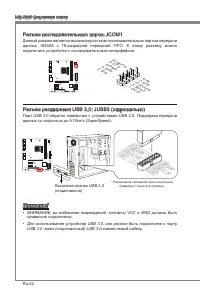
Ru-6 MS-7697 Системная плата Разъемы на задней панели Разъем мыши/клавиатуры Стандартные разъемы DIN PS/2 ® для подключения мыши/клавиатуры с интерфейсом PS/2 ® . Порт USB 2.0 Порт USB 2.0 предназначен для подключения USB-устройств, таких как клавиатура, мышь и другие USB-совместимые устройства. Пор...
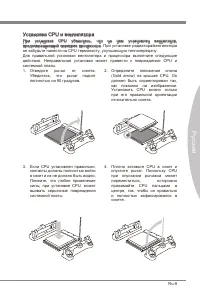
Page 115 - Установка CPU и вентилятора
Ru-9 Русский Установка CPU и вентилятора При установке CPU убедитесь, что на нем установлен вентилятор, предотвращающий перегрев процессора. При установке радиатора/вентилятора не забудьте нанести на CPU термопасту, улучшающую теплопередачу. Для правильной установки вентилятора и процессора выполнит...
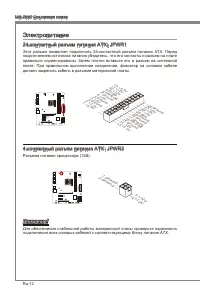
Page 118 - Электропитание
Ru-12 MS-7697 Системная плата Электропитание 24-контактный разъем питания ATX: JPWR1 Этот разъем позволяет подключить 24-контактный разъем питания ATX. Перед подключением источника питания убедитесь, что его контакты и разъем на плате правильно сориентированы. Затем плотно вставьте его в разъем на с...
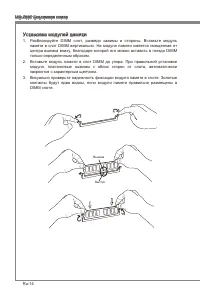
Page 120 - Установка модулей памяти
Ru-14 MS-7697 Системная плата Установка модулей памяти Разблокируйте DIMM слот, разведя зажимы в стороны. Вставьте модуль памяти в слот DIMM вертикально. На модуле памяти имеется смещенная от центра выемка внизу, благодаря которой его можно вставить в гнездо DIMM только определенным образом.Вставьте...
Page 121 - Слот PCIe (Perpheral Component Interconnect Express)
Ru-15 Русский Слот расширения Данная материнская плата содержит несколько слотов для плат расширения, таких как дискретные видео и аудио карты. Слот PCIe (Perpheral Component Interconnect Express) Слот PCIe поддерживает карты расширения интерфейса PCIe. PCIe 2.0 x16 слот PCIe x1 слот Слот PCI (Perph...
Page 122 - Установка одной видеокарты
Ru-16 MS-7697 Системная плата Видео/ Видеокарты По умолчанию, данная плата использует графическое ядро интегрированное в CPU, но Вы так же можете значительно повысит графическую производительность системы, путем добавление одной или нескольких дискретных видеокарт в слоты расширения. Для лучшей совм...
Page 125 - Выносной разъем аудио: JAUD1
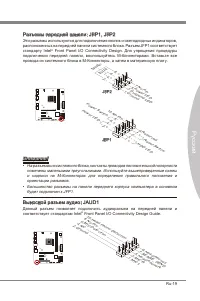
Ru-19 Русский Разъемы передней панели: JFP1, JFP2 Эти разъемы используются для подключения кнопок и светодиодных индикаторов, расположенных на передней панели системного блока. Разъем JFP1 соответствует стандарту Intel ® Front Panel I/O Connectvty Desgn. Для упрощения процедуры подключения передней ...
Page 127 - Разъем параллельного порта: JLPT1
Ru-21 Русский Разъем модуля ТРМ: JTPM1 (опционально) Данный разъем подключается к модулю TPM (Trusted Platform Module). За более подробной информацией и назначениями обращайтесь к описанию модуля TPM. * Размещение системной платы на рисунке приведено только для примера. 11 5 V 10.N o Pin 14.G roun d...
Page 128 - Разъем последовательного порта: JCOM1
Ru-22 MS-7697 Системная плата Разъем последовательного порта: JCOM1 Данный разъем является высокоскоростным последовательным портом передачи данных 16550А с 16-разрядной передачей FIFO. К этому разъему можно подключить устройство c последовательным интерфейсом. 1.DC D 3.SO UT 10.N o Pin 5.Gro und 7....
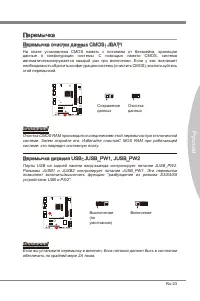
Page 129 - Перемычка очистки данных CMOS: JBAT1
Ru-23 Русский Перемычка Перемычка очистки данных CMOS: JBAT1 На плате установлена CMOS память с питанием от батарейки, хранящая данные о конфигурации системы. С помощью памяти CMOS, система автоматическизагружается каждый раз при включении. Если у вас возникает необходимость сбросить конфигурацию си...
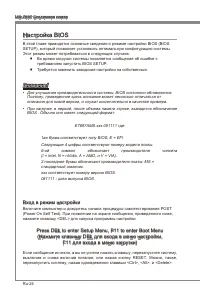
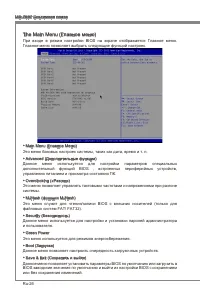
Page 130 - Настройка BIOS; Вход в режим настройки
Ru-24 MS-7697 Системная плата Настройка BIOS В этой главе приводятся основные сведения о режиме настройки BIOS (BIOS SETUP), который позволяет установить оптимальную конфигурацию системы. Этот режим может потребоваться в следующих случаях: Во время загрузки системы появляется сообщение об ошибке с т...
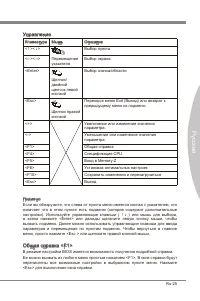
Page 131 - Управление
Ru-25 Русский Управление Клавиатура Мышь Описание <↑><↓> Перемещение указателя Выбор пункта <←><→> Выбор экрана <Enter> Щелчок/ двойной щелчок левой кнопкой Выбор значка/области <Esc> Щелчок правой кнопкой Переход в меню Ext (Выход) или возврат к предыдущему меню ...
Page 134 - Overclockng «Разгон»
Ru-28 MS-7697 Системная плата Overclockng «Разгон» Данное меню предназначено для опытных пользователей и предоставляет возможности для “Overclockng (разгона)” системы. Current CPU / NB / DRAM Frequency В этом разделе отображается текущая частота процессора (CPU), процессора в режиме бездействия (NB)...
Page 138 - Сведения о программном обеспечении
Ru-32 MS-7697 Системная плата Сведения о программном обеспечении Установите в привод DVD-ROM прилагаемый к системной плате компакт диск «Drver/Utlty». Установка запустится автоматически. Выберите драйвер или служебную программу и следуйте инструкциям на экране для завершения установки. Содержимое Ds...


 MSI 651M-V
User Manual
MSI 651M-V
User Manual
 MSI MS-7304
User Manual
MSI MS-7304
User Manual
 MSI 870-C45 V2series
User Manual
MSI 870-C45 V2series
User Manual
 MSI StarCam mini
User Manual
MSI StarCam mini
User Manual
 MSI AP16 Flex-SJ1904G32DX81MGMXH
User Manual
MSI AP16 Flex-SJ1904G32DX81MGMXH
User Manual
 MSI 970A-G45
User Manual
MSI 970A-G45
User Manual
 MSI MEGA 865 PRO MS-6287
User Manual
MSI MEGA 865 PRO MS-6287
User Manual
-User-Manual/webp/1.webp) MSI Z68MA-ED55 (B3)
User Manual
MSI Z68MA-ED55 (B3)
User Manual
 MSI EC14H
User Manual
MSI EC14H
User Manual
-OC-Guide-User-Manual/webp/1.webp) MSI P67A-GD65 (B3) OC Guide
User Manual
MSI P67A-GD65 (B3) OC Guide
User Manual
 MSI J1800TI
User Manual
MSI J1800TI
User Manual
-User-Manual/webp/1.webp) MSI PH61-P33 (B3)
User Manual
MSI PH61-P33 (B3)
User Manual
 MSI Z97-GD65 GAMING Manual
User Manual
MSI Z97-GD65 GAMING Manual
User Manual
-User-Manual/webp/1.webp) MSI Z68A-GD55 (G3)
User Manual
MSI Z68A-GD55 (G3)
User Manual
 MSI B85-G43
User Manual
MSI B85-G43
User Manual
 MSI MS-7199
User Manual
MSI MS-7199
User Manual
-User-Manual/webp/1.webp) MSI MS-9A35 (WindBOX III)
User Manual
MSI MS-9A35 (WindBOX III)
User Manual
-User-Manual/webp/1.webp) MSI H67MA-E45 (B3)
User Manual
MSI H67MA-E45 (B3)
User Manual
-User-Manual/webp/1.webp) MSI X79A-GD45 (8D)
User Manual
MSI X79A-GD45 (8D)
User Manual