Page 2 - SPECIFICATIONS; Applicable battery cartridge and charger; SAFETY WARNINGS; IMPORTANT; WARNING
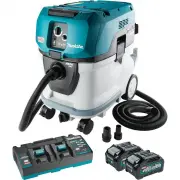
2 ENGLISH ENGLISH (Original instructions) SPECIFICATIONS Model: XCV09 Capacity Filter bag 2.0 L (0.53 gal.) Dust bag 1.5 L (0.40 gal.) Maximum air volume (With hose ø28 mm) 1.8 m 3 /min (64 cu.ft/min) Vacuum 110 hPa Dimensions (L x W x H) (excluding the harness) 230 mm x 185 mm x 373 mm (9″ x 7-1/4″...
Page 3 - SAVE THESE
3 ENGLISH 7. Do not put any object into openings. Do not use with any opening blocked; keep free of dust, lint, hair, and any- thing that may reduce air flow. 8. Keep hair, loose clothing, fingers, and all parts of body away from openings and moving parts. 9. Turn off all controls before removing th...
Page 4 - Symbols; Important safety
4 ENGLISH • Hot substances that are burn- ing or smoking (cigarettes, matches, incense sticks, can- dles, hot ashes), sparks and metal dust generated by cutting or grinding metal, etc. • Flammable material (toner, paint, spray, etc.) • Foam like carpet cleaning agent, etc. (they may cause explosion ...
Page 5 - requirement on packaging and labeling; Tips for maintaining maximum; FUNCTIONAL DESCRIPTION; Installing or removing battery cartridge
5 ENGLISH 7. Do not incinerate the battery car- tridge even if it is severely damaged or is completely worn out. The bat- tery cartridge can explode in a fire. 8. Be careful not to drop or strike battery. 9. Do not use a damaged battery. 10. The contained lithium-ion batteries are subject to the Dan...
Page 6 - Overheat protection; Switch box position
6 ENGLISH Overheat protection When the tool is overheated, the tool stops automati - cally. Let the tool cool down before turning the tool on again. Overdischarge protection When the battery capacity becomes low, the tool stops automatically. If the product does not operate even when the switches ar...
Page 7 - Carrying hook
7 ENGLISH Shoulder belts 2 1 ► 1. Strap 2. Fastener Upper belt 1 2 ► 1. Strap 2. Fastener Carrying hook Always grab the carrying hook when handling the vac- uum cleaner body. 1 ► 1. Carrying hook Switch action You can change the suction power in three steps: nor - mal (1), high (2), and max (3).To s...
Page 8 - Hose band; ASSEMBLY; Assembling hose
8 ENGLISH Hose band Hose band can be used for holding the hose or free nozzle. To secure the hose to the vacuum cleaner body, pass the hose band through the slot on the body. You can attach the hose band on either side. 12 3 ► 1. Hose band 2. Slot 3. Hose To hold the free nozzle on the lower belt, p...
Page 10 - Connecting the tool; When using ø28 mm dust extraction
10 ENGLISH For the aluminum bending pipe / aluminum straight pipe (Only for the model with ø38 mm hose and front cuff 38) Shoulder the vacuum cleaner body then twist and insert the pipe into the front cuff. To disconnect, twist and extract it. 1 2 3 4 4 ► 1. Front cuff 38 2. Aluminum bending pipe 3....
Page 11 - Installing filter bag / dust bag
11 ENGLISH 2. Connect the front cuff to the tool's extraction outlet. 2 1 1 3 ► 1. Front cuff 2. Extraction outlet 3. Hose The front cuff can be detached by turning it counter - clockwise while holding the hose. When using ø38 mm hose with front cuff 38 1. Twist and insert the joint or the front cuf...
Page 13 - OPERATION
13 ENGLISH OPERATION WARNING: Operators shall be adequately instructed on the use of the vacuum cleaner. WARNING: This vacuum cleaner is not suit- able for picking up hazardous dust. CAUTION: This cleaner is for dry use only. CAUTION: This cleaner is for indoor use only. CAUTION: Always insert the b...
Page 14 - MAINTENANCE; Cleaning the HEPA filter
14 ENGLISH NOTICE: Periodically check the filter bag if it is full. Continuous use with the filter bag full results in reduced suction power. NOTICE: Do not use an used filter bag. The filter bag is designed for single use. Using filter bag repeat- edly may cause clogging of the filter and results i...
Page 15 - Clearing the clog; OPTIONAL; MAKITA LIMITED WARRANTY
15 ENGLISH Clearing the clog When clearing the clog, remove the hose or the exten - sion wand, or the bent pipe assembly to check inside. Removing/attaching the snap-on type bent pipe assembly To remove, pull the bent pipe assembly while pressing both of the tab on the hose end. To attach, insert th...
Page 16 - ESPECIFICACIONES; Cartucho de batería y cargador aplicables; ADVERTENCIAS DE; INSTRUCCIONES; GUARDE ESTAS
16 ESPAÑOL ESPAÑOL (Instrucciones originales) ESPECIFICACIONES Modelo: XCV09 Capacidad Bolsa del filtro 2,0 L (0,53 gal.) Bolsa recolectora de polvo 1,5 L (0,40 gal.) Volumen de aire máximo (Con manguera de ø28 mm) 1,8 m 3 /min (64 cu.ft/min) Aspiradora 110 hPa Dimensiones (La x An x Al) (sin inclui...
Page 18 - Símbolos
18 ESPAÑOL REGLAS DE SEGURIDAD ADICIONALES 1. Lea cuidadosamente este manual de instrucciones y el manual de instrucciones del cargador antes de usar el aparato. 2. No aspire los siguientes elementos: • Líquidos inflamables (quero- seno, gasolina, disolventes como bencina, diluyentes, etc.) • Sustan...
Page 19 - Instalar las baterías en pro-; Consejos para alargar al máximo
19 ESPAÑOL Instrucciones importantes de seguridad para el cartucho de batería 1. Antes de utilizar el cartucho de batería, lea todas las instrucciones e indicacio- nes de precaución en el (1) el cargador de batería, (2) la batería, y (3) el pro- ducto con el que se utiliza la batería. 2. No desarme ...
Page 20 - Instalación o extracción del
20 ESPAÑOL DESCRIPCIÓN DEL FUNCIONAMIENTO PRECAUCIÓN: Asegúrese siempre de que la herramienta esté apagada y el cartucho de batería haya sido extraído antes de realizar cualquier ajuste o comprobación en la herramienta. Instalación o extracción del cartucho de batería PRECAUCIÓN: Apague siempre la h...
Page 21 - Posición de la caja del interruptor
21 ESPAÑOL Luces indicadoras Capacidad restante Iluminadas Apagadas Parpadeando 75% a 100% 50% a 75% 25% a 50% 0% a 25% Cargar la batería. La batería pudo haber funcionado mal. NOTA: Dependiendo de las condiciones de uso y la temperatura ambiente, la indicación podrá diferir ligeramente de la capaci...
Page 22 - Abrazadera de la manguera
22 ESPAÑOL Gancho de sujeción Siempre agarre el gancho de sujeción cuando manipule el cuerpo de la aspiradora. 1 ► 1. Gancho de sujeción Accionamiento del interruptor La potencia de succión puede cambiarse a tres niveles: normal (1), alto (2) y máximo (3). Para comenzar a aspirar, oprima el botón un...
Page 23 - Gancho de la manguera; MONTAJE; Ensamble de la manguera
23 ESPAÑOL Para sujetar la boquilla amplia en la correa inferior, pase la abrazadera de la manguera a través del bucle en la correa inferior. 1 2 ► 1. Abrazadera de la manguera 2. Boquilla amplia Gancho de la manguera Cuando suspenda la operación, el gancho en el con - junto de tubo curvo puede util...
Page 25 - Conexión de la herramienta
25 ESPAÑOL Para el tubo curvo/recto de aluminio (Solo para el modelo con manguera de ø38 mm y boca delantera 38) Cárguese al hombro el cuerpo de la aspiradora y a con - tinuación inserte girando el tubo en la boca delantera. Para desconectar, extráigalo girándolo. 1 2 3 4 4 ► 1. Boca delantera 38 2....
Page 27 - Instalación de la bolsa del filtro/
27 ESPAÑOL 1 2 3 ► 1. Manguera 2. Conjunto de tubo curvo 3. Manguito Instalación de la bolsa del filtro/ bolsa recolectora de polvo Accesorio opcional PRECAUCIÓN: No use una bolsa del filtro dañada. Siempre utilice la aspiradora con la bolsa del filtro instalada correctamente. De lo contrario, el po...
Page 28 - OPERACIÓN
28 ESPAÑOL 3. Alinee el orificio de la bolsa del filtro con la boca de la manguera y empuje la parte de cartón hasta el tope. Asegúrese de que la arandela de goma en la bolsa del filtro esté por encima del reborde en la boca de la manguera. 3 2 1 4 1 ► 1. Arandela de goma en la bolsa del filtro 2. R...
Page 29 - MANTENIMIENTO; Limpieza del filtro HEPA
29 ESPAÑOL 3. Reemplace la bolsa del filtro cuando esté llena. Abra la tapa y extraiga la bolsa del filtro. Jale la tira en el lado de la abertura para cerrar la bolsa del filtro y desechar la bolsa del filtro completa. 1 ► 1. Tira Cuando utilice una bolsa recolectora de polvo, retire la bolsa recol...
Page 31 - GARANTÍA LIMITADA DE MAKITA; Ésta Garantía no aplica para México
31 ESPAÑOL ACCESORIOS OPCIONALES PRECAUCIÓN: Estos accesorios o aditamen- tos están recomendados para utilizarse con su herramienta Makita especificada en este manual. El empleo de cualquier otro accesorio o aditamento puede conllevar el riesgo de lesiones personales. Utilice los accesorios o aditam...
Page 32 - Makita Corporation
Some dust created by power sanding, sawing, grinding, drilling, and other construction activities contains chemicals known to the State of California to cause cancer, birth defects or other reproductive harm. Some examples of these chemicals are: • lead from lead-based paints, • crystalline silica f...