Page 2 - TABLE OF CONTENTS
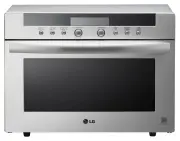
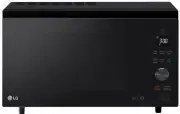
TABLE OF CONTENTS 2 3 IMPORTANT SAFETY INSTRUCTIONS 3 READ ALL INSTRUCTIONS BEFORE USE 3 WARNING 7 INSTALLATION 7 Product Overview 8 Installation Requirements 10 OPERATION 10 Control Panel 12 Before Use 13 Quick Start and Stop 13 Manual Cooking 14 Cooking Mode 17 Cookware Guide 18 Cooking Guide 20 S...
Page 3 - IMPORTANT SAFETY INSTRUCTIONS; READ ALL INSTRUCTIONS BEFORE USE; Safety Messages; WARNING; Technical Safety
3 IMPORTANT SAFETY INSTRUCTIONS ENG LI SH IMPORTANT SAFETY INSTRUCTIONS READ ALL INSTRUCTIONS BEFORE USE Safety Messages Your safety and the safety of others are very important. We have provided many important safety messages in this manual and on your appliance. Always read and follow all safety me...
Page 4 - Operation
4 IMPORTANT SAFETY INSTRUCTIONS - Do not immerse the electrical cord or plug in water. Keep cord away from heated surfaces.- Do not let cord hang over edge of table or counter. • To reduce the risk of fire in the oven cavity: - Do not overcook food. Carefully attend to the microwave oven when paper,...
Page 5 - Maintenance
5 IMPORTANT SAFETY INSTRUCTIONS ENG LI SH The oven must only be used for heating or cooking food. The results of misuse can include safety risks such as fire, burns, or death due to electric shock. • During use the appliance becomes hot. Care should be taken to avoid touching heating elements inside...
Page 6 - SAVE THESE INSTRUCTIONS
6 IMPORTANT SAFETY INSTRUCTIONS SAVE THESE INSTRUCTIONS determined by turning the equipment off and on, the user is encouraged to try to correct the interference by one or more of the following:- Reorient the receiving antenna of the radio or television.- Relocate the microwave oven with respect to ...
Page 7 - INSTALLATION; Product Overview; Front View; Back View; Specifications
7 INSTALLATION ENG LI SH INSTALLATION Product Overview Front View a Control Panel b Mica Sheet c Safety Door Lock System d Window NOTE • Do not remove the mica sheet from the inside cavity of the oven. It is there to protect the microwave components from food spatters. Back View a Location of Model ...
Page 8 - Installation Requirements; Installation Location; Grounding Instructions
8 INSTALLATION • Oven Cavity Dimensions (W x H x D) : 12 11/16" x 8 15/16" x 13 3/16" (32.2 x 22.8 x 33.5 cm) • Capacity of Oven Cavity : 0.9 cu.ft. (0.02 m 3 ) LMC1575XX, MSWN1590L Model • Power Supply : 120 V AC, 60 Hz • Rated Power Consumption : 1250 W • Microwave Output : Max. 1200 W...
Page 10 - OPERATION; Control Panel; Control Panel Features
10 OPERATION OPERATION Control Panel The actual control panel may differ from model to model. Control Panel Features a Display Shows the time of day, cooking time settings, and selected cooking functions. b Sensor Operations Press the buttons to select preprogrammed cook and defrost settings for pop...
Page 11 - Using the Control Panel
11 OPERATION ENG LI SH Using the Control Panel Touch Buttons To use the this buttons, press inside the text area. Slide Touch Use the this button to adjust the cooking time or defrost weight.• To increase the cooking time Press and slowly slide from left to right. Or, press button. • To decrease the...
Page 12 - Before Use; Setting the Clock
12 OPERATION Before Use Setting the Clock Set the current time to operate the microwave oven. 1 Open the oven door. 2 Press START/Enter to confirm the 12H clock display.• To switch between the 12-hour and 24-hour clock modes, press + . 3 Press + or - repeatedly to set the desired hour, and press STA...
Page 13 - Microwave Power Levels; Quick Start and Stop; Using Quick Start; Manual Cooking; Using Manual Cooking
13 OPERATION ENG LI SH Microwave Power Levels This microwave oven is equipped with 10 power levels to give you maximum flexibility and control over cooking.• When operating at 100 - 80 % power levels for prolonged periods, the output power will be reduced gradually to help prevent the unit from elec...
Page 14 - Cooking Mode; Sensor/Auto Cook Mode; Sensor/Auto Cook Menu
14 OPERATION remains in the display and the chime repeats every minute until the door is opened, or any button is pressed. NOTE • If a power level is not selected, the oven defaults to 100% power. Cooking Mode Cook your favorite foods without having to select cooking times and power levels. Sensor/A...
Page 15 - Sensor/Auto Reheat Mode; Sensor Reheat Menu; Popcorn Mode
15 OPERATION ENG LI SH Sc-5 or Ac-5 Oatmeal (1 - 2 servings) • Combine water or milk, salt and oats in large microwave-safe bowl. Cover with vented plastic wrap.- 1 serving : 0.5 cup (40 g) oats, 1 cup (230 g) water or milk, dash of salt. - 2 servings : 1 cup (80 g) oats, 1.5 cup (345 g) water or mi...
Page 16 - Popcorn Menu; Defrost Mode; Defrost Menu
16 OPERATION 1 Open the oven door. Press STOP/Clear . 2 Press Popcorn once. 3 Close the oven door. Press START/Enter . CAUTION • Never use a brown paper bag for popping corn or attempt to pop leftover kernels. • Do not pop popcorn, except in a microwave-safe container or commercial packages designed...
Page 17 - Cookware Guide; Microwave-Safe Cookware
17 OPERATION ENG LI SH • Turn food over at beep.• Standing time: 5-15 minutes dEF2 Poultry (0.1 - 6.0 lbs) • Poultry: Whole, cut-up, breast (boneless)• Cornish Hens: Whole• Turkey: Breast• Rinse chicken with tap water and let stand for 60 minutes after cooking for better results. • Turn food over at...
Page 18 - Testing Cookware before Use; Cooking Guide; Cooking Tips
18 OPERATION - Microwaves cannot penetrate metal. They will bounce off any metal object in the oven and cause arcing, an alarming phenomenon that resembles lightning. - Metal shields the food from microwave energy and produces uneven cooking. Also avoid metal skewers, thermometers, foil trays, metal...
Page 19 - Precautions
19 OPERATION ENG LI SH plastic wrap to trap heat and steam and cook food more quickly. - Standing Time : Let food stand for several minutes after being removed from the oven to allow it to finish cooking and help flavors blend and develop. - Quantity : The more food you place in the oven, the longer...
Page 20 - SMART FUNCTIONS; LG ThinQ Application; LG ThinQ Application Features; Smart Diagnosis; Smart Diagnosis; Feature; Using Audible Diagnosis to
20 SMART FUNCTIONS SMART FUNCTIONS LG ThinQ Application This feature is only available on models with the c or d logo. The LG ThinQ application allows you to communicate with the appliance using a smartphone. LG ThinQ Application Features Communicate with the appliance from a smartphone using the co...
Page 21 - MAINTENANCE; Cleaning; Cleaning the Interior; Cleaning the Accessories
21 MAINTENANCE ENG LI SH MAINTENANCE Cleaning Cleaning the Interior 1 Use a damp cloth to clean the surfaces of the door and wipe out crumbs between the door and the frame. 2 Remove greasy spatters with a soapy cloth then rinse and dry.• Wipe spatters immediately with a wet paper towel, especially a...
Page 22 - TROUBLESHOOTING; FAQs; Frequently Asked Questions
22 TROUBLESHOOTING TROUBLESHOOTING FAQs Frequently Asked Questions Q What’s wrong when the oven light will not glow? A There may be several reasons why the oven light will not glow. Either the light bulb has blown or the electric circuit has failed. Q Does microwave energy pass through the viewing s...
Page 23 - Before Calling for Service
23 TROUBLESHOOTING ENG LI SH Before Calling for Service Operation Problem Possible Cause & Solution Microwave oven does not start Power cord is unplugged, door is open, or cooking time has not been set. • Plug in power cord.• Close oven door.• Set cooking time. A fuse in your home may be blown o...
Page 24 - LIMITED WARRANTY; USA; TERMS AND CONDITIONS; THIS LIMITED WARRANTY DOES NOT COVER:
24 LIMITED WARRANTY LIMITED WARRANTY USA TERMS AND CONDITIONS ARBITRATION NOTICE: THIS LIMITED WARRANTY CONTAINS AN ARBITRATION PROVISION THAT REQUIRES YOU AND LG ELECTRONICS ("LG") TO RESOLVE DISPUTES BY BINDING ARBITRATION INSTEAD OF IN COURT, UNLESS YOU CHOOSE TO OPT OUT. IN ARBITRATION, ...
Page 25 - PROCEDURE FOR RESOLVING DISPUTES:
25 LIMITED WARRANTY ENG LI SH • Damage or failure of the Product resulting from operating the Product in a corrosive atmosphere or contrary to the Product owner’s manual. • Damage or failure of the Product caused by accidents, pests and vermin, lightning, wind, fire, floods, acts of nature, or any o...