Page 2 - I N T R O D U C T I O N
2 I N T R O D U C T I O N IMPORTANT SAFETY INFORMATION Important Notice: Radio Interference............................ 3Important Safety Precautions ................................... 4–8 INTRODUCTION TO INDUCTION COOKING Induction Cooking ........................................................ 9...
Page 3 - I M P O R TA N T S A F E T Y I N F O R M AT I O N; IMPORTANT NOTICE: RADIO INTERFERENCE; READ ALL INSTRUCTIONS BEFORE USE; WARNING
3 ENGLISH I M P O R TA N T S A F E T Y I N F O R M AT I O N IMPORTANT NOTICE: RADIO INTERFERENCE This unit has been tested and found to comply with the limits for a class B digital device, pursuant to Part 18 of the FCC rules. These limits are designed to provide reasonable protection against harmfu...
Page 4 - CAUTION
4 I M P O R TA N T S A F E T Y I N F O R M AT I O N • Proper Installation: Be sure your appliance is properly installed and grounded by a qualified technician in accordance with the National Electrical Code ANSI/NFPA No. 70, latest edition in the United States, and all local code requirements. Insta...
Page 5 - SAFETY PRECAUTIONS
5 ENGLISH I M P O R TA N T S A F E T Y I N F O R M AT I O N READ ALL INSTRUCTIONS BEFORE USE SAFETY PRECAUTIONS (cont.) • Wear proper apparel. Loose-fitting or hanging garments should never be worn while using the appliance. Do not let clothing or other flammable materials contact hot surfaces. • Do...
Page 6 - SAFETY DURING USE
6 I M P O R TA N T S A F E T Y I N F O R M AT I O N READ ALL INSTRUCTIONS BEFORE USE SAFETY DURING USE • This appliance may only be used for normal cooking and frying in the home. It is not designed for commercial or industrial purposes. • Do not use the cooktop to heat the room.• Take care when plu...
Page 8 - READ AND FOLLOW THIS SAFETY INFORMATION CAREFULLY.; SAVE THESE INSTRUCTIONS; HOW TO AVOID DAMAGE TO THE APPLIANCE
8 I M P O R TA N T S A F E T Y I N F O R M AT I O N READ AND FOLLOW THIS SAFETY INFORMATION CAREFULLY. SAVE THESE INSTRUCTIONS • Prior to using your cooktop for the first time, apply the recommended cooktop cleaning creme to the ceramic surface. Buff with a non-abrasive cloth or pad. This will make ...
Page 9 - I N T R O D U C T I O N TO I N D U C T I O N C O O K I N G; INDUCTION COOKING
9 ENGLISH I N T R O D U C T I O N TO I N D U C T I O N C O O K I N G INDUCTION COOKING SELECTING COOKWARE The magnetic Cooking Zone sensors located below the cooktop surface require the use of cookware made with magnetic material in order to start the heating process on any of the Cooking Zones. Whe...
Page 10 - SELECTING COOKWARE
10 I N T R O D U C T I O N TO I N D U C T I O N C O O K I N G SELECTING COOKWARE (continued) AVOIDING SCRATCHES It is recommended to always use heavier gauge stainless steel cookware on your induction cooktop surface. This will help reduce the possibility of developing scratches on the ceramic surfa...
Page 12 - P A R T S A N D F E AT U R E S; PARTS AND FEATURES OF YOUR COOKTOP
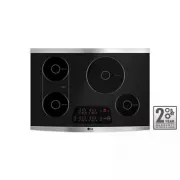
12 P A R T S A N D F E AT U R E S PARTS AND FEATURES OF YOUR COOKTOP Throughout this manual, features and appearance may vary from your model. Ceramic Cooktop: LG’s new induction cooktop features a ceramic cooktop surface that remains cooler than conventional ceramic cooktops, regardless of whether ...
Page 13 - TOUCH CONTROL FEATURES
13 ENGLISH P A R T S A N D F E AT U R E S TOUCH CONTROL FEATURES BRIDGE: Activates the two left Cooking Zones together as a single large Cooking Zone. For bridge operation, touch this pad to activate and adjust the power level with the or pads for either left Cooking Zone. TIMER: When activated, the...
Page 14 - O P E R AT I N G I N S T R U C T I O N S; BEFORE USING THE COOKTOP
14 O P E R AT I N G I N S T R U C T I O N S Before using the cooktop for the first time, clean it thoroughly with the included cleaner or ceramic cooktop cleaner according to the Care and Cleaning instructions in this guide. This will remove any help protect the ceramic surface and make future clean...
Page 15 - SETTING THE CONTROLS
15 ENGLISH O P E R AT I N G I N S T R U C T I O N S SETTING THE CONTROLS SETTING THE POWER LEVEL The power level for the selected Cooking Zone can be set from to and (Boost).To adjust the power level: Touch the or pad for the selected Cooking Zone. Touching will set the power level to . Touching wil...
Page 17 - USING THE BRIDGE COOKING ZONES
17 ENGLISH O P E R AT I N G I N S T R U C T I O N S The timer feature may be helpful if a recipe calls for cooking for a set time. The timer can be set from 1 to 99 minutes. Once set, the digital display between the timer or pads will begin to count down the remaining time in minutes. NOTE: The time...
Page 18 - USING CHILD LOCK
18 O P E R AT I N G I N S T R U C T I O N S USING CHILD LOCK OTHER FUNCTIONS POWER SHARING Your cooktop is equipped with four induction Cooking Zones within two heating sections. The right and left Cooking Zones are powered by two independent induction inverters—one inverter for each of the two heat...
Page 19 - C A R E A N D C L E A N I N G; BEFORE YOU BEGIN
19 ENGLISH C A R E A N D C L E A N I N G BEFORE YOU BEGIN General cleaning for induction ceramic glass cooking surfaces is considerably easier than for cooking surfaces with radiant heating. NOTE: To prevent accidental activation of the controls, it is recommended that you set the CHILD LOCK feature...
Page 20 - I N S TA L L AT I O N I N S T R U C T I O N S
20 I N S TA L L AT I O N I N S T R U C T I O N S BEFORE YOU BEGIN TECHNICAL SPECIFICATIONS UNPACKING THE COOKTOP Read these instructions completely and carefully. NOTES TO INSTALLER: • Read all instructions contained in these installation instructions before installing the cooktop. • Remove all pack...
Page 21 - PREPARING THE INSTALLATION LOCATION
21 ENGLISH I N S TA L L AT I O N I N S T R U C T I O N S IMPORTANT INSTALLATION INFORMATION • All electric cooktops run off a single phase, three- wire or four-wire cable, 240/208 volt, 60 hertz, AC-only electrical supply with ground. • Minimum distance between cooktop and overhead cabinetry is 30ʺ ...
Page 22 - DIMENSIONS AND CLEARANCES
22 I N S TA L L AT I O N I N S T R U C T I O N S DIMENSIONS AND CLEARANCES J F G I L M H K Overhead cabinet should not exceed a maximum depth of 13” (33 cm). Min. recommended distance between rear edge of cutout and nearest combustible surface. 24" (61 cm) 12" (30.5 cm) Min. from edge of coo...
Page 23 - ELECTRICAL CONNECTIONS
23 ENGLISH I N S TA L L AT I O N I N S T R U C T I O N S IMPORTANT SAFETY INSTRUCTIONS • Be sure your cooktop is installed and grounded properly by a qualified installer or service technician. • This cooktop must be electrically grounded in accordance with local codes or, in their absence, with the ...
Page 26 - COOKTOP INSTALLATION
26 I N S TA L L AT I O N I N S T R U C T I O N S Install the retainer brackets to the bottom of the cooktop; then snug the bolts against the bottom of the countertop as shown. NOTE: The retainer brackets MUST be installed to meet local codes or, in their absence, with the National Electrical Code AN...
Page 27 - T R O U B L E S H O O T I N G; BEFORE CALLING FOR SERVICE
27 ENGLISH T R O U B L E S H O O T I N G BEFORE CALLING FOR SERVICE Before you call for service, review this list. It may save you time and expense. This list includes common occurrences that are not the result of a defect in workmanship or materials. Problem Possible Causes Solutions Cooktop does n...
Page 29 - LG INDUCTION COOKTOP LIMITED WARRANTY - USA
I N T R O D U C T I O N 29 ENGLISH LG Electronics Inc. will repair or replace your product, at LG’s option, if it proves to be defective in material or workmanship under normal use, during the warranty period set forth below, effective from the date of original consumer purchase of the product. This...
Page 30 - M E M O
Page 31 - GUÍA PARA EL USO & INSTRUCCIONES DE INSTALACIÓN; COCINA A INDUCCIÓN DE; Lea detenidamente estas instrucciones antes utilizar y
GUÍA PARA EL USO & INSTRUCCIONES DE INSTALACIÓN COCINA A INDUCCIÓN DE VIDRIO CERÁMICO LSCI307ST Lea detenidamente estas instrucciones antes utilizar y guárdelas como referencia para el futuro. P/No.: MFL41494802 www.lg.com ESP AÑOL
Page 32 - I N T R O D U C C I Ó N
2 I N T R O D U C C I Ó N INFORMACIÓN IMPORTANTE DE SEGURIDAD Aviso Importante: Interferencia Radio .......................... 3Precauciones Importantes de Seguridad ................. 4–8 INTRODUCCIÓN A LA COCCIÓN POR INDUCCIÓN Cocción por Inducción ................................................. ...
Page 33 - I N F O R M A C I Ó N I M P O R TA N T E D E S E G U R I D A D; AVISO IMPORTANTE: INTERFERENCIA RADIO; ADVERTENCIA
3 ESP AÑOL I N F O R M A C I Ó N I M P O R TA N T E D E S E G U R I D A D AVISO IMPORTANTE: INTERFERENCIA RADIO Este equipo ha sido probado y cumple con los límites establecidos para un dispositivo digital de clase B, según la parte 18 de la Normativa de la FCC. Estos límites han sido establecidos p...
Page 34 - PRECAUCIÓN
4 I N F O R M A C I Ó N I M P O R TA N T E D E S E G U R I D A D • Instalación Adecuada: Asegúrese que el dispositivo sea instalado y conectado en forma adecuada por un técnico calificado, de acuerdocon el Código de Electricidad Nacional ANSI/NFPA Nº 70 – la última edición en los Estados Unidos y to...
Page 35 - PRECAUCIONES DE SEGURIDAD
5 ESP AÑOL I N F O R M A C I Ó N I M P O R TA N T E D E S E G U R I D A D LEA TODAS LAS INSTRUCCIONES ANTES DE USAR PRECAUCIONES DE SEGURIDAD (continua) • Use ropa adecuada. Nunca se deben usar prendas sueltas o que cuelguen mientras se usa el electrodoméstico. Evite que la ropa u otros materiales i...
Page 36 - SEGURIDAD DURANTE EL USO
6 I N F O R M A C I Ó N I M P O R TA N T E D E S E G U R I D A D LEA TODAS LAS INSTRUCCIONES ANTES DE USAR SEGURIDAD DURANTE EL USO • Este electrodoméstico sólo se podrá usar para una cocción o fritura normal. No fue diseñado para uso comercial o industrial. • No use la cocina para calefaccionar el ...
Page 38 - LEA Y SIGA ESTA INFORMACIÓN DE SEGURIDAD CUIDADOSAMENTE.; CONSERVE ESTAS INSTRUCCIONES; CÓMO EVITAR DAÑOS SOBRE EL ELECTRODOMÉSTICO; LEA TODAS LAS INSTRUCCIONES
8 I N F O R M A C I Ó N I M P O R TA N T E D E S E G U R I D A D LEA Y SIGA ESTA INFORMACIÓN DE SEGURIDAD CUIDADOSAMENTE. CONSERVE ESTAS INSTRUCCIONES • Antes de usar la cocina por primera vez, aplique la crema de limpieza recomendada sobre la superficie cerámica de la cocina. Pula con una tela o es...
Page 39 - I N T R O D U C C I Ó N A L A C O C C I Ó N P O R I N D U C C I Ó N; COCCIÓN POR INDUCCIÓN
9 ESP AÑOL I N T R O D U C C I Ó N A L A C O C C I Ó N P O R I N D U C C I Ó N COCCIÓN POR INDUCCIÓN SELECCIÓN DE UTENSILIOS Los sensores magnéticos de la Zona de Cocción ubicados debajo de la superficie de la cocina requieren el uso de utensilios fabricados con material magnético, a fin de iniciar ...
Page 40 - SELECCIÓN DE UTENSILIOS
10 I N T R O D U C C I Ó N A L A C O C C I Ó N P O R I N D U C C I Ó N SELECCIÓN DE UTENSILIOS (continúa) EVITE QUE SE PRODUZCAN RAYAS Se recomienda usar siempre utensilios de acero inoxidable de calibre grueso sobre la superficie de la cocina de inducción. Esto ayudará a reducir la posibilidad que ...
Page 42 - P A R T E S Y C A R A C T E R Í S T I C A S; PARTES Y CARACTERÍSTICAS DE SU COCINA
12 P A R T E S Y C A R A C T E R Í S T I C A S PARTES Y CARACTERÍSTICAS DE SU COCINA Es posible que las funciones y apariencias varíen con relación a su modelo a lo largo del manual. Cocina de Cerámica: La nueva cocina de inducción de LG cuenta con una superficie cerámica que permanece más fría que ...
Page 43 - CARACTERÍSTICAS DEL CONTROL TÁCTIL
13 ESP AÑOL P A R T E S Y C A R A C T E R Í S T I C A S CARACTERÍSTICAS DEL CONTROL TÁCTIL PUENTE: Active las dos zonas de cocción izquierdas al mismo tiempo como una gran zona de cocción. Para activar la función de puente, toque esta tecla a fin de activar y ajustar el nivel de energía con las tecl...
Page 44 - I N S T R U C C I O N E S D E U S O; ANTES DE USAR LA COCINA
14 I N S T R U C C I O N E S D E U S O Antes de usar la cocina por primera vez, limpie la misma completamente con el limpiador incluido o con un limpiador para cocinas de cerámica, de acuerdo con las instrucciones de Cuidado y Limpieza de esta guía. Esto ayudará a proteger la superficie de cerámica ...
Page 45 - CONFIGURACIÓN DE CONTROLES
15 ESP AÑOL I N S T R U C C I O N E S D E U S O CONFIGURACIÓN DE CONTROLES (continúa) AJUSTE EL NIVEL DE INTENSIDAD Puede ajustar el nivel de intensidad de la zona de cocción seleccionada a y (nivel más alto de intensidad). Para ajustar el nivel de intensidad: Presione la tecla o de la zona de cocci...
Page 47 - USO DE LAS zonas DE COCCIÓN DEL PUENTE
17 ESP AÑOL I N S T R U C C I O N E S D E U S O La función de temporizador puede ser de ayuda si es necesario realizar la cocción de una receta durante un tiempo específico. El temporizador se puede configurar entre 1 y 99 minutos. Una vez configurado, la pantalla digital entre las teclas o comenzar...
Page 48 - USO DEL BLOQUEO PARA NIÑOS
18 I N S T R U C C I O N E S D E U S O USO DEL BLOQUEO PARA NIÑOS OTRAS FUNCIONES INTERCAMBIO DE ENERGÍA La cocina está equipada con cuatro zonas de cocción por inducción dentro de dos secciones para calentar. Las zonas de cocción derechas e izquierdas cuentan con dos inversores de inducción indepen...
Page 49 - C U I D A D O Y L I M P I E Z A; LIMPIEZA DE LA COCINA
19 ESP AÑOL C U I D A D O Y L I M P I E Z A LIMPIEZA DE LA COCINA La limpieza general sobre superficies de cocción de vidrio cerámico de inducción es considerablemente más fácil que sobre superficies de calor radiante. NOTA: A fin de evitar la activación accidental de los controles, se recomienda qu...
Page 50 - I N S T R U C C I O N E S D E I N S TA L A C I Ó N; ANTES DE COMENZAR
20 I N S T R U C C I O N E S D E I N S TA L A C I Ó N ANTES DE COMENZAR ESPECIFICACIONES TÉCNICAS DESEMPAQUE DE LA COCINA Lea estas instrucciones en su totalidad y atentamente. NOTAS PARA EL INSTALADOR: • Lea todas las instrucciones que aparecen en estas instrucciones de instalación antes e instalar...
Page 51 - PREPARACIÓN DEL LUGAR DE INSTALACIÓN
21 ESP AÑOL I N S T R U C C I O N E S D E I N S TA L A C I Ó N INFORMACIÓN IMPORTANTE DE INSTALACIÓN • Todas las cocinas eléctricas usan un cable de tres o cuatro polos, de una sola fase, 240/208 voltios, 60 hertz, con suministro eléctrico a tierra de AC (corriente alterna). • Se debe mantener una d...
Page 52 - DIMENSIONES Y DESPEJE
22 I N S T R U C C I O N E S D E I N S TA L A C I Ó N DIMENSIONES Y DESPEJE J F G I L M H K El gabinete de la parte Superior no deberá superar una profundidad máxima de 13Ó (33 cm.) Min. distancia recomendada entre el extremo trasero del apoyo y de la superficie combustible más cercana sobre la base...
Page 53 - CONEXIONES ELÉCTRICAS
23 ESP AÑOL I N S T R U C C I O N E S D E I N S TA L A C I Ó N INSTRUCCIONES IMPORTANTESDE SEGURIDAD • Asegúrese que su cocina sea instalada y conectada a tierra de forma adecuada por un instalador o técnico calificado. • La cocina deberá estar conectada a tierra de acuerdo con los códigos locales o...
Page 56 - INSTALACIÓN DE LA COCINA
26 I N S T R U C C I O N E S D E I N S TA L A C I Ó N Instale los soportes de retención en la parte inferior de la cocina; luego ajuste los tornillos contra la parte inferior de la base como se muestra. NOTA: Los soportes de retención DEBEN ser instalados de acuerdo con los códigos locales o, en aus...
Page 57 - S O L U C I Ó N D E P R O B L E M A S; ANTES DE SOLICITAR REPARACIONES
27 ESP AÑOL S O L U C I Ó N D E P R O B L E M A S ANTES DE SOLICITAR REPARACIONES Antes de solicitar reparaciones, revise esta lista. Es posible que le ahorre tiempo y gastos. Esta lista incluye hechos comunes que no son el resultado de un defecto de fabricación o materiales. Problema Causas Posible...
Page 60 - N O T E S


 LG CBGS3028S
User Manual
LG CBGS3028S
User Manual
 LG HU641BAG
User Manual
LG HU641BAG
User Manual
 LG HU641DAG
User Manual
LG HU641DAG
User Manual
 LG LSCE305ST
User Manual
LG LSCE305ST
User Manual
 LG CBGJ3023D
User Manual
LG CBGJ3023D
User Manual
 LG CBGJ3023S
User Manual
LG CBGJ3023S
User Manual
 LG CBGJ3027S
User Manual
LG CBGJ3027S
User Manual
 LG CBGJ3623D
User Manual
LG CBGJ3623D
User Manual
 LG CBGJ3623S
User Manual
LG CBGJ3623S
User Manual
 LG CBGJ3627S
User Manual
LG CBGJ3627S
User Manual
 LG CBGS3028N
User Manual
LG CBGS3028N
User Manual
 LG CBGS3628N
User Manual
LG CBGS3628N
User Manual
 LG CBIH3013BE
User Manual
LG CBIH3013BE
User Manual
 LG CBIH3613BE
User Manual
LG CBIH3613BE
User Manual
 LG CBIS3618BE
User Manual
LG CBIS3618BE
User Manual
 LG LCE3010SB
User Manual
LG LCE3010SB
User Manual
 LG LCE3081ST
User Manual
LG LCE3081ST
User Manual