LG LCE3010SB - Manuals
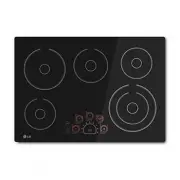
User Manual LG LCE3010SB


Summary
TABLE OF CONTENTS 2 3 IMPORTANT SAFETY INSTRUCTIONS 3 READ ALL INSTRUCTIONS BEFORE USE 3 WARNING STATEMENTS 6 CAUTION STATEMENTS 8 PRODUCT OVERVIEW 8 Product Features 9 INSTALLATION 9 Before Installing 13 Installing the Cooktop 18 OPERATION 18 Cookware 20 Control Panel 25 MAINTENANCE 25 Care and Cle...
3 IMPORTANT SAFETY INSTRUCTIONS ENGLISH IMPORTANT SAFETY INSTRUCTIONS READ ALL INSTRUCTIONS BEFORE USE Safety Messages Your safety and the safety of others are very important. We have provided many important safety messages in this manual and on your appliance. Always read and follow all safety mess...
5 IMPORTANT SAFETY INSTRUCTIONS ENGLISH • Do not clean or operate a broken cooktop. If the cooktop breaks, cleaning solutions and spillovers may penetrate the broken cooktop and create a risk of electric shock. Contact a qualified technician immediately. • Never leave surface units unattended at hig...
LG Hobs Manuals
-
 LG CBGS3028S
User Manual
LG CBGS3028S
User Manual
-
LG CBGS3628S
User Manual
-
 LG LSCE305ST
User Manual
LG LSCE305ST
User Manual
-
 LG CBGJ3023D
User Manual
LG CBGJ3023D
User Manual
-
 LG CBGJ3023S
User Manual
LG CBGJ3023S
User Manual
-
 LG CBGJ3027S
User Manual
LG CBGJ3027S
User Manual
-
 LG CBGJ3623D
User Manual
LG CBGJ3623D
User Manual
-
 LG CBGJ3623S
User Manual
LG CBGJ3623S
User Manual
-
 LG CBGJ3627S
User Manual
LG CBGJ3627S
User Manual
-
 LG CBIH3013BE
User Manual
LG CBIH3013BE
User Manual
-
 LG CBIH3613BE
User Manual
LG CBIH3613BE
User Manual
-
 LG CBIS3618BE
User Manual
LG CBIS3618BE
User Manual
-
 LG LCE3610SB
User Manual
LG LCE3610SB
User Manual
-
 LG LCG3011ST
User Manual
LG LCG3011ST
User Manual
-
LG LCG3011ST
Manual
-
 LG LCG3611ST
User Manual
LG LCG3611ST
User Manual
-
LG LCG3611ST
Manual
-
 LG LCG3691ST
Manual
LG LCG3691ST
Manual