KitchenAid KMBP107ESS - Manuals
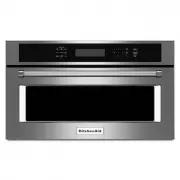
KitchenAid KMBP107ESS Microwave – User Manual, Manual, Installation Manual in PDF format online.
Manuals:
User Manual KitchenAid KMBP107ESS

Manual KitchenAid KMBP107ESS


Summary
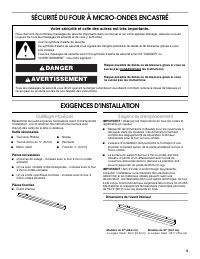
2 BUILT-IN MICROWAVE OVEN SAFETY INSTALLATION REQUIREMENTS Tools and Parts Gather the required tools and parts before starting installation. Read and follow the instructions provided with any tools listed here. Tools Needed ■ Phillips screwdriver ■ ¼" (6 mm) nut driver ■ Measuring tape Parts Nee...
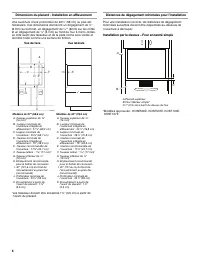
3 Cabinet Dimensions - Flush Installation A 23¹⁄ 4 " (59.0 cm) minimum cutout depth is required. These dimensions will result in a ¹⁄ 4 " (6 mm) reveal on the top, a ¹⁄ 4 " (6 mm) reveal on the sides, and a ¹⁄ 8 " (3 mm) reveal on the bottom of the microwave oven. The front face of t...
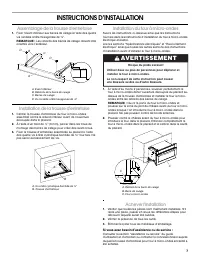
4 INSTALLATION INSTRUCTIONS Assemble Spacer Kit 1. Attach bottom vent to spacer bars using four ³⁄ 8 " hex-head washer screws. NOTE: Spacer bar flanges should be facing out. A. Bottom ventB. Spacer bar flangeC. Spacer barsD. ³⁄ 8 " hex-head washer screws Install Spacer Kit 1. Center assemble...
Installation Manual KitchenAid KMBP107ESS


Summary
2 BUILT-IN MICROWAVE OVEN SAFETY INSTALLATION REQUIREMENTS Tools and Parts Gather the required tools and parts before starting installation. Read and follow the instructions provided with any tools listed here. Tools Needed Parts Needed ■ (2) Spacer bars - included with built-in microwave oven ■ (4)...
3 Cabinet Dimensions - Flush Installation A 23 ¹⁄₄ " (59.0 cm) minimum cutout depth is required. These dimensions will result in a ¹⁄₄ " (6 mm) reveal on the top, a ¹⁄₄ " (6mm) reveal on the sides, and a ¹⁄₈ " (3 mm) reveal on the bottom of the microwave oven. The front face of the c...
4 INSTALLATION INSTRUCTIONS Assemble Spacer Kit 1. Attach bottom vent to spacer bars using four ³⁄₈ " hex-head washer screws. NOTE: Spacer bar flanges should be facing out. Install Spacer Kit 1. Center assembled microwave oven spacer kit against lower, front edge of the cabinet cutout. 2. Using ...
KitchenAid Microwaves Manuals
-
 KitchenAid KMBD104GSS
User Manual
KitchenAid KMBD104GSS
User Manual
-
KitchenAid KMBD104GSS
Installation Manual
-
KitchenAid KMBD104GSS
Manual
-
KitchenAid KMBD104GSS
Troubleshooting Guide
-
 KitchenAid KMBP100EBS
User Manual
KitchenAid KMBP100EBS
User Manual
-
KitchenAid KMBP100EBS
Manual
-
KitchenAid KMBP100EBS
Installation Manual
-
 KitchenAid KMBP100ESS
User Manual
KitchenAid KMBP100ESS
User Manual
-
KitchenAid KMBP100ESS
Manual
-
KitchenAid KMBP100ESS
Installation Manual
-
 KitchenAid KMBP107EBS
User Manual
KitchenAid KMBP107EBS
User Manual
-
KitchenAid KMBP107EBS
Manual
-
KitchenAid KMBP107EBS
Installation Manual
-
 KitchenAid KMBS104EBL
User Manual
KitchenAid KMBS104EBL
User Manual
-
KitchenAid KMBS104EBL
Installation Manual
-
KitchenAid KMBS104EBL
Manual
-
 KitchenAid KMBS104ESS
User Manual
KitchenAid KMBS104ESS
User Manual
-
KitchenAid KMBS104ESS
Manual
-
 KitchenAid KMBT5011KSS
Troubleshooting Guide
KitchenAid KMBT5011KSS
Troubleshooting Guide
-
KitchenAid KMBT5011KSS
Manual