Page 2 - RANGE HOOD SAFETY; Your safety and the safety of others are very important.; DANGER; TABLE OF CONTENTS
2 RANGE HOOD SAFETY You can be killed or seriously injured if you don't immediately You can be killed or seriously injured if you don't follow All safety messages will tell you what the potential hazard is, tell you how to reduce the chance of injury, and tell you what canhappen if the instructions ...
Page 3 - IMPORTANT SAFETY INSTRUCTIONS; READ AND SAVE THESE INSTRUCTIONS
3 IMPORTANT SAFETY INSTRUCTIONS READ AND SAVE THESE INSTRUCTIONS
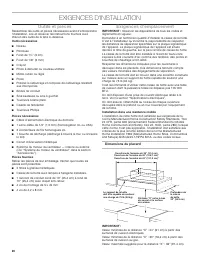
Page 4 - INSTALLATION REQUIREMENTS; Tools and Parts; Location Requirements
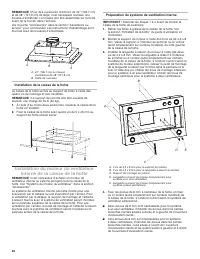
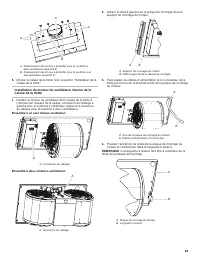
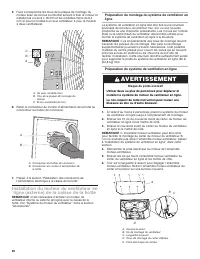
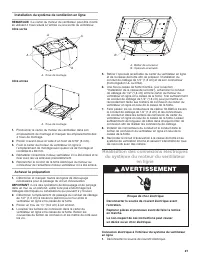
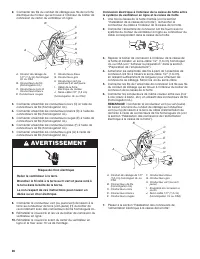
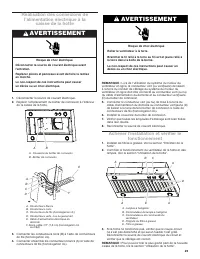
4 INSTALLATION REQUIREMENTS Tools and Parts Gather the required tools and parts before starting installation. Read and follow the instructions provided with any tools listed here. Tools needed ■ Level ■ Drill ■ 1¼" (3.0 cm) drill bit ■ 1/8" (3 mm) drill bit ■ Pencil ■ Wire stripper or utilit...
Page 5 - Venting Requirements
5 Installation Dimensions Venting Requirements ■ Vent system must terminate to the outdoors. ■ Do not terminate the vent system in an attic or other enclosed area. ■ Do not use 4" (10.2 cm) laundry-type wall caps. ■ Use metal vent only. Rigid metal vent is recommended. Plastic or metal foil vent...
Page 6 - Electrical Requirements
6 Typical In-line Blower Motor System Venting Installations Calculating Vent System Length To calculate the length of the system you need, add the equivalent feet (meters) for each vent piece used in the system. Vent Piece Equivalent Length 45° elbow 2.5 ft (0.8 m) 90° elbow 5.0 ft (1.5 m) The maxim...
Page 7 - INSTALLATION INSTRUCTIONS; Prepare Location; WARNING
7 INSTALLATION INSTRUCTIONS Prepare Location ■ It is recommended that the vent system be installed before the hood is installed. ■ Before making cutouts, make sure there is proper clearance within the ceiling or wall for exhaust vent. ■ Hood liner is to be installed 24" (61.0 cm) minimum for ele...
Page 8 - Install Hood Liner Internal Blower
8 NOTE: For 42" (106.7 cm) and 48" (121.9 cm) wide cabinet openings, a spacer kit is required. The kit must be assembled to the range hood prior to mounting the hood to the cabinet.See “Accessories” in the “Assistance or Service” section to order. The assembly instructions come with the spac...
Page 11 - Make Electrical Connections for In-line
11 Complete Preparation 1. Determine and make all necessary cuts for the vent system. IMPORTANT: When cutting or drilling into the ceiling or wall, do not damage electrical wiring or other hidden utilities. 2. Determine the location where the 1/2" (1.3 cm) wiring conduit will be routed through t...
Page 12 - Make Electrical Power Supply
12 8. Connect the green (or yellow/green) ground wire to the green/ yellow ground wire (H) in the terminal box using UL listed wire connectors. 9. Reinstall the in-line blower terminal box cover and screw. 10. Reinstall the front cover of the in-line blower housing and secure it with 10 mounting scr...
Page 14 - RANGE HOOD USE; Range Hood Controls
14 RANGE HOOD USE The range hood is designed to remove smoke, cooking vapors and odors from the cooktop area. For best results, start the hood before cooking and allow it to operate several minutes after the cooking is complete to clear all smoke and odors from the kitchen.The hood controls are loca...
Page 15 - RANGE HOOD CARE; Cleaning
15 RANGE HOOD CARE Cleaning IMPORTANT: Clean the hood and grease filters frequently according to the following instructions. Replace grease filters before operating hood. Exterior Surfaces: To avoid damage to the exterior surface, do not use steel wool or soap-filled scouring pads.Always wipe dry to...
Page 16 - WIRING DIAGRAM
16 WIRING DIAGRAM SE13RA M M Junction box Y/G W GND N L BK BK BK BK BK BK BK BK BK W W W W Y Y Y Y Y Y Y Y Y Y Y Y BR BR W Lightswitch Thermo Motor switch W switch R GY W R GY BU BU 25uF 25uF BR BR BU BK GY R W Y/G BR BR Y Y BU Single or double motor GY R W Y/G Optional kit a c 1 2 3 a e 1 23 4 5 1 ...
Page 17 - ASSISTANCE OR SERVICE; In Canada; Accessories
17 ASSISTANCE OR SERVICE When calling for assistance or service, please know the purchase date and the complete model and serial number of your appliance. This information will help us to better respond to your request. If you need replacement parts: If you need to order replacement parts, we recomm...
Page 18 - SÉCURITÉ DE LA HOTTE DE CUISINIÈRE; Votre sécurité et celle des autres est très importante.; AVERTISSEMENT
18 SÉCURITÉ DE LA HOTTE DE CUISINIÈRE Risque possible de décès ou de blessure grave si vous ne suivez pas immédiatement les instructions. Risque possible de décès ou de blessure grave si vous ne suivez pas les instructions. Tous les messages de sécurité vous diront quel est le danger potentiel et vo...
Page 19 - IMPORTANTES INSTRUCTIONS DE SÉCURITÉ; LIRE ET CONSERVER CES INSTRUCTIONS
19 IMPORTANTES INSTRUCTIONS DE SÉCURITÉ LIRE ET CONSERVER CES INSTRUCTIONS AVERTISSEMENT : POUR RÉDUIRE LE RISQUE D’INCENDIE, DE DÉCHARGE ÉLECTRIQUE OU DE BLESSURES, RESPECTER LES INSTRUCTIONS SUIVANTES : ■ Utiliser cet appareil uniquement selon les modalités d’utilisation prévues par le fabricant. ...
Page 20 - EXIGENCES D'INSTALLATION; Outils et pièces; Exigences d'emplacement
20 EXIGENCES D'INSTALLATION Outils et pièces Rassembler les outils et pièces nécessaires avant d’entreprendre l’installation. Lire et observer les instructions fournies avec chacun des outils de la liste ci-dessous. Outils nécessaires ■ Niveau ■ Perceuse ■ Foret de 1¼" (3 cm) ■ Foret de 1/8"...
Page 21 - Exigences concernant l’évacuation
21 Dimensions du produit Exigences concernant l’évacuation ■ Le système doit décharger l'air à l'extérieur. ■ Ne pas terminer le circuit d’évacuation dans un grenier ou dans un autre espace clos. ■ Ne pas utiliser une bouche de décharge murale de 4" (10,2 cm) normalement utilisée pour un équipem...
Page 22 - Spécifications électriques
22 Installations d'évacuation typiques avec système de moteur de ventilateur en ligne Calcul de la longueur du circuit d’évacuation Pour calculer la longueur effective du circuit d’évacuation nécessaire, additionner les longueurs équivalentes (en pieds ou mètres) de tous les composants utilisés dans...
Page 23 - INSTRUCTIONS D’INSTALLATION; Préparation de l’emplacement
23 INSTRUCTIONS D’INSTALLATION Préparation de l’emplacement ■ Il est recommandé d'installer le conduit de décharge avant de procéder à l'installation de la hotte. ■ Avant d’exécuter les découpages, vérifier la disponibilité d’un dégagement suffisant dans le plafond ou le mur pour le conduit d’évacua...
Page 24 - Installation du moteur du ventilateur
24 REMARQUE : Pour des ouvertures d'armoire de 42" (106,7 cm) et de 48" (121,9 cm) de large, il est nécessaire d'utiliser une trousse d'entretoise. La trousse doit être assemblée sur la hotte avant de la monter dans l'armoire.Voir la partie “Accessoires” dans la section “Assistance ou servic...
Page 26 - Installation du moteur du ventilateur en
26 5. Faire correspondre les trous de la plaque de montage du moteur avec les écrous à emboîter servant à fixer le moteur et installer les vis de 6 x 16 mm et les rondelles-freins de 6,4 mm (2 pour le modèle à un seul ventilateur, 5 pour le modèle à deux ventilateurs). 6. Relier le connecteur du cor...
Page 27 - Réalisation des connexions électriques
27 Installation du système de ventilation en ligne REMARQUE : Le carter du moteur du ventilateur peut être monté en utilisant 4 trous situés à l’entrée ou à la sortie du ventilateur. Côté sortie Côté entrée 1. Positionner le carter du moteur du ventilateur dans son emplacement de montage et marquer ...
Page 30 - UTILISATION DE LA HOTTE; Commandes de la hotte de
30 UTILISATION DE LA HOTTE La hotte de cuisinière est conçue pour extraire fumée, vapeurs de cuisson et odeurs de la zone de la table de cuisson. Pour obtenir les meilleurs résultats, mettre le ventilateur de la hotte en marche avant d’entreprendre une cuisson, et laisser le ventilateur fonctionner ...
Page 31 - ENTRETIEN DE LA HOTTE; Nettoyage
31 ENTRETIEN DE LA HOTTE Nettoyage IMPORTANT : Nettoyer fréquemment la hotte et les filtres à graisse en suivant les instructions suivantes. Réinstaller les filtres à graisse avant de faire fonctionner la hotte. Surfaces externes : Afin d'éviter d'endommager la surface externe, ne pas utiliser de ta...
Page 32 - SCHÉMA DE CÂBLAGE
32 SCHÉMA DE CÂBLAGE SE13RA M M Boîtier de connexion BL JA/VE Terre NEU L N N N N N N N N BL BL BL BL JA JA JA JA JA JA JA JA JA JA JA JA MAR MAR BL de lampe Commutateur Commutateur thermique du moteur Commutateur BL R GRIS BL R GRIS BU BU MAR MAR BU GRIS N R BL MAR JA /V E MA R JA BU a c 1 2 3 a e ...
Page 33 - ASSISTANCE OU SERVICE; Au Canada; Accessoires
33 ASSISTANCE OU SERVICE Lors d’un appel pour assistance ou service, veuillez connaître la date d’achat, le numéro de modèle et le numéro de série complets de l’appareil. Ces renseignements nous aideront à mieux répondre à votre demande. Si vous avez besoin de pièces de rechange Si vous avez besoin ...
Page 34 - REMARQUES