Page 3 - INTRODUCTION; SAFETY; Your safety and the safety of others are very important.; DANGER
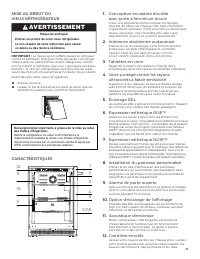
3 INTRODUCTION SAFETY IMPORTANT SAFETY INSTRUCTIONS WARNING: To reduce the risk of fire, electric shock, or injury when using your refrigerator, follow these basic precautions: SAVE THESE INSTRUCTIONS ■ Plug into a grounded 3 prong outlet. ■ Do not remove ground prong. ■ Do not use an adapter. ■ Do ...
Page 4 - WARNING
4 PROPER DISPOSAL OF YOUR OLD REFRIGERATOR IMPORTANT: Child entrapment and suffocation are not problems of the past. Junked or abandoned ref rigerators are still dangerous – even if they will sit for “just a few days.” If you are getting rid of your old ref rigerator, please follow these instruction...
Page 5 - INSTALLATION REQUIREMENTS; TOOLS AND PARTS; LOCATION REQUIREMENTS
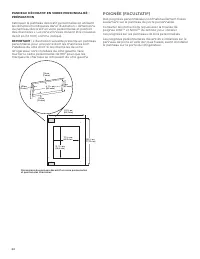
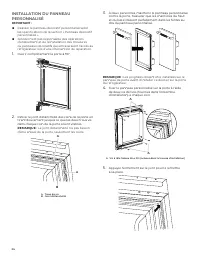
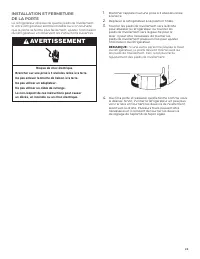
5 INSTALLATION REQUIREMENTS TOOLS AND PARTS Gather the required tools and parts before starting installation TOOLS AND PARTS NEEDED: Phillips screwdriver Custom Overlay Door Panel — Refer “ Custom Overlay Panel Preparation.” Custom handle and mounting hardware (optional) PARTS SUPPLIED: M4 x 30 flat...
Page 6 - PRODUCT DIMENSIONS; CUSTOM OVERLAY PANEL
6 PRODUCT DIMENSIONS OVERALL PRODUCT Width (up to hinge cover) 237/8" (60.72 cm) Height (up to hinge cover) 343/8" (87.32 cm) Glass door model (NOIR™) depth (no handle) 233/4" (60.36 cm) Glass door model (RISE™) depth (no handle) 235/8" (60 cm) Solid door models (NOIR™/ RISE™) 235/8&...
Page 8 - ELECTRICAL REQUIREMENTS; INSTALLATION INSTRUCTIONS; UNPACK THE REFRIGERATOR
8 ELECTRICAL REQUIREMENTS Before you move your ref rigerator into its final location, it is important to make sure you have the proper electrical connection. RECOMMENDED GROUNDING METHOD A 115 V, 60 Hz, AC only, 15 or 20 A fused, grounded electrical supply is required. It is recommended that a separ...
Page 9 - CUSTOM OVERLAY PANEL INSTALLATION
9 CUSTOM OVERLAY PANEL INSTALLATION IMPORTANT: Create custom overlay panel according to the specifications in the “Custom Overlay Panel” section. JennAir is not responsible for the removal or addition of molding or decorative panels that would not allow access to the ref rigerator for service. 1. Op...
Page 10 - INSTALLATION AND DOOR CLOSING
10 INSTALLATION AND DOOR CLOSING Your ref rigerator has four leveling legs. If your ref rigerator seems unsteady or you want the door to close more easily, adjust the ref rigerator’s tilt using the instructions below. 1. Plug into a grounded 3 prong outlet. 2. Move the ref rigerator into its final l...
Page 11 - USING REFRIGERATOR; CONTROLS
11 USING REFRIGERATOR CONTROLS NOTE: The control panel is located at the top of the compartment and facing f ront. The control of the ref rigerator has no mechanical parts or buttons. When disconnected, the control panel displays nothing and may be difficult to locate. 1. Turning Control On/Off The ...
Page 12 - NORMAL SOUNDS
12 9. Auto Light (Glass Door Models) The ref rigerator has a sensor that will turn on the interior display light automatically when someone walks by. When motion is no longer detected, the interior display light will go off after 2 minutes. Press the Auto Light option to activate this feature. When ...
Page 13 - LIGHTS; CARE AND CLEANING; CLEANING; REMOVING BASE GRILLE
13 DOOR BINS (SOLID DOOR MODELS) Your ref rigerator has two door bin locations for maximum storage capacity. TO REMOVE AND REPLACE THE DOOR BINS: 1. Remove the door bin by tilting it forward and pulling it out. 2. Replace the bin by placing the rear of the bin under the support on the door and slidi...
Page 14 - TROUBLESHOOTING; OPERATION
14 2. Using a Phillips screwdriver, remove the two screws. 3. Remove the base grille. TO REPLACE THE BASE GRILLE: 1. Open the ref rigerator door. 2. Position the base grille so that both tabs align and the base grille snaps into place. Replace two screws. Tighten the screws. VACATION CARE If you cho...
Page 15 - DOOR; ASSISTANCE; IN CANADA
15 Is the food packaged correctly? Check that all food is securely wrapped. Wipe off damp food containers before placing in the ref rigerator. Is the control set correctly for the surrounding conditions? Refer “Controls” section. DOOR THE DOOR IS DIFFICULT TO OPEN Is the gasket dirty or sticky? Clea...
Page 16 - TEN YEAR LIMITED WARRANTY
16 JENNAIR ® REFRIGERATION LIMITED WARRANTY ATTACH YOUR RECEIPT HERE. PROOF OF PURCHASE IS REQUIRED TO OBTAIN WARRANTY SERVICE. Please have the following information available when you call the Customer eXperience Center: ❏ Name, address, and telephone number ❏ Model number and serial number ❏ A cle...
Page 18 - SÉCURITÉ; CONSERVER CES INSTRUCTIONS; Votre sécurité et celle des autres est très importante.; AVERTISSEMENT
18 INTRODUCTION SÉCURITÉ IMPORTANTES INSTRUCTIONS DE SÉCURITÉ ■ Brancher sur une prise de courant à 3 alvéoles, reliée à la terre. ■ Ne pas enlever la prise de liaison à la terre. ■ Ne pas utiliser d’adaptateur. ■ Ne pas utiliser de rallonge. ■ Déconnecter la source de courant électrique avant l’ent...
Page 20 - EXIGENCES D’INSTALLATION; OUTILS ET PIÈCES; EXIGENCES D’EMPLACEMENT
20 EXIGENCES D’INSTALLATION OUTILS ET PIÈCES Rassembler les outils et pièces nécessaires avant d’entreprendre l’installation OUTILS ET PIÈCES NÉCESSAIRES : Tournevis à tête cruciforme Panneau de porte décoratif personnalisé – voir la section « Dimensions du panneau décoratif personnalisé ». Poignée ...
Page 21 - DIMENSIONS DU PRODUIT; PANNEAU DÉCORATIF PERSONNALISÉ
21 DIMENSIONS DU PRODUIT PRODUIT ENTIER Largeur ( jusqu’au cache-charnière) 23 7/8 po (60,72 cm) Hauteur ( jusqu’au cache-charnière) 34 3/8 po (87,32 cm) Modèles avec porte en verre (NOIR™) profondeur (sans poignée) 23 3/4 po (60,36 cm) Modèles avec porte en verre (RISE™) profondeur (sans poignée) 2...
Page 23 - SPÉCIFICATIONS ÉLECTRIQUES; INSTRUCTIONS D’INSTALLATION; DÉBALLAGE DU RÉFRIGÉRATEUR
23 SPÉCIFICATIONS ÉLECTRIQUES Avant de placer le réf rigérateur à son emplacement final, il est important de s’assurer d’avoir le raccordement électrique approprié. MÉTHODE RECOMMANDÉE DE MISE À LA TERRE Chaque appareil doit être alimenté par un circuit à 115 V CA à 60 Hz relié à la terre et protégé...
Page 26 - UTILISATION DU RÉFRIGÉRATEUR; COMMANDES
26 UTILISATION DU RÉFRIGÉRATEUR COMMANDES REMARQUE : Le tableau de commande se trouve dans la partie supérieure et fait face vers l’avant. La commande du réf rigérateur ne comporte aucune pièce ou aucun bouton mécaniques. Lorsqu’elle est déconnectée, la commande n’affiche rien et peut être difficile...
Page 27 - SONS NORMAUX
27 8. Alarme de dépassement de température Permet d’éviter que les aliments ne se gâtent en donnant une alerte sonore et visuelle si la température dans l’une ou l’autre des zones dépasse la plage prédéfinie pendant 10 minutes.L’alarme sonore s’éteint automatiquement lorsque la température revient à...
Page 28 - TABLETTES DU RÉFRIGÉRATEUR; BALCONNETS DE PORTE; LAMPES
28 TABLETTES DU RÉFRIGÉRATEUR POUR ENLEVER ET AJUSTER LES TABLETTES SUPÉRIEURES : 1. Ôter la tablette en la soulevant pour la sortir des supports de tablette. 2. Retirer les deux supports de tablette et les replacer à l’endroit souhaité. 3. Réinstaller la tablette en l’insérant dans les supports de ...
Page 29 - ENTRETIEN ET NETTOYAGE; NETTOYAGE; ENLEVER LA GRILLE DE LA BASE
29 ENTRETIEN ET NETTOYAGE NETTOYAGE Nettoyer le réf rigérateur une fois par mois pour empêcher une accumulation d’odeurs. Essuyer les renversements immédiatement. NETTOYAGE DU RÉFRIGÉRATEUR : 1. Débrancher le réf rigérateur ou déconnecter la source de courant électrique. 2. Retirer toutes les tablet...
Page 30 - DÉPANNAGE; UTILISATION
30 ENTRETIEN AVANT LES VACANCES Pour arrêter le réf rigérateur avant de partir, suivre ces étapes. 1. Enlever tous les aliments du réf rigérateur. 2. Débrancher le réf rigérateur. 3. Nettoyer le réf rigérateur. Se reporter à la section « Nettoyage ». 4. À l’aide d’un ruban adhésif, placer un bloc de...
Page 31 - PORTE
31 IL Y A ACCUMULATION D’HUMIDITÉ À L’INTÉRIEUR La porte est-elle ouverte f réquemment? Pour éviter l’accumulation d’humidité, essayer de sortir du réf rigérateur tout ce dont vous avez besoin en une fois, garder les aliments organisés de sorte qu’ils soient faciles à trouver et fermer la porte dès ...
Page 32 - AU CANADA
32 ASSISTANCE SI VOUS AVEZ BESOIN DE SERVICE Avant de faire un appel pour assistance ou dépannage, vérifier la section « Dépannage ». Cette vérification peut vous faire économiser le coût d’une intervention de dépannage. Pour de l’aide supplémentaire, suivre les instructions ci-dessous.Avant d’appel...
Page 33 - GARANTIE LIMITÉE DE DIX ANS
33 GARANTIE LIMITÉE DES APPAREILS DE RÉFRIGÉRATION JENNAIR ® ATTACHEZ ICI VOTRE REÇU DE VENTE. UNE PREUVE D’ACHAT EST OBLIGATOIRE POUR OBTENIR L'APPLICATION DE LA GARANTIE. Lorsque vous appelez le centre d'eXpérience de la clientèle, veuillez garder à disposition les renseignements suivants : ❏ Nom,...