Page 3 - Defi nitions: Safety Guidelines; IF YOU HAVE ANY QUESTIONS OR COMMENTS ABOUT THIS OR; WALT; SAVE ALL WARNINGS AND INSTRUCTIONS
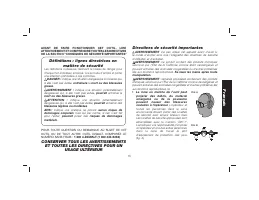
BEFORE OPERATING THIS TOOL, CAREFULLY READ AND UNDERSTAND ALL INSTRUCTIONS IN THE IMPORTANT SAFETY INSTRUCTIONS SECTION. Defi nitions: Safety Guidelines The definitions below describe the level of severity for each signal word. Please read the manual and pay attention to these symbols. DANGER: Indica...
Page 4 - English
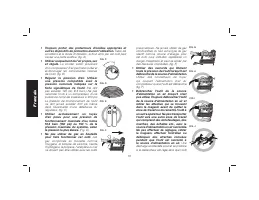
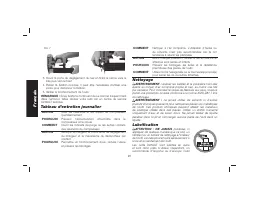
• Only use air hose that is rated for a maximum working pressure of at least 150 PSI (10.3 BAR) or 150% of the maximum system pressure, which ever is greater. (Fig. D) • Do not use bottled gases to power this FIG. E FIG. F FIG. G tool. Bottled compressed gases such as oxygen, carbon dioxide, nitroge...
Page 5 - Be sure the work surface
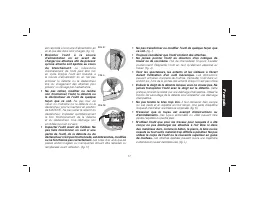
• Keep bystanders, children, and visitors away while operating a power tool. Distractions can cause you to lose control. When tool is not in use, it should be locked in a safe place, out of the reach of children. • Remove finger from trigger when not FIG. K FIG. L FIG. M driving fasteners. Never car...
Page 7 - 8 GA Brad Nailer
• Stay alert, watch what you are doing and use common sense when operating a power tool. Do not use tool while tired or under the influence of drugs, alcohol, or medication. A moment of inattention while operating power tools may result in serious personal injury. WARNING: Some dust created by power...
Page 8 - OPERATION; Important Safety Instructions
COMPONENTS (FIG. 1) A. Trigger B. Trigger mode selector C. Jam clearing latch D. Contact trip E. No-mar pad F. Magazine G. Magazine release H. Air inlet I. Rear exhaust J. Belt hook K. Depth adjustment wheel L. Pencil Sharpener FIG. 1 H A D I F B C G J K E L OPERATION Preparing the Tool WARNING: Rea...
Page 9 - Mode Selection; Keep fingers AWAY from trigger when not driving
Mode Selection WARNING: Always wear proper eye [ANSI Z87.1 (CAN/CSA Z94.3)] and hearing protection [ANSI S12.6 (S3.19)] when operating this tool. WARNING: Keep fingers AWAY from trigger when not driving fasteners to avoid accidental firing. NEVER carry tool with finger on trigger. In contact mode to...
Page 11 - INSTALLING THE BELT HOOK; Disconnect air line from tool and remove fasteners; Using The Integrated Pencil Sharpener
2. Open magazine fully and turn tool sideways with discharge area pointed away from yourself and others. Load fastenerss in channel. 3. Push magazine closed until it locks in place. FIG. 4 Depth Setting (Fig. 1) WARNING: Disconnect air line from tool and remove fasteners from magazine before making ...
Page 12 - Cold Weather Operation; Read the section titled; Hot Weather Operation
FIG. 6 L Cold Weather Operation WARNING: Read the section titled Important Safety Instructions at the beginning of this manual. Always wear eye and ear protection when operating this tool. Keep the nailer pointed away from yourself and others. For safe operation, complete the following procedures an...
Page 13 - Troubleshooting Guide; Accessories
Daily Maintenance Chart ACTION Drain compressor tanks and hoses daily WHY Prevents accumulation of moisture in compressor and nailer HOW Open petcocks or other drain valves on compressor tanks. Allow any accumulated water to drain from hoses ACTION Clean magazine, magazine release, and contact trip ...
Page 14 - Register Online; CONFIRMATION OF OWNERSHIP:; Seven Year Limited Warranty; YEAR FREE SERVICE
Register Online Thank you for your purchase. Register your product now for: • WARRANTY SERVICE: Registering your product will help you obtain more efficient warranty service in case there is a problem with your product. • CONFIRMATION OF OWNERSHIP: In case of an insurance loss, such as fire, flood o...
Page 15 - TROUBLESHOOTING GUIDE; To reduce the risk of serious personal injury, remove; SYMPTOM
TROUBLESHOOTING GUIDE MANY COMMON PROBLEMS CAN BE SOLVED EASILY BY UTILIZING THE CHART BELOW. FOR MORE SERIOUS OR PERSISTENT PROBLEMS, CONTACT A D E WALT SERVICE CENTER OR CALL 1-(800)-4-D E WALT. WARNING: To reduce the risk of serious personal injury, remove fasteners from magazine before making an...
Page 17 - DE LA SECTION “CONSIGNES DE SÉCURITÉ IMPORTANTES”; POUR TOUTE QUESTION OU REMARQUE AU SUJET DE CET; Français
AVANT DE FAIRE FONCTIONNER CET OUTIL, LIRE ATTENTIVEMENT ET COMPRENDRE TOUTES LES DIRECTIVES DE LA SECTION “CONSIGNES DE SÉCURITÉ IMPORTANTES” Défi nitions : lignes directrices en matière de sécurité Les définitions ci-dessous décrivent le niveau de danger pour chaque mot-indicateur employé. Lire le ...
Page 22 - CONSERVER TOUS LES AVERTISSEMENTS; Cloueuse de vitrier de calibre 18
• le plomb dans les peintures à base de plomb ;• la silice cristallisée dans les briques et le ciment ou autres articles de maçonnerie ; et • l’arsenic et le chrome dans le bois ayant subi un traitement chimique. Le risque associé à de telles expositions varie selon la fréquence à laquelle on effect...
Page 24 - AVERTISSEMENT; Sélection du mode; NE; Déclenchement séquentiel; Déclenchement par contact; Gâchette à action par choc/contact; Ainsi, une fixation est libérée à chaque contact avec la surface.; DÉCLENCHEMENT SÉQUENTIEL; Tourner le sélecteur de mode de la
AVERTISSEMENT : pour réduire les risques de blessures corporelles, débrancher l’outil de la source d’alimentation en air avant d’effectuer l’entretien, de dégager une attache bloquée, de quitter la zone de travail, de déplacer l’outil dans un autre endroit ou de donner l’outil à une autre personne....
Page 26 - L’OUTIL DOIT SE DÉCLENCHER.; Chargement de l’outil; INSTALLATION DU CROCHET POUR CEINTURE
D. Sans toucher la gâchette, appuyer le déclencheur par contact contre la surface de travail, puis appuyer sur la gâchette. L’OUTIL DOIT SE DÉCLENCHER. Chargement de l’outil AVERTISSEMENT : afin d’éviter les risques de blessures, débrancher le tuyau à air de l’outil et retirer les fixations du char...
Page 27 - Fonctionnement par temps froid; Fonctionnement par temps chaud; afin d’éviter les risques de blessures,
3. Aligner la tige du corps du crochet pour ceinture avec le trou d’alignement et la pousser pour la placer. 4. Relâcher les côtés du corps du crochet pour de ceinture et vérifier que ce dernier est bien verrouillé. Utilisation du taille-crayon intégré (fi g. 6) Un taille-crayon standard (L) est inté...
Page 28 - enlever les saletés et la poussière hors des; Lubrifi cation; NE JAMAIS
FIG. 7 3. Ouvrir la porte du dégagement du nez en tirant le verrou vers le bas puis vers le haut. 4. Retirer la fixation coincée. Il peut être nécessaire d’utiliser une pince pour décoincer la fixation. 5. Vérifier le fonctionnement de l’outil. REMARQUE : Si les fixations continuent de se coincer fr...
Page 29 - Réparations; Accessoires; puisque les accessoires autres que ceux; Registre en ligne; RÉPARATIONS SOUS GARANTIE:
une fois par année dans un centre de service qualifié afin qu’ils puissent être complètement nettoyés et inspectés. Réparations AVERTISSEMENT : afin d’éviter les risques de blessures, débrancher le tuyau à air de l’outil et retirer les fixations du chargeur avant de procéder au réglage. Se reporter...
Page 31 - GUIDE DE DÉPANNAGE; pour réduire les risques de blessures graves,; SYMPTÔME
GUIDE DE DÉPANNAGE IL EST POSSIBLE DE RÉSOUDRE FACILEMENT LES PROBLÈMES LES PLUS COMMUNS À L’AIDE DU TABLEAU CI-DESSOUS. POUR DES PROBLÈMES PLUS GRAVES OU DES PROBLÈMES QUI PERSISTENT, COMMUNIQUER AVEC UN CENTRE DE RÉPARATION D E WALT OU COMPOSER LE 1 800 4-D E WALT. AVERTISSEMENT : pour réduire les...
Page 34 - Defi niciones: Normas de seguridad; SI TIENE ALGUNA PREGUNTA O DESEA HACER ALGÚN COMENTARIO; CONSERVE TODAS LAS ADVERTENCIAS
ANTES DE OPERAR ESTA HERRAMIENTA LEA CON DETENIMIENTO LAS INSTRUCCIONES DEL APARTADO “INSTRUCCIONES IMPORTANTES DE SEGURIDAD”. Defi niciones: Normas de seguridad Las siguientes definiciones describen el nivel de gravedad de cada palabra de señal. Lea el manual y preste atención a estos símbolos. PELI...
Page 35 - Español
compresor de aire puede oxidar y dañar las piezas internas de la herramienta. (Fig. B) • Regule la presión del aire. Utilice una presión compatible con los valores indicados en la placa de características. (No debe exceder de 120 psi, 8.3 bar.) No conecte la herramienta a un compresor con un valor s...
Page 38 - • La elección del método de disparo es importante.; GATILLO DE ACCIÓN POR TOPE/CONTACTO; Al usar el gatillo de acción de; GATILLO SECUENCIAL; • Cuando utilice el gatillo secuencial no opere la
que se suelte el disparador, se disparará un elemento de fijación innecesario. • La elección del método de disparo es importante. Verifique las opciones de disparo en el manual. GATILLO DE ACCIÓN POR TOPE/CONTACTO • Al usar el gatillo de acción de FIG. T contacto, tenga cuidado de no realizar un dob...
Page 39 - ADVERTENCIA: USE SIEMPRE LENTES DE SEGURIDAD.; Libre de aceite
ADVERTENCIA: USE SIEMPRE LENTES DE SEGURIDAD. Los anteojos de uso diario NO son lentes de seguridad. Utilice también máscaras faciales o para polvo si la operación produce polvillo. UTILICE SIEMPRE EQUIPOS DE SEGURIDADCERTIFICADOS: • Protección para los ojos ANSI Z87.1(CAN/CSA Z94.3),• protección au...
Page 41 - Selección de modo; NUNCA; Interruptor secuencial; Interruptor de contacto; Gatillo de acción por tope/contacto; , como se muestra en la
7. Controle si hay pérdidas audibles alrededor de válvulas y sellos. Nunca utilice una herramienta que tenga pérdidas o piezas dañadas ADVERTENCIA: Para reducir el riesgo de lesiones personales, desconecte la herramienta del suministro de aire antes de realizarle mantenimiento, extraer un elemento d...
Page 43 - superficie de trabajo, luego presione el gatillo.; LA HERRAMIENTA DEBE ACCIONARSE.; Abra el cartucho por completo y gire la herramienta hacia; INSTALACIÓN DEL GANCHO PARA CINTURÓN
LA HERRAMIENTA DEBE ACCIONARSE. D. Sin tocar el gatillo, presione el interruptor de contacto contra la superficie de trabajo, luego presione el gatillo. LA HERRAMIENTA DEBE ACCIONARSE. Carga de la herramienta (Fig. 1, 4) ADVERTENCIA: Mantenga la herramienta apuntando a una dirección segura al cargar...
Page 44 - Funcionamiento en climas fríos; Lea el apartado titulado; Funcionamiento en climas cálidos; Desconecte la línea de aire de la herramienta y
3. Alinee el poste del cuerpo del gancho para el cinturón con el orificio de alineación y presione para colocarlo en su posición. 4. Suelte los lados del cuerpo del gancho para el cinturón y revise para verificar que el gancho para el cinturón esté bloqueado en su posición. Uso del sacapuntas integr...
Page 45 - Sople la suciedad y el polvo de todos los; Lubricación; rocíe o aplique
FIG. 7 4. Quite el remache obstruido. En ciertas circunstancias, pueden requerirse pinzas para quitar el remache. 5. Realice la comprobación de funcionamiento de la herramienta. NOTA: Si los remaches quedan obstruidos con frecuencia en la nariz, lleve la herramienta a reparar a un centro autorizado ...
Page 46 - Reparaciones; Para reducir el riesgo de lesiones personales; Accesorios; Debido a que no se han probado con este; Registro en línea; SERVICIO EN GARANTÍA:; Garantía limitada por siete años; SERVICIO GRATUITO DE 1 AÑO
Reparaciones ADVERTENCIA: Para reducir el riesgo de lesiones personales graves, quite los clavos del cargador antes de realizar ajustes o reparar esta herramienta. Consulte la Guía para solucionar problemas al final de esta sección.Para asegurar la SEGURIDAD y la CONFIABILIDAD del producto, las repa...
Page 47 - GARANTÍA DE REEMBOLSO DE 90 DÍAS; WALT por algún motivo,; REEMPLAZO GRATUITO DE LA ETIQUETA DE ADVERTENCIA:; WALT) para obtener un reemplazo
GARANTÍA DE REEMBOLSO DE 90 DÍAS Si usted no está completamente satisfecho con el rendimiento de su herramienta eléctrica, láser o clavadora D E WALT por algún motivo, puede devolverlos dentro de los 90 días posteriores a la fecha de compra con un recibo para obtener un reembolso completo, sin ningu...
Page 48 - GUÍA DE SOLUCIÓN DE PROBLEMAS; Para reducir el riesgo de lesiones personales graves,
GUÍA DE SOLUCIÓN DE PROBLEMAS CON LA TABLA SIGUIENTE, PODRÁ SOLUCIONAR MUCHOS PROBLEMAS COMUNES CON FACILIDAD. PARA PROBLEMAS PERSISTENTES O MÁS GRAVES, PÓNGASE EN CONTACTO CON EL CENTRO DE MANTENIMIENTO D E WALT O LLAME AL 1-(800)-4-D E WALT. ADVERTENCIA: Para reducir el riesgo de lesiones personal...
Page 50 - DE MANTENIMIENTO D; Filtro de aire obstruido
GUÍA DE SOLUCIÓN DE PROBLEMAS CON LA TABLA SIGUIENTE, PODRÁ SOLUCIONAR MUCHOS PROBLEMAS COMUNES CON FACILIDAD. PARA PROBLEMAS PERSISTENTES O MÁS GRAVES, PÓNGASE EN CONTACTO CON EL CENTRO DE MANTENIMIENTO D E WALT O LLAME AL 1-(800)-4-D E WALT. ADVERTENCIA: Para reducir el riesgo de lesiones personal...