Page 3 - Instructions for use. Keep these instructions
DE GB fully automatic coffEE cEntEr Machine à cafè autoMatique cafEtEra supErautomatica eSaM5600 Instructions for use. Keep these instructions Mode d’emploi. Conservez cette notice Instrucciones para el uso. Repase y guarde estas instrucciones. Lea cuidadosamente este instructivo antes de usar su ap...
Page 9 - contEnts
7 contEnts important safEGuarDs ....................................... 8 SAVE THESE INSTRUCTIONS ...................................................... 8 short corD instructions .................................... 8 introDuction ...................................................... 9 Symbols used...
Page 10 - i m p o r t a n t s a f E G u a r D s; • Read all instructions carefully.; saVE thEsE instructions; THIS APPLIANCE IS FOR HOUSEHOLD USE ONLY; short corD instructions
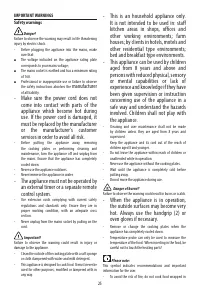
8 i m p o r t a n t s a f E G u a r D s When using electrical appliances, basic safety precautions should always be followed, including the following. • Read all instructions carefully. • Make sure the voltage of your electrical system corresponds to the voltage shown on the bottom of the machine. •...
Page 12 - cording to the text shown above the icon).; prEliminary chEcKs
10 (When in the settings MENU, they change function ac- cording to the text shown above the icon). C8. cappuccino icon: to deliver a cappuccino. C9. caffElattE icon: to deliver a caffelatte. C10. Selection icon to choose the coffee quantity. (When in the settings MENU, it changes function accor- din...
Page 13 - turninG thE appliancE on; • To turn the appliance on, press the; turninG thE appliancE off; sEttinGs
11 5. “Press OK”: then press the icon corresponding to OK on the display (fig. 2). “Please wait...” is displayed and the applian-ce begins to deliver water from the hot water spout. The appliance ends the first start up procedure and goes off. The coffee maker is now ready for normal use. Please Not...
Page 15 - adjust time; the time must already be set cor-; Choose the “CLOCK” section as described above.; maKinG coffEE; selecting the coffee taste
13 adjust time To adjust the time on the display, proceed as follows: 1. Choose the “CLOCK” section as described above. 2. Press the selection icons < or > until “Adjust time” is di- splayed. 3. Press the icon to confirm: the hours flash on the di- splay; 4. Press the selection icons < or &...
Page 16 - llll
14 “Quantity” bar coffee selected Quantity (fl. oz.) + - + - + - + - + - - + MY COFFEE Program from ≃ 0.68 to ≃ 6.1 + - + - + - + - + - - + EXTRA SHORT COFFEE ≃ 1 + - + - + - + - + - - + SHORT COFFEE ≃ 1.35 + - + - + - + - + - - + STANDARD COFFEE ≃ 2.35 + - + - + - + - + - - + LONG COFFEE ≃ 3.04 + -...
Page 17 - maKinG DrinKs With milK; not exceeding the MAX level marked on the handle (fig.
15 • For hotter coffee, see the section “Tips for a hotter coffee”. Important! If the coffee is delivered a drop at a time, too fast and not cre-amy enough or too cold, read the tips in the “Troubleshooting” section on page 22.Various alarm messages could be displayed while the machine is in use. Th...
Page 18 - hEatinG WatEr
16 Please Note! If during delivery you want to stop preparing milk, press the cappuccino icon or interrupt preparation of the coffee by pressing the icon. making macchiato 1. After attaching the milk container (see previous section), position the froth regulator on LATTE MACCHIATO (fig. 27) printed ...
Page 19 - changing the quantity; clEaninG; cleaning the coffee maker; Danger of electric shock!
17 avoid splashes). 3 Press the icon (fig. 32). Preparation begins. “Hot Water” and the corresponding animation are displayed. 4. Water flows out of the spout. Delivery stops automatically after 250 ml / 0.25 liters. 5. To interrupt delivery of hot water manually, press the icon again. Please Note! ...
Page 21 - DEscalinG; oK; sEttinG WatEr harDnEss; measuring water hardness; mmml; set water hardness
19 DEscalinG Descale the machine when the message “DESCALE!” flashes on the display. Important! Descaler contains acids which may irritate the skin and eyes. It is vital to respect the manufacturer’s safety warnings given on the descaler pack and the warnings relating to the procedu-re to follow in ...
Page 22 - tEchnical spEcification; Water tank capacity:
20 tEchnical spEcification Voltage: 120 V~ 60 Hz max. 10A Absorbed power: 1350W Pressure: 15 bar Water tank capacity: 1,8 L Size: LxHxD: 282x380x441 mm Cable length: 1,5 m Weight: 11,5 Kg Beans container capacity 250 g
Page 23 - DisplayED mEssaGEs; DisplayED mEssaGE; GROUND TOO FINE ADJUST
21 DisplayED mEssaGEs DisplayED mEssaGE possiBlE causE solution FILL TANK! • Insufficient water in the tank. • Fill the tank with water and/or insert it correctly, pushing it as far as it will go until it clicks into place. GROUND TOO FINE ADJUST MILL! Insert water spout and press OK • The grinding ...
Page 24 - trouBlEshootinG; The coffee is not hot
22 DisplayED mEssaGE possiBlE causE solution INSERT MILK CONTAINER • The milk container is not inserted correctly. • Insert the milk container as far as it will go. CLOSE DOOR! • The service door is open • Close the service door. PRESS CLEAN BUTTON • Milk has been delivered recently and the tubes in...
Page 25 - The milk is not frothed.
23 proBlEm possiBlE causE solution The coffee is delivered too quickly. • The coffee is ground too coarsely. • Turn the grinding adjustment dial one click anticlockwise towards “1” while the coffee mill is in operation (fig. 10). Avoid turning the grinding adjustment dial excessively otherwise when ...
Page 26 - limitED Warranty; If repairs become necessary, see contact information below:
24 limitED Warranty This warranty applies to all products with De’Longhi or Kenwood brand names. What does the warranty cover? We warrant each appliance to be free from defects in material and workmanship. Our obligation under this warranty is limited to re-pair at our factory or authorized service ...