Page 3 - System Information Guide
w w w . d e l l . c o m | s u p p o r t . e u r o . d e l l . c o m Dell™ Latitude™ D600 System Information Guide
Page 4 - Abbreviations and Acronyms
Notes, Notices, and Cautions N O T E : A NOTE indicates important information that helps you make better use of your computer. N O T I C E : A NOTICE indicates either potential damage to hardware or loss of data and tells you how to avoid the problem. C A U T I O N : A C A U T I O N i n d i c a t e ...
Page 5 - C o n t e n t s
C o n t e n t s 3 C o n t e n t s CAUTION: Safety Instructions . . . . . . . . . . . . . . . . . . . 5 General . . . . . . . . . . . . . . . . . . . . . . . . . . . . . 5 Power . . . . . . . . . . . . . . . . . . . . . . . . . . . . . . 6 Battery . . . . . . . . . . . . . . . . . . . . . . . . . . ....
Page 7 - CAUTION: Safety Instructions; General
S y s t e m I n f o r m a t i o n G u i d e 5 CAUTION: Safety Instructions Use the following safety guidelines to help ensure your own personal safety and to help protect your computer and working environment from potential damage. General • Do not attempt to service the computer yourself unless you...
Page 8 - Power
6 S y s t e m I n f o r m a t i o n G u i d e www .dell.com | support.euro.dell.com • To help avoid the potential hazard of electric shock, do not connect or disconnect any cables or perform maintenance or reconfiguration of this product during an electrical storm. Do not use your computer during an...
Page 9 - Battery
S y s t e m I n f o r m a t i o n G u i d e 7 • Be sure that nothing rests on your AC adapter’s power cable and that the cable is not located where it can be tripped over or stepped on. • If you are using a multiple-outlet power strip, use caution when plugging the AC adapter’s power cable into the ...
Page 10 - Air Travel; EMC Instructions
8 S y s t e m I n f o r m a t i o n G u i d e www .dell.com | support.euro.dell.com Air Travel • Certain Federal Aviation Administration regulations and/or airline-specific restrictions may apply to the operation of your Dell computer while you are on board an aircraft. For example, such regulations...
Page 11 - When Using Your Computer
S y s t e m I n f o r m a t i o n G u i d e 9 When Using Your Computer Observe the following safe-handling guidelines to prevent damage to your computer: • When setting up the computer for work, place it on a level surface. • When traveling, do not check the computer as baggage. You can put your com...
Page 12 - Ergonomic Computing Habits; When Working Inside Your Computer
10 S y s t e m I n f o r m a t i o n G u i d e www .dell.com | support.euro.dell.com • Clean the display with a soft, clean cloth and water. Apply the water to the cloth; then stroke the cloth across the display in one direction, moving from the top of the display to the bottom. Remove moisture from...
Page 13 - Protecting Against Electrostatic Discharge
S y s t e m I n f o r m a t i o n G u i d e 11 4 Ground yourself by touching the unpainted metal surface of the I/O panel on the back of the computer. While you work, periodically touch the I/O panel to dissipate any static electricity that might harm internal components. Protecting Against Electros...
Page 14 - Finding Information for Your Computer
12 S y s t e m I n f o r m a t i o n G u i d e www .dell.com | support.euro.dell.com Finding Information for Your Computer What are you looking for? Find It Here • A diagnostic program for my computer• Drivers for my computer • My computer documentation• My device documentation D r i v e r s a n d U...
Page 15 - Setting Up Your Computer
S y s t e m I n f o r m a t i o n G u i d e 13 Setting Up Your Computer 1 Unpack the accessories box. 2 Set aside the contents of the accessories box, which you will need to complete the setup of your computer. The accessories box also contains user documentation and any software or additional hardw...
Page 17 - About Your Computer
S y s t e m I n f o r m a t i o n G u i d e 15 About Your Computer See your online User’s Guide for detailed information about the computer. Depending on your operating system, double-click the User’s Guide icon on your desktop, or click the Start button, click Help and Support Center , and then cli...
Page 18 - Front View
16 S y s t e m I n f o r m a t i o n G u i d e www .dell.com | support.euro.dell.com Front View display touch pad power button volume control buttons display latch mute button keyboard track stick track stick/touch pad buttons keyboard status lights device status lights speakers
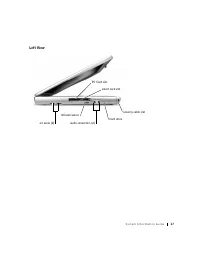
Page 19 - Left View
S y s t e m I n f o r m a t i o n G u i d e 17 Left View hard drive PC Card slot smart card slot infrared sensor audio connectors (2) security cable slot air vents (2)
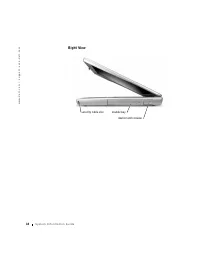
Page 20 - Right View
18 S y s t e m I n f o r m a t i o n G u i d e www .dell.com | support.euro.dell.com Right View security cable slot module bay device latch release
Page 21 - Back View
S y s t e m I n f o r m a t i o n G u i d e 19 Back View N O T I C E : To avoid damaging the computer, wait 5 seconds after turning off the computer before you disconnect an external device. C A U T I O N : D o n o t b l o c k , p u s h o b j e c t s i n t o , o r a l l o w d u s t t o a c c u m u l...
Page 22 - Bottom View
20 S y s t e m I n f o r m a t i o n G u i d e www .dell.com | support.euro.dell.com Bottom View fan battery-bay latch release battery charge gauge battery memory module cover hard drive Mini PCI card cover docking device slot
Page 23 - Removing a Battery
S y s t e m I n f o r m a t i o n G u i d e 21 Removing a Battery For more information about removing the second battery, see “Using the Module Bay” in your online User’s Guide . C A U T I O N : B e f o r e p e r f o r m i n g t h e s e p r o c e d u r e s , t u r n o f f t h e c o m p u t e r, d i ...
Page 26 - Installing a Battery
24 S y s t e m I n f o r m a t i o n G u i d e www .dell.com | support.euro.dell.com 5 Place the reserve battery in the compartment, and replace the reserve battery cover. Installing a Battery Slide the battery into the bay until the latch release clicks. For more information about installing the se...
Page 27 - Running the Dell Diagnostics
S y s t e m I n f o r m a t i o n G u i d e 25 Running the Dell Diagnostics The Dell Diagnostics is located on a hidden Diagnostic utility partition on your hard drive. N O T E : If your computer cannot display a screen image, contact Dell (see “Getting Help” in your User’s Guide for the appropriate...
Page 30 - Regulatory Notices
28 S y s t e m I n f o r m a t i o n G u i d e www .dell.com | support.euro.dell.com Regulatory Notices Electromagnetic Interference (EMI) is any signal or emission, radiated in free space or conducted along power or signal leads, that endangers the functioning of a radio navigation or other safety ...
Page 31 - Systeeminformatiegids
w w w . d e l l . c o m | s u p p o r t . e u r o . d e l l . c o m Dell™ Latitude™ D600 Systeeminformatiegids
Page 32 - Afkortingen en acroniemen
Opmerkingen, kennisgevingen en waarschuwingen O P M E R K I N G : Een OPMERKING duidt belangrijke informatie aan voor een beter gebruik van de computer. K E N N I S G E V I N G : Een KENNISGEVING duidt mogelijke beschadiging van de hardware of gegevensverlies aan en geeft aan hoe u dergelijke proble...
Page 33 - I n h o u d
I n h o u d 3 1 I n h o u d WAARSCHUWING: Veiligheidsinstructies . . . . . . . . . . . . . 33 Algemeen . . . . . . . . . . . . . . . . . . . . . . . . . . . . 33 Voeding . . . . . . . . . . . . . . . . . . . . . . . . . . . . . 34 Batterij . . . . . . . . . . . . . . . . . . . . . . . . . . . . . 35...
Page 35 - WAARSCHUWING: Veiligheidsinstructies; Algemeen
S y s t e e m i n f o r m a t i e g i d s 33 WAARSCHUWING: Veiligheidsinstructies Houd u aan de volgende veiligheidsrichtlijnen om uw eigen veiligheid te garanderen en de computer en werkomgeving te beschermen tegen mogelijke schade. Algemeen • Probeer niet zelf onderhoud te plegen aan de computer, ...
Page 36 - Voeding
34 S y s t e e m i n f o r m a t i e g i d s www .dell.com | support.euro.dell.com • U kunt het risico van elektrische schokken vermijden door tijdens onweer geen kabels aan te sluiten of los te maken, geen onderhoud aan dit product te plegen en het product niet opnieuw te configureren. Gebruik de c...
Page 37 - Batterij
S y s t e e m i n f o r m a t i e g i d s 35 • Zorg dat er niets op de stroomkabel van de adapter ligt en dat niemand op deze kabel kan stappen of erover kan struikelen. • Als u een stekkerdoos gebruikt, moet u voorzichtig zijn als u de stroomkabel van de adapter in de stekkerdoos steekt. Bij sommig...
Page 38 - Luchtverkeer; Inwoners van Californië
36 S y s t e e m i n f o r m a t i e g i d s www .dell.com | support.euro.dell.com Luchtverkeer • Als u uw Dell-computer meeneemt in het vliegtuig, kunnen bepaalde regels van de luchtvaartmaatschappij van kracht zijn. Het kan bijvoorbeeld verboden zijn in het vliegtuig persoonlijke elektronische app...
Page 39 - Bij gebruik van de computer
S y s t e e m i n f o r m a t i e g i d s 37 Bij gebruik van de computer Neem de volgende veiligheidsmaatregelen in acht om schade aan de computer te voorkomen. • Als u de computer voorbereidt op gebruik, moet u deze op een effen oppervlak plaatsen. • Check bij een vliegreis de computer niet als bag...
Page 40 - Ergonomische overwegingen bij het werken met de computer; De computer openen voor onderhoud
38 S y s t e e m i n f o r m a t i e g i d s www .dell.com | support.euro.dell.com • U kunt het beeldscherm reinigen met een schone, zachte doek en water. Breng water aan op de doek en wrijf vervolgens met de doek in één richting over het scherm, van boven naar beneden. Verwijder vocht zo snel mogel...
Page 41 - Bescherming tegen elektrostatische ontlading
S y s t e e m i n f o r m a t i e g i d s 39 4 Zorg dat u bent geaard door het ongeverfde metalen oppervlak op het I/O-paneel aan de achterzijde van de computer aan te raken. Raak tijdens het werken zo nu en dan het I/O-paneel aan om eventuele statische elektriciteit te ontladen die de interne onder...
Page 42 - Informatie over uw computer vinden
40 S y s t e e m i n f o r m a t i e g i d s www .dell.com | support.euro.dell.com Informatie over uw computer vinden Waar bent u naar op zoek? Hier kunt u het vinden • Een diagnostisch programma voor de computer • Stuurprogramma's voor de computer• Documentatie voor de computer• Documentatie voor e...
Page 43 - De computer instellen
S y s t e e m i n f o r m a t i e g i d s 41 De computer instellen 1 Haal de onderdelen uit de accessoiredoos. 2 Leg de onderdelen terzijde. U hebt deze nodig om het instellen van de computer te kunnen voltooien. De accessoiredoos bevat tevens gebruikersdocumentatie en eventuele software of extra ha...
Page 44 - Over de computer
42 S y s t e e m i n f o r m a t i e g i d s www .dell.com | support.euro.dell.com O P M E R K I N G : Sluit de computer alleen aan op een dockingstation als de computer ten minste één keer is in- en uitgeschakeld. Over de computer Raadpleeg de on line User’s Guide (Gebruikershandleiding) voor gedet...
Page 46 - Voorkant
44 S y s t e e m i n f o r m a t i e g i d s www .dell.com | support.euro.dell.com Voorkant beeldscherm touch pad aan/uit-knop volumeregelknoppen schuifje van beeldscherm knop voor geluid uit/aan toetsenbord track stick track stick/touch pad-knoppen toetsenbordstatuslampjes apparaatstatuslampjes lui...
Page 49 - Achterkant
S y s t e e m i n f o r m a t i e g i d s 47 Achterkant K E N N I S G E V I N G : Wacht 5 seconden na het uitschakelen van de computer met het loskoppelen van een extern apparaat. Doet u dat niet, dan loopt u het risico de computer te beschadigen. W A A R S C H U W I N G : B l o k k e e r d e l u c ...
Page 50 - Onderaanzicht
48 S y s t e e m i n f o r m a t i e g i d s www .dell.com | support.euro.dell.com Onderaanzicht ventilator ontgrendelingsschuifje van batterijhouder batterijoplaadmeter batterij geheugenmodulekap vaste schijf mini-PCI-kaartkap slot voor dockingstation
Page 51 - Een batterij verwijderen
S y s t e e m i n f o r m a t i e g i d s 49 Een batterij verwijderen Raadpleeg 'Using the Module Bay' (De modulehouder gebruiken) in de on line User’s Guide (Gebruikershandleiding) voor meer informatie over het verwijderen van de tweede batterij. W A A R S C H U W I N G : Vo o r d a t u d e z e h a...
Page 54 - Een batterij installeren; Dell-diagnoseprogramma uitvoeren
52 S y s t e e m i n f o r m a t i e g i d s www .dell.com | support.euro.dell.com Een batterij installeren Schuif de nieuwe batterij in de batterijhouder tot het schuifje vastklikt. Raadpleeg 'Using the Module Bay' (De modulehouder gebruiken) in de on line User’s Guide (Gebruikershandleiding) voor ...
Page 58 - Internationale kennisgevingen
56 S y s t e e m i n f o r m a t i e g i d s www .dell.com | support.euro.dell.com Internationale kennisgevingen Elektromagnetische storingen (EMI) zijn in de vrije ruimte uitgestraalde of langs elektriciteits- of signaalkabels geleide emissiesignalen die de goede werking van radionavigatiediensten ...
Page 60 - Remarques, avis et précautions; Abréviations et acronymes
Remarques, avis et précautions R E M A R Q U E : Une REMARQUE indique des informations importantes qui vous aident à mieux utiliser votre ordinateur. A V I S : Un AVIS vous avertit d'un risque de dommage matériel ou de perte de données et vous indique comment éviter le problème. P R É C A U T I O N ...
Page 61 - S o m m a i r e
S o m m a i r e 5 9 S o m m a i r e PRÉCAUTION : Consignes de sécurité . . . . . . . . . . . . . . . 61 Généralités . . . . . . . . . . . . . . . . . . . . . . . . . . . 61 Alimentation . . . . . . . . . . . . . . . . . . . . . . . . . . 62 Batterie . . . . . . . . . . . . . . . . . . . . . . . . . ...
Page 63 - PRÉCAUTION : Consignes de sécurité; Généralités
G u i d e d ' i n f o r m a t i o n s u r l e s y s t è m e 61 PRÉCAUTION : Consignes de sécurité Utilisez les consignes de sécurité suivantes pour vous aider à protéger votre ordinateur de dommages éventuels et pour garantir votre sécurité personnelle. Généralités • N'essayez pas de réparer l'ordin...
Page 64 - Alimentation
62 G u i d e d ' i n f o r m a t i o n s u r l e s y s t è m e www .dell.com | support.euro.dell.com • Pour éviter tout risque de décharge électrique, n'effectuez aucun branchement ou débranchement, ni aucune opération de maintenance ou de reconfiguration de ce produit pendant un orage. N'utilisez p...
Page 65 - Batterie
G u i d e d ' i n f o r m a t i o n s u r l e s y s t è m e 63 • Assurez-vous que rien ne repose sur le cordon d'alimentation de l'adaptateur CA/CC et que ce cordon n'est pas placé dans un endroit où l'on pourrait marcher ou trébucher dessus. • Si vous utilisez une barrette d'alimentation multiprise...
Page 66 - Voyages en avion
64 G u i d e d ' i n f o r m a t i o n s u r l e s y s t è m e www .dell.com | support.euro.dell.com Voyages en avion • Les réglementations de certaines administrations fédérales d'aviation et/ou les restrictions propres à chaque compagnie aérienne peuvent s'appliquer au fonctionnement de votre ordi...
Page 67 - Lors de l'utilisation de votre ordinateur
G u i d e d ' i n f o r m a t i o n s u r l e s y s t è m e 65 Lors de l'utilisation de votre ordinateur Suivez les consignes de sécurité suivantes afin d'éviter d'endommager votre ordinateur : • Lorsque vous installez l'ordinateur pour travailler, placez-le sur une surface plane. • Lorsque vous vou...
Page 68 - Précautions ergonomiques; Intervention à l'intérieur de votre ordinateur
66 G u i d e d ' i n f o r m a t i o n s u r l e s y s t è m e www .dell.com | support.euro.dell.com • Nettoyez l'écran avec un tissu propre et doux et l'eau. Appliquez l'eau sur le chiffon, et non directement sur l'écran, puis passez le chiffon sur l'écran toujours dans le même sens, de haut en bas...
Page 69 - Protection contre les décharges électrostatiques
G u i d e d ' i n f o r m a t i o n s u r l e s y s t è m e 67 4 Mettez-vous à la masse en touchant la surface métallique non peinte du panneau d'E/S situé à l'arrière de l'ordinateur. Pendant votre intervention, touchez régulièrement le panneau E/S pour dissiper toute électricité statique qui pourr...
Page 71 - Configuration de votre ordinateur
G u i d e d ' i n f o r m a t i o n s u r l e s y s t è m e 69 Configuration de votre ordinateur 1 Déballez la boîte d'accessoires. 2 Mettez de côté le contenu de la boîte d'accessoires ; vous en aurez besoin ultérieurement pour compléter la configuration. Cette boîte contient également la documenta...
Page 72 - À propos de votre ordinateur
70 G u i d e d ' i n f o r m a t i o n s u r l e s y s t è m e www .dell.com | support.euro.dell.com R E M A R Q U E : N'amarrez pas l'ordinateur tant qu'il n'a pas été mis sous tension et arrêté au moins une fois. À propos de votre ordinateur Consultez votre Guide d'utilisation en ligne pour obteni...
Page 74 - Vue avant
72 G u i d e d ' i n f o r m a t i o n s u r l e s y s t è m e www .dell.com | support.euro.dell.com Vue avant écran touchpad bouton d'alimentation boutons du contrôle du volume dispositif de blocage de l'écran bouton de mise en sourdine clavier trackstick boutons du trackstick ou du touchpad voyant...
Page 75 - Vue du côté gauche
G u i d e d ' i n f o r m a t i o n s u r l e s y s t è m e 73 Vue du côté gauche unité de disque dur emplacement pour carte PC emplacement pour carte intelligente capteur infrarouge connecteurs audio (2) emplacement pour câble de sécurité orifices d'aération (2)
Page 76 - Vue du côté droit
74 G u i d e d ' i n f o r m a t i o n s u r l e s y s t è m e www .dell.com | support.euro.dell.com Vue du côté droit emplacement pour câble de sécurité baie modulaire loquet de verrouillage du périphérique
Page 77 - Vue arrière
G u i d e d ' i n f o r m a t i o n s u r l e s y s t è m e 75 Vue arrière A V I S : Pour éviter d'endommager l'ordinateur, patientez 5 secondes après l'avoir éteint pour déconnecter un périphérique externe. P R É C A U T I O N : N e b l o q u e z p a s e t n ' i n s é r e z p a s d ' o b j e t s d ...
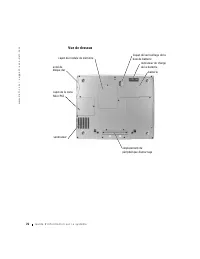
Page 78 - Vue de dessous
76 G u i d e d ' i n f o r m a t i o n s u r l e s y s t è m e www .dell.com | support.euro.dell.com Vue de dessous ventilateur loquet de verrouillage de la baie de batterie indicateur de charge de la batterie batterie capot du module de mémoire unité de disque dur capot de la carte Mini PCI emplace...
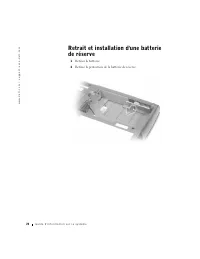
Page 79 - Retrait d'une batterie
G u i d e d ' i n f o r m a t i o n s u r l e s y s t è m e 77 Retrait d'une batterie Pour plus d'informations sur le retrait de la deuxième batterie en option, consultez la section « Utilisation de la baie modulaire » dans le Guide d'utilisation en ligne. P R É C A U T I O N : A v a n t d ' exé c u...
Page 82 - Installation d'une batterie; Exécution des diagnostics Dell
80 G u i d e d ' i n f o r m a t i o n s u r l e s y s t è m e www .dell.com | support.euro.dell.com Installation d'une batterie Faites glisser la batterie dans la baie jusqu'à ce que le loquet de verrouillage s'enclenche. Pour plus d'informations sur l'installation de la deuxième batterie en option...
Page 85 - Réglementations
G u i d e d ' i n f o r m a t i o n s u r l e s y s t è m e 83 10 Lorsque vous avez terminé un test, fermez l'écran pour revenir à l'écran Main Menu (Menu principal) . Pour quitter les Diagnostics Dell et redémarrer l'ordinateur, fermez l'écran Menu principal . Réglementations Une interférence élect...
Page 87 - Systeminformationshandbuch
w w w . d e l l . c o m | s u p p o r t . e u r o . d e l l . c o m Dell™ Latitude™ D600 Systeminformationshandbuch
Page 88 - Abkürzungen und Akronyme
Hinweise, Vorsichtshinweise und Warnungen H I N W E I S : Ein HINWEIS macht auf wichtige Informationen aufmerksam, mit denen Sie das System besser einsetzen können. V O R S I C H T: VORSICHT warnt vor möglichen Beschädigungen der Hardware oder vor Datenverlust und zeigt, wie diese vermieden werden k...
Page 89 - I n h a l t
I n h a l t 8 7 I n h a l t WARNUNG: Sicherheitshinweise . . . . . . . . . . . . . . . . . . 89 Allgemein . . . . . . . . . . . . . . . . . . . . . . . . . . . . 89 Stromversorgung . . . . . . . . . . . . . . . . . . . . . . . . 90 Akku . . . . . . . . . . . . . . . . . . . . . . . . . . . . . . 91 ...
Page 91 - WARNUNG: Sicherheitshinweise; Allgemein
S y s t e m i n f o r m a t i o n s h a n d b u c h 89 WARNUNG: Sicherheitshinweise Die folgenden Sicherheitshinweise schützen den Computer sowie die Arbeitsumgebung vor möglichen Schäden und dienen der persönlichen Sicherheit des Benutzers. Allgemein • Wartungsarbeiten dürfen nur von qualifizierten...
Page 92 - Stromversorgung
90 S y s t e m i n f o r m a t i o n s h a n d b u c h www .dell.com | support.euro.dell.com • Wenn Ihr Computer mit einem integrierten oder optionalen (PC-Karten-)Modem ausge-stattet ist, ziehen Sie das Modemkabel bei Herannahen eines Gewitters ab, um die Gefahr eines Blitzeinschlages zu vermeiden....
Page 93 - Akku
S y s t e m i n f o r m a t i o n s h a n d b u c h 91 • Um Stromschläge zu vermeiden, schließen Sie die Netzkabel von Netzadapter und Geräten immer an ordnungsgemäß geerdete Stromquellen an. Die Kabel sollten mit Schukosteckern ausgestattet sein, um eine einwandfreie Erdung zu gewährleisten. Verwen...
Page 94 - Reisen mit dem Flugzeug
92 S y s t e m i n f o r m a t i o n s h a n d b u c h www .dell.com | support.euro.dell.com Reisen mit dem Flugzeug • Für den Betrieb von Dell-Computern an Bord eines Flugzeugs gelten bestimmte gesetz-liche Bestimmungen und/oder von der Fluglinie festgelegte Richtlinien. Gemäß solchen Richtlinien i...
Page 95 - Arbeiten mit dem Computer
S y s t e m i n f o r m a t i o n s h a n d b u c h 93 Arbeiten mit dem Computer Beachten Sie die folgenden Sicherheitshinweise, um Schäden am Computer zu vermeiden. • Wenn Sie den Computer zum Arbeiten aufstellen, platzieren Sie ihn auf einer ebenen Fläche. • Geben Sie den Computer auf Reisen nicht...
Page 96 - Ergonomische Haltung beim Arbeiten mit dem Computer
94 S y s t e m i n f o r m a t i o n s h a n d b u c h www .dell.com | support.euro.dell.com • Wenn Sie ein Speichermodul von der Systemplatine entfernen oder ein Gerät vom Computer trennen möchten, warten Sie nach dem Ausschalten und Entfernen des Netzadapterkabels des Computers mindestens fünf Sek...
Page 97 - Bei der Arbeit an Komponenten im Inneren des Computers
S y s t e m i n f o r m a t i o n s h a n d b u c h 95 Bei der Arbeit an Komponenten im Inneren des Computers Führen Sie vor dem Entfernen oder Installieren von Speichermodulen, Mini-PC-Karten bzw. eines Modems folgende Schritte in der angegebenen Reihenfolge aus. V O R S I C H T: Nur bei der Instal...
Page 98 - Schutz vor elektrostatischen Entladungen
96 S y s t e m i n f o r m a t i o n s h a n d b u c h www .dell.com | support.euro.dell.com Schutz vor elektrostatischen Entladungen Elektrostatische Entladungen können die elektronischen Bauteile des Computers beschädigen. Um Beschädigungen durch elektrostatische Entladungen zu vermeiden, sollten ...
Page 101 - Einrichten des Computers
S y s t e m i n f o r m a t i o n s h a n d b u c h 99 Einrichten des Computers 1 Das Zubehör auspacken. 2 Die für das Einrichten des Computers erforderlichen Zubehörteile bereitlegen. Der Lieferumfang des Zubehörs umfasst ferner die Benutzerdokumen-tation sowie die Software oder zusätzliche Hardwar...
Page 102 - Wissenswertes über den Computer
100 S y s t e m i n f o r m a t i o n s h a n d b u c h www .dell.com | support.euro.dell.com Wissenswertes über den Computer Nähere Informationen zum Computer finden Sie im Online- Benutzerhand- buch . Doppelklicken Sie je nach Betriebssystem auf das Symbol User’s Guides (Benutzerhandbücher) auf de...
Page 103 - Vorderseite
S y s t e m i n f o r m a t i o n s h a n d b u c h 101 • Docking-Geräte: Der Computer unterstützt die Dell D/Dock- Erweiterungsstation und den Dell D/Port Advanced Port Replicator. H I N W E I S : Docking- Geräte sind in bestimmten Ländern möglicherweise nicht verfügbar. – Informationen zum optiona...
Page 104 - Linke Seitenansicht
102 S y s t e m i n f o r m a t i o n s h a n d b u c h www .dell.com | support.euro.dell.com Linke Seitenansicht Rechte Seitenansicht Festplattenlaufwerk PC-Kartensteckplatz Steckplatz für Smart Card Infrarotsensor Audioanschlüsse (2) Sicherungs-kabeleinschub Lüftungsschlitze (2) Sicherungs-kabelei...
Page 105 - Rückseite
S y s t e m i n f o r m a t i o n s h a n d b u c h 103 Rückseite V O R S I C H T: Um Schäden am Computer zu vermeiden, sollten Sie nach dem Ausschalten des Computers fünf Sekunden warten, bevor Sie ein externes Gerät davon trennen. W A R N U N G : A c h t e n S i e d a r a u f, d i e L ü f t u n g ...
Page 106 - Unterseite
104 S y s t e m i n f o r m a t i o n s h a n d b u c h www .dell.com | support.euro.dell.com Unterseite Lüfter Akkufachfreigabeklinke Akkuladeanzeige Akku Speichermodulabdeckung Festplatten-laufwerk Abdeckung der Mini-PCI-Karte Einschub für Docking-Gerät
Page 107 - Entfernen des Akkus
S y s t e m i n f o r m a t i o n s h a n d b u c h 105 Entfernen des Akkus Weitere Informationen über den Akkuaustausch finden Sie unter Verwenden des Modulschachts im Online- Benutzerhandbuch . W A R N U N G : B e v o r S i e d i e s e S c h r i t t e a u s f ü h r e n , s c h a l t e n S i e d e ...
Page 108 - Ein- und Ausbauen eines Reserveakkus
106 S y s t e m i n f o r m a t i o n s h a n d b u c h www .dell.com | support.euro.dell.com Ein- und Ausbauen eines Reserveakkus 1 Den Akku entfernen. 2 Die Abdeckung des Reserveakkufachs entfernen. 3 Den Reserveakku aus dem Fach herausziehen und das Kabel vom Anschluss abziehen.
Page 110 - Einsetzen eines Akkus
108 S y s t e m i n f o r m a t i o n s h a n d b u c h www .dell.com | support.euro.dell.com Einsetzen eines Akkus Den Akku so weit in den Schacht schieben, bis die Freigabeklinke hörbar einrastet. Weitere Informationen über die Installation des zweiten Akkus finden Sie unter Verwenden des Modulsch...
Page 113 - Betriebsbestimmungen
S y s t e m i n f o r m a t i o n s h a n d b u c h 111 10 Wenn ein Test vollständig ausgeführt wurde, das Testfenster schließen, um zum Hauptmenü zurückzukehren. Um das Dell- Diagnoseprogramm zu verlassen und den Computer neu zu starten, den Bildschirm Main Menu (Hauptmenü) schließen. Betriebsbesti...
Page 115 - Informazioni di sistema
w w w . d e l l . c o m | s u p p o r t . e u r o . d e l l . c o m Dell™ Latitude™ D600 Informazioni di sistema
Page 116 - Note, avvisi e messaggi di attenzione; Abbreviazioni ed acronimi
Note, avvisi e messaggi di attenzione N O TA : una NOTA evidenzia informazioni importanti per un uso ottimale del computer. A V V I S O : un AVVISO può indicare un potenziale danno a livello di hardware o una perdita di dati e consiglia come evitare il problema. AT T E N Z I O N E : u n m e s s a g ...
Page 117 - S o m m a r i o
S o m m a r i o 1 1 5 S o m m a r i o ATTENZIONE: Istruzioni di sicurezza . . . . . . . . . . . . . . . 117 Informazioni generali . . . . . . . . . . . . . . . . . . . . . 117 Alimentazione . . . . . . . . . . . . . . . . . . . . . . . . . 118 Batteria . . . . . . . . . . . . . . . . . . . . . . . ....
Page 119 - ATTENZIONE: Istruzioni di sicurezza; Informazioni generali
I n f o r m a z i o n i d i s i s t e m a 117 ATTENZIONE: Istruzioni di sicurezza Per proteggere il computer e l’ambiente di lavoro da eventuali danni e per la sicurezza personale, attenersi alle seguenti indicazioni di sicurezza. Informazioni generali • Non cercare di riparare il computer da soli s...
Page 120 - Alimentazione
118 I n f o r m a z i o n i d i s i s t e m a www .dell.com | support.euro.dell.com • Per evitare potenziali rischi di scariche elettriche, non collegare o scollegare cavi, né eseguire operazioni di manutenzione o riconfigurazione del prodotto durante un temporale. Non usare il computer durante un t...
Page 121 - Batteria
I n f o r m a z i o n i d i s i s t e m a 119 • Se si usa una multipresa, prestare particolare attenzione quando vi si collega il cavo di alimentazione dell’adattatore c.a. Alcune multiprese potrebbero non consentire l’inserimento corretto della spina del cavo di alimentazione, con conseguente possi...
Page 122 - Uso in aereo
120 I n f o r m a z i o n i d i s i s t e m a www .dell.com | support.euro.dell.com Uso in aereo • L’uso del computer Dell a bordo di un aereo è subordinato a determinate normative stabilite degli enti amministrativi per il trasporto aereo e/o a restrizioni specifiche delle compagnie aeree. Ad esemp...
Page 123 - Uso del computer
I n f o r m a z i o n i d i s i s t e m a 121 Uso del computer Attenersi alle seguenti indicazioni di sicurezza per prevenire danni al computer. • Prima di iniziare a usare il computer, appoggiarlo su una superficie piana. • Se si viaggia in aereo, non spedire il computer come bagaglio. Sebbene il c...
Page 124 - Abitudini ergonomiche nell’uso del computer; Interventi sui componenti interni del computer
122 I n f o r m a z i o n i d i s i s t e m a www .dell.com | support.euro.dell.com • Pulire lo schermo con un panno morbido e pulito, inumidito con acqua. Applicare l’acqua sul panno, quindi passare il panno sullo schermo in una sola direzione, dalla parte superiore a quella inferiore. Rimuovere ve...
Page 125 - Protezione dalle scariche elettrostatiche
I n f o r m a z i o n i d i s i s t e m a 123 A V V I S O : per evitare possibili danni alla scheda di sistema, attendere 5 secondi dallo spegnimento del computer prima di scollegare una periferica o rimuovere un modulo di memoria, una scheda miniaturizzata PCI o un modem dalla scheda di sistema. 1 ...
Page 126 - Smaltimento della batteria
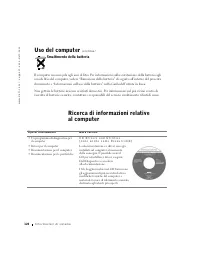
124 I n f o r m a z i o n i d i s i s t e m a www .dell.com | support.euro.dell.com Ricerca di informazioni relative al computer Smaltimento della batteria Il computer usa una pila agli ioni di litio. Per informazioni sulla sostituzione della batteria agli ioni di litio del computer, vedere “Rimozio...
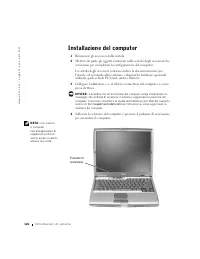
Page 128 - Installazione del computer
126 I n f o r m a z i o n i d i s i s t e m a www .dell.com | support.euro.dell.com Installazione del computer 1 Rimuovere gli accessori dalla scatola. 2 Mettere da parte gli oggetti contenuti nella scatola degli accessori che serviranno per completare la configurazione del computer. La scatola degl...
Page 129 - Informazioni sul computer
I n f o r m a z i o n i d i s i s t e m a 127 Informazioni sul computer Per informazioni dettagliate sul computer, consultare la Guida dell’utente in linea. A seconda del sistema operativo in uso, fare doppio clic sull’icona Guide dell’utente sul desktop oppure fare clic sul pulsante Start , sceglie...
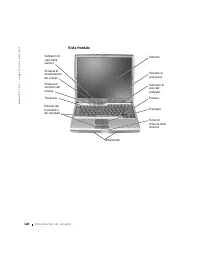
Page 130 - Vista frontale
128 I n f o r m a z i o n i d i s i s t e m a www .dell.com | support.euro.dell.com Vista frontale Schermo Touchpad Pulsante di accensione Pulsanti di controllo del volume Fermo di chiusura dello schermo Pulsante di disattivazione del volume Tastiera Trackstick Pulsanti del trackstick e del touchpad...
Page 131 - Vista sinistra
I n f o r m a z i o n i d i s i s t e m a 129 Vista sinistra Disco rigido Slot per schede PC Card Slot per smart card Sensore a infrarossi Connettori audio (2) Slot per cavo di sicurezza Prese d’aria (2)
Page 132 - Vista destra
130 I n f o r m a z i o n i d i s i s t e m a www .dell.com | support.euro.dell.com Vista destra Slot per cavo di sicurezza Alloggiamento dei moduli Fermo di chiusura della periferica
Page 133 - Retro del computer
I n f o r m a z i o n i d i s i s t e m a 131 Retro del computer A V V I S O : per evitare danni al computer, attendere 5 secondi dallo spegnimento del computer prima di scollegare una periferica esterna. AT T E N Z I O N E : n o n o s t r u i r e l e p r e s e d ’ a r i a , n o n i n t r o d u r v ...
Page 134 - Vista inferiore
132 I n f o r m a z i o n i d i s i s t e m a www .dell.com | support.euro.dell.com Vista inferiore Ventola Fermo di chiusura dell’alloggiamento della batteria Indicatore del livello di carica della batteria Batteria Coperchio della baia dei moduli di memoria Disco rigido Coperchio della scheda mini...
Page 135 - Rimozione della batteria
I n f o r m a z i o n i d i s i s t e m a 133 Rimozione della batteria Per ulteriori informazioni sulla rimozione della batteria aggiuntiva, vedere Uso dell’alloggiamento dei moduli nella Guida dell’utente in linea. AT T E N Z I O N E : p r i m a d i e s e g u i r e q u e s t e p r o c e d u r e , s...
Page 138 - Installazione di una batteria
136 I n f o r m a z i o n i d i s i s t e m a www .dell.com | support.euro.dell.com Installazione di una batteria Fare scorrere la batteria nell’alloggiamento fino a quando il fermo di chiusura scatta in posizione. Per ulteriori informazioni sull’installazione della batteria aggiuntiva, vedere Uso d...
Page 142 - Avvisi sulle normative
140 I n f o r m a z i o n i d i s i s t e m a www .dell.com | support.euro.dell.com Avvisi sulle normative Con interferenza elettromagnetica (EMI) si indica un qualsiasi segnale o emissione, irradiato nello spazio o trasmesso tramite cavi di alimentazione o di segnale, che può compromettere il funzi...
Page 144 - Notas, avisos e cuidados; Abreviaturas e acrónimos
Notas, avisos e cuidados N O TA : Indica informações importantes que o ajudam a utilizar melhor o computador. A V I S O : Indica uma situação que pode provocar danos no hardware ou perda de dados e indica como evitar o problema. C U I D A D O : I n d i c a u m a s i t u a ç ã o q u e p o d e p r o v...
Page 145 - S u m á r i o
S u m á r i o 1 4 3 S u m á r i o CUIDADO: Instruções de segurança . . . . . . . . . . . . . . . 145 Geral . . . . . . . . . . . . . . . . . . . . . . . . . . . . . 145 Alimentação . . . . . . . . . . . . . . . . . . . . . . . . . 146 Bateria . . . . . . . . . . . . . . . . . . . . . . . . . . . . 1...
Page 147 - CUIDADO: Instruções de segurança; Geral
M a n u a l d e i n f o r m a ç õ e s d o s i s t e m a 145 CUIDADO: Instruções de segurança Siga as seguintes directrizes gerais de segurança para garantir a sua própria segurança pessoal e para proteger o computador e o ambiente de trabalho contra possíveis danos. Geral • Não tente fazer a manuten...
Page 148 - Alimentação
146 M a n u a l d e i n f o r m a ç õ e s d o s i s t e m a www .dell.com | support.euro.dell.com • Para evitar o risco potencial de choque eléctrico, não ligue ou desligue cabos, nem faça a manutenção ou reconfiguração deste produto durante tempestades com descargas eléctricas. Não utilize o comput...
Page 149 - Bateria
M a n u a l d e i n f o r m a ç õ e s d o s i s t e m a 147 • Certifique-se de que nada se encontra sobre o cabo de alimentação do adaptador CA e de que o cabo não se encontra em locais em que possa ser pisado ou em que provoque quedas. • Se estiver a utilizar uma tomada com várias saídas, tenha cui...
Page 150 - Viagens de avião; Instruções de EMC
148 M a n u a l d e i n f o r m a ç õ e s d o s i s t e m a www .dell.com | support.euro.dell.com Viagens de avião • O funcionamento do computador Dell™ a bordo de aviões pode estar sujeito às leis do país em questão ou a restrições específicas das companhias aéreas. Por exemplo, essas leis ou restr...
Page 151 - Utilização do computador
M a n u a l d e i n f o r m a ç õ e s d o s i s t e m a 149 Utilização do computador Siga as instruções de manuseamento seguro que se seguem para evitar danos no computador: • Ao preparar o computador para trabalhar, coloque-o sobre uma superfície plana. • Ao viajar, não despache o computador como b...
Page 152 - Hábitos computacionais ergonómicos; Manusear componentes internos do computador
150 M a n u a l d e i n f o r m a ç õ e s d o s i s t e m a www .dell.com | support.euro.dell.com • Limpe o ecrã com um pano macio e limpo e água. Aplique a água no pano; depois, passe-o sobre o ecrã numa única direcção, em movimentos de cima para baixo. Remova rapidamente a humidade do ecrã e mante...
Page 153 - Protecção contra descargas electrostáticas:
M a n u a l d e i n f o r m a ç õ e s d o s i s t e m a 151 4 Para eliminar a electricidade estática do corpo, toque na superfície de metal não pintada do painel de E/S existente na parte de trás do computador. Ao trabalhar, toque periodicamente no painel de E/S para dissipar electricidade estática ...
Page 155 - Configurar o computador
M a n u a l d e i n f o r m a ç õ e s d o s i s t e m a 153 Configurar o computador 1 Desembale a caixa de acessórios. 2 Separe o conteúdo da caixa de acessórios, necessário para concluir a configuração do computador. A caixa de acessórios também contém documentação do utilizador e todo o software o...
Page 156 - Sobre o computador
154 M a n u a l d e i n f o r m a ç õ e s d o s i s t e m a www .dell.com | support.euro.dell.com N O TA : Só deve ancorar o computador depois de o ligar e encerrar pelo menos uma vez. Sobre o computador Consulte o Manual do utilizador online para obter informações detalhadas sobre o computador. Dep...
Page 158 - Vista frontal
156 M a n u a l d e i n f o r m a ç õ e s d o s i s t e m a www .dell.com | support.euro.dell.com Vista frontal ecrã touch pad botão de alimentação botões de controlo do volume fecho do ecrã silenciar teclado botão do rato botão do rato/touch pad luzes de estado do teclado luzes de estado do disposi...
Page 159 - Vista do lado esquerdo
M a n u a l d e i n f o r m a ç õ e s d o s i s t e m a 157 Vista do lado esquerdo disco rígido ranhura de PC Card ranhura de Smart Card sensor de infravermelhos conectores de áudio (2) ranhura do cabo de segurança saídas de ar (2)
Page 160 - Vista do lado direito
158 M a n u a l d e i n f o r m a ç õ e s d o s i s t e m a www .dell.com | support.euro.dell.com Vista do lado direito ranhura do cabo de segurança compartimento de módulos patilha de libertação do fecho do dispositivo
Page 161 - Vista posterior
M a n u a l d e i n f o r m a ç õ e s d o s i s t e m a 159 Vista posterior A V I S O : Para evitar danos no computador, aguarde cinco segundos após desligar o computador antes de desligar um dispositivo externo. C U I D A D O : N ã o b l o q u e i e , n ã o i n t r o d u z a o b j e c t o s n e m d...
Page 162 - Vista inferior
160 M a n u a l d e i n f o r m a ç õ e s d o s i s t e m a www .dell.com | support.euro.dell.com Vista inferior ventoinha fecho de libertação do compartimento da bateria indicador de carga da bateria bateria tampa do módulo de memória disco rígido tampa da placa Mini PCI ranhura do dispositivo de a...
Page 163 - Remover uma bateria
M a n u a l d e i n f o r m a ç õ e s d o s i s t e m a 161 Remover uma bateria Para mais informações sobre como remover a segunda bateria, consulte “Utilizar o compartimento de módulos” no Manual do utilizador online. C U I D A D O : A n t e s d e e f e c t u a r e s t e s p r o c e d i m e n t o s...
Page 166 - Instalar uma bateria
164 M a n u a l d e i n f o r m a ç õ e s d o s i s t e m a www .dell.com | support.euro.dell.com Instalar uma bateria Deslize a bateria para dentro do compartimento até ouvir um clique do fecho. Para mais informações sobre como instalar a segunda bateria, consulte “Utilizar o compartimento de módul...
Page 170 - Avisos regulamentares
168 M a n u a l d e i n f o r m a ç õ e s d o s i s t e m a www .dell.com | support.euro.dell.com Avisos regulamentares Interferência electromagnética (EMI) é qualquer sinal ou emissão, irradiada em espaço livre ou transmitida através de condutores de alimentação ou de sinais, que coloque em risco o...
Page 172 - Notas, avisos y precauciones; Abreviaturas y acrónimos
Notas, avisos y precauciones N O TA : Una NOTA proporciona información importante que le ayuda a utilizar su equipo de la mejor manera posible. A V I S O : Un AVISO indica un posible daño en el hardware o la pérdida de datos, y le explica cómo evitar el problema. P R E C A U C I Ó N : U n a P R E C ...
Page 173 - C o n t e n i d o
C o n t e n i d o 1 7 1 C o n t e n i d o PRECAUCIÓN: instrucciones de seguridad . . . . . . . . . . . . 173 General . . . . . . . . . . . . . . . . . . . . . . . . . . . . 173 Alimentación . . . . . . . . . . . . . . . . . . . . . . . . . . 174 Batería . . . . . . . . . . . . . . . . . . . . . . . ...
Page 175 - instrucciones de seguridad
G u í a d e i n f o r m a c i ó n d e l s i s t e m a 173 PRECAUCIÓN: instrucciones de seguridad Aplique las siguientes pautas de seguridad para garantizar su propia seguridad personal y para ayudarle a proteger el ordenador y su entorno de trabajo contra posibles daños. General • No intente reparar...
Page 176 - Alimentación
174 G u í a d e i n f o r m a c i ó n d e l s i s t e m a www .dell.com | support.euro.dell.com • No utilice el equipo en un entorno mojado, por ejemplo, cerca de una bañera, lavabo o piscina, o sobre un suelo mojado. • Si el equipo incluye un módem integrado u opcional (de tarjeta PC), desconecte e...
Page 177 - Batería
G u í a d e i n f o r m a c i ó n d e l s i s t e m a 175 • Para desconectar el equipo de todas las fuentes de energía, apáguelo, extraiga el paquete de baterías y desconecte el adaptador de CA del enchufe eléctrico. • Para evitar descargas eléctricas, enchufe el adaptador de CA y los cables de alim...
Page 178 - Viajes en avión
176 G u í a d e i n f o r m a c i ó n d e l s i s t e m a www .dell.com | support.euro.dell.com • No almacene ni deje el ordenador ni la batería cerca de una fuente de calor como un radiador, una chimenea, una estufa, un calentador eléctrico u otro tipo de generador de calor ni los exponga en ningún...
Page 179 - Instrucciones EMC
G u í a d e i n f o r m a c i ó n d e l s i s t e m a 177 Instrucciones EMC La utilización de cables de señal blindados garantiza que se mantiene la clasificación EMC apropiada para el entorno deseado. Para impresoras en paralelo, existen cables de Dell. Si lo prefiere, puede solicitar un cable a De...
Page 180 - Cuando utilice el equipo
178 G u í a d e i n f o r m a c i ó n d e l s i s t e m a www .dell.com | support.euro.dell.com Cuando utilice el equipo Observe las siguientes pautas de seguridad para evitar daños en el ordenador. • Cuando prepare el equipo para trabajar, colóquelo en una superficie plana. • Cuando viaje, no factu...
Page 181 - Hábitos de ergonomía con su equipo; Al trabajar en el interior de su equipo
G u í a d e i n f o r m a c i ó n d e l s i s t e m a 179 • Limpie la pantalla con un paño suave humedecido en agua. Aplique el agua al paño y después pase éste por la pantalla en una sola dirección, de arriba abajo. Quite el vaho de la pantalla rápidamente y, a continuación, séquela. Una exposición...
Page 182 - Protección contra descargas electrostáticas
180 G u í a d e i n f o r m a c i ó n d e l s i s t e m a www .dell.com | support.euro.dell.com 4 Conéctese usted mismo a tierra por el procedimiento de tocar una superficie metálica sin pintura del panel de entrada y salida (E/S) en la parte posterior del ordenador. Mientras trabaja, toque de vez e...
Page 183 - Búsqueda de información del equipo
G u í a d e i n f o r m a c i ó n d e l s i s t e m a 181 Búsqueda de información del equipo Si busca Aquí lo encontrará • Un programa de diagnóstico para el equipo • Controladores para el equipo• La documentación del equipo• La documentación del dispositivo E l C D D r i v e r s a n d U t i l i t i...
Page 184 - Configuración del equipo
182 G u í a d e i n f o r m a c i ó n d e l s i s t e m a www .dell.com | support.euro.dell.com Configuración del equipo 1 Desempaquete la caja de accesorios. 2 Saque el contenido de la caja de accesorios, que necesitará para completar la configuración del equipo. La caja de accesorios también conti...
Page 185 - Acerca del ordenador
G u í a d e i n f o r m a c i ó n d e l s i s t e m a 183 NOTA : No acople el equipo hasta que se haya encendido y apagado por lo menos una vez. Acerca del ordenador Consulte la Guía del usuario en línea para obtener información detallada sobre el equipo. Dependiendo del sistema operativo, haga dobl...
Page 187 - Vista anterior
G u í a d e i n f o r m a c i ó n d e l s i s t e m a 185 Vista anterior pantalla almohadilla de contacto botón de encendido botones de control de volumen seguro de la pantalla botón de silencio teclado palanca de seguimiento botones de la palanca de seguimiento y de la almohadilla de contacto indic...
Page 188 - Vista izquierda
186 G u í a d e i n f o r m a c i ó n d e l s i s t e m a www .dell.com | support.euro.dell.com Vista izquierda unidad de disco duro ranura para tarjeta PC ranura para smart cards sensor de infrarrojos conectores para sonido (2) ranura para cable de seguridad rejillas de ventilación (2)
Page 189 - Vista derecha
G u í a d e i n f o r m a c i ó n d e l s i s t e m a 187 Vista derecha ranura para cable de seguridad compartimento modular pestillo de liberación del dispositivo
Page 192 - Extracción de una batería
190 G u í a d e i n f o r m a c i ó n d e l s i s t e m a www .dell.com | support.euro.dell.com Extracción de una batería Para obtener más información sobre la extracción de la segunda batería, consulte la sección "Uso del compartimiento modular" de la Guía del usuario en línea. P R E C A U ...
Page 193 - Extraer e instalar la batería de reserva
G u í a d e i n f o r m a c i ó n d e l s i s t e m a 191 Extraer e instalar la batería de reserva 1 Extraiga la batería. 2 Retire la cubierta de la batería de reserva. 3 Tire de la batería de reserva para extraerla de su compartimiento y desconecte el cable del conector.
Page 195 - Instalación de la batería; Ejecución de los Diagnósticos Dell
G u í a d e i n f o r m a c i ó n d e l s i s t e m a 193 Instalación de la batería Deslice la batería en el compartimento hasta que el seguro de liberación emita un “clic”. Para obtener más información sobre la instalación de la segunda batería, consulte la sección "Uso del compartimiento modul...
Page 198 - Avisos sobre regulación
196 G u í a d e i n f o r m a c i ó n d e l s i s t e m a www .dell.com | support.euro.dell.com Avisos sobre regulación Una interferencia electromagnética (EMI, del inglés Electromagnetic Interference) es cualquier señal o emisión, radiada en el espacio o conducida a través de un cable de alimentaci...


 Dell 04YJJ6A00
User Manual
Dell 04YJJ6A00
User Manual
 Dell 10 Pro
User Manual
Dell 10 Pro
User Manual
 Dell 10
Manual
Dell 10
Manual
 Dell 1000
User Manual
Dell 1000
User Manual
 Dell 1014
User Manual
Dell 1014
User Manual
 Dell 1000W
User Manual
Dell 1000W
User Manual
 Dell 0JH552A01
User Manual
Dell 0JH552A01
User Manual
 Dell 10g
User Manual
Dell 10g
User Manual
 Dell 1100
User Manual
Dell 1100
User Manual
 Dell 11
User Manual
Dell 11
User Manual
 Dell 11 Pro
User Manual
Dell 11 Pro
User Manual
 Dell 110T
User Manual
Dell 110T
User Manual
 Dell 110T DLT1 Drive
User Manual
Dell 110T DLT1 Drive
User Manual
 Dell 1100 Laser Mono Printer
User Manual
Dell 1100 Laser Mono Printer
User Manual
 Dell 1100MP
User Manual
Dell 1100MP
User Manual