Page 3 - CONTENTS
3 CONTENTS CAUTION ....................................................................................................................................................... 6 BATTERY WARNING ..................................................................................................................
Page 4 - STILL MODE 22
4 7. INITIAL SETTINGS ......................................................................................................................... 14 7.1 FORMATTING THE INSERTED MICRO SD CARD .................................................................14 7.2 SETTING THE TIME AND DATE ................
Page 6 - CAUTION; Please set time and date before you use this device to record.
6 CAUTION • Ensure you are using your Dash Cam within your countries’ road laws. Please make sure you are familiar with your local road legislation before use. • Avoid leaving your Dash Cam in direct sunlight for extended periods of time in an unventilated space. • Please set time and date before yo...
Page 8 - • Full High Definition Recording; PACKAGE CONTENTS
8 1. INTRODUCTION Thank you for purchasing a Dashmate Dash Cam. We are certain that our product will give you trouble free operation while providing you with safety features that enhances your driving experience. Our products, like most after-market safety enhanced devices, are designed to assist an...
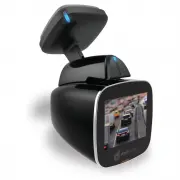
Page 9 - PRODUCT OVERVIEW
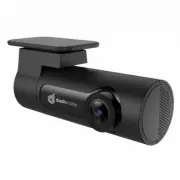
9 1.3 PRODUCT OVERVIEW A Reset Button B Microphone C Micro SD Card Slot D Magnetic Mount E Wide Angle Lens F Protective Glass G 1.5” LCD Screen H Status Light 1 OK Button 2 Menu Button 3 Up Button 4 Down Button
Page 10 - Micro SD Card should eject from the Dash Cam.
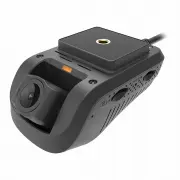
10 2. GETTING STARTED 2.1 INSERTING A MICRO SD CARD With the Dash Cam powered off disconnect the Dash Cam from the magnetic mount. With the screen facing toward you insert the Micro SD card in the slot in the top of the camera making sure the copper contacts of the Micro SD Card are facing toward yo...
Page 12 - will automatically power up and start recording.; MANUAL POWER OFF; for 5 seconds until the camera powers up.; RESET THE DASH CAM
12 3. POWERING THE DASH CAM ON/OFF 3.1 AUTO POWER ON/OFF When the Dash Cam is correctly installed to your vehicles 12V power supply, the Dash Cam will automatically power up and start recording. 3.2 MANUAL POWER OFF To manually power off the camera make sure the Dash Cam isn’t recording and hold the...
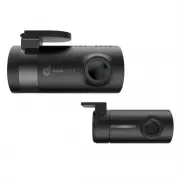
Page 13 - WIFI SMART PHONE CONNECTIVITY
13 5. GPS RECORDING GPS recording will record your speed and location when driving. When the Dash Cam is started it may take up to two minutes for the GPS module to position itself, in this time your position and speed will not be recorded. It is recommended that the windscreen mount is positioned s...
Page 15 - USING THE DASH CAM
15 7.2 SETTING THE TIME AND DATE Setting the correct time and date ensures that the date is correct when you date stamp your footage. To set the correct time and date, please follow the steps below. 1. Press the (OK) button to stop your Dash Cam from recording. 2. Press the (Menu) button to enter th...
Page 16 - LOCKED RECORDING
16 __________________________________________________________________________________________________________________________ NOTE: • Because of how some vehicles are wired, the recording may continue when the engine is switched off. If this happens, please manually turn off the Dash Cam or remove t...
Page 17 - VIDEO MODE; To set your recording resolution, please follow the steps below.; Use the; Video menu; and highlight the; Resolution
17 8. VIDEO MODE When the Dash Cam is powered up the video screen will start by default. In this screen recording will automatically start and can be stopped by pressing the (OK) Button. To access the Video Menu, ensure that the Dash Cam is not recording then press the (Menu) button. 8.1 VIDEO MENU ...
Page 21 - • LDWS; LDWS
21 8.1.8 LDWS The LDWS setting controls the Lane Departure Warning System feature, this feature will warn you if your vehicle is leaving it’s lane when your vehicle is traveling over 60kph. To activate LDWS please follow the instructions on the next page. 1. Press the (OK) button to stop your Dash C...
Page 26 - 0 SETTINGS MENU
26 9.1.7 DATE STAMP The Date Stamp stamps the time and date of recording on your photos giving you a chronological record of your travels. To activate Date Stamp please follow the instructions below. 1. Press the (OK) button to stop your Dash Cam from recording. 2. Hold the (Menu) button for 2 secon...
Page 31 - DEFAULT SETTINGS
31 10.7 FORMAT Formatting the Micro SD Card will delete all information on the inserted Micro SD Card and prepare it for recording with the Dash Cam. To format your inserted Micro SD Card please follow the instructions below. 1. Press the (OK) button to stop your Dash Cam from recording. 2. Press th...
Page 34 - SPECIFICATIONS
34 12. SPECIFICATIONS SCREEN 1.5" LCD LENS 150° MINIMUM LIGHT 1 LUX VIDEO RESOLUTION FULL HD 1080P GPS BUILT IN WiFi BUILT IN MEMORY TYPE MICRO SD CARD CAPACITY SUPPORTED UP TO 32GB/CLASS 4 & ABOVE MICROPHONE/SPEAKER BUILT IN
Page 35 - VIDE
35 13. VIDEO MENU VIDE O RESOLUTION 1080FHD 1920 x 1080 WVGA 848 x 480720P 1280 x 720 VGA 640 x 480 LOOP RECORDING OFF 5 MINUTES 3 MINUTES 10 MINUTES WDR OFF ON CAPACITY +2.0 -1/3 EXPOSURE +5/3 -2/3 +4/3 -1.0 +1.0 -4/3 +2/3 -5/3 +1/3 -2.0 0.0 MOTION DETECTION OFF ON RECORD AUDIO OFF ON PARKING MONIT...
Page 36 - STILL MENU; TILL
36 14. STILL MENU S TILL CAPTURE MODE SINGLE 5S TIMER 2S TIMER 10S TIMER RESOLUTION 12M 4032 x 3024 3M 2048 x 1536 10M 3648 x 2736 2MHD 1920 x 1080 8M 3264 x 2248 VGA 640 x 480 5M 2592 x 1944 1.3M 1280 x 960 SEQUENCE OFF ON QUALITY FINE NORMAL ECONOMY SHARPNESS STRONG NORMAL SOFT WHITE BALANCE AUTO ...
Page 37 - SETTINGS MENU; SET; PLAYBACK MENU; YB
37 15. SETTINGS MENU SET TING S WIFI OFF ON DATE / TIME *SET TIME AND DATE* BEEP SOUND OFF ON LANGUAGE *SET LANGUAGE* FREQUENCY 50Hz 60Hz SCREEN SAVER OFF 1 MINUTE 3 MINUTES 5 MINUTES CAR PLATE *SET REGO PLATE NUMBER* FORMAT OK CANCEL DEFAULT SETTING OK CANCEL VERSION *DISPLAY FIRMWARE VERSION* 16. ...
Page 38 - ABOUT THIS GUIDE
38 17. ABOUT THIS GUIDE The content in this document is for information purpose and is subject to change without prior notice. We make every effort to ensure that this User Guide is accurate and complete. However, no liability is assumed for any errors and omissions that may have occurred. The manuf...
Page 39 - Directed Electronics Address:; 4 Translink Drive, Keilor Park Victoria Australia 3042
39 18. WARRANTY TERMS & CONDITIONS Our goods come with guarantees that cannot be excluded under the Australian & New Zealand Consumer Law. You are entitled to a replacement or refund for a major failure and for compensation for any other reasonably foreseeable loss or damage. You are also en...