Page 2 - CLEANING & MAINTENANCE; MOTOR; OPERATION
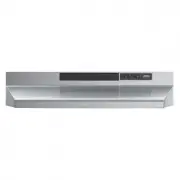
Page 2 MODELS EWP1306SS • EWP1366SS CLEANING & MAINTENANCE Proper maintenance of the Range Hood will assure proper performance of the unit. MOTOR The motor is permanently lubricated and never needs oiling. If the motor bearings make excessive or unusual noise, replace the blower with the exact s...
Page 3 - INSTALL THE DUCTWORK; MEASURE THE INSTALLATION
Page 3 MODELS EWP1306SS • EWP1366SS INSTALL THE DUCTWORK (Ducted Hoods Only) 1. Decide where the ductwork will run between the hood and the outside. 2. A straight, short duct run will allow the hood to perform most efficiently. 3. Long duct runs, elbows and transitions will reduce the performance of...
Page 4 - PREPARE THE HOOD; cont; INSTALL THE WIRING
Page 4 MODELS EWP1306SS • EWP1366SS PREPARE THE HOOD ( cont ’ d ) For ducted installation only: Install both damper flaps inside the blower exhaust opening, ensuring the pins are top oriented. See illustration below. HJ0225 P ins on toP 1. GROUNDING INSTRUCTIONS This appliance must be grounded. In t...
Page 5 - INSTALL THE HOOD MOUNTING BRACKET; CL; WALL STUDS
Page 5 MODELS EWP1306SS • EWP1366SS INSTALL THE HOOD MOUNTING BRACKET CL HD1221 1. Construct wood wall framing that is flush with interior surface of wall studs. Make sure: a) the framing is centered over installation location. b) the height of the framing will allow the mounting bracket to be secur...
Page 6 - INSTALL THE HOOD
Page 6 MODELS EWP1306SS • EWP1366SS INSTALL UPPER FLUE MOUNTING BRACKET 1. If a framing member is not present, drill two 5/16” diameter holes where shown. Insert drywall anchors into the holes. 2. Center the bracket over the hood location and flush with the ceiling. Make sure that the slots of the u...
Page 8 - NON-DUCT KIT MODEL ARKBWP CONTENTS
Page 8 MODELS EWP1306SS • EWP1366SS INSTALL THE HOOD (Non-Ducted Hoods Only) 7. Measure and install 6” round steel ductwork to the blower exhaust opening on top of hood. Use duct tape to make all joints secure and air tight. 8. Hold hood up close to wall mounting location and plug power cord into wa...
Page 10 - SERVICE PARTS
Page 10 MODELS EWP1306SS • EWP1366SS SERVICE PARTS Replacement parts can be ordered on our website. r eplacement p arts and r epairs In order to ensure your unit remains in good working condition, you must use Broan-NuTone LLC or Venmar Ventilation ULC genuine replacement parts only. Broan-NuTone LL...
Page 11 - WARRANTY
Page 11 MODELS EWP1306SS • EWP1366SS Limited Warranty Warranty Period and Exclusions: Broan-NuTone LLC and Venmar Ventilation ULC (either being the “Company”) warrants to the original consumer purchaser of its product (“you”) that the product (the “Product”) will be free from material defects in the...
Page 12 - LIRE CES DIRECTIVES ET LES CONSERVER; pour; INSTALLATEUR : VEUILLEZ LAISSER CE GUIDE AU PROPRIÉTAIRE.; AVERTISSEMENT; Pour enregistrer ce produit,
Page 12 MODÈLES EWP1306SS • EWP1366SS 8. 8. LIRE CES DIRECTIVES ET LES CONSERVER HOTTE CHEMINÉE ! pour usage domestique seulement . ! AFIN DE RÉDUIRE LES RISQUES D’INCENDIE, DE DÉCHARGES ÉLECTRIQUES OU DE BLESSURES CORPORELLES, VEUILLEZ OBSERVER LES DIRECTIVES SUIVANTES : 1. N’utilisez cet appareil ...
Page 13 - NETTOYAGE ET ENTRETIEN; MOTEUR; FONCTIONNEMENT
Page 13 MODÈLES EWP1306SS • EWP1366SS NETTOYAGE ET ENTRETIEN Un entretien adéquat de la hotte assurera son bon fonctionnement. MOTEUR Le moteur est lubrifié en permanence et n’a pas besoin d’être huilé. Si les roulements du moteur sont anormalement bruyants, remplacer le ventilateur par exactement l...
Page 15 - suite; INSTALLATION DU CÂBLAGE
Page 15 MODÈLES EWP1306SS • EWP1366SS PRÉPARATION DE LA HOTTE ( suite ) Pour les installations avec conduit seulement : Installer les deux clapets à l’intérieur de l’ouverture d’évacuation du ventilateur, en s’assurant que les tiges sont sur le dessus. Voir l’illustration ci-dessous. HJ0225 t iges s...
Page 16 - INSTALLATION DU SUPPORT DE MONTAGE DE LA HOTTE; MONTANTS; po
Page 16 MODÈLES EWP1306SS • EWP1366SS CL HD1221 INSTALLATION DU SUPPORT DE MONTAGE DE LA HOTTE 42 5/8 po = bas de la hotte à 30 po au-dessus de la surface de cuisson CHARPENTE DERRIÈRE LA CLOISON SÈCHE MONTANTS REMARQUE : La distance minimale de la hotte au-dessus de la surface de cuisson ne doit pa...
Page 17 - INSTALLATION DE LA HOTTE
Page 17 MODÈLES EWP1306SS • EWP1366SS INSTALLATION DU SUPPORT DE MONTAGE DE CONDUIT DÉCORATIF SUPÉRIEUR 1. Si aucune pièce de charpente n’est présente, percer deux trous de 5/16 po aux endroits indiqués. Insérer des douilles à expansion dans les trous. 2. Centrer le support avec l’emplacement de la ...
Page 19 - CONTENU DE L’ENSEMBLE POUR HOTTE
Page 19 MODÈLES EWP1306SS • EWP1366SS INSTALLATION DE LA HOTTE (hottes sans conduits seulement) 7. Mesurer et installer un conduit rond métallique de 6 po sur l’ouverture d’évacuation du ventilateur de la hotte. Utiliser du ruban pour conduit afin de fixer solidement tous les joints et d’assurer leu...
Page 21 - PIÈCES DE RECHANGE
Page 21 MODÈLES EWP1306SS • EWP1366SS PIÈCES DE RECHANGE Les pièces de rechange peuvent être commandées sur notre site : www.broan-nutone.com pour les clients américains seulement p ièces de remplacement et service Pour assurer le bon fonctionnement de votre appareil, vous devez toujours utiliser de...
Page 22 - GARANTIE
Page 22 MODÈLES EWP1306SS • EWP1366SS Garantie limitée Période de garantie et exclusions : Broan NuTone LLC (la « Société ») ou Venmar Ventilation ULC et/ou son subsidiaire garantit au consommateur acheteur initial (« vous ») de son produit (le « Produit ») que celui-ci est exempt de tout vice de ma...
Page 23 - LEA Y CONSERVE ESTAS INSTRUCCIONES; INSTALADOR: DEJE ESTA GUÍA CON EL PROPIETARIO DE LA VIVIENDA.; ADVERTENCIA; Para registrar este producto
Página 23 MODELOS EWP1306SS • EWP1366SS 8. 8. CAMPANA DE ESTUFA DE CHIMENEA ! indicada solamente para cocinar en casa . ! LEA Y CONSERVE ESTAS INSTRUCCIONES PARA REDUCIR EL RIESGO DE INCENDIO, DESCARGA ELÉCTRICA O LESIONES PERSONALES, OBSERVE LO SIGUIENTE: 1. Use la unidad solo de la manera indicada...
Page 24 - LIMPIEZA Y MANTENIMIENTO; FUNCIONAMIENTO
Página 24 MODELOS EWP1306SS • EWP1366SS LIMPIEZA Y MANTENIMIENTO El mantenimiento correcto de la campana de la estufa asegurará el funcionamiento adecuado de la unidad. MOTOR El motor está permanentemente lubricado y nunca necesitará ponerle aceite. Si los cojinetes del motor están haciendo ruido ex...
Page 26 - continuación; INSTALE EL CABLEADO
Página 26 MODELOS EWP1306SS • EWP1366SS PREPARE LA CAMPANA ( continuación ) Para las instalaciones con conducto solamente: Instalar ambas clapetas al interior de la abertura de descarga del ventilador, asegurese de que las barras están en la parte superior de las clapetas. Vease la ilustración abajo...
Page 27 - INSTALE EL SOPORTE DE MONTAJE DE LA CAMPANA; MONTANTES DE PARED
Página 27 MODELOS EWP1306SS • EWP1366SS CL HD1221 INSTALE EL SOPORTE DE MONTAJE DE LA CAMPANA 1. Construya un bastidor de madera en la pared que quede al ras de la superficie interior de los montantes de la pared. Asegúrese de que: a) El bastidor esté centrado en el lugar de la instalación. b) La al...
Page 28 - INSTALACIÓN DE LA CAMPANA
Página 28 MODELOS EWP1306SS • EWP1366SS INSTALACIÓN DEL SOPORTE DE MONTAJE DEL TUBO DE HUMOS SUPERIOR 1. Si no tiene ahí un bastidor, perfore dos orificios de 5/16 pulg. de diámetro donde se muestra. Inserte los taquetes para placa de yeso en los orificios. 2. Centre el soporte sobre la ubicación de...
Page 32 - PIEZAS DE SERVICIO
Página 32 MODELOS EWP1306SS • EWP1366SS PIEZAS DE SERVICIO Se pueden hacer los pedidos de las piezas de repuesto en nuestro sitio Web. r epuestos y reparaciones Para que el aparato esté en buenas condiciones, use sólo repuestos genuinos Broan-NuTone LLC o Venmar Ventilation ULC. Los repuestos genuin...
Page 33 - GARANTÍA
Página 33 MODELOS EWP1306SS • EWP1366SS Garantía limitada Periodo y exclusiones de la garantía: Broan-NuTone LLC o Venmar Ventilation ULC (sea esta la “Compañía”) garantiza al consumidor comprador original de su producto (“usted”) que el producto (el “Producto”) estará libre de defectos en materiale...