Page 2 - IMPORTANT; Contents
2 BREVILLE RECOMMENDS SAFETY FIRST At Breville ® we are very safety conscious. We design and manufacture consumer products with the safety of you, our valued customer, foremost in mind. In addition, we ask that you exercise a degree of care when using any electrical appliance and adhere to the follo...
Page 3 - SAFETY
3 ELECTRICAL / POWER SAFETY • Do not use the appliance near the edge of a countertop or table. Ensure the surface is stable, level, heat-resistant and clean. • Do not use on a cloth-covered surface, near curtains or other flammable materials. • A fire may occur if the oven is covered or touches flam...
Page 4 - SAFETY WITH CHILDREN
4 • The use of accessories and attachments not recommended or supplied with this oven may cause injuries. • Do not store any materials, other than manufacturers recommended accessories, in this oven when not in use. • To switch off the oven, press the START/CANCEL button on the control panel. The ov...
Page 7 - DISPOSAL (caring for the
7 generates, uses and can radiate radio frequency energy and, if not installed and used in accordance with the instructions, may cause harmful interference to radio communications. However, there is no guarantee that interference will not occur in a particular installation. • If this equipment does ...
Page 9 - Components
9 Components A. 13’’ non-stick pizza panB. Wire racks (x 2) Reversible for 8 different rack positions C. 9” x 13” broiling rackD. 9’’ x 13’’ enamel roasting panE. Air fry / dehydrate basket F. Oven light G. Door handleH. Ventilation slotsI. Crumb trayJ. Breville Assist ® Plug CONFIRM Rotate Remind F...
Page 10 - Accessories sold separately:
10 K. LCD screenL. CONFIRM dial and ROTATE REMIND button M. TEMPERATURE dial and Toast and Bagel Darkness control N. TIME dial and Toast and Bagel Slice selection O. START/STOP button Start and Confirm button when using the connected guided recipes. P. OVEN LIGHT / temperature conversion button Q. C...
Page 11 - Element iQ; Functions
11 BEFORE FIRST USE This guide is designed for first time useFor safety and more information, refer to the rest of the Instruction Book. PREPARING THE OVEN In order to remove any protective substances on the heating elements, it is necessary to run the oven empty for 16 minutes. Ensure the area is w...
Page 14 - Connecting Your Oven; NOTE; STEP 5; NOTES
14 Connecting Your Oven The Joule™ Oven Air Fryer Pro is Wi-Fi- enabled and can be remotely controlled using a mobile device.*If the appliance is not connected to Wi-Fi, the oven can still be operated via the control panel in the same way as an oven with no network connection. NOTE * We are constant...
Page 15 - OPERATING YOUR BREVILLE OVEN; Oven Functions
15 OPERATING YOUR BREVILLE OVEN 1. Insert the wire rack into the desired rack position. The rack positions are conveniently printed on the left-hand side of the oven door window. There are four groove positions. The rack can be inserted either facing upwards or downwards to allow two rack positions ...
Page 17 - TOAST FUNCTION
17 PRESET FUNCTIONS: TOAST FUNCTION The TOAST function browns and crisps the outside of your bread while keeping the inside soft and moist. This function is also ideal for English muffins and frozen waffles.1. Insert the wire rack into rack position 4.2. Position bread slices as close to the center ...
Page 18 - BAGEL FUNCTION; Desired toast color
18 The number of slices is displayed as the bottom figure on the LCD screen. Turn the TIME dial to the left to reduce the number of slices, or to the right to increase it. The number of slices ranges from ‘1’ to ‘9’.6. Press the START/STOP button to start the TOAST function. The button backlight wil...
Page 19 - BAKE FUNCTION
19 3. Turn the CONFIRM dial until the indicator on the LCD screen reaches the BAKE function. The top figure on the LCD screen indicates the preset BAKE temperature of ‘325°F’, while the bottom figure indicates the preset time of ‘30:00 MIN/SEC’. The preset CONVECTION setting will also be displayed. ...
Page 20 - AIR FRY FUNCTION
20 7. Place food, positioned on the included roasting pan or other oven-proof dish, on the center of the wire rack so air will flow around all sides of the food. Close the oven door. 8. After the PREHEATING alert has sounded, the timer will automatically begin to count down. The temperature and time...
Page 21 - BROIL FUNCTION
21 NOTE You can fit a total of 4 air frying/dehydrating baskets in this oven. Visit www.breville.com for more information on purchasing additional air fry/dehydrate baskets. BROIL FUNCTION The BROIL function is ideal for cooking open- faced sandwiches, thin cuts of meat, poultry and fish, sausages a...
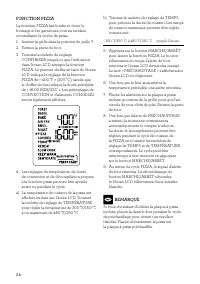
Page 22 - PIZZA FUNCTION
22 4. The roasting temperature, time and convection settings can be adjusted before or during the roasting cycle. a) The roasting temperature is displayed as the top figure on the LCD screen. Turn the TEMPERATURE dial to adjust the roasting temperature from 120°F/50°C to a maximum of 480°F/250°C. b)...
Page 23 - A NOTE ON PIZZA STONES
23 7. Place food, positioned on the included pizza pan if using, on the center of the wire rack so air will flow around all sides of the food. Close the oven door. 8. After the PREHEATING alert has sounded, the timer will automatically begin to count down. The temperature and time can be adjusted du...
Page 24 - PROOF FUNCTION
24 a) The COOKIES temperature is displayed as the top figure on the LCD screen. Turn the TEMPERATURE dial to adjust the baking temperature from 210°F/100°C to a maximum of 480°F/250°C. b) The COOKIES time is displayed as the bottom figure on the LCD screen. Turn the TIME dial to adjust the time up t...
Page 26 - TIPS FOR SLOW COOKING
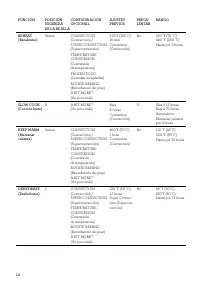
26 a) The temperature is displayed as the top figure on the LCD screen. Turn the TEMPERATURE dial to adjust slow cooking to one of two preset temperatures: ‘LOW’ or ‘HIGH’. b) The time is displayed as the bottom figure on the LCD screen. Turn the TIME dial to adjust the time between 4 and 72 hours f...
Page 27 - DEHYDRATE FUNCTION
27 4. Turn the CONFIRM dial until the indicator on the LCD screen reaches the WARM function. The top figure on the LCD screen indicates the preset temperature of ‘160°F’, while the bottom figure indicates the preset time of ‘1:00 HR/MIN’. The preset CONVECTION setting will also be displayed. 5. The ...
Page 28 - TIPS
28 5. Press the START/STOP button to activate the DEHYDRATE function. The button backlight will illuminate red, the oven alert will sound, and the LCD screen will illuminate orange. 6. The timer will be displayed and begin to count down. The temperature and time can be adjusted during the dehydratin...
Page 29 - Cleaning the outer body and door; Cleaning the interior; WARNING; Cleaning the crumb tray
29 Before cleaning, ensure the oven is turned off by removing the power plug from the power outlet.Allow the oven and all accessories to cool completely before disassembling and cleaning. Cleaning the outer body and door 1. Wipe the outer body with a soft, damp sponge. A non-abrasive liquid cleanser...
Page 31 - Troubleshooting; POSSIBLE PROBLEM
31 Troubleshooting POSSIBLE PROBLEM EASY SOLUTION Oven will not switch “ON” • Check that the power plug is securely inserted into the outlet. • Insert the power plug into an independent outlet. • Insert the power plug into a different outlet. • Reset the circuit breaker if necessary. I would like to...
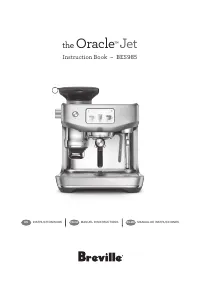
Page 33 - the
FR-CA MANUEL D'INSTRUCTIONS the Joule ™ Oven Air Fryer Pro
Page 34 - PRÉCAUTIONS; Contenu
2 BREVILLE RECOMMANDE LA SÉCURITÉ D'ABORD Chez Breville ® , la sécurité est au centre de nos préoccupations. Nous concevons et fabriquons nos produits en priorisant la sécurité de leurs utilisateurs, votre sécurité. De plus, nous vous demandons de faire preuve de prudence lors de l'utilisation de to...
Page 35 - SÉCURITÉ ET ÉLECTRICITÉ
3 • Cet appareil est prévu pour un usage exclusivement domes- tique. Ne l'utilisez dans aucun type de véhicule en mouvement. N'utilisez pas l'appareil à l'ex- térieur, ni pour aucune autre utilisation que celle prévue. Une mauvaise utilisation peut provo- quer des blessures. SÉCURITÉ ET ÉLECTRICITÉ ...
Page 41 - Composants
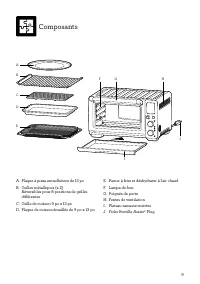
9 Composants A. Plaque à pizza antiadhésive de 13 poB. Grilles métalliques (x 2) Réversibles pour 8 positions de grilles différentes C. Grille de cuisson 9 po x 13 poD. Plaque de cuisson émaillée de 9 po x 13 po E. Panier à frire et déshydrater à l'air chaudF. Lampe de four G. Poignée de porteH. Fen...
Page 42 - Accessoires vendus séparément :
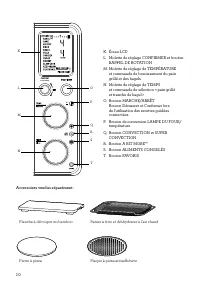
10 K. Écran LCDL. Molette de réglage CONFIRMER et bouton RAPPEL DE ROTATION M. Molette de réglage de TEMPÉRATURE et commande de brunissement du pain grillé et des bagels N. Molette de réglage de TEMPS et commande de sélection « pain grillé et tranche de bagel » O. Bouton MARCHE/ARRÊT Bouton Démarrer...
Page 43 - ELEMENT IQ; Fonctions
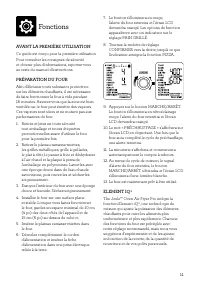
11 AVANT LA PREMIÈRE UTILISATION Ce guide est conçu pour la première utilisationPour consulter les consignes de sécurité et obtenir plus d'informations, reportez-vous au reste du manuel d'instructions. PRÉPARATION DU FOUR Afin d'éliminer toute substance protectrice sur les éléments chauffants, il es...
Page 47 - Fonctions du four
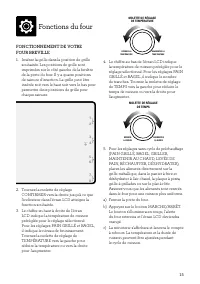
15 FONCTIONNEMENT DE VOTRE FOUR BREVILLE 1. Insérez la grille dans la position de grille souhaitée. Les positions de grille sont imprimées sur le côté gauche de la fenêtre de la porte du four. Il y a quatre positions de rainure d'insertion. La grille peut être insérée soit vers le haut soit vers le ...
Page 50 - REMARQUE
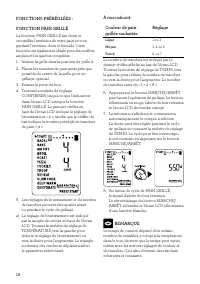
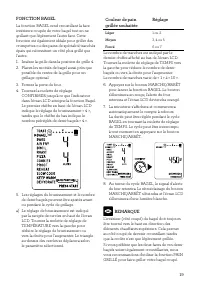
18 FONCTIONS PRÉRÉGLÉES : FONCTION PAIN GRILLÉ La fonction PAIN GRILLÉ fait dorer et croustiller l'extérieur de votre pain tout en gardant l'intérieur doux et humide. Cette fonction est également idéale pour les muffins anglais et les gaufres congelées.1. Insérez la grille dans la position de grille...
Page 51 - Réglage
19 Couleur de pain grillée souhaitée Réglage Léger 1 ou 2 Moyen 3, 4 ou 5 Foncé 6 ou 7 Le nombre de tranches est indiqué par le dernier chiffre affiché au bas de l'écran LCD. Tournez la molette de réglage de TEMPS vers la gauche pour réduire le nombre de demi- bagels ou vers la droite pour l'augment...
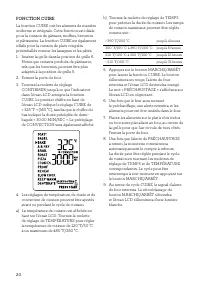
Page 52 - FONCTION CUIRE
20 FONCTION CUIRE La fonction CUIRE cuit les aliments de manière uniforme et intégrale. Cette fonction est idéale pour la cuisson de gâteaux, muffins, brownies et pâtisseries. La fonction CUIRE est également idéale pour la cuisson de plats congelés préemballés comme les lasagnes et les pâtés.1. Insé...
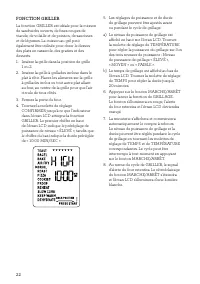
Page 54 - FONCTION GRILLER
22 FONCTION GRILLER La fonction GRILLER est idéale pour la cuisson de sandwichs ouverts, de fines coupes de viande, de volaille et de poisson, de saucisses et de légumes. La cuisson au gril peut également être utilisée pour dorer le dessus des plats en casserole, des gratins et des desserts.1. Insér...
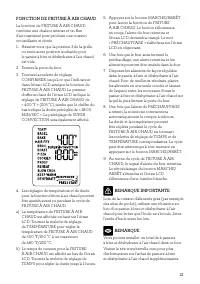
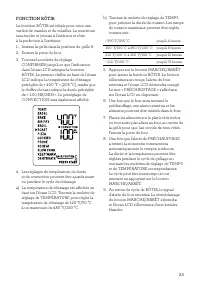
Page 55 - FONCTION RÔTIR
23 FONCTION RÔTIR La fonction RÔTIR est idéale pour cuire une variété de viandes et de volailles. La nourriture sera tendre et juteuse à l'intérieur et rôtie à la perfection à l'extérieur.1. Insérez la grille dans la position de grille 6.2. Fermez la porte du four.3. Tournez la molette de réglage CO...
Page 58 - FONCTION LEVÉE DE PAIN
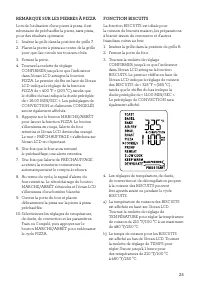
26 5. Appuyez sur le bouton COMMENCER/ ARRÊTER pour lancer la fonction BISCUITS. Le bouton s'illuminera en rétroéclairage rouge, l'alerte du four retentira et l'écran LCD deviendra orangé. Le mot « PRÉCHAUFFAGE » s'affichera sur l'écran LCD en clignotant. 6. Une fois que le four aura terminé le préc...
Page 59 - FONCTION RÉCHAUFFER
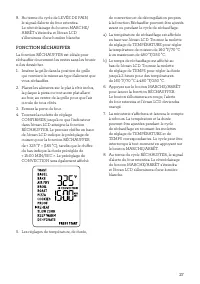
27 8. Au terme du cycle de LEVÉE DE PAIN, le signal d'alerte du four retentira. Le rétroéclairage du bouton MARCHE/ ARRÊT s'éteindra et l'écran LCD s'illuminera d'une lumière blanche. FONCTION RÉCHAUFFER La fonction RÉCHAUFFER est idéale pour réchauffer doucement les restes sans les brunir ni les de...
Page 60 - CONSEILS POUR LA FONCTION MIJOTER
28 FONCTION MIJOTER (CUISSON LENTE) La fonction Mijoter propose des profils de cuisson conçus pour de longues périodes de cuisson à basse température.1. Insérez la grille dans la position de grille 8.2. Fermez la porte du four.3. Tournez la molette de réglage CONFIRMER jusqu'à ce que l'indicateur da...
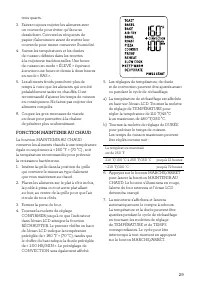
Page 61 - FONCTION MAINTENIR AU CHAUD
29 trois quarts. 3. Faites toujours mijoter les aliments avec un couvercle pour éviter qu'ils ne se dessèchent. Couvrez les récipients de papier d'aluminium avant de mettre leur couvercle pour mieux conserver l'humidité. 4. Suivez les températures et les durées de cuisson définies dans les recettes ...
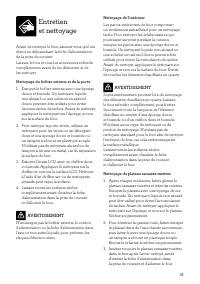
Page 63 - Nettoyage du boîtier externe et de la porte; Nettoyage de l'intérieur; AVERTISSEMENT; Nettoyage du plateau ramasse-miettes
31 Avant de nettoyer le four, assurez-vous qu'il est éteint en débranchant la fiche d'alimentation de la prise de courant.Laissez le four et tous les accessoires refroidir complètement avant de les démonter et de les nettoyer. Nettoyage du boîtier externe et de la porte 1. Essuyez le boîtier externe...
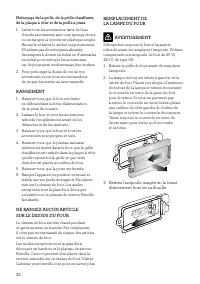
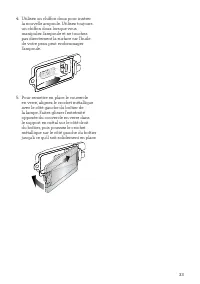
Page 64 - Retirez l'ampoule usagée en la tirant
32 Nettoyage de la grille, de la grille chauffante, de la plaque à rôtir et de la poêle à pizza 1. Lavez tous les accessoires dans de l'eau chaude savonneuse avec une éponge douce ou un tampon à récurer en plastique souple. Rincez-le et faites-le sécher soigneusement. N'utilisez pas de nettoyants ab...
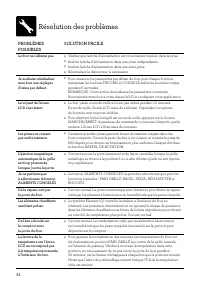
Page 66 - Résolution des problèmes; SOLUTION FACILE
34 Résolution des problèmes PROBLÈMES POSSIBLES SOLUTION FACILE Le four ne s'allume pas. • Vérifiez que la fiche d'alimentation est correctement insérée dans la prise. • Insérez la fiche d'alimentation dans une prise indépendante. • Insérez la fiche d'alimentation dans une autre prise. • Réinitialis...
Page 68 - Notes
Page 70 - RACIONES; Contenido
2 BREVILLE RECOMIENDA PRIORIZAR LA SEGURIDAD En Breville ® somos muy conscientes de lo importante que es la seguridad. La seguridad es nuestra prioridad a la hora de diseñar y fabricar productos para clientes como usted. En este sentido, le pedimos ejercer suma precaución al usar cualquier aparato e...
Page 71 - SEGURIDAD ELÉCTRICA
3 promocionales antes de usar el horno por primera vez. • El equipo es para uso exclusivo en el hogar. No use el equipo en ningún tipo de vehículos en movimiento. No use este equipo al aire libre o para otro fin distinto al previsto. El mal uso puede causar lesiones. SEGURIDAD ELÉCTRICA • No use el ...
Page 77 - Componentes
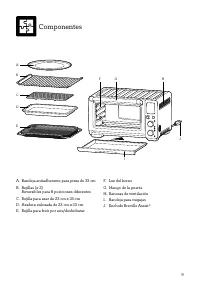
9 Componentes A. Bandeja antiadherente para pizza de 33 cmB. Rejillas (x 2) Reversibles para 8 posiciones diferentes C. Rejilla para asar de 23 cm x 33 cmD. Asadera enlozada de 23 cm x 33 cmE. Rejilla para freír por aire/deshidratar F. Luz del horno G. Mango de la puertaH. Ranuras de ventilaciónI. B...
Page 78 - Accesorios que se venden por separado:
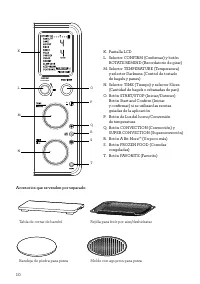
10 K. Pantalla LCDL. Selector CONFIRM (Confirmar) y botón ROTATE REMIND (Recordatorio de girar) M. Selector TEMPERATURE (Temperatura) y selector Darkness (Control de tostado de bagels y panes) N. Selector TIME (Tiempo) y selector Slices (Cantidad de bagels o rebanadas de pan) O. Botón START/STOP (In...
Page 79 - Funciones
11 ANTES DEL PRIMER USO Este manual está diseñado para el primer uso.Para mayor seguridad y conocer más, consulte el resto del manual de instrucciones. CÓMO PREPARAR EL HORNO Es necesario hacer funcionar el horno vacío durante 16 minutos para eliminar cualquier sustancia protectora de los elementos ...
Page 84 - CÓMO USAR SU HORNO BREVILLE
16 CÓMO USAR SU HORNO BREVILLE 1. Inserte la rejilla en la posición deseada. Para su conveniencia, las posiciones de las rejillas están impresas en el lado izquierdo del vidrio de la puerta del horno. Hay cuatro posiciones de la ranura. La rejilla se puede insertar mirando hacia arriba o hacia abajo...
Page 87 - FUNCIONES PREESTABLECIDAS:; Siga estas instrucciones generales:; Configuración; NOTA
19 FUNCIONES PREESTABLECIDAS: FUNCIÓN TOAST (TOSTAR) La función TOAST (Tostar) dora y deja crujiente el exterior del pan, mientras mantiene el interior suave y húmedo. Esta función también es ideal para muffins ingleses y wafles congelados.1. Inserte la rejilla en la posición número 4.2. Ponga las r...
Page 90 - IMPORTANTE
22 FUNCIÓN AIR FRY (FREÍR POR AIRE) La función AIR FRY (Freír por aire) combina calor intenso y flujo de aire maximizado para cocinar alimentos y dejarlos crujientes y dorados.1. Asegúrese de que la posición 3 u otra posición deseada esté vacía para la rejilla para freír por aire/deshidratar. 2. Cie...
Page 92 - FUNCIÓN PIZZA
24 en 1:00 H/MIN. También se mostrará la configuración del ajuste CONVECTION (Convección) preestablecida. 4. La temperatura de rostizado, el tiempo y la configuración de convección se pueden ajustar antes o durante el ciclo de rostizado. a) La cifra en la parte superior en la pantalla LCD muestra la...
Page 99 - CONSEJOS
31 (Temperatura) o TIME (Tiempo). El ciclo se puede detener en cualquier momento presionando el botón START/STOP (Iniciar/Detener). 7. Al final del ciclo DEHYDRATE (Deshidratar) sonará la alerta del horno. La luz del botón START/STOP (Iniciar/ Detener) desaparecerá y la pantalla LCD se iluminará de ...
Page 100 - Limpieza de la parte exterior y la puerta; Limpieza del interior; ADVERTENCIA; Limpieza de la bandeja para migajas
32 Antes de limpiar, asegúrese de que el horno esté apagado quitando el enchufe del toma de corriente.Deje que el horno y todos sus accesorios se enfríen por completo antes de desarmarlo y limpiarlo. Limpieza de la parte exterior y la puerta 1. Limpie la parte exterior con una esponja suave y húmeda...
Page 106 - Notas
Page 108 - Breville Consumer Support; Breville USA; USA
Breville is a registered trademark of Breville Pty. Ltd. A.B.N. 98 000 092 928. Copyright Breville Pty. Ltd. 2020. • Due to continued product improvement, the products illustrated/photographed in this brochure may vary slightly from the actual product. • En raison de son amélioration continue, le pr...


 Breville BES985BSS1BNA1
User Manual
Breville BES985BSS1BNA1
User Manual
 Breville BRC800
User Manual
Breville BRC800
User Manual
 Breville BBL620W
Manual
Breville BBL620W
Manual
 Breville BGR350
User Manual
Breville BGR350
User Manual
 Breville BMC700
User Manual
Breville BMC700
User Manual
 Breville BMO735
User Manual
Breville BMO735
User Manual
 Breville BOV905
Manual
Breville BOV905
Manual
 Breville BFP610
Manual
Breville BFP610
Manual
 Breville BFP638
User Manual
Breville BFP638
User Manual
 Breville BBL920 BLENDER
Manual
Breville BBL920 BLENDER
Manual
 Breville BES985
User Manual
Breville BES985
User Manual
 Breville LRC470
User Manual
Breville LRC470
User Manual
 Breville OPTIONALLY
User Manual
Breville OPTIONALLY
User Manual