Breville BOV900BSSUSC - Manuals
Breville BOV900BSSUSC – User Manual in PDF format online.
Manuals:
User Manual Breville BOV900BSSUSC
Summary
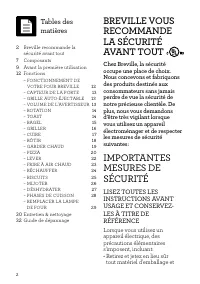
2 BREVILLE RECOMMENDS SAFETY FIRST At Breville we are very safety conscious. We design and manufacture consumer products with the safety of you, our valued customer, foremost in mind. In addition we ask that you exercise a degree of care when using any electrical appliance and adhere to the followin...
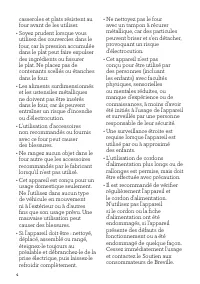
4 • The use of accessories and attachments not recommended or supplied with this oven may cause injuries. • Do not store any materials, other than manufacturers recommended accessories, in this oven when not in use. • This appliance is for household use only. Do not use in any type of moving vehicle...
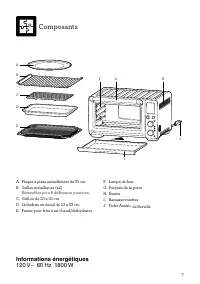
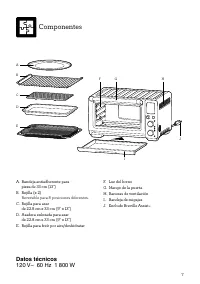
7 Components A. 13" non-stick pizza panB. Wire rack (x 2) Reversible for 8 different rack positions. C. 9" x 13" broiling rackD. 9" x 13" enamel roasting panE. Air fry/dehydrate basket F. Oven lightG. Door handleH. Ventilation slotsI. Crumb trayJ. Breville Assist ‰ Plug F I J G H...
8 K. LCD screenL. SELECT/CONFIRM dial and ROTATE REMIND button M. TEMPERATURE dial/toast and bagel darkness control N. TIME dial/toast and bagel slice selectionO. START/STOP buttonP. OVEN LIGHT buttonQ. CONVECTION buttonR. PHASE COOK buttonS. FROZEN FOOD buttonT. TEMPERATURE CONVERSION button and vo...
9 This guide is designed for first time use.For safety and more information, refer to the rest of the Instruction Book. PREPARING THE OVEN In order to remove any protective substances on the heating elements, it is necessary to run the oven empty for 20 minutes. Ensure the area is well ventilated as...
10 OVEN FUNCTIONS OVERVIEW FUNCTION SUGGESTED RACK POSITION OPTIONAL SETTINGS PRESETS PREHEAT RANGE TOAST 4 FROZEN FOODS Darkness 4 Slices 4 No Darkness 1–7Slices 1–9 BAGEL 4 FROZEN FOODS Darkness 4 Slices 4 No Darkness 1–7Slices 1–10 BROIL 1 – 2 HIGH No LOW, MED, HIGHUp to 20 MIN BAKE 6 CONVECTIONT...
12 Functions OPERATING YOUR BREVILLE OVEN 1. Insert the wire rack into the desired rack position. The rack positions are conveniently printed on the left-hand side of the oven door window. There are four groove positions. The rack can be inserted either facing upwards or downwards to allow two rack ...
14 a) The darkness setting is indicated by the row of circles at the top of the LCD screen. Turn the TEMPERATURE dial to the left to reduce the darkness setting, or to the right to increase it. The triangle above the circles will move according to the selected setting. As general guide: Desired toas...
15 BAGEL FUNCTION The BAGEL function crisps the insides of your cut bagel while only lightly toasting the outside. This function is also ideal for toasting crumpets or thick sliced specialty breads which require one side to be toasted more than the other.1. Insert the wire rack into rack position 4....
18 ROAST FUNCTION The ROAST function is ideal for cooking a variety of meats and poultry. Food will be tender and juicy on the inside and roasted to perfection on the outside.1. Insert the wire rack into rack position 6.2. Close the oven door.3. Turn the SELECT/CONFIRM dial until the indicator on th...
19 WARM FUNCTION The WARM function maintains hot foods at the recommended temperature to prevent bacterial growth, 160°F/70°C or above.1. Insert the wire rack into a rack position that best suits the type of food you are keeping warm. 2. Place food, positioned on the included roasting pan, pizza pan...
20 PIZZA FUNCTION The PIZZA function melts and browns cheese and toppings, while crisping up the pizza crust.1. Insert the wire rack into rack position 7.2. Close the oven door.3. Turn the SELECT/CONFIRM dial until the indicator on the LCD screen reaches the PIZZA function. The top figure on the LCD...
21 A note on pizza stones When using a pizza stone, it is necessary to preheat the stone, without a pizza, for optimum results.1. Insert the wire rack into rack position 7.2. Place pizza stone on the center of the wire rack so air will flow around all sides of the stone. 3. Close the door.4. Turn th...
23 REHEAT FUNCTION The REHEAT function is ideal for gently reheating leftovers without browning or drying them out.1. Insert the wire rack into a rack position that best suits the type of food you are reheating. 2. Place food, positioned on the included roasting pan, pizza pan or other oven-proof di...
24 COOKIES FUNCTION The COOKIES function is ideal for baking homemade or commercially prepared cookies and other baked treats.1. Insert the wire rack into rack position 6.2. Close the oven door.3. Turn the SELECT/CONFIRM dial until the indicator on the LCD screen reaches the COOKIES function. The to...
29 Care & Cleaning Before cleaning, ensure the oven is turned off by removing the power plug from the power outlet.Allow the oven and all accessories to cool completely before disassembling and cleaning. Cleaning the outer body and door 1. Wipe the outer body with a soft, damp sponge. A non-abra...
30 Cleaning the wire rack, broiling rack, roasting pan and pizza pan 1. Wash all accessories in warm soapy water with a soft sponge or soft plastic scouring pad. Rinse and dry thoroughly. Do not use abrasive cleansers, metal scouring pads or metal utensils to clean any of the accessories as they may...
31 Troubleshooting POSSIBLE PROBLEM EASY SOLUTION Oven will not switch "ON" • Check that the power plug is securely inserted into the outlet. • Insert the power plug into an independent outlet. • Insert the power plug into a different outlet. • Reset the circuit breaker if necessary. I would...
FR-CA MANUEL D'INSTRUCTIONS the Smart Oven ® Air Fryer Pro
2 BREVILLE VOUS RECOMMANDE LA SÉCURITÉ AVANT TOUT Chez Breville, la sécurité occupe une place de choix. Nous concevons et fabriquons des produits destinés aux consommateurs sans jamais perdre de vue la sécurité de notre précieuse clientèle. De plus, nous vous demandons d’être très vigilant lorsque v...
5 • L'entretien doit être effectué par un représentant de service autorisé. • Cet appareil n'est pas conçu pour fonctionner à l'aide d'une minuterie externe ou d'un système de contrôle à distance. AVERTISSEMENT Pour prévenir le risque d'électrocution, débranchez l'appareil avant de le nettoyer. INST...
6 USAGE DOMESTIQUE SEULEMENT CONSERVEZ CES INSTRUCTIONS COURT CORDON D'ALIMENTATION Votre appareil Breville est muni d'un court cordon d'alimentation très sécuritaire qui réduit les risques de blessures ou de dommages pouvant résulter du fait de tirer, trébucher ou s'enchevêtrer dans un cordon plus ...
7 Composants A. Plaque à pizza antiadhésive de 33 cmB. Grilles métalliques (x2) Réversibles pour 8 différentes positions. C. Grilloir de 23 x 33 cmD. Lèchefrite en émail de 23 x 33 cmE. Panier pour frire à air chaud/déshydrater F. Lampe de fourG. Poignée de la porteH. ÉventsI. Ramasse-miettesJ. Fich...
8 K. Écran ACLL. Cadran SÉLECTION/CONFIRMER et bouton RAPPEL ROTATION M. Cadran de TEMPÉRATURE/coloration de toast & bagel N. Cadran de TEMPS/nombre de tranches de toast & bagel O. Bouton MARCHE/ARRÊTP. Bouton pour LAMPE DE FOURQ. Bouton de CONVECTIONR. Bouton de PHASES DE CUISSONS. Bouton p...
9 Ce guide est conçu pour la première utilisation.Pour plus d'information et de sécurité, consultez le reste du manuel d'instructions. PRÉPARER LE FOUR Afin d'éliminer toutes les substances protectrices sur les éléments chauffants, il est nécessaire de faire fonctionner le four à vide durant 20 minu...
10 SURVOL DES FONCTIONS DU FOUR FONCTION POSITION DE GRILLE SUGGÉRÉE RÉGLAGES OPTIONNELS PRÉRÉGLAGES PRÉ- CHAUFFAGE ÉCHELLE TOAST 4 FROZEN (CONGELÉS) Coloration 4Tranches 4 Non Coloration 1-7Tranches 1-9 BAGEL 4 FROZEN (CONGELÉS) Coloration 4Tranches 4 Non Coloration 1-7Tranches 1-10 BROIL (GRILLER)...
12 Fonctions FONCTIONNEMENT DE VOTRE FOUR BREVILLE 1. Insérez la grille à la position désirée. Les positions de la grille sont imprimées sur le côté gauche de la porte vitrée. La grille peut être insérée dans l'une ou l'autre des quatre rainures, à l'endroit ou à l'envers, doublant ainsi le nombre d...
20 5. Les réglages de température, de temps et de convection peuvent être ajustés avant ou durant le cycle de maintien au chaud. a) Le chiffre du haut sur l'écran ACL indique la température de maintien au chaud. Tournez le cadran de TEMPÉRATURE pour ajuster la température de 110°F/45°C à un maximum ...
21 5. Appuyez sur le bouton MARCHE/ARRÊT pour activer la fonction PIZZA. Le bouton sera rétroéclairé en rouge, le signal sonore se fera entendre et l'écran ACL s'illuminera en orange. Le message 'PREHEATING' (PRÉCHAUFFAGE) clignotera sur l'écran ACL. 6. Une fois la température atteinte, le signal so...
30 Entretien & nettoyage Avant de nettoyer le four, assurez-vous qu'il est éteint en le débranchant de la prise électrique.Laissez le four et les accessoires refroidir complètement avant le retrait des pièces et le nettoyage. Nettoyer le boîtier et la porte 1. Essuyez l'extérieur du four avec un...
31 Nettoyer la grille, le grilloir, la lèchefrite et la plaque à pizza 1. Lavez tous les accessoires à l'eau chaude savonneuse à l'aide d'une éponge douce ou d'un tampon à récurer en plastique souple. Rincez et séchez complètement. Ne nettoyez aucun des accessoires avec un nettoyant abrasif, un tamp...
32 Guide de dépannage PROBLÈME POSSIBLE SOLUTION FACILE Le four ne se met pas sous tension • Vérifiez si la fiche d'alimentation est bien insérée dans la prie électrique. • Branchez le cordon d'alimentation dans une prise indépendante. • Branchez le cordon d'alimentation dans une autre prise. • Réin...
2 BREVILLE RECOMIENDA ANTEPONER LA SEGURIDAD En Breville somos muy conscientes de lo importante que es la seguridad. La segu ridad es nuestra prioridad a la hora de diseñar y fabricar productos para clientes como usted. En pos de su seguridad, le pedimos que ejerza suma precaución al usar cualquier...
5 • El servicio debe ser realizado por un representante del servicio autorizado. • El aparato no se destina para ponerse en funcionamiento por medio de un temporizador externo o sistema de control separado. ADVERTENCIA Para evitar descargas eléctricas, desenchufe el equipo antes de limpiarlo. INSTRU...
7 Datos técnicos A. Bandeja antiadherente para pizza de 33 cm (13") B. Rejilla (x 2) Reversible para 8 posiciones diferentes. C. Rejilla para asar de 22.8 cm x 33 cm (9" x 13") D. Asadera enlozada para asar de 22.8 cm x 33 cm (9" x 13") E. Rejilla para freír por aire/deshidratar ...
8 K. Pantalla LCDL. Selector SELECT/CONFIRM (Seleccionar/ Confirmar) y botón ROTATE REMIND (Recordatorio de girar) M. Selector TEMPERATURE/DARKNESS (Temperatura/Tostado) controla el nivel de tostado de bagels y tostadas N. Selector Time/toast (Tiempo/tostadas) y selección de rebanadas de bagel O. Bo...
9 Este manual está diseñado para el primer uso.Para mayor seguridad y más información, consulte el resto del manual de instrucciones. CÓMO PREPARAR EL HORNO Es necesario hacer funcionar el horno vacío durante 20 minutos para eliminar cualquier sustancia protectora de los elementos de calefacción. As...
10 DESCRIPCIÓN GENERAL DE LAS FUNCIONES DEL HORNO FUNCIÓN POSICIÓN SUGERIDA DE LA REJILLA CONFIGURACIÓN OPCIONAL AJUSTES PREVIOS PRECALENTAR RANGO TOAST (Tostar) 4 FROZEN FOODS (Comidas congeladas) Tostado 4Rebanadas 4 No Tostado 1 – 7Rebanadas 1 – 9 BAGEL 4 FROZEN FOODS (Comidas congeladas) Tostad...
12 CÓMO USAR SU HORNO BREVILLE 1. Inserte la rejilla en la posición deseada. Para su conveniencia, las posiciones de las rejillas están impresas en el lado izquierdo del vidrio de la puerta del horno. Hay cuatro posiciones de la ranura. La rejilla se puede insertar mirando hacia arriba o hacia abajo...
15 5. La configuración del nivel de tostado y el número de rebanadas se pueden ajustar antes o durante el ciclo de tostado. a) La configuración del nivel de tostado se indica mediante la línea de círculos en la parte superior de la pantalla LCD. Gire el selector TEMPERATURE (Temperatura) hacia la iz...
16 b) La cifra en la parte inferior de la pantalla LCD muestra la cantidad de mitades de bagel. Gire el selector TIME (Tiempo) hacia la izquierda para reducir la cantidad de mitades de bagel o hacia la derecha para aumentarlo. El número de mitades va desde 1 a 10. 6. Presione el botón START/STOP (In...
20 9. Al final del ciclo ROAST (ROSTIZAR) sonará la alerta del horno. La luz del botón START/ STOP (Iniciar/Detener) desaparecerá y la pantalla LCD se iluminará de color blanco. FUNCIÓN WARM (CALENTAR) La función WARM (CALENTAR) mantiene los alimentos calientes a la temperatura recomendada para evit...
21 3. Gire el selector SELECT/CONFIRM (Seleccionar/Confirmar) hasta que el indicador en la pantalla LCD esté en la función PIZZA. La cifra en la parte superior de la pantalla LCD indica la temperatura preestablecida para el ciclo BAKE (pizza) en 190 °C, mientras que la cifra en la parte inferior mue...
28 CONSEJOS • Use papel para hornear encima de la rejilla para freír por aire/deshidratar al deshidratar alimentos con colores fuertes para evitar manchas. • Al deshidratar alimentos que puedan gotear, como la cecina marinada, use la asadera incluida para atrapar cualquier líquido que gotee. Inserte...
30 Antes de limpiar, asegúrese de que el horno esté apagado quitando el enchufe del tomacorriente.Deje que el horno y todos sus accesorios se enfríen por completo antes de desarmarlo y limpiarlo. Limpieza de la parte exterior y la puerta 1. Limpie la parte exterior con una esponja suave y húmeda. Se...
31 Limpieza de la rejilla, rejilla para asar, asadera y bandeja para pizza 1. Lave todos los accesorios en agua jabonosa tibia con una esponja suave o una almohadilla de plástico suave. Enjuague y seque completamente. No utilice limpiadores abrasivos, esponjas metálicas ni utensilios metálicos para ...
32 POSIBLES PROBLEMAS SOLUCIÓN SENCILLA El horno no se enciende • Compruebe que el enchufe de alimentación esté bien insertado en el tomacorriente. • Enchufe el cable de alimentación en un tomacorriente independiente. • Enchufe el cable de alimentación en un tomacorriente distinto. • Restablezca el ...
Breville is a registered trademark of Breville Pty. Ltd. A.B.N. 98 000 092 928. Copyright Breville Pty. Ltd. 2021. • Due to continued product improvement, the products illustrated/photographed in this brochure may vary slightly from the actual product. • En raison de son amélioration continue, le pr...
Breville Manuals
-
Breville BES985BSS1BNA1
User Manual
-
Breville BRC800
User Manual
-
Breville LRC800
User Manual
-
Breville BBL620W
Manual
-
Breville BGR350
User Manual
-
Breville LGR350
User Manual
-
Breville BMC700
User Manual
-
Breville LMC700
User Manual
-
Breville BMO735
User Manual
-
Breville BMO735
Manual
-
Breville BOV905
Manual
-
Breville BFP610
Manual
-
Breville BFP610
User Manual
-
Breville BFP638
User Manual
-
Breville BFP638
Manual
-
Breville BBL920 BLENDER
Manual
-
Breville BES985
User Manual
-
Breville BES985
Manual
-
Breville LRC470
User Manual
-
Breville OPTIONALLY
User Manual