Page 2 - READ ALL INSTRUCTIONS; Contents
2 BREVILLE RECOMMENDS SAFETY FIRST At Breville we are very safety conscious. We design and manufacture consumer products with the safety of you, our valued customer, foremost in mind. In addition we ask that you exercise a degree of care when using any electrical appliance and adhere to the followin...
Page 6 - Components
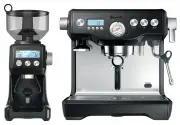
6 Components A. Integrated conical burr grinder With removable 280g bean hopper. B. Top-fill 2.5L removable water tank With integrated water filter and backlit level indicator. C. Grind size dial Adjust grind size to suit your coffee beans. D. Touch screen control panel Displays current settings and...
Page 7 - removal magnet; ACCESSORIES
7 A E F I G H J D C K L M B A. Stainless steel milk jugB. 2 cup filter basketC. 1 cup filter basketD. Water filter holder with filterE. Cleaning discF. Mini grinds binG. Grinder burr brush H. Grind outlet brush & tamp removal magnet I. Cleaning tool for steam wand tipJ. Two allen keysK. Steam wa...
Page 9 - Assembly; BEFORE FIRST USE; Machine Preparation; TIP; NOTE
9 Assembly BEFORE FIRST USE Machine Preparation Remove and discard all labels and packaging materials attached to your espresso machine. Ensure you have removed all parts and accessories before discarding the packaging.Remove the water tank located at the back of the machine by pulling down the wate...
Page 10 - Functions; FIRST USE
10 Functions FIRST USE 1. Press POWER button to turn the machine on. 2. Follow the instructions on screen to guide you through first use setup. 3. After completing setup, the machine will tell that it is ready to use. Select the guide to find out more about your Oracle Touch or to exit and proceed t...
Page 11 - DRINK SELECTION; To enter Drinks Menu screen, touch the Home icon; Select your drink; Cappuccino; Single
11 DRINK SELECTION To enter Drinks Menu screen, touch the Home icon . Swipe & select your drink. Touch the 'Help & Tip' icon to see Oracle Touch Guide. Select your drink Espresso Long Black Latte Flat White Cappuccino NOTE Please keep the touch screen dry and clean to ensure that the machine...
Page 13 - TEXTURING MILK; Wipe the; Wipe the wand & tip with a clean damp cloth.; LONG BLACK; PRESET; The brewed amounts are approximate only.
13 TEXTURING MILK Different brands and types of milk and milk alternatives will texture differently. You may need to adjust the froth level accordingly. Start with fresh cold milk. Fill milk jug to below the spout position. Lift steam wand and insert into milk jug. Lower steam wand, ensuring it is f...
Page 14 - Add New; SETTINGS
14 HOT WATER The HOT WATER function can be used to pre- heat cups or add hot water manually.To start & stop hot water, touch 'Hot Water' on the screen. To ensure water is dispensed at the correct temperature, hot water will cease to dispense after approx. 30 seconds. Depending on the size of you...
Page 15 - ADJUSTING CONICAL BURRS; We recommend making only one adjustment at a time.; TRANSPORTING AND STORING; to extreme cold temperatures.
15 ADJUSTING CONICAL BURRS Some types of coffee may require a wider grind range to achieve an ideal extraction or brew. A feature of the built-in grinder is the ability to extend this range with an adjustable upper burr. We recommend making only one adjustment at a time. Move adjustable top burr, 1 ...
Page 16 - Tips; Heating your cup or glass; THE GRIND; and bitter in flavour.; PURGING THE GROUP HEAD
16 Tips PRE-HEATING Heating your cup or glass A warm cup will help maintain the coffee’s optimal temperature. Pre-heat your cup by rinsing with hot water from the hot water outlet and place on the cup warming tray. Heating the portafilter and filter basket A cold portafilter and filter basket can re...
Page 17 - EXTRACTION GUIDE; After texturing is complete
17 The flavour of your coffee will depend on many factors, such as the type of coffee beans, degree of roast, freshness, coarseness or fineness of the grind. Experiment by adjusting these factors just one at a time to achieve the taste of your preference. EXTRACTION GUIDE EXTRACTION TYPES GRIND SHOT...
Page 18 - COFFEE BEAN HINTS & TIPS; COLOUR TOUCH SCREEN DISPLAY; INSTALLING THE WATER FILTER
18 COFFEE BEAN HINTS & TIPS • Fresh, quality coffee beans will give you the best possible extraction. • We recommend quality 100% Arabica beans with a ‘Roasted On’ date stamped on the bag, not a ‘Best Before’ or ‘Use By’ date. • Coffee beans are best consumed between 5-20 days after the ‘Roasted...
Page 19 - CLEANING CONICAL BURRS; when grinding for espresso.
19 CLEANING CONICAL BURRS Regular cleaning helps the burrs achieve consistent grinding results which is especially important when grinding for espresso. 13 Replace & lock hopper Remove beans Run grinder until empty Unlock & remove hopper Remove upper burr Unlock hopper 1 2 3 4 5 6 Clean lowe...
Page 20 - Steam Wand Cleaning Powder
20 CLEANING THE STEAM WAND IMPORTANT After every use, thoroughly wipe the steam wand and tip with a damp cloth & purge immediately. Failure to clean the steam wand may affect the milk texturing performance. • If any of the holes in the tip of the steam wand become blocked, ensure the machine sto...
Page 21 - If you’ve just finished using
21 CLEAR WATER BACKFLUSH • After each coffee making session we recommend doing a clear water backflush before you turn off the machine. Empty drip tray. Insert the cleaning disc into the filter basket then insert the portafilter into the group head. Touch the 'Brew' button and allow pressure to buil...
Page 22 - Troubleshooting; PROBLEM
22 Troubleshooting PROBLEM POSSIBLE CAUSE WHAT TO DO Grinder Motor starts but no ground coffee coming from grind outlet • No coffee beans in bean hopper. • Grinder/bean hopper is blocked. • Coffee bean may have become stuck in hopper. • Fill bean hopper with fresh coffee beans. • Remove bean hopper....
Page 26 - Notes
26 Notes BES990_ANZ_IB_A16.indd 26 16/12/2016 9:56 am
Page 28 - AUSTRALIA; Breville Customer Service Centre
Web: www.breville.co.nz Web: www.breville.com.au Breville is a registered trademark of Breville Pty. Ltd. A.B.N. 98 000 092 928. Copyright Breville Pty. Ltd. 2016. Due to continued product improvement, the products illustrated/photographed in this brochure may vary slightly from the actual product. ...