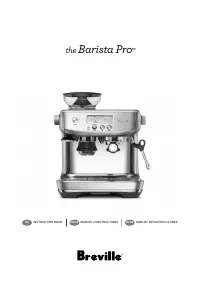
Page 2 - READ ALL; Contents
2 BREVILLE RECOMMENDS SAFETY FIRST At Breville we are very safety conscious. We design and manufacture consumer products with the safety of you, our valued customer, foremost in mind. In addition we ask that you exercise a degree of care when using any electrical appliance and adhere to the followin...
Page 5 - WARNING; SPECIFIC
5 WARNING To avoid the risk of injury, do not open the brew chamber during the brew process.• Ensure the portafilter is firmly inserted and secured into the group head before starting an extraction. Never remove the portafilter during the extraction process. • Caution must be used during descaling a...
Page 6 - FOR HOUSEHOLD USE ONLY; BREVILLE ASSIST
6 SHORT CORD INSTRUCTIONS Your Breville appliance is fitted with a short power cord to reduce personal injury or property damage resulting from pulling, tripping or becoming entangled with a longer cord. Longer detachable power cords or extension cords are available and may be used if care is exerci...
Page 7 - Rating Information; Components
7 Rating Information A. ½ lb (250g) bean hopper With locking system for easy removal, storage and transfer of c offee beans. B. Integrated conical burr grinder C. GRIND SIZE selector 30 espresso grind setting s from fine to coarse. D. POWER button E. Integrated removable 54mm tamper F. Grinder outle...
Page 8 - ACCESSORIES; With MIN and MAX markings.; All parts of the Barista ProTM
8 ACCESSORIES 1. Stainless steel milk jug With MIN and MAX markings. 2. Dual wall filter baskets (1 cup & 2 cup) Use with pre-ground coffee. 3. Single wall filter baskets (1 cup & 2 cup) Use when grinding fresh whole coffee beans. 4. Water filter and filter holder All parts of the Barista Pr...
Page 9 - Barista Pro; Features
9 THERMOJET™ HEATING SYSTEM Innovative heating system achieves ideal extraction temperature in 3 seconds. INTEGRATED CONICAL BURR GRINDER Precision conical burrs maximize ground coffee surface area for a full espresso flavor. Upper and lower burrs are removable for cleaning. ADJUSTABLE GRIND SIZE 30...
Page 10 - Machine Preparation; INSTALL; INSTALL; Assembly
10 BEFORE FIRST USE Machine Preparation Remove and discard all labels and packaging materials attached to your espresso machine. Ensure you have removed all parts and accessories before discarding the packaging. Remove the packaging and the plastics bags containing the water filter and water filter ...
Page 12 - Functions; TURNING OFF THE MACHINE
12 Functions TURNING OFF THE MACHINE To turn the machine off, press the POWER button. Alternatively, the machine has auto-off, if it is not used for 30 minutes. FILTER BASKETS This machine includes 4 filter baskets; 2 x Single Wall and 2 x Dual Wall.Single Wall filter baskets should be used when gri...
Page 13 - FINER
13 THE GRIND When grinding coffee beans, the grind size should be fine, but not too fine. The grind size will affect the rate at which water flows through the ground coffee in the filter basket and the taste of the espresso.If the grind is too fine (looks like powder and feels like flour when rubbed...
Page 14 - TAMPING THE GROUND COFFEE; NOTE; TRIMMING THE DOSE
14 TAMPING THE GROUND COFFEE • Remove the portafilter from the grinding cradle. • Tap the portafilter several timers to collapse and distribute the coffee evenly in the filter basket. • Using the tamper, tamp down firmly (approx. 15-20kg of pressure). The amount of pressure is not as important as th...
Page 15 - consistency of dripping honey.
15 EXTRACTING ESPRESSO • As a guide the espresso will start to flow after 8–12 seconds (infusion time) and should be the consistency of dripping honey. • If the espresso starts to flow after less than 7 seconds, you have either under dosed the filter basket and /or the grind is too coarse. This is a...
Page 17 - TEXTURING MILK
17 RESETTING TO DEFAULTS • Press the MENU button to enter the main menu. • Use the GRIND AMOUNT dial to navigate the menu and select RESET DEFAULTS. • The machine will beep.• The GRIND AMOUNT, FILTER SIZE, SHOT TEMP, 1 CUP and 2 CUP SHOT settings will all return to the default settings. The machine ...
Page 18 - ADJUSTING CONICAL BURRS
18 ADJUSTING CONICAL BURRS Some types of coffee may require a wider grind range to achieve an ideal extraction or brew. A feature of your Barista Pro™ is the ability to extend this range with an adjustable upper burr. We recommend making only one adjustment at a time. 6 77 FIN E C OA RS E 4 PUSH 2 A...
Page 19 - REPLACING THE WATER FILTER; and locking into place.
19 Care & Cleaning CAUTION: To prevent damage to the appliance, do not use alkaline cleaning agents when cleaning, use a soft cloth and mild detergent. REPLACING THE WATER FILTER INSTALL WATER FILTER 2 Rinse filter 2 4 3 6 Replace water tank Assemble Set date + 2 months Install filter in tank 5 ...
Page 20 - FLUSH CLEANING CYCLE; DESCALING
20 FLUSH CLEANING CYCLE The LCD will display a FLUSH alert when a cleaning cycle is required. The cleaning cycle is separate from descaling. PRE-INFUSE SHOT STEAM SEC AMOUNT MANUAL PAUSED HOT WATER FLUSH RESET DEFAULTS DESCALE IN PROGRESS FILL TANK GRIND DOUBLE SINGLE LOCK HOPPER GRIND SIZE SHOT TEM...
Page 21 - CLEANING THE CONICAL BURR GRINDER; ADVANCED CLEANING FOR THE CONICAL BURR GRINDER; Care should be taken as the grinder burrs are extremely sharp.
21 CLEANING THE CONICAL BURR GRINDER This grinder cleaning cycle removes oil build-up on the burrs which can impede performance. Unlock hopper Empty hopper Replace hopper Lock hopper Run grinder empty Unlock hopper Remove hopper Remove top burr Unlock top burr Clean top burr with brush Clean lower b...
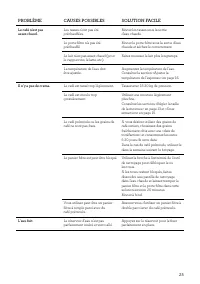
Page 23 - Troubleshooting; PROBLEM; Espresso only drips
23 Troubleshooting PROBLEM POSSIBLE CAUSES EASY SOLUTION Water does not flow from the group head.No hot water. Water tank is empty. Fill tank. Water tank is not fully inserted and locked into position. Push water tank down completely to lock into place. Machine needs to be descaled. Perform descale ...
Page 25 - Coffee not hot enough.
25 PROBLEM POSSIBLE CAUSES EASY SOLUTION Coffee not hot enough. Cups not pre-heated. Rinse cups under hot water outlet. Portafilter not pre-heated. Rinse portafilter under hot water outlet. Dry thoroughly. Milk not hot enough (if making a cappuccino or latté etc). Texture milk for a longer period of...
Page 26 - being delivered to
26 PROBLEM POSSIBLE CAUSES EASY SOLUTION Machine is on but ceases to operate. The safety thermal-cut out may have activated due to the pump or grinder overheating. Press the POWER button to switch the machine off and unplug from the power outlet. Allow to cool for about 30–60 minutes.If problem pers...
Page 27 - the
Page 31 - AVERTISSEMENT; NSTRUCTIONS
5 N'utilisez pas d'eau hautement filtrée, déminéralisée ou distillée, car cela peut affecter le goût du café et le mode de fonctionnement de la machine à espresso. AVERTISSEMENT Pour éviter tout risque de blessure, n'ouvrez pas la chambre d'infusion (ne pas retirer le porte- filtre) pendant le proce...
Page 32 - FICHE BREVILLE; USAGE DOMESTIQUE SEULEMENT
6 • N'ouvrez pas les cartouches du filtre. • Si vous vous absentez pour une période prolongée, videz le réservoir d'eau et remplacez la cartouche. INSTRUCTIONS SUR LE COURT CORDON Votre appareil Breville est muni d’un cordon d’alimentation court et très sécuritaire qui prévient les blessures corpore...
Page 33 - Composants; Informations énergétiques
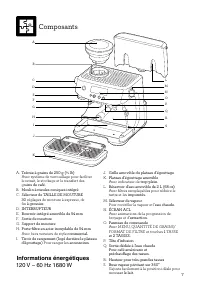
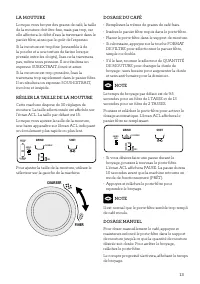
7 A. Trémie à grains de 250 g (½ lb) Avec système de verrouillage pour faciliter le retrait, le stockage et le transfert des gra ins de café. B. Moulin à meules coniques intégré C. Sélecteur de TAILLE DE MOUTURE 30 réglages de mouture à espresso, de fin à grossier. D. INTERRUPTEUR E. Bourroir intégr...
Page 34 - ACCESSOIRES; Avec marques MIN et MAX.; Toutes les pièces de la Barista ProTM
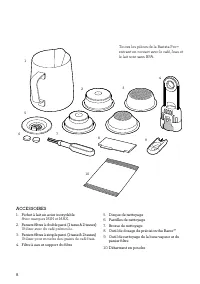
8 ACCESSOIRES 1. Pichet à lait en acier inoxydable Avec marques MIN et MAX. 2. Paniers filtres à double paroi (1 tasse & 2 tasses) Utiliser avec du café prémoulu. 3. Paniers filtres à simple paroi (1 tasse & 2 tasses) Utiliser pour moudre des grains de café frais. 4. Filtre à eau et support ...
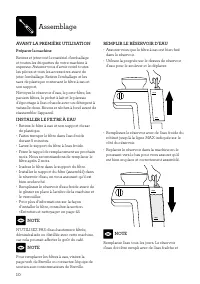
Page 36 - Préparer la machine; Assemblage
10 AVANT LA PREMIÈRE UTILISATION Préparer la machine Retirez et jetez tout le matériel d'emballage et toutes les étiquettes de votre machine à espresso. Assurez-vous d'avoir retiré toutes les pièces et tous les accessoires avant de jeter l'emballage. Retirez l'emballage et les sacs de plastique cont...
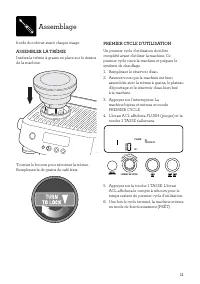
Page 38 - Fonctions; ÉTEINDRE LA MACHINE; TASSE
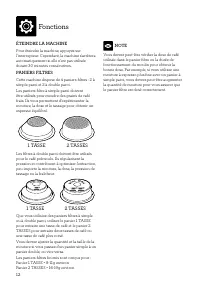
12 Fonctions ÉTEINDRE LA MACHINE Pour éteindre la machine, appuyez sur l'interrupteur. Cependant, la machine s'arrêtera automatiquement si elle n'est pas utilisée durant 30 minutes consécutives. PANIERS FILTRES Cette machine dispose de 4 paniers filtres : 2 à simple paroi et 2 à double paroi.Les pan...
Page 40 - TASSER LE CAFÉ MOULU; ÉGALISER DE LA DOSE
14 TASSER LE CAFÉ MOULU • Retirez le porte-filtre du support de mouture.• Tapottez plusieurs fois le porte-filtre sur le comptoir pour que le café se compacte et se distribue uniformément dans le panier filtre. • À l'aide du bourroir, tassez fermement la mouture (avec environ 15-20 kg de pression). ...
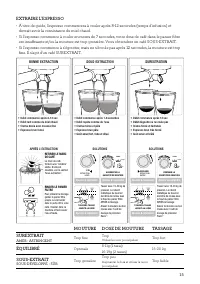
Page 41 - devrait avoir la consistance du miel chaud.; MOUTURE DOSE DE MOUTURE; ÉQUILIBRÉ
15 EXTRAIRE L'ESPRESSO • À titre de guide, l'espresso commencera à couler après 8-12 secondes (temps d'infusion) et devrait avoir la consistance du miel chaud. • Si l'espresso commence à couler en moins de 7 secondes, votre dose de café dans le panier filtre est insuffisante et/ou la mouture est tro...
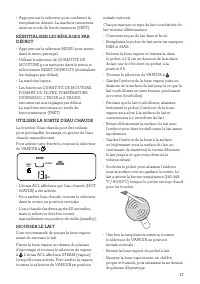
Page 43 - UTILISER LA SORTIE D'EAU CHAUDE; MOUSSER LE LAIT
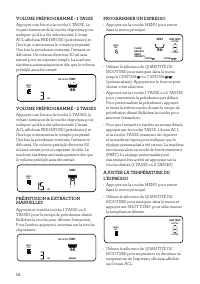
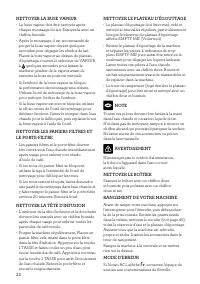
17 • Appuyez sur le sélecteur pour confirmer la température désirée. La machine retournera alors en mode de fonctionnement (PRÊT). RÉINITIALISER LES RÉGLAGES PAR DÉFAUT • Appuyez sur le sélecteur MENU pour entrer dans le menu principal. • Utilisez le sélecteur de QUANTITÉ DE MOUTURE pour naviguer da...
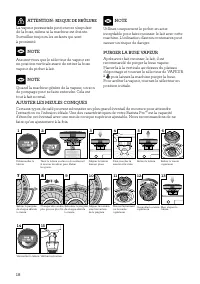
Page 44 - AJUSTER LES MEULES CONIQUES; RISQUE DE BRÛLURE
18 AJUSTER LES MEULES CONIQUES Certains types de café peuvent nécessiter un plus grand éventail de mouture pour atteindre l'extraction ou l'infusion idéale. Une des caractéristiques de votre Barista Pro™ est la capacité d'étendre cet éventail avec une meule conique supérieur ajustable. Nous recomman...
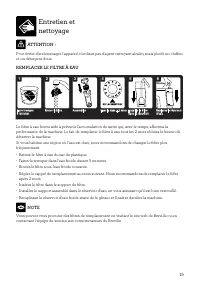
Page 45 - REMPLACER LE FILTRE À EAU; contactant l'équipe de soutien aux consommateurs de Breville.
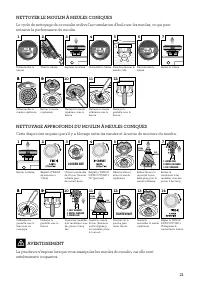
19 Entretien et nettoyage ATTENTION : Pour éviter d'endommager l'appareil, n'utilisez pas d'agent nettoyant alcalin, mais plutôt un chiffon et un détergent doux. REMPLACER LE FILTRE À EAU INSTALL WATER FILTER 2 Rincer le filtre 2 4 3 6 Replacer le réservoir d'eau Assembler Fixer la date + 2 mois Ins...
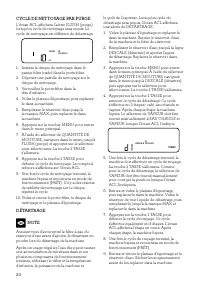
Page 46 - CYCLE DE NETTOYAGE PAR PURGE; DÉTARTRAGE
20 CYCLE DE NETTOYAGE PAR PURGE L'écran ACL affichera l'alerte FLUSH (purge) lorsqu'un cycle de nettoyage sera requis. Le cycle de nettoyage est différent du détartrage. PRE-INFUSE SHOT STEAM SEC AMOUNT MANUAL PAUSED HOT WATER FLUSH RESET DEFAULTS DESCALE IN PROGRESS FILL TANK GRIND DOUBLE SINGLE LO...
Page 47 - NETTOYER LE MOULIN À MEULES CONIQUES; entraver la performance du moulin.; NETTOYAGE APPROFONDI DU MOULIN À MEULES CONIQUES; extrêmement coupantes.
21 NETTOYER LE MOULIN À MEULES CONIQUES Le cycle de nettoyage de ce moulin enlève l'accumulation d'huile sur les meules, ce qui peut entraver la performance du moulin. Déverrouiller la trémie Vider la trémie Replacer la trémie Verrouiller la trémie Faire fonctionner le moulin vide Déverrouiller la t...
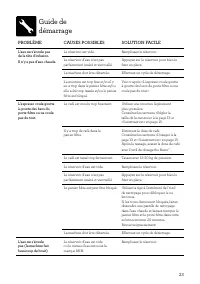
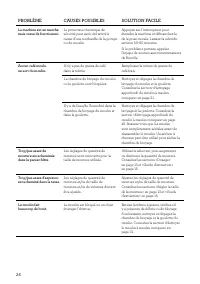
Page 49 - L'espresso coule goutte
23 Guide de démarrage PROBLÈME CAUSES POSSIBLES SOLUTION FACILE L'eau ne s'écoule pas de la tête d'infusion.Il n'y a pas d'eau chaude. Le réservoir est vide. Remplissez le réservoir. Le réservoir d'eau n'est pas parfaitement inséré et verrouillé. Appuyez sur le réservoir pour bien le fixer en place....
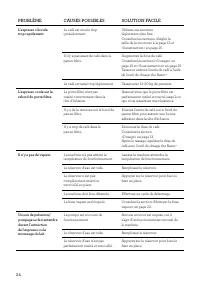
Page 52 - Aucun café moulu
26 PROBLÈME CAUSES POSSIBLES SOLUTION FACILE La machine est en marche mais cesse de fonctionner. Le protecteur thermique de sécurité peut avoir été activé à cause d'une surchauffe de la pompe ou du moulin. Appuyez sur l'interrupteur pour éteindre la machine et débranchez-la de la prise murale. Laiss...
Page 54 - Contenido
2 BREVILLE RECOMIENDA ANTEPONER LA SEGURIDAD En Breville somos muy conscientes de lo importante que es la seguridad. La seguridad es nuestra prioridad a la hora de diseñar y fabricar productos para clientes como usted. En pos de su seguridad, le pedimos que ejerza suma precaución al usar cualquier a...
Page 57 - ADVERTENCIA; INSTRUCCIONES
5 • Verifique la presencia de objetos extraños en el depósito de café antes de usar. • Use solo agua fría en el depósito de agua. No use ningún otro líquido. No utilice agua altamente filtrada, desmineralizada o destilada. Su uso puede afectar el sabor del café y el funcionamiento de la máquina de c...
Page 58 - PARA USO EXCLUSIVO EN EL HOGAR.; ENCHUFE BREVILLE
6 • No use cartuchos de filtro dañados. • No abra los cartuchos de filtro. • Si se ausenta por un período prolongado, vacíe el depósito de agua y reemplace el cartucho. INSTRUCCIONES DE CABLE DE ALIMENTACIÓN CORTO Su equipo Breville está equipado con un cable de alimentación corto para disminuir el ...
Page 59 - Componentes; Datos técnicos
7 Componentes A. Depósito de café de 250 g Con sistema de bloqueo para retirar, almacenar y transferir los granos de café fácilmente. B. Molinillo de muela cónica integrado C. SELECTOR de tamaño de molido Con 30 ajustes de molido, de fi no a grueso. D. BOTÓN DE encendido (POWER) E. Prensador extraíb...
Page 60 - Todas las partes del Barista ProTM; ACCESORIOS
8 1. Jarra para leche de acero inoxidable Con marcas MÍN y MÁX. 2. Filtros presurizados (1 taza y 2 tazas) Para uso con café premolido. 3. Filtros de pared simple (1 taza y 2 tazas) Para uso con granos de café recién molido. 4. Filtro de agua y soporte del filtro Todas las partes del Barista Pro™ qu...
Page 62 - Montaje; Preparación de la máquina; INSTALACIÓN DEL FILTRO DE AGUA; NOTA
10 Montaje TENGA EN CUENTA LO SIGUIENTE ANTES DEL PRIMER USO Preparación de la máquina Retire y deseche todas las etiquetas y materiales de empaque adheridos a la máquina de café espresso. Asegúrese de haber retirado todas las piezas y accesorios antes de desechar el empaque. Retire el empaque y las...
Page 64 - TAZAS; Funciones
12 APAGADO DE LA MÁQUINA Presione el botón POWER (Encendido) para apagar la máquina. La máquina también se apaga de forma automática si no se usa durante 30 minutos. FILTROS Esta máquina incluye 4 filtros, de los cuales 2 son no presurizados y 2 son presurizados.Los filtros no presurizados deben usa...
Page 65 - AJUSTE DEL TAMAÑO DE MOLIDO; DOSIFICACIÓN DEL CAFÉ
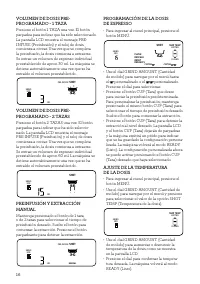
13 AJUSTE DEL TAMAÑO DE MOLIDO Esta máquina tiene 30 configuraciones de molido para seleccionar. El tamaño seleccionado se muestra en la pantalla LCD. El tamaño de molido predeterminado es 15. Al ajustar el tamaño de molido, se mostrará una barra en la pantalla LCD para indicar la velocidad de verti...
Page 66 - PRENSADO DEL CAFÉ MOLIDO; AJUSTE DE LA DOSIS
14 PRENSADO DEL CAFÉ MOLIDO • Retire el portafiltro del soporte.• Golpee el portafiltro suavemente varias veces para hacer caer y distribuir el café de manera uniforme en el filtro. • Usando el prensador, prense el café con firmeza, aplicando aprox. 15-20 kg de presión. La cantidad de presión no es ...
Page 67 - EXTRACCIÓN DE ESPRESSO
15 EXTRACCIÓN DE ESPRESSO • Como referencia, el café espresso debe comenzar a fluir tras un periodo de infusión de entre 8 y 12 segundos y tener la consistencia de la miel caliente cuando gotea. • Si el espresso comienza a fluir antes de 7 segundos, entonces la dosis de café en el filtro es insufi- ...
Page 69 - TEXTURIZACIÓN DE LA LECHE
17 RESTABLECIMIENTO DE LOS VALORES POR DEFECTO • Para ingresar al menú principal, presione el botón MENÚ. • Use el dial GRIND AMOUNT (Cantidad de molido) para navegar por el menú y seleccione la opción RESET DEFAULTS (Restablecer valores por defecto). • La máquina emitirá un pitido.• Los ajustes GRI...
Page 70 - AJUSTE DE LAS MUELAS CÓNICAS
18 AJUSTE DE LAS MUELAS CÓNICAS Algunos tipos de café pueden requerir un rango de molienda más amplio para lograr una extracción o preparación ideal. Una característica de su Barista Pro™ es la capacidad de extender este rango mediante una muela superior ajustable. Recomendamos realizar solo un ajus...
Page 71 - suave y un detergente neutro.; SUSTITUCIÓN DEL FILTRO DE AGUA; INSTALE; de servicios de Breville.; Cuidado y limpieza
19 ADVERTENCIA: Para evitar daños al equipo, no use productos de limpieza alcalinos. Prefiera el uso de un paño suave y un detergente neutro. SUSTITUCIÓN DEL FILTRO DE AGUA 22 4 3 6 5 1 Enjuague el filtro. Reemplace el depósito de agua. Ensamble Establezca la fecha para 2 meses después. Instale el f...
Page 72 - DESCALCIFICACIÓN
20 CICLO DE LIMPIEZA (FLUSH) La pantalla LCD mostrará una alerta con la palabra FLUSH (Enjuague) cuando se requiera un ciclo de limpieza. El ciclo de limpieza es independiente de la descalcificación. PRE-INFUSE SHOT STEAM SEC AMOUNT MANUAL PAUSED HOT WATER FLUSH RESET DEFAULTS DESCALE IN PROGRESS FI...
Page 73 - LIMPIEZA DEL MOLINILLO DE MUELA CÓNICA; impedir un rendimiento perfecto.; LIMPIEZA AVANZADA DEL MOLINILLO DE MUELA CÓNICA
21 LIMPIEZA DEL MOLINILLO DE MUELA CÓNICA Este ciclo de limpieza del molinillo elimina la acumulación de aceite en las muelas, lo que puede impedir un rendimiento perfecto. Desbloquee el depósito. Vacíe el depósito. Reemplace el depósito. Bloquee el depósito. Haga funcionar el molinillo hasta que es...
Page 75 - El espresso solo gotea de; Solucionar problemas
23 PROBLEMA CAUSAS POSIBLES SOLUCIÓN SENCILLA El agua no fluye desde el grupo.No hay agua caliente. El depósito de agua está vacío. Llene el depósito. El depósito de agua no está completamente insertado y bloqueado en su posición. Empuje el depósito de agua hacia abajo para asegurarlo en su lugar. E...
Page 77 - Hay una fuga de agua
25 PROBLEMA CAUSAS POSIBLES SOLUCIÓN SENCILLA El café no está lo suficientemente caliente. Tazas no precalentadas. Enjuague las tazas bajo la salida de agua caliente. El portafiltro no está precalentado. Enjuague el portafiltro bajo la salida dedicada de agua caliente. Seque bien. La leche no está l...
Page 78 - No sale café molido de
26 PROBLEMA CAUSAS POSIBLES SOLUCIÓN SENCILLA La máquina indica que está encendida, pero deja de funcionar. El corte térmico de seguridad puede haberse activado debido al sobrecalentamiento de la bomba o del molinillo. Presione el botón POWER (Encendido) para apagar la máquina y desenchúfela del tom...
Page 79 - Notas
Page 80 - Breville Consumer Support; Breville USA; USA
Breville is a registered trademark of Breville Pty. Ltd. A.B.N. 98 000 092 928. Copyright Breville Pty. Ltd. 2021. • Due to continued product improvement, the products illustrated/photographed in this brochure may vary slightly from the actual product. • En raison de son amélioration continue, le pr...


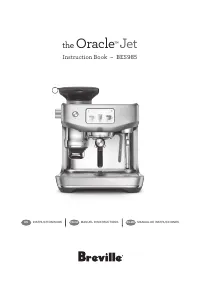 Breville BES985BSS1BNA1
User Manual
Breville BES985BSS1BNA1
User Manual
 Breville BRC800
User Manual
Breville BRC800
User Manual
 Breville BBL620W
Manual
Breville BBL620W
Manual
 Breville BGR350
User Manual
Breville BGR350
User Manual
 Breville BMC700
User Manual
Breville BMC700
User Manual
 Breville BMO735
User Manual
Breville BMO735
User Manual
 Breville BOV905
Manual
Breville BOV905
Manual
 Breville BFP610
Manual
Breville BFP610
Manual
 Breville BFP638
User Manual
Breville BFP638
User Manual
 Breville BBL920 BLENDER
Manual
Breville BBL920 BLENDER
Manual
 Breville BES985
User Manual
Breville BES985
User Manual
 Breville LRC470
User Manual
Breville LRC470
User Manual
 Breville OPTIONALLY
User Manual
Breville OPTIONALLY
User Manual